Dear readers of the NskTarelka.ru blog, this article will discuss how to independently update channels on Telekart. In principle, the procedure for updating channels on a satellite receiver, regardless of which satellite or satellites your dish is tuned to, is almost the same.
The receiver is reset to factory settings or default settings, and a new channel search is performed. The satellite receiver prescribes new parameters that are relevant on the day of scanning. Accordingly, a fresh list of channels available for viewing is formed.
Below I will publish text instructions for receivers recommended by the operator, as well as general instructions for non-operator equipment. If someone fails to update the Telecard channels themselves according to the instructions due to the fact that it is not available for your receiver, ask questions in the comments. I'll try to help you.
When do you need to configure channels on Telecard?
There are many cases when you need to search for channels on Telecard. A short list can be given as follows:
- you need to configure the receiver when you turn it on for the first time;
- you need to update the list of broadcasts on your TV when the provider adds new content;
- a new subscription has been activated or the subscriber has switched to another channel package;
- it is necessary to increase the number of broadcasts in the list according to the recommendations of the provider;
- you need to connect a local package when moving the receiver to another region of the country;
- you need to restore channels after deletion.
The last item on the list is the most common. After the children's pranks, the subscriber suddenly discovers that the channels have disappeared. Or the user himself clears the list by incorrect actions or accidentally pressing buttons on the remote control.
How to reset your receiver
The procedure for resetting the settings depends on the model of the receiver you are using. Today, the Telekarta provider offers several brands of receivers in equipment sets or recommends for use.
EVO and GLOBO
In receivers of the EVO and GLOBO brands, not only the order of moving through sections and menu items, but even the design of the interface is almost identical. The names of the required on-screen buttons vary slightly. For example, in EVO receivers the required item is called “Factory settings”. And for GLOBO models the same on-screen button is labeled “Reset to factory settings.” It is clear that both points, when activated, do the same thing.
Step-by-step instructions on how to reset the receiver settings to factory defaults yourself look like this:
- press the Menu button on the remote control;
- use arrows to go to the “Custom Settings” block;
- then find and activate the “Factory settings” menu item.
This action affects the global parameters of the receiver. Therefore, its operating system will ask you to enter a PIN code. If the user or technician installing the equipment has specified their own combination, it must be entered. The default code is 0000. If the PIN has not been changed in the receiver options, you need to enter this combination.
Next, the user is required to confirm his action. To do this, just press the red button on the remote control or the on-screen “Yes”, depending on the receiver model. A factory reset will occur automatically, after which the device will reboot.
Continent
Continent brand receivers are quite simple in terms of protecting the parameters of the operating environment from changes. They do not ask for a PIN when initiating a factory reset procedure. To do this, it is enough:
- press the Menu button on the remote control;
- go to the “On-screen menu installation” section using the cursor keys;
- select “Factory settings”;
- Click “Yes” in response to the system request.
This completes the reset procedure. The receiver will reboot automatically.
Ricor
Rikor is the only brand of receivers that do not require a preliminary reset to factory settings. They provide for setting up channels with a complete replacement of the old list with a new one. You can do this yourself as follows:
- press the Menu button on the remote control;
- enter the “OSD Menu Settings” section;
- go to the “Television” block;
- press the right arrow on the remote control;
- select and activate the “Orion Express” item;
- click “Replace” in response to the search engine request.
After this, automatic scanning of Telecard system channels will begin. Once the search is complete, a new list of relevant channels will be compiled. It can be updated at any time by repeating the list replacement algorithm.
Securing the converter
Before finally fixing the device, it is rotated to the desired angle; this is done by rotating the converter around the axis of the neck in the holder. When the angle is set, the clamps securing the converter are tightened tightly.
The direction of rotation depends on where you live:
- if you live west of 85°E, then turn the converter in the direction of the clock;
- If you live east of 85°E, then turn the converter counterclockwise.
If you have secured the converter correctly, the lower part of its housing will be directed to the south and away from the north side. This recommendation is suitable for any region of the Russian Federation, except for villages exactly at 85° East, for which you do not need to set an angle, the bottom of the converter is simply directed towards the ground.
How to search and tune channels
If you need to update the list of existing ones or connect additional channels in accordance with changes in the broadcast schedule or active subscriptions, you need to conduct a full search for broadcasts. The general step-by-step instructions look like this:
- press the Menu button on the remote control;
- select the “OSD Menu Settings” section;
- Transponder data is entered in the satellite or antenna parameter block.
For each line of receivers, the procedure may be slightly different. For EVO receivers the procedure is as follows:
- you need to enter the system settings;
- select a transponder list item;
- enter a PIN previously specified by the user or a default combination of four zeros;
- In the parameter lines, enter the values speed 44948, carrier frequency 10981 MHz, set the polarization option to “Upper”.
Data is saved by pressing the blue button on the remote control. The search is carried out after confirmation by the user in the dialog box that appears. Upon completion, a new list of channels will be generated in the receiver.
How to set up free channels
The Telekarta provider, in addition to the package that the user has activated, offers a number of free channels. They are broadcast within the used transponder frequencies. To detect them, it is enough to conduct an express search over the entire range. This is done as follows:
- select system or antenna settings;
- go to the list of satellites;
- select from the list (KU) Express;
- confirm the start of the search.
Setting methods for individual receivers may differ from each other. Therefore, owners of equipment sets are recommended to study the instructions supplied by the provider. This will help you choose the parameters correctly and set their values, which may vary depending on the subscriber’s region of residence.
Source
Deciding on a place for the plate
It is necessary to choose a place so that there are no obstacles in the direction of the satellite. Obstacles may include vegetation and buildings in the neighborhood. Depending on the region of residence, we give the approximate orientation to the Intelsat15 and Horizons2 satellites located in geostationary orbit at 85 degrees East:
Directing a dish to satellites for residents of Russia
- for residents of the Central region, send equipment to the southeast;
- residents of Siberia - to the south;
- residents of the Far Eastern region and Sakhalin - to the southwest, using only Intelsat
to contents ^
How to set up Telecard yourself?
The Telekarta company has been working in the market of services for the supply of satellite television to the population for a long time. Today, Telekarta offers its services to users of any category.
Affordable prices and a wide coverage area allow everyone to use the services.
It is also important that you can buy, install, and configure equipment either with the help of a company specialist or independently.
Company tariffs
At the same time, to install and configure broadcasting equipment, you do not need to have special knowledge or expensive equipment.
Choosing the right place
For successful installation of equipment, you should not only purchase a set of company equipment, but also choose the right place for installation.
It is also important to choose the correct diameter of the plate. There is an unspoken rule here - the lower the signal level, the larger the antenna should be in diameter.
Before purchasing equipment, you should check the coverage area in your area of residence.
If the provider reports that the coverage area is good, then you can safely enter into an agreement, purchase equipment and install and configure the Telecard.
It is important to understand that the company broadcasts from the American satellite and in order to choose the right location for installing the antenna, it is important to find the highest quality location for receiving the signal.
Operating principles of the company
You can find out the most successful coordinates by calling the toll-free hotline listed on the company’s website, or by going to the Satellite Finder resource and viewing the necessary settings on Google maps.
Once the mounting location and directions have been chosen, you can begin installing the equipment and begin configuring the antenna as a whole.
What can you find out by phone{q}
Support is provided by calling the hotline 8800-100-104-7. By calling the number you will hear a cheerful and sincere greeting from the Telekarta satellite television. The following is advertising and reference information. But after listening to it, you still won’t immediately get to the operator.
To begin with, the system will offer you:
- press number 1 to become a subscriber and activate a new access card. The company’s specialists will select the optimal channel package and installation option for you;
- press number 2 for priority service if you have the “Unlimited” package activated;
- obtain the necessary information for authorized partners by clicking on button 3;
- order a new HD receiver by clicking on the number 4.
If the necessary information is not provided, then you can wait for the operator’s response. He can:
- provide detailed information on the “Unlimited” package;
- help you quickly find out the balance on your access card and the expiration date of your current subscription,
- inform about tariffs, payment methods, and the Telekarta Bonus loyalty program,
- explain how to enable the “Autopayment” option;
- help with connecting “Telecards online” to watch TV via the Internet and mobile application;
- help restore the broadcast of encrypted channels and check the signal.
You can also learn from the operator about current promotions and special offers and how to get additional packages and services.
Installation of equipment
Installation of equipment should be carried out in the recommended direction. Installation involves simply securing the antenna at the desired height in a suitable manner.
The antenna is installed on the outside of the building.
Usually the equipment has special fasteners for installation. The equipment can be secured with ordinary self-tapping screws, or using pre-dowels - the choice of fastening method depends solely on the material of the surface to which you plan to attach the equipment.
The antenna can be adjusted in two directions at once - in azimuth or in the angle of the signal reception location.
Principles for adjusting the location of an antenna dish on a building
A slight adjustment to the location of the equipment can either increase the signal level from the satellite or completely reduce it to zero.
Antenna mount
In order for the antenna to successfully receive a signal from the satellite, it is not necessary to call specialists; you can install it yourself.
The main rule when installing a satellite dish: it must be securely mounted on a stationary surface. If you plan to attach it to a vertical wall of the house, then you will need to drill the wall with a hammer drill, then insert dowels into the hole and fasten the necessary parts with self-tapping screws. The piece of pipe to which the antenna is attached must stand strictly vertical, so you need to use a level or at least a regular plumb line with a weight. After the bracket is secured, you can assemble the antenna itself. It is at this stage that you need to attach the cable and rotate the converter around its axis.
Setting up Telecard equipment
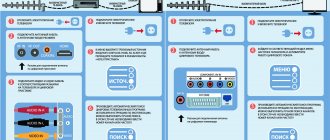
Before setting up the equipment, you must connect the antenna through the receiver to the TV. This can be done using tulip wires or through a cord connected to Scart.
The connection should be made with the equipment turned off.
Then you need to turn on the TV in reception mode from external sources, most often AV. Most often, a message appears stating that there is no signal.
After the inscription appears, press the menu button on the receiver’s remote control and select sub-items, as shown in the figure.
Setting up company equipment
Then you need to click the “Ok” button and the system will transfer the user to the next menu. Where you should also select the parameters according to the photo.
Hardware Settings
After pressing the “Ok” button again, the equipment will begin automatically searching and tuning all available channels. As soon as the equipment is configured, the user will be able to watch available channels at the selected tariff.
Connect and configure the receiver
The second edge of the cable with the F-connector is brought indoors; now it can be screwed tightly onto the F-connector of the receiver. During the entire installation, safety regulations must be strictly observed, therefore all manipulations are carried out with the receiver disconnected from the 220V network. The receiver connects to the TV via HDMI or RCA cable.
Now you can turn on the TV and set it to receive images from the video input to which the receiver is connected. A smart card is inserted into the receiver slot.
Setting up the Telecard receiver
The receiver is configured to capture channels from the Telekarta operator using its own remote control. This is done like this:
- turn on the receiver, the device identification process is shown on the TV screen;
- if the receiver has not been configured before, a request to select a profile will appear on the screen, select “Telecard HD” or “Telecard Vostok” and press “Ok” on the remote control;
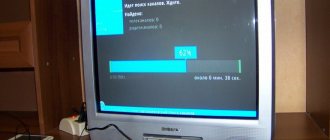
- select the scanning mode and press “OK” on the remote control again. Waiting for the search process to complete. At this stage, the channels will not be found, when the message “No programs found” appears on the screen, press “Ok” on the remote control
- use the arrows on the remote control to select “DVB-S Settings”, click “Ok”;
- use the arrows to select “Antenna installation” and click “Ok”;
- set the antenna characteristics, they can be found in the subscriber's directory. This section will show the signal strength and quality scales. When setting the plate, it is necessary to achieve the highest value on the second scale; the first does not play a special role.
to contents ^
When should you contact a setup specialist?
In a situation where the user cannot configure and install the equipment himself, he should seek help from a company specialist or a third party.
The same applies to the situation when the setup was carried out correctly, but the equipment does not work.
Application for connection to satellite TV channels
If the coverage area is poor or the signal level is weak, you should contact a specialist for help before purchasing equipment.
A professional will select the required diameter of the antenna dish and install the equipment as correctly as possible to receive the signal from the satellite.
Source
Reasons for updating
There are times when the question of updating channels is raised. It appears when:
- disappearance of paid channels or blocking of connected broadcasts;
- in case of satellite malfunctions;
- when the provider changes the broadcasting network and adds additional TV channels to the connected set.
There are 2 common options for setting up devices:
- for recommended equipment;
- for non-recommended equipment.
Instructions for setting up channels on Telecard
When a person pays for television, he expects that the quality of the paid services will be much better than on free TV channels. The satellite television operator Telekarta TV is an excellent provider that really offers high-quality, affordable and interesting channels. You don’t mind paying for such content, especially since the provider also provides several free channels. But their parameters should also be taken care of, especially if Telecard warned about changing the broadcast settings.
But there are often situations when the user accidentally deletes all channels by pressing something on the remote control, or if children tried to press the wrong key combination. The provider has provided for this situation, so any user can independently go to the menu and search automatically or through manual control. If you use the services of a specialist, you will have to pay, and given that independent work is not so difficult, many users prefer it.
On non-recommended satellite receivers
In addition to the recommended equipment, satellite television can also be watched on other receivers - not recommended. Non-recommended equipment is those receivers from which the operator has nothing. If you do not understand well what setting the receiver to a satellite is, then it is not recommended to reset the parameters offline.
After this step, you will probably still have to call a specialist or study this topic in more depth on your own.
Before updating, be sure to check the settings of your receiver. It is possible that when installing a package of TV channels, a specialist could simply enter the name “Telecard”, but use a different satellite.
To do this you need:
- Go to “Info” and see which satellite is indicated. Satellites of the Telekarta operator are Intelsat 15 at 85.0°E and Express AM5 at 140.0°E.
- The satellite is indicated correctly - proceed to further actions.
- If incorrect, we reconfigure the receiver.
If the satellite data is entered incorrectly, Telecard will not work.
How to reset the Telecard receiver settings
In order to set up TV channels on Telecard receivers, you first need to reset the settings to factory settings. Only after all the changes that you made during operation have been removed, you can carry out a new search. True, it is important to clarify the parameters of satellite broadcasting, which is relevant at the time when the user decides to update channels after hearing that the operator is connecting new services.
It will be useful for users to know that there are receivers recommended by the company for providing services, and those that Telekarta does not recommend using due to the presence of some inaccuracies. However, this does not mean that the device will not be able to broadcast TV packages at all. The process is possible, but it will require more adjustments and, possibly, the purchase of additional parts. Overall, too many headaches.
Here's what the process looks like to begin installing new channels on recommended receivers:
- The EVO line of receivers is configured as follows:
- Find the “Menu” key on the remote control;
- In the “Menu” the user needs to select the “Custom Settings” item;
- Find “Factory settings” in this section and reset the settings. But in order to do this, the system will ask for a password - it consists of four zeros;
- To confirm your actions again, press the red button on the remote control.
- GLOBO receivers are configured as follows:
- Go to “Menu” using the remote control;
- Find the “Custom Settings” subsection in the menu settings;
- Click "Reset to factory settings";
- Enter the password, which by default consists of four zeros.
- Resetting the settings of Continent receivers to the factory level on Telecard is also not a problem. This procedure looks like this:
- Find the button on the remote control to go to the “Menu”;
- Find the "Installation" tab;
- “Factory settings” and clicks yes. You are not required to enter a password, so be careful.
- Receivers Rikor:
- Open the menu and go to settings;
- Go to the “television” tab;
- Using the “Right” arrow, click “Orion Express”;
- Select “Search” and activate it;
- A window will pop up and you need to click on “Replace” to start scanning the Telecard.
Determining the direction to the satellite
This procedure can be done using a compass or using a map. Let's consider both methods.
Using a compass
First, you need to check with the service department the azimuth of the village in which you live, taking into account the magnetic deviation. It is also necessary to find out the vertical tilt angles of the dish and the rotation angles of the receiving and amplifying external device. To clarify this information, you can call 8 (800) 1001047. For example, let’s take data for Moscow:
- azimuth with magnetic deviation = 137 degrees;
- the angle of inclination in the vertical plane is -11°, it is directed downwards;
- the rotation angle of the external receiving device is 27°.
Now you can take the compass and go outside. On the street, turn your back to the wall in the southeast of your house. Determine the north using the compass (the arrow points to 0°), and plot the azimuth on the device (137°). Fix the direction in which the arrow will point at azimuth 137. You can make a note for yourself for further orientation, for example, a tree or house standing in the distance. This is the direction towards satellites.
Using a card
To determine the direction to the satellites using a map, you must, in the same way as in the previous method, clarify the settings for your locality through the call center. For example, let's take data for Moscow, which was also taken into account in the previous method.
Determining guidelines for installing the plate
We take a map of your locality, you can simply print it from any search engine. Additional tools we will need are a protractor and a pencil. Use a pencil to mark the object on which the antenna is installed. When determining which direction north is, search engines usually mark the cardinal directions on their maps. From the north guide, use a protractor to mark 127° - this is the direction to the Intelsat15 and Horizons2 satellites. Using the map, you can make a note for yourself, for example, the edge of the roof of a house standing in the distance.
With a map on which the marks are marked, go out of the house and look for the landmark visually made earlier on the map, and then evaluate where on the building you can install the dish so that there is no obstacle to the signal in the direction of the satellite. If you have decided on the installation location, proceed to the next step.
Step-by-step instructions for setting up Telecard channels
The process of setting up channels from a provider such as Telekarta does not take much time, and it is not at all necessary to call a specialist, since the company does everything so that the user can autonomously carry out most of the settings, use services, connect and disconnect broadcast packages. Naturally, setting up channels on your own is also on the list of interests of users who don’t want to call a technician for every little detail.
- So, first of all, before setting up channels, you need to turn off the TV and receiver from the network. After a few seconds, the equipment connects again;
- To access channels on the remote, switch to “AV” mode. If the TV works, but there is no image, this means that the reset to factory settings was successful, and the device needs further settings to restore the receiver’s broadcasting;
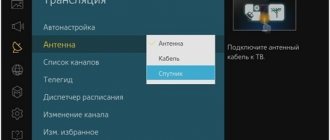
- Go to the menu and go to the “Antenna Settings” item, enter the parameters relevant for your region.
But, in addition to this, you need to consider which receiver is installed, especially if the setup is done yourself. Here, for example, is how to search for channels on receivers from the EVO line, and these are general parameters, and each model has its own slight differences:
- Enter the “Channel Search” menu and you will see that there are no channels;
- Go to “Menu” and find “System Settings”;
- Enter the “Transponder List” and enter the password 0000;
- Press the scarlet key on the receiver's remote control;
- Select the lines “Frequency” - 10981, and “Flow Speed” - 44948, and also indicate that the polarization is upper;
- There is a blue button on the receiver's remote control that must be pressed to confirm the search;
- The “Scan Mode” window will appear, but you still need to confirm it by clicking “Ok”;
Once the receiver finds the channels, they will start streaming immediately, so be patient. If the channels are not shown after this, try removing and putting back the card, or rebooting the receiver. You may have to wait about a quarter of an hour for the retuning to work, so don't turn off the TV.
How to set up free channels
The telecard provides not only paid, but also a small number of free channels. But sometimes they disappear, and therefore require reconfiguration. On GLOBO receivers their search looks like this:
- As soon as the settings have been reset, the receiver will display the message “No channels found” on the TV screen. You need to click “Ok”;
- Select “Satellite”, among the listed options select “(KU)Express...”, and start searching;
- The search will be completely automatic, and after it all those broadcast channels that the provider set as free will work, but as for the paid ones, it depends on whether the service package has been paid for.
Source
Telecard - setting up channels. Step-by-step instruction
When a person pays for television, he expects that the quality of the paid services will be much better than on free TV channels. The satellite television operator Telekarta TV is an excellent provider that really offers high-quality, affordable and interesting channels. You don’t mind paying for such content, especially since the provider also provides several free channels. But their parameters should also be taken care of, especially if Telecard warned about changing the broadcast settings.
But there are often situations when the user accidentally deletes all channels by pressing something on the remote control, or if children tried to press the wrong key combination. The provider has provided for this situation, so any user can independently go to the menu and search automatically or through manual control. If you use the services of a specialist, you will have to pay, and given that independent work is not so difficult, many users prefer it.
Other methods of communication "Telekarta TV"
The company is represented on social networks Vkontakte, Facebook, Odnoklassniki.
There is also a number for Moscow clients of the company - 8 (495) 781-410-3 and a call back from the website.
You can always evaluate the quality of service provided by operators by clicking on the “Rate the quality of service” link. By clicking on it, you will have access to an online questionnaire in which you can rate the operators who advised you on a 5-point scale. You will be able to reflect how friendly they were, how quickly they responded, the quality of service, whether the request was helpful, and other characteristics.
There are other communication options on the site:
- To contact the HR Directorate, you need to call 7 (495) 781-4101;
- The Sales Directorate will provide advice by phone 7 (495) 781-4170, a fax can be sent to 7 (495) 781-4105 (fax);
- The Directorate of Corporate and Operator Sales and the Program Department can be contacted at 7 (495) 781-4101.
Various promotions are being held on social networks and difficulties with displaying channels are being resolved. For example, consultations on various issues, including those related to connection and broadcasting problems, are resolved by an online consultant on the company’s official page on the VKontakte network. And judging by the number of comments and their date, the service is quite relevant.
How to reset the Telecard receiver settings
In order to set up TV channels on Telecard receivers, you first need to reset the settings to factory settings. Only after all the changes that you made during operation have been removed, you can carry out a new search. True, it is important to clarify the parameters of satellite broadcasting, which is relevant at the time when the user decides to update channels after hearing that the operator is connecting new services.
It will be useful for users to know that there are receivers recommended by the company for providing services, and those that Telekarta does not recommend using due to the presence of some inaccuracies. However, this does not mean that the device will not be able to broadcast TV packages at all. The process is possible, but it will require more adjustments and, possibly, the purchase of additional parts. Overall, too many headaches.
Here's what the process looks like to begin installing new channels on recommended receivers:
- The EVO line of receivers is configured as follows:
- Find the “Menu” key on the remote control;
- In the “Menu” the user needs to select the “Custom Settings” item;
- Find “Factory settings” in this section and reset the settings. But in order to do this, the system will ask for a password - it consists of four zeros;
- To confirm your actions again, press the red button on the remote control.
- GLOBO receivers are configured as follows:
- Go to “Menu” using the remote control;
- Find the “Custom Settings” subsection in the menu settings;
- Click "Reset to factory settings";
- Enter the password, which by default consists of four zeros.
- Resetting the settings of Continent receivers to the factory level on Telecard is also not a problem. This procedure looks like this:
- Find the button on the remote control to go to the “Menu”;
- Find the "Installation" tab;
- “Factory settings” and clicks yes. You are not required to enter a password, so be careful.
- Receivers Rikor:
- Open the menu and go to settings;
- Go to the “television” tab;
- Using the “Right” arrow, click “Orion Express”;
- Select “Search” and activate it;
- A window will pop up and you need to click on “Replace” to start scanning the Telecard.
Step-by-step instructions for setting up Telecard channels
The process of setting up channels from a provider such as Telekarta does not take much time, and it is not at all necessary to call a specialist, since the company does everything so that the user can autonomously carry out most of the settings, use services, connect and disconnect broadcast packages. Naturally, setting up channels on your own is also on the list of interests of users who don’t want to call a technician for every little detail.
- So, first of all, before setting up channels, you need to turn off the TV and receiver from the network. After a few seconds, the equipment connects again;
- To access channels on the remote, switch to “AV” mode. If the TV works, but there is no image, this means that the reset to factory settings was successful, and the device needs further settings to restore the receiver’s broadcasting;
- Go to the menu and go to the “Antenna Settings” item, enter the parameters relevant for your region.
But, in addition to this, you need to consider which receiver is installed, especially if the setup is done yourself. Here, for example, is how to search for channels on receivers from the EVO line, and these are general parameters, and each model has its own slight differences:
- Enter the “Channel Search” menu and you will see that there are no channels;
- Go to “Menu” and find “System Settings”;
- Enter the “Transponder List” and enter the password 0000;
- Press the scarlet key on the receiver's remote control;
- Select the lines “Frequency” - 10981, and “Flow Speed” - 44948, and also indicate that the polarization is upper;
- There is a blue button on the receiver's remote control that must be pressed to confirm the search;
- The “Scan Mode” window will appear, but you still need to confirm it by clicking “Ok”;
Once the receiver finds the channels, they will start streaming immediately, so be patient. If the channels are not shown after this, try removing and putting back the card, or rebooting the receiver. You may have to wait about a quarter of an hour for the retuning to work, so don't turn off the TV.
How to set up free channels
The telecard provides not only paid, but also a small number of free channels. But sometimes they disappear, and therefore require reconfiguration. On GLOBO receivers their search looks like this:
- As soon as the settings have been reset, the receiver will display the message “No channels found” on the TV screen. You need to click “Ok”;
- Select “Satellite”, among the listed options select “(KU)Express...”, and start searching;
- The search will be completely automatic, and after it all those broadcast channels that the provider set as free will work, but as for the paid ones, it depends on whether the service package has been paid for.