TV menu
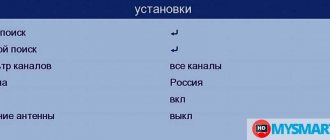
Initial setup menu FIRST TIME SETUP: Turn on the TV and call up the First Time Setup menu). Use the Up/Down arrows to select Language (menu language), then use the Right/Left arrows to select the desired language.
Country
(Country) Use the arrows to select Country, then use the Left/Right arrows to select the desired country.
Tuner Tour
(Tuner Type) Use the arrows to select Tuner Type, then select the desired tuner type: Antenna, Cable, or Satellite.
Select Auto Scan, then use the Right/Left arrows to select DTV+ATV, DTV, ATV.
Auto Channel Update
(Shivaki TV Channel Auto Update) use the Right/Left arrows to select On or Off.
Auto Tuning Status
(Auto Tuning Status) While tuning digital channels, press the Menu button to skip tuning digital channels. While tuning analog channels, press the Menu button to skip analog channel tuning.
Picture Adjustment Menu
PICTURE
(Image) Press the Menu button and press the ENTER button to enter this menu:
Note: If a menu item is grayed out, it means that it is not available or cannot be configured at the moment.
Picture Mode
(Picture Mode) Use the arrows to select Picture Mode, then use the Left/Right arrows to select Standard, Mild, Personal, or Dynamic.
Advanced Settings
(Additional settings ). press the ENTER button to move to this menu, then press the Left or Right Arrow button to select Medium, Strong, OFF or Weak. Press the Menu button to return to the previous menu.
Sound settings menu
SOUND
(Sound) Press the Menu button to get to the main menu, use the Left/Right arrows to select Sound and press the ENTER button to go to the sound menu:
Sound Mode
(Sound Mode) Use the Left/Right arrows to select Standard, Music, Personal or Movie. Press the Menu button to return to the previous menu.
Tgeble
(Treble) / Bass / Balance Use the Left/Right arrows to increase or decrease the value of the selected parameter. Press the Menu button to return to the previous menu.
Surround Sound
(Surround Sound) / AVL Use the Left/Right arrows to select On or Off. Press the Menu button to return to the previous menu.
SPDIF
select PCM, Off or Auto. Press the Menu button to return to the previous menu.
Audio Description
(Audio Description) press ENTER Use the Up/Down arrows to select an item
Mode
(Mode), use the Left/Right arrows to select On or Off. When enabled, the user can adjust the Volume parameter.
Sound Toure
(Sound Type) Use the Left/Right arrows to select Stereo, Dual I, Dual II or Mixed.
Source https://dr-krupnik.ru/Televizor/nastrojka-tv-shivaki.html ?utm_referrer=https://zen.yandex.com
Shivaki STV-32LED12 Operating instructions online [14/35]
Picture Mode
Press the ▼/▲ button to select the picture mode, then press the
◄/► to enter submenu.
Press the ▼/▲ button to select picture modes (Available modes:
Standard, Mild, Personal, Dynamic - Standard, Soft, Custom,
Dynamic).
You can change Brightness, Contrast, Sharpness, Saturation and Aspect
shade when Custom mode is selected.
TIPS: You can press the PMODE button on the remote control
to change the picture mode directly.
Brightness/Contrast/Sharpness/Saturation/Hue
(Brightness/Contrast/Sharpness/Saturation/Hue)
Press the ▼/▲ button to select the desired option. To make the settings
press the ◄/► button.
Brightness Adjust the brightness of the entire image; this is also change-
nit all dark areas of the image.
Contrast Adjust the intensity of the image; dark
areas of the image remain unchanged.
Sharpness Adjust the sharpness of the image outlines.
Saturation Adjust color saturation to your liking
desire.
Hue Use when compensating for color changes according to your own
lania.
Color Temp
Allows you to change the color tone of the image to suit your
requirements.
Press the ▼/▲ button to select Color Temperature menu item, then
press ◄/► button to enter submenu.
Standard Makes the image bright.
Cool Gives the image a soft blue tint.
Warm Gives the image a subtle red tint.
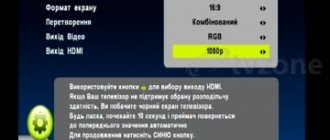
Aspect Ratio
Press the ▼/▲ button to select the Aspect Ratio menu item.
fermentation),
then press the ◄/► button to enter the submenu.
The following formats are available for selection: Full / 4:3 / Zoom1 /
Zoom2 (Zoom2).
9
mcgrp.ru
Checking DVB-T2 on a Shivaki TV receiver
There are several ways to find out whether Shivaki's TV supports DVB-T2: the simplest is to open the instructions and look at the technical specifications. There will be an inscription about support for DVB-T/T2 MPEG-4. There are two more options:
- Go to the Yandex Market website. Type the TV model in the search section and find the “all characteristics” field. In the item called “signal reception” we are looking for DVB-T/T2 MPEG-4.
- You can simply call the equipment manufacturer's service center.
If there is no built-in tuner, you will have to purchase additional equipment.
Preparing the TV
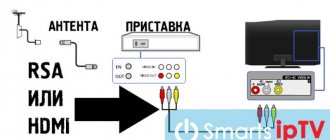
Before you start directly setting up channels, you should connect the TV to the broadcast source. With an analog signal, the cable from the antenna or cable television operator is connected directly to the antenna input of the TV (marked in the photo):
At the same time, it is worth separately considering the situation in which more than one TV is used in the apartment. In this case, a special antenna splitter is used for connection, which in most cases has two or three outputs:
How to tune channels from a regular antenna to several TVs?
People often complain that the channels on their TV in one room are worse than in another. Some of them are missing, and the rest have interference. This is due to an incorrect connection. It is important that both TVs are equidistant from the main cable. Otherwise, the one that is located closer will take over most of the signal. Also, to connect two or more TVs, you should use a high-quality cable that is better protected from interference. Therefore, a standard cheap cable, which is usually offered by many cable television operators, will not work here.
Results
A truly universal and very functional solution is the Shivaki TV discussed in this article. Its main area of application is low-cost home multimedia systems. The only caveat in this case is that there is no need for a software feature such as Smart TV. Another possible place for using such an LED panel is information boards at bus stations or railway stations. In these cases, the possibilities of such a solution will also be sufficient. A TV can also be used as an advertising screen. And in this case, he will look quite decent.
So it turns out that this is a universal device that can be used in almost any situation and place. At the same time, the cost of a TV is not so high, and such an approach to pricing from the perspective of a potential owner seems justified.
Positioning
Most TV solutions are distributed as follows:
- The most affordable ultra-budget class devices have a small diagonal (less than 32 inches), an HD matrix type and the absence of a “Smart TV” software option. As a result, their cost is low and ranges from 6,000 to 11,000 rubles. Most optimally, such devices are used as a second TV or information panel.
- The key differences between mid-level devices and entry-level ones are the increase in matrix resolution to Full HD, diagonal to 32-40 inches and the presence of Smart TV. The price in this case already increases from 11,000 to 27,000 rubles.
- Flagship solutions have 4K resolution, diagonal sizes from 40 inches. In this case, it is necessary to have the “Smart TV” function in the software.
If you carefully study the previously given classification, then the Shivaki TV considered in this article almost completely fits into the criteria for devices in the mid-price range. Only the unfinished software component does not allow it to be considered a full-fledged representative of this class. Essentially, this is its only drawback.
Screen. Image quality. Sound
The Shivaki LED TV boasts a fairly large screen. Its diagonal is a respectable 40 inches by today's standards. The image format in this case is declared by the manufacturer at 1920 x 1080, or, as it is sometimes referred to, 1080p. The contrast ratio of the LCD display of the Shivaki TV is 5000:1. Brightness corresponds to 350 cd. The model is equipped with LED backlight. The frame refresh rate is only 50 Hz. The latter value, in turn, indicates that when playing back the most dynamic scenes, image quality may deteriorate.
This model of television device boasts two built-in speakers. Each of them produces 20 W during operation, and in total this allows the owner to receive 40 W.
When should you buy a set-top box?
Purchasing a set-top box is necessary if the old TV model does not have the DVB-T/T2 MPEG-4 function. A digital receiver offers many benefits to users:
- It has a large memory capacity, which allows you to save any number of channels.
- Digital television improves picture quality and resolution.
- By purchasing a digital receiver, you can save a lot of money without having to change your TV.
It is important that before purchasing a set-top box, you need to make sure that the TV is in normal working condition. If the board works with difficulty and the chips are old, then the digital set-top box may not function on this TV model. To connect, it is enough to use a decimeter antenna. It needs to be connected to the TV using a cable and directed towards the nearest aerial platform.
If there is no built-in tuner and a set-top box is purchased, then the antenna is first connected to the set-top box, and then to the TV.
Communications
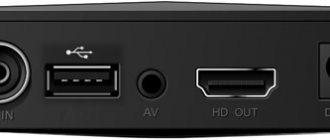
The strength of the Shivaki STV-40LED14 TV is its communication list. With its help, the functionality of the solution in question can be improved significantly. The manufacturing company's development engineers included the following in this list:
- The main communication port in this case is HDMI. It allows you to connect to your TV any modern personal computer, a new satellite tuner, or any other current multimedia solution. Their number is 3.
- Another important communication interface is USB. It is most often used to display information from flash drives. There is only one such port in the multimedia device in question.
- Completing this list is a component connector. Another connection method in this case is a composite port. It is used when connecting old receivers and tuners.
- To output sound to external speakers, the TV is equipped with one 3.5 mm jack. It can output a signal to both headphones or a stereo headset, and a set of speakers. Even a subwoofer can act as a sound receiver from such a TV.
TV Shivaki answers to questions
The order of channels on Shivaki Vitra stv-24ledgr9 is confused
Channels installed in a certain order reboot spontaneously after some time, as during auto-tuning. Couldn't this be auto-tuning with an update in the TV's firmware? I would like to get rid of this problem. 11/14/2018, Zelenodolsk.
Your TV has three ways to create your own channel list, described in the instruction manual. 1) Editing the channel number after auto-tuning. 2) Manually adjust each position number of the list to the desired channel. 3) Formation of a favorite list of FAV channels from the available ones. Try changing the setup method. It is always useful to update the firmware; this can be done at an authorized service center. However, such behavior of the TV due to the old firmware version is unlikely. This situation occurs if the LCN option is enabled on the TV - tuning channels according to the priority of the transmitting station, or the option of periodically updating channels. Look carefully among the sections of the STV-24LEDGR9 Menu - they should be disabled if available.
How to launch the initial setup menu on Shivaki STV-39LED20W
The fact is that there is no separate button for calling up the initial setup menu (first time setup) and this setup starts only when the TV is turned on for the first time! The TV menu has buttons for setting the language, country, and channel settings. And the point of re-running first time setup is that only there there is an Auto channel update option, which I need to disable! I didn’t know what it was before and missed this position by leaving it on, now I’m tormented by the fact that the TV constantly updates satellite channels, crashes them and loses my settings! I tried resetting it to factory settings and turning it off from the network, but I couldn’t run “first time setup”. How can I repeat this procedure again so that the TV calls up this setting when turned on? 05/02/2018, Krasnogvardeysk
How to do this on modern models with Smart TV?
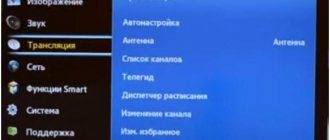
Tuning of digital terrestrial channels can be done manually or automatically. Automatic setup algorithm for Shivaki Smart TV:
- Make sure the signal source is connected correctly.
- Exit to the TV menu using the remote control.
- Go to the channel menu.
- To automatically search, click “Auto Search”.
- Confirm with the “OK” button.
- Then you just need to wait until the process of searching for all available digital TV channels is completed. If unnecessary ones appear, they can be deleted.
Shivaki Smart TV is also easy to configure manually. The instructions are completely the same as the previous ones, with the difference that in the channel menu you need to select the option with manual tuning - “DTV Manual Search”. Scanning on Smart TV will happen automatically here too, but the user will be able to adjust the frequency of the found channels and influence their image. You can use the signal strength icon for guidance.
also possible to search for satellite channels, the instructions are as follows:
- Select the signal source. In this case, it is a satellite dish (DVB-S).
- In the channel settings section you will need to select the satellite model. This information can be obtained from the provider that provides the services.
- Set the rest of the settings to default.
- Then click “Search” and wait for the scan to finish.
To set up Internet TV on Shivaki’s TV, most often all you need is a login and password to log into your account. All other settings will not be needed.
Review of the best Shivaki TVs with reviews
02.01.2019
When choosing a television panel, buyers are interested in who produces Shivaki TVs and what the advantages and disadvantages of the equipment are. Every consumer who chooses equipment from this company should know about all this, as well as about the brand’s popular models and owner reviews.
Who is the manufacturer
The Shivaki company appeared in 1988 in Japan and was engaged in the production of audio and video equipment, including televisions. The equipment of this brand was sold in many countries. In the USSR, the Shivaki brand was well known thanks to black marketeers who sold VCRs and cassettes.
In 1994, the Shivaki brand was acquired by the international company AGIV Group, whose head office is in Germany. After this, the range of products was significantly expanded. Shivaki equipment is produced in many countries around the world. TVs coming to our market are assembled in Russia. Thanks to foreign components and Russian assembly under the careful supervision of foreign specialists, Shivaki equipment is reliable and high quality at an affordable price.
Pros and cons of Shivaka technique
At a low cost, Shivaki TV receivers have a number of advantages. Firstly, the range of television panels deserves attention. There are many devices of various diagonals (from 22 to 55 inches) with technical characteristics for every taste.
There are inexpensive TV receivers with HD resolution and a minimal set of functions, but there are also real multimedia entertainment centers with options for connecting to the Internet, broadcasting images from a smartphone to a TV, and other interesting features.
Apart from technical features, Shivaki TVs attract consumers with their design. Most models are made in a stylish and thin case with small frames and can harmoniously fit into the interior of any room.
At the same time, small television receivers are made in various colors - red, white, black, etc. Shivaki TVs stand out from their competitors with excellent images. The picture does not reach the level of such companies as Samsung or Sony, but among television panels of the same price category, Shivaki television receivers show much better.
The disadvantage of some Shivaki TV receivers with diagonals of 24-28 inches concerns their performance. The matrices have a glossy finish, so when installed opposite a light source, glare will appear on the screen.
Popular Shivaki TV models
The following Shivaki TV models are the most popular.
STV-24LEDG9
This 24-inch Full HD TV is perfect for small bedrooms or kitchens. It is equipped with DVB-T/T2, DVB-C and DVB-S2 tuners, which will allow you to connect digital terrestrial, cable or satellite television. The TV receiver supports the use of USB devices for playing multimedia content or recording broadcasts. HDMI is installed to connect additional equipment. The stunning design will make your TV the centerpiece of your room.
STV-49LED16
Equipment for those who need a large 49-inch Full HD screen to watch television channels and do not require additional options.
The television receiver is equipped with DVB-T2 and DVB-S2 tuners for viewing digital terrestrial and satellite television, support for USB drives for playing multimedia content and recording TV shows, as well as three HDMI connectors for connecting additional devices. The TV is made in a thin silver body and is suitable for any interior.
STV-43LED18S
An excellent SMART TV with a screen diagonal of 43 inches and a resolution of 1920x1080. The TV receiver has tuners for satellite, cable and terrestrial television, and there is a media player for playing movies, music and photos from flash drives and hard drives. The TV connects to the network via Wi-Fi or Ethernet, after which the user can watch entertainment content via the Internet, use a browser, communicate on social networks, etc. The TV receiver is equipped with Android OS, which makes it possible to download applications and games from the Play Market. The thin body, narrow frames and excellent design allow you to place the TV panel in any room.
Reviews
In reviews of Shivaki TVs, the characteristics of the manufacturer and its products are usually positive. Users note the image quality, reliable reception of digital channels, a media player that reads most well-known video formats, and the Android OS installed on Smart TVs.
Many other features of the television receiver are also mentioned, including design and the ability to hang the equipment on the wall. One of the disadvantages is the poor sound quality on most models.
Conclusion Shivaki TVs are excellent value for money. For a small price, the user can buy both a regular TV receiver and a TV panel with wide functionality. The technique is popular among consumers and receives a large number of positive reviews.
Review of Shivaka's best TVs with reviews Link to main publication
televizore.ru
List of 20 free digital channels
You can connect 20 digital television channels for free after purchasing a receiver or TV with built-in digital broadcasting functions. Digital television is divided into two multiplexes, which are called packages. The first displays news and information channels, the second - entertainment channels. The first multiplex broadcasts the following 10 channels:
- First;
- Russia 1;
- Match TV;
- NTV;
- Channel 5;
- Russia-K;
- Russia 24;
- Carousel;
- OTR;
- TVC.
The second multiplex does not yet operate in all regions; sometimes there are lags, which should be eliminated over time. Includes the following channels:
- REN TV;
- SAVED;
- STS;
- Home;
- TV3;
- Friday!;
- Star;
- WORLD;
- TNT;
- Muz TV.
To determine the number of available channels in a particular region, you can open a special map on RTRS. On the map, regions with broadcasting and areas where the signal is just being installed are marked with special icons.
A 3rd multiplex should appear soon. The list of channels is determined by each region independently.
"Shivaki LED 14" (24 inches)
This TV was distinguished not only by its low cost, but also by its quality, which is usually not typical for products of this category. The screen has HD resolution. The picture here is of high quality, image refresh is 50 Hz. The comfort of the Shivaki TV, reviews of which are mostly good, is also shown by the speakers that have received stereo sound. Their power is 20 W. Thanks to this, you can even play 3D videos. This TV is simple and has no additional features. There is a built-in tuner, so everyone can choose the channel to their liking. In order to search, you can use a special menu. You can also save all materials to an external drive to play them later.
How to set up 20 digital TV channels
If you want to watch 20 channels freely, you don’t have to call a specialist and pay money for it. It is enough to have the necessary tools and follow the connection instructions.
Required materials and tools
Mandatory digital setup elements include an antenna, a DVB-T2 tuner or a TV with built-in functions. To connect them, special cables are used, which are provided with the devices upon purchase.
Antenna
An antenna is required to capture the digital signal. Use indoors, outdoors and with signal amplification. The final choice depends on:
- distance of the antenna from the television tower;
- floor, window exit, city;
- possibility of connecting to a collective antenna;
- distance from industrial zones;
The closer to the tower, the better the reception. These factors explain the phenomenon why in a country house far from the amenities of civilization the signal is better than in the city center. In terms of power, antennas are either active or passive. The latter are much more powerful, but also cost more and require more electrical energy. In residential areas and for watching television in the country, a passive antenna will be sufficient. Active ones are necessary for those areas where the signal is weak. Depending on the design:
- unidirectional;
- flat;
- spatial.
A good signal is possible if the antenna power and its design are correctly selected.
Decoder
Prefixes are required to decipher the supplied signal. Allows you to view 20 channels. New models are released on a smart platform with a built-in set-top box, so that everyone can use the benefits of digital television without barriers. Those who have an old TV model and those who do not plan to change the gadget in the near future purchase a receiver. These look like normal consoles.
TV
If you have any questions or complaints, please let us know
Ask a Question
The main task of the TV is to quickly and clearly catch the signal and display it on the screen. Buying a TV with a built-in gadget will save money on the purchase of a set-top box. It will also greatly simplify the connection process.
Resolution is also important, since this affects the clarity of the picture. Older TV models have only one antenna connector and a maximum resolution of 720p.
Before the next setup step, you need to make sure that the receiver is correctly connected to the TV.
Antenna installation
The method of installing the antenna directly depends on its type. To operate indoors, you need to place it on the windowsill and point it towards the tower. Check that there are no other devices nearby that work to set the signal. For example, a Wi-Fi router.
External ones are mounted outside the premises. Fix it so that the antenna does not fall off due to a strong gust of wind.
Connecting equipment
To connect devices, the user must:
- disconnect the TV from the power supply;
- connect the antenna cable to the antenna input;
- plug in the TV;
- open the main menu with the remote control and activate search;
The search can be manual or automatic.
How to connect free 20 digital television channels
Before you start setting up digital channels, you must open the main menu using the remote control. Next, proceed with automatic or manual search.
Auto search
Is an easy way to configure. To activate you need:
- perform the transition “Menu”/“Channel”;
- select the reception mode - Antenna, Broadcast or DVB-T2;
- activate auto search;
- set type - DTV.
Then confirm your actions by clicking OK. Wait a few seconds for the system to automatically perform the search.
Manual mode
All TV models support manual search. This option, compared to the automatic one, is more complicated due to the large number of actions. But it is necessary when it was not possible to activate automatic search. For manual mode, the user must specify the frequency for a specific region, and then:
- select “Channels” in the main menu;
- set the reception mode to “Broadcast”;
- open the “Manual setting” mode;
- enter frequency, start scanning.
Then wait a few seconds until the system finds the channels on its own. Save, enter frequency for another multiplex.
Search via receiver
To activate through the receiver, you must first configure it.
- Take the console out of the box and be sure to remove the film so that the tuner does not overheat.
- Cut the TV cable by 1.5 cm, so that the wire is slightly exposed.
- Peel back the protective film and insert the cable into the appropriate connector.
- Connect the cable between the set-top box and the TV.
- Connect the antenna to the TV.
Next, proceed with manual or automatic settings.
Smart TV
On new TVs with a smart platform, setting up the work is much easier. It is necessary to go to “Menu” / “Broadcasts” / “Auto Configuration” / “Start” / “Scanner”; Then wait until all channels are displayed and complete the setup with the “Close” button.
Cable TV
If desired, you can connect digital cable TV. To activate, you need a cable receiver, as well as a specific access module. If the TV already has a built-in receiver, then only an additional module is needed. It is important to carry out operations with the equipment turned off. The smart card must be inserted into the CAM access module for activation.
Satellite television
Satellite television allows you to receive a digital signal, but the number of free channels increases significantly. To activate, you need a dish, convectors, antenna and tuner.
Connection and setup
It is very easy to assemble and configure the Shivaki STV-40LED14 TV. To do this you need to follow these steps:
- We assemble the multimedia device in accordance with the instructions that come with the kit.
- We make all the necessary connections: connect the power cord and television cable.
- The next stage comes down to step-by-step software configuration. After switching on, the current date and time are set. Then it automatically searches for all available TV programs. Upon completion, save the resulting list.
Equipment
The multimedia device in question has a familiar supply list. The manufacturer included everything in it that allows you to start using the TV for its intended purpose immediately after purchase:
- Directly considered is a multimedia and versatile device.
- Remote control for Shivaki TV, complete with a set of batteries.
- Power cord.
- Coupon with a company guarantee. The last term is 1 year.
- User guide.
- Support with a set of fastenings.
The only downside of this list is that there is no vertical installation system. In any case, it will have to be purchased separately.
What to do if the TV stops turning on?
It will be much more comfortable and better to call a specialist who has been dealing with these problems for a very long time, and who will fix your problem easily and quickly.
The TV turns on with a delay.
Does your AIWA TV turn on with a delay and you can't wait to turn it on? These problems indicate that your device is not working properly and need to be fixed immediately. The beginning of the long-awaited film will definitely be missed, and no one will recover the nerves spent because of this problem. Malfunctions can be due to several reasons:
- The power supply is not working correctly
- There are problems that need to be fixed, for example in the motherboard
- There are problems with the radio channel
The TV panel buttons do not work, how can I quickly fix the problem?
Correcting these incidents for the “ordinary” user is an impossible task, so it is better to call a specialist before you cause more damage to your “pet”. A qualified specialist (master) will quickly and efficiently fix the problem.
The TV doesn't pick up channels.
When setting up AIWA TVs, channels are not fixed? You found the channel you were looking for, installed it, spent time, and after turning it back on, it suddenly disappeared. Having repeated the procedure more than once, you realize that this is a useless exercise, and there is no time left for rest, and your favorite movie has passed. What to do with such misfortune? Users who find themselves in this situation ask themselves this question. The cause of this problem lies in the memory storage device, the incorrect operation of which leads to this incident. Take care of your device, otherwise you will have to contact a specialist.
Why did the TV stop responding to the remote control?
The refusal of the AIWA TV to obey its “boss” may be due to several factors:
- The remote control chip may also be damaged (as a result of a fall or by accident). When the remote control is repaired or replaced, control over the equipment is restored
- The problem may lie in the remote control receiver
- The batteries in the remote control are dead. By changing the finger “assistants” the problem will be eliminated
- The issue may be a problem within the processor.
The last two problems require professional help. The intervention of a specialist will help to correct the breakdown in a timely and efficient manner.