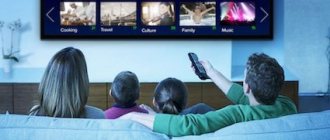
Setting up digital channels
After you are convinced that your TV is digital, we proceed to the very process of searching for digital TV channels on Telefunken TV.
- Press the button on the remote control.
- Next, use the left button to go to the Channels section.
- We need the Auto settings item, go to it.
- Select the setting type DVB-T to search for twenty free digital channels.
- Selecting the country Russia.
- Type of DTV channels, if you need analogue, then select ATV, after scanning, both television options will be available to you.
- Click on confirm and wait for the search to complete.
Answers to questions on Telefunken TV
Telefunken led32s41t2 channel order gets confused after setup
Today I bought and set up 20 digital channels, after a while the channel numbering got mixed up, i.e. there was a radio on button 1, and the first channel moved to button 21. Other channels also got mixed up. I started auto-tuning again - for a while everything was fine, and then the same problem. The TV was taken for my old father, he himself will not constantly tune. 11/16/2018, Syzran.
Your TV has the ability to create a list of favorite channels, try using it. Select a channel to edit. If this channel is your favorite, you can add it to your favorite channel list by pressing the FAV button. The list of favorite channels must be created in the sequence required for you.
Setting up cable TV
You can watch digital cable television on Telefunken TVs; for this, your TV must have a built-in DVB-C tuner or a digital subscriber receiver.
- Go to the TV menu.
- Select the CHANNELS item, usually it is indicated by a picture of a satellite dish. The most convenient setting option is auto-search for channels, so select this item.
- The setting type must be selected DVB-C.
- Next, you need to select the type of DTV channels; if your network has analogue television, select two types and press OK.
- The country should be Russia; in older models, Germany or Finland should be chosen.
- The next stage is Scanning, here you need to do several important steps.
- Scan type Full or Full.
- If you know the parameters of your provider, select Network, for this you need to know the starting frequency, > Setting up an old Telefunken TV
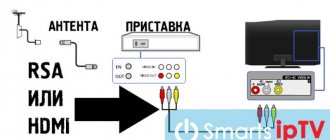
Telefunken is a manufacturer with history, because the first products of this brand were produced at the beginning of the twentieth century. Therefore, there are a large number of old Telefunken TVs on which a set-top box is needed to view digital channels
The set-top box is connected to the TV using a Tulip cable; they are included in all sets of digital set-top boxes. But the best way to connect is an HDMI cable. This method is only suitable for LCD TVs and set-top boxes that have the appropriate input.
In connection with the shutdown of analog television, the question arises of how to switch to digital television on your TV. It doesn't take much time to set up your Telefunken TV, and you'll end up with high quality picture and sound. First, make sure that your Telefunken TV supports the DVB-T2 broadcast format, you can find this out in the instructions for your TV.
Before you start tuning in to digital channels, connect the television cable coming from the antenna to your TV.
How to set up tf tv
We set up your Telefunken TV. Cable and satellite television channels are configured, brightness, color saturation and other screen parameters are adjusted, image clarity is increased, high-quality sound is adjusted, the TV is connected to the home network router, and external playback devices are connected. We know how to set up a Telefunken TV.
Instructions and operating instructions
Instructions for connecting a Telefunken TV
The instructions for the Telefunken TF-LED32S32T2 model contain information about the control buttons and connectors on the TV body:
- Remote control sensor/Power indicator
- INPUT button
- MENU button
- CH+/CH- buttons
- VOL+/VOL- buttons
- POWER/STANDBY button
- Power switch
- Computer audio/video input
- Composite video input
- Composite audio input
- Satellite antenna connector
- Antenna/cable connector
- HDMI1 input
- HDMI2 input
- HDMI3 input
- Coaxial audio output
- AV input
- Component video input YPbPr (mini)
- CI connector (PCMCIA)
- USB port
- Headphone jack
Stage 2: switching
Now let's figure out how to connect a Telefunken TV. This operation consists of two steps. First, connect the power cord to the outlet and power supply socket. Then we connect the cable with the television signal and connect it to the connector marked ANT IN.
In some cases, when using a wired connection to a computer network, it is also necessary to connect a twisted pair cable with a lug to the multimedia center. It connects to the RJ-45 port, which is labeled LAN.
Step 4: Setting up the shell and installing widgets
All TVs from this manufacturer that support Smart TV run AndroidOS. When setting it up in this case, you need to perform the following steps:
- In the settings menu, select “Network” and set the appropriate parameters. With a wired connection, as a rule, no changes need to be made. If you use WiFi, select the name of the network and enter the password to gain access to it.
- Then you need to go to the Play Market and create an account.
- Then we install all the necessary applications. At the end of the installation process, the configuration is completed.
Setting up cable TV
You can watch digital cable television on Telefunken TVs; for this, your TV must have a built-in DVB-C tuner or a digital subscriber receiver.
- Go to the TV menu.
- Select the CHANNELS item, usually it is indicated by a picture of a satellite dish. The most convenient setting option is auto-search for channels, so select this item.
- The setting type must be selected DVB-C.
- Next, you need to select the type of DTV channels; if your network has analogue television, select two types and press OK.
- The country should be Russia; in older models, Germany or Finland should be chosen.
- The next stage is Scanning, here you need to do several important steps.
- Scan type Full or Full.
- If you know the parameters of your provider, select Network, for this you need to know the starting frequency, > Setting up an old Telefunken TV
Telefunken is a manufacturer with history, because the first products of this brand were produced at the beginning of the twentieth century. Therefore, there are a large number of old Telefunken TVs on which a set-top box is needed to view digital channels
The set-top box is connected to the TV using a Tulip cable; they are included in all sets of digital set-top boxes. But the best way to connect is an HDMI cable. This method is only suitable for LCD TVs and set-top boxes that have the appropriate input.
The modern world can no longer be imagined without digital TV. This signal transmission has been used for quite some time to broadcast television and radio channels in many countries in Europe, America and Asia. In Russia, the process of transition from analogue to digital TV has been delayed.
The digital signal arriving through the receiver antenna allows you to watch more TV channels throughout the country without loss of quality or interference. The signal itself can be sent either to an antenna, which is attached to a set-top box, or directly to the TV. It all depends on how modern the model of this device you have.
With devices that support DVB-T2, everything is simple. In order to connect to digital TV, just insert the cable into the appropriate connector and perform a simple channel setup. If your TV is outdated and does not support receiving this type of signal, then in order to view digital channels you should purchase a special set-top box. It is inexpensive, but some people may have problems connecting and setting it up, so today we will talk about how to do this.
Assignment of remote control buttons for Telefunken TV
Purpose of the Telefunken remote control buttons
The figure shows the Telefunken TV remote control, its functional buttons and their purpose:
- STANDBY(POWER)—On/off. Standby mode
- INPUT—Input source selection
- NICAM—NICAM/A2 Audio Select
- ASPECT—Select screen aspect ratio
- P.MODE—Picture mode selection
- S.MODE—Select the sound mode
- Number buttons—Channel selection
- —/-— Select the number of digits in the channel number
- RECALL—Return to the previously watched channel
- FAV—Accesses the favorite channels menu
- FREEZE—Freeze frame
- TV/RADIO—switch between TV and radio modes
- SLEEP—Select auto power off time
- EPG—Access to electronic TV guide
- UP/DOWN/LEFT/RIGHT/ENTER—Navigate and select menu items
- MENU—Access the main menu
- EXIT—Exits a menu or screen
- VOL+/-— Increase/decrease sound volume
- CH+/-— Scroll channels up/down
- DISPLAY—Display signal and channel information
- MUTE—Mute sound
- HOLD—Holds the current Teletext page. Play/pause or start recording Timeshift
- REVEAL—Showing hidden information in Teletext
- SIZE—Change the screen size. Forward
- INDEX—Show Teletext title page
- Back—Previous file
- S.PAGE—Go to Teletext subpage. Next file.
- TTX—On/Off Teletext
- T.SHIFT—Start Timeshift recording
- AUDIO—DTV/USB mode: Select audio track (if available). ATV: Select the sound mode. Other signal sources: left/right audio channel selection.
- SUBTITLE—On/Off. subtitles
- AUTO/REC—Auto configuration in PC mode/Start recording in DTV mode
- PVR—Access the recording menu. Colored buttons: contextual operations in menus and teletext.
On our website you can download the TV remote control, location and designation of remote control buttons, as well as instructions and User Guide
Setting up your Telefunken TV
Selecting a signal source
When you turn on and set up the TV for the first time, you must select the viewing source: digital or analogue television, external video player, etc. Press the INPUT button, then press the DOWN/UP cursor buttons on the remote control or the CH+/CH- buttons on the panel to select one of the available sources signal: DTV => ATV => AV => YPbPr => HDMI 1 => HDMI 2 => HDMI 3 => PC => USB. Press the OK button on the remote control to confirm your selection.
Basic Control Operations
- Press the VOL-/VOL+ buttons to adjust the sound volume level
- Press the MUTE button to mute the sound. To unmute the sound, press this button again or increase the volume
- Press the RECALL button on the remote control to switch between the current and previous channels being watched
- Press the ASPECT button to select one of the available picture formats on the screen. Formats may vary depending on the current source.
- Select TV mode. Press CH-/CH+ buttons to select previous or next channel. Using the number buttons 0-9, you can directly select the desired channel number.
- Press the P.MODE button to navigate through the picture mode menu
- Press the S.MODE button to navigate through the sound mode menu
- Press DISPLAY button to display current channel information
- Press DISPLAY button to display current channel information
- Press the FREEZE button to freeze the screen
- Press the AUDIO button in TV mode to select one of the Nicam audio modes (this operation is not available for all TV channels)
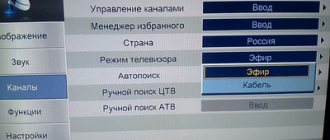
Setting up Telefunken TV channels
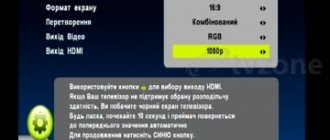
Select Menu Channel. Tuner type: Antenna/Cable. Auto Search: Automatically searches for available channels. Country: Select your country Mode: Select search mode: DTV+ATV (Digital TV + Analog TV), DTV, ATV. Search type: Advanced/Quick/Full. Start: start of auto search. Digital channels will be found first, then analog channels. Manual Search: Manually search for TV channels. DTV Manual Search: Search for digital channels manually. If Antenna is selected as the tuner type, simply select the channel number and press Start to begin searching. If a cable is selected, the following options become available: Network ID: Auto/Manual Entry. Frequency: Auto/manual input. Character range: Auto/manual input. Modulation: Auto/16QAM/32QAM/64QAM/1 28QAM/256QAM. Start: start of manual search. Manual ATV Search: Search for analogue channels manually. ATV Search: Select the search frequency. Color system: Auto/PAL/SECAM. Sound system: Auto/DK/BG/I/L. Modulation: Auto/16QAM/32QAM/64QAM/1 28QAM/256QAM. AFC: Enable/disable automatic fine tuning function. Start: start of manual search. Channel Editor: Enter the channel editing menu. The controls are red, green and blue buttons. Use the UP/DOWN buttons to select the desired channel and press: Red button to delete the channel. Green button to skip a channel while scrolling through channels using the CH +/- buttons. Blue button to move the channel in the list using the cursor buttons.
TF LED32S40T2
The presented model is a strong “middle peasant” from the entire range of televisions of the company. Telefunken TF LED32S40T2 has an average price of 10 thousand rubles, which is not so expensive considering its characteristics.
The screen diagonal is 80 cm. The resolution is not the best - 1366 by 768 pixels. The display is equipped with LED backlight. Two 8-watt speakers are responsible for providing sound.
Telefunken TF LED32S40T2 is capable of receiving signals of almost all known types. The stated maximum number of channels is 1100. Interestingly, the device has two built-in tuners independent of each other, which helps to use two different content providers.
There is a USB port for viewing materials from various external media. The TV understands the standards of many video, audio, and image formats.
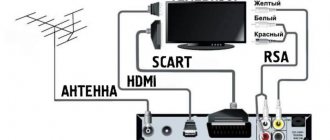
Connecting a digital set-top box
The receiver can be connected either to the TV directly or via a DVD or monitor, but for the latter two options you will most likely need to purchase a special adapter.
To connect the receiver directly, you should follow these steps:
- Take the TV box out of the box and remove the protective film from it. It is necessary to remove the film. Otherwise, the receiver may overheat and break.
- Take the TV cable and cut off the protective sheath, thus exposing 1-15 millimeters of the cable on both sides. The sheath should be stripped very carefully so as not to damage the shielding film, which is designed to protect the center conductor.
- Carefully peel back the shiny protective film and screw the f-connectors to the wires.
- Connect the TV to the set-top box using a cable.
- Insert the wires into the tulip-type connectors on the TV and set-top box.
- Connect the antenna to the TV. The antenna itself should be installed on the external wall of the house or on your balcony, if it is not glazed. At the same time, make sure that it is not touched by tree branches or power cables.
This completes the process of connecting the TV set-top box. Next, to watch the TV channels available in your region, you should configure it.
Preparing the TV
Setting up channels on a TV is not the most difficult process, but sometimes certain difficulties arise. Mostly experts recommend starting with connecting to the signal source. For example, if you plan to set up cable or analog TV, then the cable should be inserted into the antenna input.
If you use several TVs at once, then all devices can be connected to one antenna. However, to ensure truly stable signal distribution, you need to acquire a special splitter or splitter. These adapters have several outputs through which TVs are connected.
Also read: How to connect a laptop to a TV: instructions and tips for users
Stage 1: assembly
The first step is to remove the Telefunken TV from the transport box and then assemble it. This stage consists of the following actions:
- We carefully study the inscriptions on the cardboard box. You need to find the top side of the media center. It is from this side that we cut the tape using a stationery knife.
- We remove all delivery components from the transport box. At the same time, we carefully place the TV itself with the screen down on a flat surface, on top of which there is a cloth. Also, do not forget to remove the transport fasteners.
- We fix the supports on the bottom side of the TV with screws.
- We install the multimedia device on the horizontal surface of the table on which it will be used in the future.
Stage 3: Search TV programs
Next, you need to turn on the Telefunken TV and wait for it to finish loading. Then we go to the settings menu and start the auto-search procedure for TV programs. At the same time, do not forget to indicate the type of input signal. The latter can be digital or analog. It may also be a regular broadcast or cable program format.
At the end of the autosearch operation, we save the changes made. If the device “shell” does not support Smart TV, then the setup is complete. Otherwise, it is necessary to implement one more stage, which will be described below.
Connecting the receiver to Soviet TVs
In our country, many people still use televisions that were produced back in the Soviet years or in the early 90s. Connecting a receiver to such devices is not so easy - they do not have tulip-type connectors. Additionally, some models have scart outputs, but these only accept component signals.
These problems can be solved in two ways:
- Find a circuit for an adapter from the A/V input to scart and solder it yourself;
- Purchase a special adapter from the store to which you can attach an RCA cable from the set-top box or an adapter cable.
Briefly about the brand
This company was founded back in 1903 in Germany. Initially, it specialized in the development of telegraph equipment. Then the range of its devices gradually filled all available niches of the electronics market. Until recently, all of its production facilities were located in Germany. Now devices of this brand are manufactured in different parts of the globe. Even on the territory of the Russian Federation there is such an enterprise.
Again, German representatives are required to control the quality of products. Therefore, reviews of Telefunken TVs for the most part indicate that they do not have any significant shortcomings. Still, German quality makes itself felt.
Receiver setup
In order to set up digital channels on your TV, after connecting the set-top box to it, you will need to perform the following steps:
- On your remote control, press the Menu button.
- In the window that opens, go to the settings menu.
- You need to select Russia as the country if it is not the default.
- Now you need to select the signal standard. By default, DTV-T/DTV-T2 is installed, that is, analog and digital TV, respectively. If you leave it this way, the TV will search for both channels.
- You will be prompted to perform automatic or manual setup. Select Automatic and press the “OK” button on the remote control.
- Now you need to wait a while until all available free and pay TV channels are detected. When you complete your search, click “Save.”
This is one of the easiest ways to set up digital TV at home. If the TV finds few channels or does not find them at all, then you should use manual tuning.
To do this, you need to delete all the channels that were found for this. After the channels have been deleted, you should repeat the same steps as for automatic search, but instead of auto-tuning, select manual search. A window will appear in front of you in which you should set the frequency on which digital channels are broadcast in your city. You can find out this frequency on the Internet or by contacting your service provider. You may also need to change the search range for the search to begin.
After the TV channels of the first multiplex have been found, you will need to find out the frequency for the second multiplex in your city and start the manual search again. Thanks to this, you will be able to watch more channels.
Antenna types
For those people who are interested in the question: “How to set up a TV to receive channels?” You should know that there are several types of antennas for these household appliances:
- The signal received from the over-the-air antenna should be configured on TVs using the remote control.
- Setting up TV channels on a TV that is connected to a satellite dish is done using the remote control from the satellite receiver.
- On a TV that is connected to a cable antenna, you should tune in TV programs using the TV remote control.
Not so long ago, television could only be watched using an over-the-air connection. The signal was then transmitted to the TV from the TV tower. The antenna design in this case had large dimensions; it had to be installed at a height and directed towards the nearest television tower. The signal quality was poor, so the picture displayed on the screen often disappeared and noise appeared. Besides all this, the number of channels was limited. Tuning channels on a TV for high-quality signal reception using an over-the-air antenna in an urban environment is not an easy task.
Fortunately, today more modern cable television is available to most Russians. Using the latest technologies, you can set your TV to show several dozen analogue channels of impeccable quality at once. And also more than 100 digital channels. However, the questions: “How to set up channels on the TV?” hasn't gotten any smaller. The image output is carried out using a cable laid in the apartment. If you use this connection method, no additional equipment is required, such as receivers.
Owner reviews
As an example, consider the model of this manufacturer LED19S64T2. Its diagonal is 19″, and it displays the image in HD format. In addition to this, it is equipped with a good communication list and an advanced sound system. But it does not have Smart TV support.
Reviews of Telefunken TVs of this model indicate the following advantages:
- Reliability.
- Functionality.
- Low cost.
- Good quality.
It is most optimal to use it as a second TV, which is installed in the kitchen.
Another model of this brand that can be found on the domestic market is TF-LED24S38T2. Its only difference is the increased screen size. Everything else is the same, as are the benefits. But they have no disadvantages considering the cost.
Checking the signal quality
To make sure that you did everything correctly and everything is working well, you should check the quality of signal reception. This is not difficult to do. The receiver must have a button with the name . By clicking on it three times, a window will appear on the screen with information about signal quality, channel number, frequency and encoding. If the two existing indicators are above 60%, then everything is fine and the signal level is quite acceptable.
Perhaps in your model of TV set-top box this button will be called something else. To find out what this button is called for you, look at the instructions and read the purpose of the buttons.
If your TV receives several multiplexes, be sure to check the signal quality on each of them. This is due to the fact that each of them is transmitted and received using different transmitters, so it is quite possible that the signal will be good in one multiplex, but not in the second.
Firmware
ATTENTION! Don't try to flash your TV with third-party firmware if you don't understand it. Here is a comment from our reader:
I killed the bootloader, and with it the TV, by trying to flash it with third-party firmware, because... I couldn’t find an answer to my problem anywhere, so I tried it myself. When the plug is plugged in, the red indicator immediately starts flashing rapidly, the backlight does not light up. Never try to flash third-party firmware if you don’t understand it!
[adace-ad id=”5228″]
Remember that it is best to request your firmware version through technical support. By default, from the store, the firmware version on TVs should be 1.4 or 1.8. How to distinguish them? In version v1.4 there is a white screen with red letters when loading:
and on 1.8 it is black.
You can also see this in the section about the device (built-in number - look at the last digits).
If you have a TV with factory firmware for Android 6.0, do not under any circumstances flash it with firmware for Android 4.4.4. Turn your TV into a brick. You perform all operations at your own peril and risk. For the best results, we recommend asking technical support for the latest firmware version for your TV
How to flash?
Installation via manual update (not recommended)
- Download firmware file
- Rename the archive with the firmware to update_signed.zip. If the firmware file is not in the archive, create it manually
- Copy this archive (update_signed.zip) to a flash drive and paste it into the USB port of the TV
- In the TV settings, find the item for updating, select this archive - the TV will reboot and begin updating the firmware
Installing firmware via recovery (recommended)
- Download a special recovery script from here
- In this archive, find the file MstarUpgrade.bin and copy it to the USB flash drive
- Download the firmware and copy it to the same flash drive (i.e. the firmware and the MstarUpgrade.bin file must be on the same flash drive)
- Turn off the TV using the remote control (not the wall outlet)
- Insert the USB flash drive (if the TV has a blue port, do not use it)
- Hold down the Menu button on the TV body, then, without releasing it, turn on the TV from the remote control (as usual)
- As soon as you release the button, the recovery menu will start
- Next, reset recovery settings (recommended before installation) - wipe data/factory reset - YES - delete all user data
- Now you can install the firmware through the apply update from external storage menu
- After the process is completed, select reboot system now from the recovery menu
Installing the full firmware version (MstarUpgrade.bin)
- Format the flash drive to FAT32 format
- Download the firmware. In the archive with it, find the file MstarUpgrade.bin and copy it to the USB flash drive
- Turn off the TV using the remote control (not the wall outlet)
- Insert the USB flash drive (if the TV has a blue port, do not use it)
- Hold down the Menu button on the TV body, then, without releasing it, turn on the TV from the remote control (as usual)
- If the LED starts blinking, the firmware process has completed (the button can be released)
- After the process is completed, the TV will reboot and turn on itself
How to determine that the firmware has failed?
The TV behaves as follows: in standby mode the blue LED lights up. After turning on, the logo appears and goes out for 3-5 seconds, after which the blue LED on the TV panel lights up again
The firmware does not install/is interrupted
If the firmware stops loading at a certain level (maybe 20%, maybe 60%) and a black screen with multi-colored stripes appears, then reformat the flash drive to FAT32, or use another one - perhaps the problem is in a “bad” flash drive
Firmware for Android 6
[adace-ad id=»5222″]
Don’t forget that firmware specifically for your TV can only be sent after technical support and analysis of your TV serial number to identify the software
Link to the official firmware sent by technical support (TF-LED32S58T2S) -
Firmware from 01.2019 (TF-LED32S59T2S) -
Firmware from 12.2018 (TF-LED32S59T2S) -
Version 2.0.0.420_d (October 2021) -
Firmware for Android 4.4.4
These firmwares on Android 4.4.4 should only be installed on TVs with a release date before 02.2017. Newer models are not supported.
Firmware (2016) -
Factory firmware for TV up to 2021 year of manufacture -
Firmware for TV older than 02.2017:
Firmware 20190607_v2.78_Lite-g41_update_signed —
Firmware for TV older than 02.2018:
Factory firmware for TF-LED32S52T2S -
If after the firmware the screen is upside down
An inverted image occurs when using firmware from the 4pda website. The problem is that you need to know what matrix and board are installed in the TV - this is the only way to know for sure whether any firmware will suit you. How to treat?
Unzip the MstarUpgrade.bin file to the root of the flash drive and flash it like regular firmware
For version 4.4.4 - . If it doesn't help, try this one and this one
For version 6.0 - . If it doesn't help, try this one
If after flashing the luminescent image
This may be due to incorrectly selected firmware - if possible, try a different one. If this is not possible, go to the engineering menu (SOURCE button, and then 2580) and try changing the bit rate or flash the TV with this file
Is it possible to update the firmware via Wi-Fi?
This is not recommended - the best option would be to flash the firmware via USB, because... When flashing via a flash drive, the old firmware is completely erased and the new one is installed “from scratch”. In the case of updating via Wi-Fi, the new firmware is simply superimposed on the old one.
About restoring firmware from backup
If you are restoring the firmware from a backup, then be careful - in this situation, the bootloader has already been erased during the process, and the new one has not yet spilled into the TV. This means that if there is a power failure, you will get a brick. How to make a system backup using recovery - instructions
TF LED48S39T2S
According to the Yandex.Market service, this model is one of the highest rated on the company’s list. It’s worth starting with the fact that its diagonal is 48 inches. In the metric system, this means 122 cm. The maximum possible resolution is 1920 by 1080. This means that the TV can operate in Full HD mode. This device is from the Smart TV line, that is, it has its own operating system, which in this case is Android. True, its version is hopelessly outdated, because it is only 4.4. As a true smart TV, the LED48S39T2S can play a bunch of different video formats such as MP3, AVI, MP4. The entire computing load is taken over by a quad-core ARM Cortex A7 processor with a frequency of 1.2 GHz. There is 1 GB of RAM on board, 8 GB of built-in memory. Standard interfaces include Wi-Fi, a LAN port, a headphone jack and a coaxial output.
In almost every review you can find delight in this TV. First of all, this is due to the price, which does not exceed 30 thousand rubles. One of the critical disadvantages is the long turn-on of the device. Also, as one of the owners noted, it would be a good idea to organize support for updating the operating system, since new games or applications cannot be installed on this TV. There are, of course, alternative options, for example, installing from third-party sources. But no one can guarantee the stability of such a symbiosis.
By the way, some problems with Google services could be observed on some models. Another unpleasant discovery was the inability to download firmware for this device, since there is no official technical support at all.
(1 rating, average 4 out of 5)
How to get root?
To obtain root access to an android (including a TV), use the kingoroot utility.
It may not work on the first try - do at least 3-4. The procedure itself is incredibly simple - download the program for Windows, connect the TV via a USB port and after the device is detected, press just one button - ROOT. After connecting the TV, a window will appear - USB Debugging - allow it. If the window does not appear, try turning on debugging mode in the operating system on the TV. The path is: Settings -> Applications -> Development -> USB Debugging (set the flag) or this - Menu -> Settings -> For Developers -> USB Debugging.
It is worth keeping in mind that obtaining root access using KingoRoot risks the fact that the TV may eventually begin to slow down, processes will fall off and eat up memory. If you notice similar problems with your TV after receiving root, then you need to use the Super Sume program. and replace KingUser with SuperUser. Instructions on how to do this are here.
How to root a TV with Android 6.x?
Step-by-step instruction:
1) Download the ADB (Android Debug Bridge) tool on your PC (version 29.0.5). If necessary, install an additional driver for Windows 10 ()
2) Download the TelefunkenRoot archive
3) All files and folders from the TelefunkenRoot archive must be unpacked into a folder with ADB. Those. The “merged” folder will look like this:
4) Be sure to connect the TV via Wi-Fi or an ethernet cable to the same network on which your PC is located (also to the same router/modem)
5) Run the TelefunkenRoot.bat file on your computer.
Enter the IP address of your TV - you can look either on the router or on the TV itself:
6) After which you will see a new program on the TV - SuperSu (icon #). Launch it and agree to the update (do not restart the TV)
7) When the program finishes, exit it and turn off the TV