call me back
Leave your contact details and our manager will contact you within one business day
By the end of 2021, analogue broadcasting will be switched off in all regions of the country. It is being replaced by terrestrial digital TV, which is distinguished by high image quality; the signal does not disappear during snowfall, strong wind or rain. In today’s article we’ll talk about how to set up digital signal reception on a Samsung TV, since this is one of the most popular TV brands among Russians.
Which models support digital TV?
As the manufacturer himself states, the DVB-T2 format is supported by Samsung TVs produced since 2012, series E, H, J, K, LS, M, N. Before installing channels on older models released before this date, it is advisable to make sure of the capabilities of the TV. To do this, check the product passport or visit the website See Russian Federation Number. This RTRS website provides a list of models that support the digital format.
Therefore, to watch 20 free TV channels on modern Samsung devices, you only need a UHF or all-wave antenna.
The most popular TVs of 2021
TV LG 43UK6200 on Yandex Market
Sony KD-55XF9005 TV on Yandex Market
TV LG 49UK6200 on Yandex Market
Sony KD-65XF9005 TV on Yandex Market
LG OLED55C8 TV on Yandex Market
Share on social media networks:
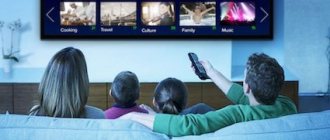
How do many pass their time? That's right, behind the TV. Television is a great opportunity to spend your leisure time with interest. And modern TV is only meeting the consumer halfway, increasing the “range” of functions every year. Soon all television broadcasting will switch to digital signal transmission, but why not start keeping up with progress now? In this article, we will figure out how to configure digital channels on a Samsung TV (any series) manually through an indoor antenna so that you do not have any difficulties in this process.
Auto search for digital channels
The easiest way to configure your television receiver to receive digital channels is to enable auto-tuning of channels.
Read below how to do this and what mistakes are made during setup.
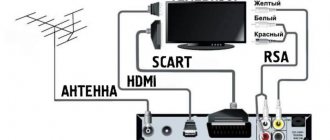
- First of all, take the antenna cable and connect it to the TV socket on the back of the TV.
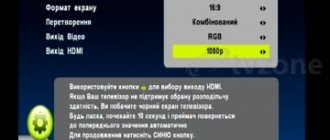
- the Home for smart models or the MENU on your remote control .
- In Smart models, you need to go to Settings.
- Click on the Broadcast item.
- Select Auto Config.
- To start searching for channels, click on Start
- Next, select the signal source Antenna.
- Next you need to select the type of channels, select Digital
- Confirm by clicking on Scan.
Wait until the search is complete for your TV to find all digital channels. This may take about ten minutes, so don't stop scanning halfway through.
Connection
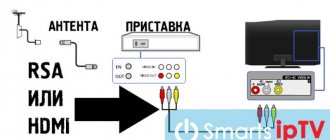
To connect an indoor antenna to a TV, you need a coaxial cable with an RF plug.
All indoor models are equipped with it during production, but often its length is not sufficient to place the TV antenna in the area of the most reliable reception. Therefore, it is often necessary to use an additional cable either to extend the existing one, or, if an external individual antenna is used, for connection.
When choosing a cable, you need to keep the following factors in mind:
- The shorter it is, the better. Even the highest quality coaxial wire has non-zero resistance, which increases with every meter. If the cable is too long, its internal resistance may be so significant that the signal that allows you to clearly show TV programs simply will not be received.
- Almost all brands of cable have a characteristic impedance of 75 Ohms. However, there are a number of additional parameters regarding signal quality. For example, RG-59 cable is relatively cheap, but its signal attenuation is too high.
- to a digital TV receiver working with the DVB-T2 standard;
- to a receiver (set-top box, tuner) capable of converting a digital signal into audio and video.
The connection is made to the antenna input of the TV or set-top box using a plug of the appropriate shape.
In cases where the TV is too old and the set-top box has a high-frequency modulator, it can be connected to the TV via an antenna input. In this case, you will also need a coaxial cable.
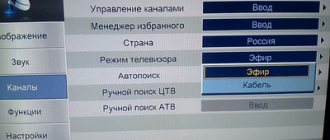
Manual search for digital channels
On Samsung TVs, you can use manual tuning of digital channels. To do this, you need to know the frequency of the multiplex broadcasting in your area. You can find it out on the RTRS website by selecting your locality on the interactive map.
- In order to perform a Manual channel search, go to the TV menu.
- The next step is to click on Broadcast.
- Find Channel Settings.
- In this menu, click on Manual Settings.
- Next, go to DTV Settings.
- Enter the multiplex channel number or Frequency, Bandwidth should be 8 MHz
Click on Search and if everything is done correctly, configure the channel package. The signal quality must be high for stable broadcasting of channels, otherwise there will be constant freezing and scattering of the picture.
3D
Activation of this option occurs as follows:
- section "MENU";
- 3D image;
- "ENTER" key;
- option activated;
In order to use this function, you must purchase special glasses, which are sold separately from the plasma panel.
You should know that most smart receivers are customized for the stores in which they are sold. As a result, the picture at home seems too bright. Therefore, it is recommended to change the settings after purchase. To do this, go to the “CONFIGURATION MENU” and reduce the color intensity by selecting the “NORMAL” mode.
In the configuration menu, disable surround sound simulation. Then turn off all sound effects. Set all tones to the middle position. This manipulation will allow you to fully use the capabilities of TV.
Experts recommend that before buying a Smart TV, you need to study all the intricacies of setup and installation. Since you will need an Internet connection, the installed modem will need to be configured for your home network. By following the instructions, you can set up Samsung TVs yourself, without contacting a technician.
Setting up digital cable channels
If you are connected to a cable operator’s network, then you have access to a large number of digital TV channels on different topics. Typically, cable providers broadcast digital in DVB-C format, so before tuning, check whether your TV receiver can receive this format. Also, most operators encode the signal and to view it you will need an access card and a CAM module.
- Press the MENU button on your remote control
- Next, go to the Broadcast item and select Auto Configuration and confirm the action.
- Be sure to choose Cable, as many people make the mistake of choosing a different broadcast standard.
- Next Channel Type, Digital to search for digital channels
- Next, select a network operator. Choose your cable operator from the list provided. Usually this is Dom ru, Rostelecom, Akado, Ufa no.
- If your provider is not listed, be sure to select Other, otherwise your TV will not tune in all the channels on your network.
- The next step will ask you to select the Setting Type, if you know the network parameters, you can select Fast or Network, but it would be better if you select Full, all channels will be configured this way, but it may take a little longer.
- Having selected Network, you need to enter the starting frequency and ending frequency, modulation and symbol rate. Please check with your service provider for this information.
When you select Full Search, the TV will scan all frequencies and find all open and closed channels.
How television works and what is needed to receive the signal
Today, three broadcasting standards are available to users:
- Analog TV. It works by transmitting a television signal in the meter wavelength range, which corresponds to the frequency range 30 - 300 MHz. Therefore, the user needs an antenna operating at these frequencies and a TV to watch. Satellite and terrestrial analogue broadcasts are currently available, although the latter of these will be switched off in the near future.
- Interactive television (IPTV). It works by directly transmitting images in any format (from HD to 4K) without pre-encoding. This broadcasting technology completely replicates the operating principle of wired Internet and is also required from a high-bandwidth cable. To watch interactive TV, you need a TV or receiver that supports a network connection (LAN connector for an Ethernet cable).
- Digital TV. Transmission of high-resolution images by pre-coding into a digital signal of the DVB standard. This technology allows you to compress information and transmit a larger volume of packet data. This allows you to transmit a signal in high quality with minimal bandwidth requirements. Consequently, Full-HD and 4K broadcasting via satellite and terrestrial towers, as well as via conventional cable, has become possible.
Important! Digital television includes only broadcasting using the DVB standard. Analogue TV is not like that due to the low image quality compared to the modern format. Interactive TV broadcasts by streaming information without pre-encoding the signal, which does not make it digital television.
Each broadcast format operates according to a specific digital standard and requires a set of different equipment.
Terrestrial TV (DVB-T/T2)
Cable TV (DVB-C)
It works using wired technology, but unlike interactive TV, instead of an Internet connection, the user receives a digital signal of the DVB-C standard. This television format is provided by large providers who set up the entire infrastructure for signal transmission. Wired technology does not require a receiving antenna; only a distribution device is used to branch into each user's apartment from the common wire.
A prefix is also used for decryption, but their supply on the market is not in demand. This is due to the fact that many cable TV providers offer customers proprietary receivers. This television is provided as a service with a subscription fee, which is a disadvantage for many.
There are two advantages to this:
- No investment. Most operators do not have a connection fee, and the set-top box is provided by the provider for free or for a small monthly fee. That is, you can connect first and pay later.
- Large selection of channels. Today, more than 100 programs are broadcast, which is many times more than on-air broadcasting. The user is offered a choice of tariffs with different subscription fees.
Satellite TV (DVB-S/S2)
It refers to a universal broadcast format that works effectively for several reasons:
- Reception of analogue and digital TV. The satellite antenna can operate in any frequency range, you just need to connect the appropriate receiving head.
- Full coverage. A high-quality signal from the satellite reaches the user regardless of external factors.
- Lots of channels. Technically, a satellite dish can receive all channels operating in the world at the frequency for which the head is designed. Restrictions are introduced only by the operator on the basis of paid broadcasting or the channel is banned in the country.
Setting up Satellite Channels
Almost all modern Samsung TVs have the ability to receive satellite television. But before installing channels, make sure that your TV can receive the DVB-S standard. Also, there should be a Satellite connector on the back of the TV; if it is not there, then you need a receiver to watch satellite TV channels.
- Go to the TV menu in the Broadcast section.
- Click on Autotune.
- In Antenna mode, select your satellite operator. The list provided includes all operators MTS TV, Tricolor, NTV+, Telekarta. If you need to tune to another satellite, then select Satellite dish.
- Next, you will need to enter the search parameters for satellite transponders.
- Click on scan.
Connection
To connect an indoor antenna to a TV, you need a coaxial cable with an RF plug.
All indoor models are equipped with it during production, but often its length is not sufficient to place the TV antenna in the area of the most reliable reception. Therefore, it is often necessary to use an additional cable either to extend the existing one, or, if an external individual antenna is used, for connection.
When choosing a cable, you need to keep the following factors in mind:
- The shorter it is, the better. Even the highest quality coaxial wire has non-zero resistance, which increases with every meter. If the cable is too long, its internal resistance may be so significant that the signal that allows you to clearly show TV programs simply will not be received.
- Almost all brands of cable have a characteristic impedance of 75 Ohms. However, there are a number of additional parameters regarding signal quality. For example, RG-59 cable is relatively cheap, but its signal attenuation is too high.
- to a digital TV receiver working with the DVB-T2 standard;
- to a receiver (set-top box, tuner) capable of converting a digital signal into audio and video.
The connection is made to the antenna input of the TV or set-top box using a plug of the appropriate shape.
In cases where the TV is too old and the set-top box has a high-frequency modulator, it can be connected to the TV via an antenna input. In this case, you will also need a coaxial cable.
Channel sorting and editor
Usually, after setting up TV channels, you may not like the location of your favorite programs. After all, your favorite program may be, for example, at the end of the list. To arrange TV channels in your order and remove unnecessary ones, use the channel sorting function.
- In some models, in order to edit the channel list, you must enable this function in the TV settings.
- To do this, enable channel changes in the Broadcast menu, in the Additional settings item.
- Then we go to the Channel List, to do this you need to press the CH LIST button.
- Select channel changes
- Put a checkmark on the desired channel and select the action Edit, Delete, Block, etc.
However, if you receive channels from a service provider, the new update may cause everything to go wrong and you will need to change everything again.
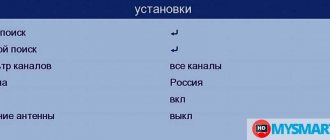
Auto settings
Samsung TVs are equipped with smart functionality, the best among TV manufacturers in the world. Users independently set up television receivers, arrange channels according to the list and select their thematic areas.
To start setting up, determine the signal source. This could be a satellite, antenna or cable. At this stage, Smart TV receivers are offered by all well-known providers. Such as NTV Plus, Tricolor, Telekarta and Rostelecom.
If you involve a specialist in the setup, the channels will be automatically selected by the provider. The order of channels is always available at will; the “Move” function will help you change it. When the auto settings are finished, select your service provider.
If you are a user of an LCD TV, then auto settings are possible without using the remote control, using a smartphone or a special keyboard. Other models have special buttons for settings on the control panel.
How to watch local channels
When switching to digital TV, all local TV channels continued to broadcast in analog format, with the exception of the State Television and Radio Broadcasting Company news. So if you want to watch local programs on your Samsung TV, you need to set up analogue channels.
Therefore, when installing channels, select Digital and Analogue. After the scan is completed, you will be able to watch both digital and analogue. In order to switch from one format to another, you simply need to duplicate the channel number by pressing the same button again.