The D-Color company is probably one of the 3-4 most popular manufacturers of DVB-T set-top boxes in our country. Considering the fact that to date the number of digital television equipment sold has exceeded 2 million sets, it can be noted that there are plenty of owners of D-Color receivers in our country and this number will only grow.
Currently, there are 16 models of dcolor consoles available to everyone. Regardless of the year of manufacture, any of the presented models works with the DVB-T and DVB-T2 standards, and therefore can receive up to 20 digital channels. Today we will try to give an overview of instructions for all models of color consoles and will try to show the correct process for connecting them to a TV.
Comparison of characteristics of all models of digital set-top boxes from D-Color
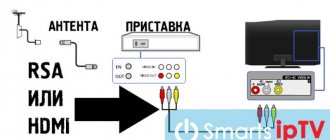
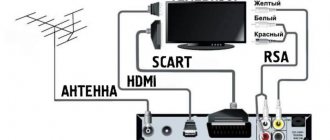
Actually, comparing receiver models with each other, in some respects, does not make sense. The only difference will be the adaptation of set-top boxes to work with certain types of broadcast transmission to a TV. In older tuners, you can only connect via an RSA connector, but in modern ones, HDMI is already built in. Otherwise, these receivers cope well with their tasks.
| Model D-Color | Frame | Display | USB | DVB-T (DVB-T2) | Digital connectors |
| DC911HD | Plastic | — | — | + | RSA |
| DC1201HD | Metal | — | — | + | RSA |
| DC930HD | Plastic | — | + | + | RSA and HDMI |
| DC902HD |
* The DC 1002 HD Mini model differs in size from all other models, which is why it has this name.
Connecting D-Color models to a TV using the example of dc1302hd and dc1002hd
Below we will try to give a general diagram for connecting all models of color set-top boxes to a TV. As an illustrative example, let’s take the 2 models presented above. However, the process will be identical for the entire list of receivers in the table, even for the dc1301hd , dc1501hd and the dc1002hd mini .
The main and determining point when connecting will be the choice of the appropriate connector. It is selected depending on the presence of a particular connector on the TV.
- HDMI. The most preferred connection option. If available, it is chosen first, because this input is capable of transmitting a higher-quality picture to the screen and will also last much longer than other wires.
- RSA. Usually comes with a set-top box. Presented in the form of colored wires with 3 inputs on both sides (there are also options 3-1 and 2-2). Available on 70%-80% of TVs, but less durable than the previous option.
- Using adapters. In some cases, it happens that the TV cannot be connected directly for a number of reasons. In this case, it is worth using adapters and signal converters that allow you to combine connectors.
- Scart-RSA. On older TV models, tulips are often missing. In this case, the device will most likely have a SCART input. Then the only option to connect to the D-Color set-top box is to use a special adapter.
- RSA-HDMI. Is the exception rather than the rule. You can combine these 2 connectors only in case of urgent need, for example, if one of the inputs on the TV is faulty. The fact is that the conversion of this type of signal can be distorted and it is not always possible to adjust the picture to a view that is convenient for viewing.
During the connection process, it is advisable to make sure in advance that the antenna is selected correctly and whether it needs to be replaced. It would be a good idea to check that the grounding is in good working order and that there are no voltage surges.
In practice, due to power surges, some types of set-top boxes may fail. This is not only common on the D Color models, but is observed everywhere. If you are aware of such problems, it would be a good idea to connect the TV and set-top box to an uninterruptible power supply.
Connecting a digital set-top box
The receiver can be connected either to the TV directly or via a DVD or monitor, but for the latter two options you will most likely need to purchase a special adapter.
To connect the receiver directly, you should follow these steps:
- Take the TV box out of the box and remove the protective film from it. It is necessary to remove the film. Otherwise, the receiver may overheat and break.
- Take the TV cable and cut off the protective sheath, thus exposing 1-15 millimeters of the cable on both sides. The sheath should be stripped very carefully so as not to damage the shielding film, which is designed to protect the center conductor.
- Carefully peel back the shiny protective film and screw the f-connectors to the wires.
- Connect the TV to the set-top box using a cable.
- Insert the wires into the tulip-type connectors on the TV and set-top box.
- Connect the antenna to the TV. The antenna itself should be installed on the external wall of the house or on your balcony, if it is not glazed. At the same time, make sure that it is not touched by tree branches or power cables.
This completes the process of connecting the TV set-top box. Next, to watch the TV channels available in your region, you should configure it.
Step-by-step channel setup on D Color
In order to check the correct connection, you will need to launch the set-top box on the TV for the first time:
- In the TV menu you need to select the display mode in which the set-top box was connected. For example, if you turned on everything via RSA, then you should go to AV.
- After this, you can start the device itself from the remote control.
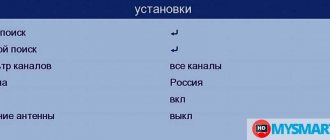
- The basic settings welcome window will open. You need to set your language in it and go to “Search for Programs”.
- The receiver will independently begin scanning the digital broadcast reception frequencies known to it and save the list of programs upon completion.
In this case, the number of channels will be determined by the level and strength of the signal from the antenna. If it is not enough, then the errors of the antenna should be corrected first.
In any case, if you were unable to find 20 channels, you can try to retune the channels manually. In this way, you will purposefully set the set-top box with the frequency data that it will need to scan. We will now tell you how to do this:
- Let's go to the interactive map of CETV. We find on it the area in which you live and look at the television tower closest to your place of residence. Click on it and write down the parameters for RTRS-1 and RTRS-2. In particular, we are interested in channel numbers.
- Go to the D-Color console menu and look for the program search section there. We need a “Manual Search”. Click OK and first indicate the first frequency channel that you recorded earlier. After the search is completed, we do the same for the second one.
If the set-top box does not work
Owners of DColor set-top boxes often have a lot of questions when the device stops working stably or refuses to find channels. In this case, it is difficult to answer in detail every owner of these types of receivers. Therefore, we have compiled a basic list of possible errors and the most obvious solutions to them.
No signal / Can't find channels
- Search for channels manually. Make sure there is a reception signal.
- If it is completely absent, then check the antenna. The cable may fail or oxide may form on the signal amplifier. In this case, it is worth disassembling it and cleaning it.
Doesn't work / No picture or sound
- In 80% of cases, the cable connecting to the TV is to blame. For example, RSA connectors wear out a lot with frequent use and, as a rule, quickly fail. Only replacement will help.
- It is also worth checking the power cable of the set-top box. Unplug it from the outlet and visually inspect for exposed wires.
- If a number of functions of the set-top box do not work, then try resetting to factory settings. To do this, you must select the appropriate item in the system menu. If the set-top box requires you to enter a password, it is usually “ 000000“
The remote doesn't work
- The coverage area of the dcolor remote control is regulated by the manufacturer and is 5 m. Make sure you are not too far from the receiver.
- Change the batteries.
- If all else fails, then the remote control may fail.
Channels are rearranged independently or are not saved / the set-top box reboots itself
In this case, the device firmware is to blame and needs to be updated. The new version can be found on the Internet. It is recorded on a flash drive and inserted into the console. Then you should go to the menu and click on software update.
How to connect a digital set-top box to a new and old TV?
The state program for a phased transition to the digital television broadcasting standard DVB T2 is approaching the final stage - a gradual reduction in the number of analogue repeaters. This suggests that the time has come to join new technologies and switch to digital.
This article will talk about the equipment necessary to receive a television signal in the new format, as well as how to properly connect a digital set-top box (receiver) to a TV or monitor.
Necessary equipment
To watch digital broadcasting, as opposed to analogue, you will need a receiver that decodes the signal. Many modern TV models (Philips, Samsung, Sony, Toshiba, LG, Panasonic, etc.) are equipped with such a unit. To make sure of this, you should refer to the user manual, this brief instruction is included with each product. At the same time, check whether the built-in tuner supports the DVB-T2 format; if not, you will need to purchase a receiver.
Receiver Supra
Depending on the set of functionality, the cost of such a device can vary from 800 to 3000 rubles. Note that many digital cable television providers provide receivers for rent to subscribers.
In addition, we will need to receive a digital signal. In cities and large towns this will not be a problem; just contact your local providers. Residents of rural areas will need to install a UHF antenna or satellite dish. The latter is preferable, since it is not a fact that your home is within the coverage area of the nearest digital repeater. In addition, the option with a satellite dish provides a wider selection of television channels.
Standard equipment for digital set-top box
Let's look at what is included in the standard set of the receiver; this information may be useful when connecting it to a television receiver.
Standard equipment for digital set-top box
Let's list what is shown in the figure:
- A – user manual, we recommend that you carefully read this manual to get a complete understanding of all the functionality of the device and its connection to the TV and antenna.
- B – “Tulip” cable (RCA) with characteristic connectors allows you to connect the set-top box to almost all modern models of television receivers.
- C – a device for decrypting and converting a digital signal into an analogue one (receiver).
- D – packing box.
- E – remote control for the device.
- F – batteries for the remote control.
- G – network adapter for connecting the device to a household power supply.
- H – warranty service coupon.
The basic configuration may differ slightly from what is shown in the photo (for example, the “Tulip” is replaced by an HDMI cable).
Connectors and their purpose
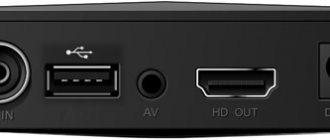
There are various connectors on the back of the device; we’ll briefly explain what they are for.
Figure 3. Connectors of the SDT-96 receiver from the SUPRA range
Explanation of the picture:
- Antenna output.
- Connector for connecting a satellite dish, UHF antenna or cable from a local provider.
- A socket for an HDMI cable allows you to connect a monitor or TV equipped with such an input (digital output can transmit sound and image).
- Sockets for the “Tulip” cable (transmits an analog video signal, as well as stereo sound).
Some devices may be additionally equipped with a “SCART” connector; a TV, VCR or DVD player with a video recording function can be connected to it.
Receiver with SCART connector
In addition, you may find devices that have D-SUB (Fig. 5) or DVI outputs instead of an HDMI jack.
Fig 5. Digital set-top box with standard VGA (D-SUB) output
Please note that such interfaces do not transmit sound, so an additional connection using “tulips” will be required to transmit it.
The process of connecting a digital set-top box to a new TV step by step
Important! All manipulations must be done with the equipment turned off. If you connect working equipment, there is a high probability of its failure.
Let us describe the order of our actions:
1. You need to select the interface for connecting the set-top box to the TV. It can be analog (tulips, D-SUB, SCART) or digital (HDMI, DVI). The choice is made depending on the specific TV model. Despite the fact that many FULL HD television receivers have an analog input, it is better to feed them “digital”, since double conversion of the signal will negatively affect the quality of the “picture”.
HDMI input on TV
This interface allows you to transmit video and audio, so the connection can be made with one cable.
If the TV does not have a digital input, it can be connected using any analog interface; the easiest way to do this is using tulips. In the case where the device only has a bulky SCART connector, you can purchase a tulip adapter for it. In this way you can connect almost any model, except for very ancient ones.
2. We check the availability of the cable necessary for connection; it may come with the receiver or television set. If you cannot find one, you will need to purchase it.
3. Remove the protective film from the set-top box (if any), install it in the chosen location and connect it to the TV. The cables are made in such a way that it is physically impossible to insert them into a connector not intended for this purpose. The exception is tulips, they can be mixed up. But to prevent this, manufacturers make nests for them in the appropriate color.
Standard colors of RCA interface connectors (tulips)
As you can see, the colors of the connectors match the colors of the sockets (4 in Fig. 3).
4. Connect power to the console. If the network adapter is built-in, simply plug the plug into the socket; pre-connect the remote power supply to the corresponding socket of the receiver.
5. Connect the provider’s cable, a decimeter antenna or a satellite dish to the antenna input (2 Fig. 3).
6. Insert the batteries into the remote control, turn on the set-top box and the TV.
This completes the connection procedure, and you can begin setting up channels. If your TV does not have the interfaces listed above, do not worry, we will tell you how to get out of this situation.
Connecting to an old TV
The signal converter can work even with older models of television receivers when connecting them to the antenna output (1 in Fig. 3). To do this, you will need a piece of antenna wire of the appropriate length and two antenna plugs. In order not to bother with soldering, you can take special F-connectors; the procedure for installing them on the cable is demonstrated in Figure 8.
Installation on the F-connector cable
Procedure:
- We remove the insulation from the antenna cable, carefully so as not to damage the braiding (it is enough to clean 15 mm).
- We bend the braid as shown in the picture.
- Carefully remove the insulation from the central core.
- It is necessary to expose 10 mm of the central wire.
- We screw the connector clockwise.
- We do this until the central core protrudes 2 mm from the connector.
Reviews for D-Color
Regarding our experience in communicating with owners of D-Color set-top boxes, we can draw up a rough picture of people’s opinions on the devices of this company.
- Tuner owners always have a number of questions regarding the availability of proper instructions for a particular model. You won’t find these on the Internet, and the official website is often inoperable.
- There are no complaints regarding the company's pricing policy. Set-top boxes cost around 1000 rubles and even the latest models will be affordable for most.
- Technically, there are some difficulties with finding programs. In most cases, when connecting digital television, subscribers do not see the need to replace the antenna. And in most cases this is correct, but there are exceptions.
- As a main advantage for dcolor consoles, we can note their adaptation to a large number of televisions. This is primarily revealed by the presence of more connectors for connection.
Otherwise, these receivers are not very different from similar DVB-T devices.
The D-Color company is probably one of the 3-4 most popular manufacturers of DVB-T set-top boxes in our country. Considering the fact that to date the number of digital television equipment sold has exceeded 2 million sets, it can be noted that there are plenty of owners of D-Color receivers in our country and this number will only grow.
Currently, there are 16 models of dcolor consoles available to everyone. Regardless of the year of manufacture, any of the presented models works with the DVB-T and DVB-T2 standards, and therefore can receive up to 20 digital channels. Today we will try to give an overview of instructions for all models of color consoles and will try to show the correct process for connecting them to a TV.
How to connect a D-color set-top box to a TV to receive digital TV
How to connect and configure the D-color set-top box to the TV? D-Color is one of the affordable and multifunctional digital TV receivers. Thanks to its configuration and support for powerful software, the receiver produces many interesting television programs. If you just purchased D-Color, then you will not need a specialist. The interface is so simple that you can calibrate and search for channels manually using the instructions below.
How to connect D-Color to Wi-fi
To set up a D-color digital television receiver for your TV, take an HDMI cable or a classic USB cable (depending on what port you have). Connect everything according to the algorithm, turn on the search, and save the results. To activate Wi-Fi, use the main menu and the remote control. There you enter the password and wait 5 seconds for pairing.
How to connect Bluetooth headphones to an LG TV: methods, instructions
Possible problems and their solutions
Considering the specifics of this technique, there are three main problems - refusal to search for a channel, lack of response to the remote control and interruptions in the signal. Such problems can be easily fixed at home.
Comparison of characteristics of all models of digital set-top boxes from D-Color
Actually, comparing receiver models with each other, in some respects, does not make sense. The only difference will be the adaptation of set-top boxes to work with certain types of broadcast transmission to a TV. In older tuners, you can only connect via an RSA connector, but in modern ones, HDMI is already built in. Otherwise, these receivers cope well with their tasks.
| Plastic | — | + | + | RSA and HDMI | |
| DC921HD | Plastic | — | + | + | RSA and HDMI |
| DC801HD | Plastic | + | + | + | RSA and HDMI |
| DC910HD | Plastic | — | + | + | RSA and HDMI |
| DC1002 HD mini | Metal | + | + | + | RSA and HDMI |
| DC1401HD | Metal | + | + | + | RSA and HDMI |
| DC1301HD | Metal | + | + | + | RSA and HDMI |
| DC1002HD | Metal | + | + | + | RSA and HDMI |
| DC1302HD | Metal | + | + | + | RSA and HDMI |
| DC1501HD | Metal | + | + | + | RSA and HDMI |
| DC702HD | Plastic | — | + | + | RSA and HDMI |
| DC700HD | Plastic | — | + | + | RSA and HDMI |
| DC705HD | Plastic | — | + | + | RSA and HDMI |
| Model D-Color | Frame | Display | USB | DVB-T (DVB-T2) | Digital connectors |
| DC911HD | Plastic | — | — | + | RSA |
| DC1201HD | Metal | — | — | + | RSA |
| DC930HD | Plastic | — | + | + | RSA and HDMI |
| DC902HD |
* The DC 1002 HD Mini model differs in size from all other models, which is why it has this name.
Checking the signal quality
To make sure that you did everything correctly and everything is working well, you should check the quality of signal reception. This is not difficult to do. The receiver must have a button called INFO. By clicking on it three times, a window will appear on the screen with information about signal quality, channel number, frequency and encoding. If the two existing indicators are above 60%, then everything is fine and the signal level is quite acceptable.
Perhaps in your model of TV set-top box this button will be called something else. To find out what this button is called for you, look at the instructions and read the purpose of the buttons.
If your TV receives several multiplexes, be sure to check the signal quality on each of them. This is due to the fact that each of them is transmitted and received using different transmitters, so it is quite possible that the signal will be good in one multiplex, but not in the second.
- Description
- Characteristics
- Accessories
- Instructions
- Reviews (2) +1000 bonuses for review!
With the D-COLOR DC1401HD digital TV tuner you will be delighted with excellent graphics!
The device supports the DVB-T2 standard - you will see many digital TV channels with amazing pictures.
The USB input will allow you to play files from a flash drive, hard drive or mobile devices. In addition, you can record videos to a USB drive.
| Plastic | — | + | + | RSA and HDMI | |
| DC921HD | Plastic | — | + | + | RSA and HDMI |
| DC801HD | Plastic | + | + | + | RSA and HDMI |
| DC910HD | Plastic | — | + | + | RSA and HDMI |
| DC1002 HD mini | Metal | + | + | + | RSA and HDMI |
| DC1401HD | Metal | + | + | + | RSA and HDMI |
| DC1301HD | Metal | + | + | + | RSA and HDMI |
| DC1002HD | Metal | + | + | + | RSA and HDMI |
| DC1302HD | Metal | + | + | + | RSA and HDMI |
| DC1501HD | Metal | + | + | + | RSA and HDMI |
| DC702HD | Plastic | — | + | + | RSA and HDMI |
| DC700HD | Plastic | — | + | + | RSA and HDMI |
| DC705HD | Plastic | — | + | + | RSA and HDMI |
| Type | digital TV tuner |
| Execution | external |
| Connection type | autonomous |
| Video capture | No |
| FM tuner | No |
| HD support | 720p, 1080i, 1080p |
| Output video format | 4:3, 16:9 |
| Digital standards | DVB-T, DVB-T2 |
| DVB-C | No |
| DVB-T | There is |
| DVB-T2 | There is |
| DVB-S | No |
| Exits | audio, HDMI, composite |
| Teletext | There is |
| Recording timer | There is |
| Delayed viewing mode | There is |
| Remote control | There is |
| Equipment | set-top box, remote control, batteries, RCA cable |
| Contents of delivery | DVB-T2 receiver, remote control, batteries, RCA cable, documentation |
| Guarantee | 12 months |
| Certificate | RU C-CN.AL16.B.21490 |
| EAN code | 6907325814012 |
All available channels are great. Extensive settings, simple menu interface. Stable operation even with a weak signal.
Small remote control for older people.
Everything is the same as in similar D-color lines; They differ only in the housing and inputs/outputs. In the garden, 16 km from the city, in a lowland, I caught all the available channels using an old antenna from a Samsung CRT TV
Everything is like most similar receivers. Shows the 1st and 2nd multiplexes.
I couldn't sort the channels by number.
Overall, not bad. The price is cheaper.
Share your experience of using the product and receive 1000 bonuses to your account: 500 for text + 500 for photos.
We check reviews with photos without waiting in line and as quickly as possible.
To leave a review and select a card for bonuses, log in or register
| Shop | Working hours | Can be picked up |
| Izhevsk, 10 Let Oktyabrya Street, building 17, Oktyabrsky shopping center, 2nd floor | Mon-Sun 10:00-21:00, no lunches and days off | Tomorrow |
| Izhevsk, Lenina Street, building 138, KIT shopping center, 2nd floor | Mon-Sun 10:00-21:00, no lunches and days off | Tomorrow |
| Izhevsk, Petrova Street, building 29, shopping and entertainment complex "Petrovsky", 2nd floor | Mon-Sun 10:00-22:00, no lunches and days off | Tomorrow |
| Izhevsk, Klubnaya Street, building 37, “TC” Planet of Equipment and Furniture | Mon-Sun 10:00-21:00, no lunches and days off | Tomorrow |
| Izhevsk, Pushkinskaya Street, building 130, Pushkinsky shopping center, 1st floor | Mon-Sun 10:00-21:00, no lunches and days off | Tomorrow |
| Izhevsk, Voroshilova Street, building 53, shopping center “On Voroshilova” | Mon-Sun 10:00-21:00, no lunches and days off | Tomorrow |
| Izhevsk, Shirokiy lane, building 53, Sigma shopping center, 3rd floor | Mon-Sun 10:00-21:00, no lunches and days off | Tomorrow |
The manufacturer's warranty is usually set for one or two years, but for expensive electronics this is not always enough.
Purchasing an additional guarantee certificate allows you to:
- 1. take into account non-warranty risks, such as non-production breakdowns as a result of power surges, fire, flooding, theft, robbery, robbery, natural disasters, supplementing the warranty options from the manufacturer;
- 2. increase the duration of the factory warranty.
You can independently choose the time period for which you want to extend it - it can be 1, 2 or 3 years.
Why does the equipment manufacturer establish a warranty of one, two, or in very rare cases, three years? It's simple. The longer the equipment operates, the higher the likelihood of breakdown. But you don’t throw away your refrigerator, washing machine or laptop immediately after the manufacturer’s warranty expires? Of course not. What if the equipment breaks down after the warranty has expired? You have to pay for repairs out of your own pocket. And often it's a lot of money. The problem will be solved by the “Additional Guarantee” certificate.
Connecting D-Color models to a TV using the example of dc1302hd and dc1002hd
Below we will try to give a general diagram for connecting all models of color set-top boxes to a TV. As an illustrative example, let’s take the 2 models presented above. However, the process will be identical for the entire list of receivers in the table, even for the dc1301hd , dc1501hd and the dc1002hd mini .
The main and determining point when connecting will be the choice of the appropriate connector. It is selected depending on the presence of a particular connector on the TV.
- HDMI. The most preferred connection option. If available, it is chosen first, because this input is capable of transmitting a higher-quality picture to the screen and will also last much longer than other wires.
- RSA. Usually comes with a set-top box. Presented in the form of colored wires with 3 inputs on both sides (there are also options 3-1 and 2-2). Available on 70%-80% of TVs, but less durable than the previous option.
- Using adapters. In some cases, it happens that the TV cannot be connected directly for a number of reasons. In this case, it is worth using adapters and signal converters that allow you to combine connectors.
- Scart-RSA. On older TV models, tulips are often missing. In this case, the device will most likely have a SCART input. Then the only option to connect to the D-Color set-top box is to use a special adapter.
- RSA-HDMI. Is the exception rather than the rule. You can combine these 2 connectors only in case of urgent need, for example, if one of the inputs on the TV is faulty. The fact is that the conversion of this type of signal can be distorted and it is not always possible to adjust the picture to a view that is convenient for viewing.
Connecting the receiver to Soviet TVs
In our country, many people still use televisions that were produced back in the Soviet years or in the early 90s. Connecting a receiver to such devices is not so easy - they do not have tulip-type connectors. Additionally, some models have scart outputs, but these only accept component signals.
These problems can be solved in two ways:
- Find a circuit for an adapter from the A/V input to scart and solder it yourself;
- Purchase a special adapter from the store to which you can attach an RCA cable from the set-top box or an adapter cable.
There are even more ancient models of TVs of the “Electron” type that do not provide any inputs at all, except for an antenna connector. Through this connector, a modulated high-frequency signal enters the TV, so in order to watch digital TV on a device of this type, you will need to additionally purchase a modulator that will be equipped with RCA connectors.
Step-by-step channel setup on D Color
In order to check the correct connection, you will need to launch the set-top box on the TV for the first time:
- In the TV menu you need to select the display mode in which the set-top box was connected. For example, if you turned on everything via RSA, then you should go to AV.
- After this, you can start the device itself from the remote control.
- The basic settings welcome window will open. You need to set your language in it and go to “Search for Programs”.
- The receiver will independently begin scanning the digital broadcast reception frequencies known to it and save the list of programs upon completion.
In this case, the number of channels will be determined by the level and strength of the signal from the antenna. If it is not enough, then the errors of the antenna should be corrected first.
In any case, if you were unable to find 20 channels, you can try to retune the channels manually. In this way, you will purposefully set the set-top box with the frequency data that it will need to scan. We will now tell you how to do this:
- Let's go to the interactive map of CETV. We find on it the area in which you live and look at the television tower closest to your place of residence. Click on it and write down the parameters for RTRS-1 and RTRS-2. In particular, we are interested in channel numbers.
- Go to the D-Color console menu and look for the program search section there. We need a “Manual Search”. Click OK and first indicate the first frequency channel that you recorded earlier. After the search is completed, we do the same for the second one.
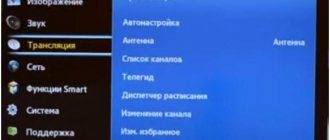
When searching manually, you should carefully monitor the quality. If the frequency is selected correctly and the antenna is operational, it should change as in the screenshot below.
If your antenna has a signal amplifier, then you should turn it on before searching. To do this, you need to find “Antenna power” in the program search menu and switch it to “on” mode.
If the set-top box does not work
Owners of DColor set-top boxes often have a lot of questions when the device stops working stably or refuses to find channels. In this case, it is difficult to answer in detail every owner of these types of receivers. Therefore, we have compiled a basic list of possible errors and the most obvious solutions to them.
No signal / Can't find channels
- Search for channels manually. Make sure there is a reception signal.
- If it is completely absent, then check the antenna. The cable may fail or oxide may form on the signal amplifier. In this case, it is worth disassembling it and cleaning it.
Doesn't work / No picture or sound
- In 80% of cases, the cable connecting to the TV is to blame. For example, RSA connectors wear out a lot with frequent use and, as a rule, quickly fail. Only replacement will help.
- It is also worth checking the power cable of the set-top box. Unplug it from the outlet and visually inspect for exposed wires.
- If a number of functions of the set-top box do not work, then try resetting to factory settings. To do this, you must select the appropriate item in the system menu. If the set-top box requires you to enter a password, it is usually “ 000000“
The remote doesn't work
- The coverage area of the dcolor remote control is regulated by the manufacturer and is 5 m. Make sure you are not too far from the receiver.
- Change the batteries.
- If all else fails, then the remote control may fail.
Channels are rearranged independently or are not saved / the set-top box reboots itself
In this case, the device firmware is to blame and needs to be updated. The new version can be found on the Internet. It is recorded on a flash drive and inserted into the console. Then you should go to the menu and click on software update.
Possible problems and their solutions
The main problem is related to the failure of the device itself. Reboot the receiver and turn it on again. The second point is a bad antenna signal. We recommend purchasing a new version or using a digital signal amplifier. This device is sold in any hardware store and is inexpensive. Another problem is that the tuner itself has failed. Then contact the service center to fix the problem.
D-Color box does not find channels
Is there no image on the screen? The reason may be the following:
- hardware failure of any equipment;
- software failure;
- various internal problems.
Try to fix the problem yourself. Reboot your device several times. If the problem is not solved, use the services of specialists.
Doesn't respond to remote control
The tuner does not respond to the remote control? First check that it is working properly. The batteries on the device itself may have run out. The second option is to remove the cables and wires from the TV and turn it on again. This kind of failure is a common occurrence.
No signal
A similar error occurs when there is no digital signal. This breakdown is temporary. Wait a couple of minutes and the connection will be restored. If the situation repeats itself constantly, you should seek the help of a specialist.
Reviews for D-Color
Regarding our experience in communicating with owners of D-Color set-top boxes, we can draw up a rough picture of people’s opinions on the devices of this company.
- Tuner owners always have a number of questions regarding the availability of proper instructions for a particular model. You won’t find these on the Internet, and the official website is often inoperable.
- There are no complaints regarding the company's pricing policy. Set-top boxes cost around 1000 rubles and even the latest models will be affordable for most.
- Technically, there are some difficulties with finding programs. In most cases, when connecting digital television, subscribers do not see the need to replace the antenna. And in most cases this is correct, but there are exceptions.
- As a main advantage for dcolor consoles, we can note their adaptation to a large number of televisions. This is primarily revealed by the presence of more connectors for connection.
Otherwise, these receivers are not very different from similar DVB-T devices.
Digital television is widespread in the country. It has received wide demand due to its availability and ease of connection. From a technical point of view, it replicates terrestrial television, while allowing for high-resolution images. Most Russian TV channels already broadcast digitally and are broadcast free of charge.
Despite the ease of connection, it often happens that there are no channels. The information below will help you figure out why the digital set-top box does not find channels and what to do in this situation.
Reasons for the lack of TV channels
If there is no image on the TV screen, this could indicate dozens of signs.
For the convenience of considering the problem, all cases can be grouped into three categories:
- Hardware . Problems with the proper operation of equipment associated with breakdown or incorrect connection.
- Software . Incorrect settings of the set-top box or TV. In this case, the problem of missing channels is on the user's side.
- External factors . Problems are due to reasons beyond the user's control.
For a more detailed study of the reasons why there is no digital TV, we need to consider each case separately.
Hardware problems
Often channels are missing due to a simple mistake - there is no connection or the wires are connected to different connectors. The first step is to check that all devices are connected correctly:
- The digital antenna and amplifier are connected to the set-top box separately using different cables;
- The receiver connects to the TV using an AV or HDMI cable, and to the computer via a VGA connector. Otherwise, the TV does not see the set-top box.
If everything is in place and connected, you need to check the functionality of each equipment:
- You can connect the TV to a computer or a regular terrestrial antenna and see the result;
- On the set-top box, it is enough to turn on auto-tuning of channels and, if there are no channels, but the image changes, the problem is in the digital receiver (antenna);
The last point to check is the quality of the incoming signal. To do this, you need to go to map.rtrs.rf and enter the locality. The results will display a map that shows the broadcast area within the desired city.
The generation of the multiplex (1st or 2nd) does not affect the quality, but the quality of the signal depends on its distance.
If, when you connect an amplifier, the image on the screen changes, but it has nothing to do with high-quality broadcasting, a weak signal is received and the current antenna power is not enough.
To find out why the TV is not finding digital channels, you will need to buy a new antenna. If a model from a well-known manufacturer is installed, you can always find a branded amplifier for it.
What is needed for this
To connect digital TV you will need:
Your TV should have an input into which you can insert an antenna, a tulip-type connector, and an input with video output (scart). If you have an HDMI input along with the scart connector, then don’t worry. It is also suitable for connecting a receiver. It's just that your model is newer.
Before buying a receiver, you should figure out which one is better and find out what parameters you should pay attention to in order to choose the most optimal model. If you don’t understand much about technology, and don’t want to spend your free time studying all these nuances, then you can contact a company that provides television broadcasting services in your city and get advice from their specialists. In addition, you can take advantage of promotional offers from the service provider. Often, if you connect to their services, you can receive a receiver as a gift.
A receiver is essentially an adapter that allows you to receive and transmit a signal to your device. He can receive it through the following sources:
- Satellite dish;
- Antenna;
- Through the Internet;
- Using other sources.
Software settings
Often the reason is due to incorrect options that have gone wrong or been set by the user by mistake.
Main cases:
- Incorrect channel selected on TV . You need to switch by the type of cable connected (mostly DVB-T2), otherwise it will only find analogue channels or nothing at all.
- Old firmware . Outdated receiver software is no longer supported by the developer and performs incorrect searches at different frequencies.
In the settings you can always check for new software for digital TV and update it directly from the set-top box.
Attention! If a complete loss of all channels is detected, you should not rush with the software settings. The reason is probably due to the cases described below.
Receiver setup
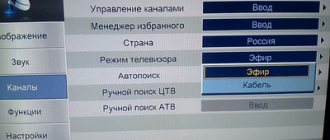
In order to set up digital channels on your TV, after connecting the set-top box to it, you will need to perform the following steps:
- On your remote control, press the Menu button.
- In the window that opens, go to the settings menu.
- You need to select Russia as the country if it is not the default.
- Now you need to select the signal standard. By default, DTV-T/DTV-T2 is installed, that is, analog and digital TV, respectively. If you leave it this way, the TV will search for both channels.
- You will be prompted to perform automatic or manual setup. Select Automatic and press the “OK” button on the remote control.
- Now you need to wait a while until all available free and pay TV channels are detected. When you complete your search, click “Save.”
This is one of the easiest ways to set up digital TV at home. If the TV finds few channels or does not find them at all, then you should use manual tuning.
To do this, you need to delete all the channels that were found for this. After the channels have been deleted, you should repeat the same steps as for automatic search, but instead of auto-tuning, select manual search. A window will appear in front of you in which you should set the frequency on which digital channels are broadcast in your city. You can find out this frequency on the Internet or by contacting your service provider. You may also need to change the search range for the search to begin.
Other reasons
Often the receiver does not find channels for external reasons that are not related to a hardware problem or settings.
Among the main cases:
- Scheduled work on the repeater (TV tower) . Each equipment requires maintenance and work is being done to improve performance over time. You can find out about this on the website rtrs.rf. As a result, in Moscow and other megacities, channels begin to show poorly (if it is far from another tower), and residents of small cities have no broadcast at all (since the repeater being repaired is the only one in the area).
- Climatic conditions may be involved in the lack of channels during the search . Strong wind or cloudy conditions lead to a decrease in signal strength. If the climate in the region is unfavorable, the problem can be solved by installing a more powerful antenna.
If one or more channels are missing
You may encounter a situation where the receiver finds almost all channels, or only one is missing.
This case is considered separately, because there are several reasons for this:
- Technical work on the provider's side . This is always reported on the official website. One operator can serve several television programs at once, and it is possible that channels disappeared from the air for this reason.
- Termination of broadcasting . If there is no specific channel, he has turned off digital broadcasting or changed the operating frequency. Detailed information about this can be found on the channel's website.
And the last option, when the set-top box finds only half - 10 channels .
This means that in the area of residence there is no broadcast of the second package , and the channels of the first multiplex (RTRS-1) are working.
Advice! It is not recommended to immediately look for a problem in the settings; it is better to contact the provider or get information about the performance of the channel and reception settings on the TV show website.
When the diplexer is connected
If both digital and satellite antennas are connected to the set-top box, you need to understand that they remain different devices. On the user side they work as a single device. But everyone has their own working conditions:
- Signal reception . The quality of the incoming signal and climatic conditions are important for the antenna, regardless of location, because... the ground station covers the entire area around the house. On the contrary, a satellite dish receives a very powerful signal with a frequency above 10 GHz and is received in any weather, but there should be no large obstacles (buildings) between the satellite and the dish.
- Broadcasting . Satellite and digital are different types of broadcasting. If there is a temporary shutdown or change of frequency on one channel, the broadcast continues on another.
If, when using diplex, the broadcast is carried out only on one of the signals (DVB or DVB-T2). Problems are observed exclusively with one of the receivers. When one channel is missing on both signals, repair work is underway.
Important! When using a diplexer, you first need to find out which device is incorrectly searching for channels. To do this, you need to connect each receiver separately and see the result.