How to connect a Denn set-top box to a TV to receive digital television
The TV broadcast connection is the same, regardless of the set-top box model (ddt 111, ddt 121, ddt 131, ddt 160). It consists of several stages:
- connecting to a TV and connecting a cable;
- search for TV channels, save detected broadcasts;
- additional settings and selection of display parameters.
Connecting the device
To connect a dvb-t2 set-top box, you just need to connect the antenna cable, power cord and cable for connecting to the TV to the device. When connecting an antenna cable, you should focus on the shape of the connector and plug, and when connecting a TV cable, on the color of the connectors, which indicate the correct location of the wires.
Initial settings
After turning on the receiver, the viewer has to choose:
- broadcast country;
- menu language;
- channel sorting mode (according to the decision of the broadcaster or the choice of the receiver owner).
Adjustment occurs using the remote control and switching arrows. This setting is necessary when you turn on the equipment for the first time or after resetting the settings to the basic level.
Basic Operations
Having set the starting operating parameters, the viewer is taken to the main menu, which consists of several items:
- settings – used to search for digital TV channels;
- channel manager for creating lists and distributing broadcasts;
- personal settings that allow you to connect subtitles, change the language and set up TV broadcasts;
- operating parameters;
- video;
- multimedia capabilities.
How to connect and set up digital TV on your Philips TV to receive channels
Program Manager
The channel manager allows:
- renaming TV channels according to the user's choice;
- creating lists and categories;
- blocking unnecessary broadcasts;
- air sorting.
To understand broadcast control, just follow the instructions on the TV screen.
Image Settings
To configure video, you need to open the AV section. It contains several points:
- Review: Denn DDT121 DVB-T2 set-top box for digital television - Inexpensive new product on the market. Needs improvement.
- digital sound (PCM);
- screen format;
- screen resolution;
- television format;
- adjusting the sound when using additional speakers.
The TV format requires special mention. This is what owners of old TVs need to change.
Search channels
Viewers don't have to worry about how to set up their Denn digital set-top box, as all they need to do to find channels is run an automatic scan. Fans of manual search need to know the reception frequency in advance. Different regions of the country use their own frequencies, so the necessary numbers will have to be clarified before scanning.
Setting the time
To set the correct time, you need to go to the “settings” section and select the appropriate item. After that, all that remains is to set the exact date and time and save the changes made. Other system parameters of the set-top box are also located here, including software updates and factory resets.
If you have any questions or complaints, please let us know
Setting options
A review of the digital terrestrial receiver would not be complete without mentioning that in the section with personal user parameters, viewers are able to:
- enable subtitles;
- activate the audio sequence.
But it is important to remember that the function will work if the TV program supports it. The set-top box cannot independently create audio and translate text.
System Settings
System settings have already been discussed above. Users are allowed:
- install software updates;
- perform a factory reset;
- set parental controls;
- select the time for the tuner to automatically turn off.
The full list is wider and contains additional functions for convenient control of equipment.
Necessary equipment
If theater begins with a hanger, then digital broadcasting begins with the purchase of equipment. What will the user need?
What is already there: standard set-top box equipment
The set-top box for DVB-T2 (the broadcasting standard used in European countries and Russia) usually includes the following:
- How to connect a D-color set-top box to a TV to receive digital TV
- The console itself. A digital tuner (receiver) that receives and converts a signal to transmit it to the ports of a TV receiver. Modern set-top boxes often have additional functions (recording to a flash card, delayed viewing, Wi-Fi support, etc.).
- Remote control. Almost all modern set-top boxes, starting from the middle price class, are equipped with IR remote controls.
- Power unit. It can be either internal, built into its body, or external. In the latter case, the kit includes an adapter that connects to an outlet and a connecting cable, from which power is supplied to the receiver.
Important: there are still old set-top boxes on sale that are designed for the DVB-T standard. They do not accept Russian multiplexes, so there is no point in purchasing them.
What else is needed: additional equipment
In addition to the set-top box itself, to connect you will need:
- Antenna. It is needed to receive a terrestrial or satellite signal. To watch digital TV from terrestrial repeaters, it is necessary to purchase a separate UHF antenna. It is not needed only in cases where “digital” is broadcast via cable broadcasting or if there is access to a community antenna with apartment wiring.
- Antenna cable and connecting plugs. Needed for . The rule usually applies: the higher the antenna is installed, the better the reception. But to connect it to the tuner you need a special coaxial cable. Since it is sold by the meter and cut to the length ordered by the buyer, you will need at least 2 more plugs to connect it to the antenna and TV receiver.
- RCA cable (bells). It transmits the signal from the set-top box directly to the input connectors of the TV. It usually has three plugs at the end: 1 for video and 2 for the right and left audio channels. This cable is used to connect the receiver to older TV models. The cable may be included with the set-top box, but sometimes it is missing. Then it will have to be purchased separately or replaced with the next type.
- HDMI cable. It is used for the same purposes as the bell, but is used in the latest models of receivers and television sets. Provides much better signal transmission, but cannot be used everywhere and therefore is usually not included in the kit.
How to connect a Denn digital set-top box to an old TV?
To connect the Denn set-top box to a TV with a cathode-ray tube, you need to buy an additional cable (with a connector suitable for the TV) and change the TV Format in the receiver settings. You will have to look for the exact connection option yourself, sequentially going through the available formats.
- How to connect and configure digital channels on the Oriel set-top box
How to flash Xiaomi Mi Box s/3/4 to global with Russian language
Possible problems and their solutions
Given the ease of control of the receiver, configuration difficulties are practically eliminated. But sometimes it turns out to be impossible to avoid troubles, such as a black screen. In such cases, it is necessary to understand the reasons for what happened and correct the situation. A service call is usually not required.
Denn box does not find channels
If the set-top box does not search for channels, you should:
- check the correctness and reliability of the cable fastening;
- correct antenna position;
- cable integrity.
When manually searching for TV channels, you need to make sure that the frequencies entered are correct.
Also, sometimes difficulties arise due to errors in the basic settings, for example, an incorrectly specified country.
Does not respond to the remote control or the button does not work
In case of difficulties with the remote control, you should:
- change batteries;
- make sure that there are no obstacles between the receiver and the remote control, and that the receiver itself is not blocked.
Typically, it is these problems that interfere with switching programs and controlling the set-top box.
No signal
In addition to the already mentioned reasons for problems, technical work of the broadcaster leads to the lack of a signal. To make sure that the problem is on the broadcaster’s side, you need to turn on another channel. If at least one works, then you need to wait for the completion of preventive work or re-search if you know for sure that the problem is not preventative.
Poor image quality
If the image is poor and the reception of digital channels is poor, it is recommended:
- How to connect digital channels on an orbit set-top box: setup instructions
- check the correct position of the antenna;
- change the video settings to the optimal ones for the TV you are using.
Also, sometimes the reason for a poor-quality image lies in the unreliable fastening of the antenna cable to the TV.
How to connect and configure a Denn digital set-top box? More and more people are giving preference to high-quality digital television, and for several years now the leading position in this rating in Russia has been occupied by the Denn company. If you have just purchased a tuner and do not yet know the features of its configuration, then this article is for you. In detailed and understandable instructions you will find answers to all questions about setting up channels yourself.
How to set up digital television
How to set up DVB-T2 on your TV? The setup process is suitable for almost all receiver models. The design of windows, the names of buttons and menu sections may vary, but the general algorithm is approximately the same for everyone.
Connecting a device that supports the DVB-T2 standard to digital television and setting it up is not at all difficult. To do this, just insert the cable into the appropriate connector and perform some simple manipulations to configure the channels. If you are using an outdated TV model that does not support receiving this type of signal, you will need to purchase a special set-top box.
The TV must have a special input for connecting an antenna, as well as a tulip-type connector and an input with a video output (scart). If your TV has an HDMI input instead of a SCART connector, then this is a better option.
If you can make a double connection – both via the “tulip” and via HDMI, you will be able to switch from one cable to another. It is best to watch via HDMI, because... In this case, a higher quality image is obtained.
How to connect a Denn set-top box to a TV to receive digital television
The process of establishing a connection takes several steps:
- physical debugging via cable;
- custom presets for starting work;
- installation and administration of specialized software;
- parameters of the broadcast picture;
- search for channels and save them;
- basic system settings for correct operation.
Connecting the device
Let's start with the main thing - connecting the device to Smart TV. By default, the HDMI connector is used for this, which is found on almost all models of modern technology. But if it is not on TV, it is possible to purchase regular “tulips” with an adapter. The general scheme is simple - you connect the set-top box to the TV using a cable, and the antenna itself goes into the corresponding Denn sockets. The marker of a successful signal is a corresponding notification on the TV screen. To do this, select HDMI as the source.
Digital television freezes with and without a set-top box: reasons, how to fix it?
Initial settings
After this debugging, point the remote control at the screen, and select the “AV” section. In the settings section you will need to configure the following parameters:
- automatic search;
- manual mode;
- filter for adding channels and radio stations;
- region of registration (indicate your country of residence);
- LCN.
- activation of power from the antenna.
In the channel section there is a complete list and its manager (adding, deleting, renaming, moving, etc.). There are also personal settings - adjusting the appearance of subtitles, the main menu, and adjusting the sound. Here it is also possible to regulate the purpose of the wire outlets. You can adjust all these parameters to suit yourself or leave them at “default”.
Features of initial settings:
- if it doesn’t matter to you in what order the channels are saved into memory, then run auto search without special commands;
- auto search finds frequencies with high signal strength, identifies them and saves them (this applies to all frequency zones that exist in the region of operation);
- if the order of display and saving is important to you, select manual search;
- when using manual settings, you are asked to set the numbering, frequency band, frequency, BIIP.
Basic Operations
When you have specified some basic parameters, the main menu appears on the TV screen. Its main operations are as follows:
- narrow settings for searching for digital broadcast channels;
- file manager - distribution into folders, renaming, deleting, moving;
- personal presets - subtitles, interface language;
- multimedia performance and video playback.
Program Manager
A tool such as a file manager allows owners to perform the following actions:
- change channel name;
- create thematic blocks and folders - films, news, children's, national, sports, music, and so on;
- block and encode third-party broadcast streams;
- sort the air.
Image Settings
Picture quality is one of the most important parameters for the viewer. The perception of information and comfort depend on this. Therefore, in the Denn digital cinema it is possible to adjust the following indicators:
If you have any questions or complaints, please let us know
- RSM - digital sound stream;
- screen format and resolution;
- TV format;
- additional speakers, equalizer, volume.
How to connect and configure an Oriel digital set-top box to receive channels: instructions
Search channels
Initially, the console is sold without special settings. When you bring it home, connect it to the antenna and Smart TV, you will be able to watch shows and your favorite movies. But before that you will have to perform one simple step - run an automatic scan. The system will look through the list of active frequencies and save those that are received in your region. Different areas have their own frequencies, but the guidelines for starting a search are approximately the same everywhere:
- open the installation;
- select auto search;
- confirm;
- wait for the process to complete;
- click “Save”.
We emphasize that interrupting the scanning process is prohibited.
Setting the time
Time and date are indicators on which synchronization with the network depends. If they do not match the network settings, many actions will be limited. To prevent the cinema from malfunctioning, set the current time data in the main settings.
Setting options
The digital receiver has several interesting user features - displaying subtitles and active audio. You can enable or disable these parameters in the main menu using the remote control.
System Settings
Basic system presets allow the owner to:
- update and change the software package;
- reset the device to factory settings;
- enable or disable parental controls;
- indicate automatic shutdown hours.
The Russian company has been supplying various electronic products under the DENN . In recent years, the range has expanded to include set-top boxes for receiving free digital terrestrial television of the DVB-T2 standard.
And immediately from set-top boxes equipped with learning remote control. Only a few models on the Russian market have something like this, which can be counted on the fingers of one hand - in comparison with more than 500 conventional models.
Let's start with the DENN DDT103 console. Comes in a small colorful box:
with the icon - 2 year warranty.
On the reverse side are the technical specifications:
On the side the functionality is indicated in the form of visual icons:
There is also a QR code:
Having photographed it, we will receive a link to the site.
And of course, all the more than comprehensive information about the manufacturer and contact details:
Contents: the console itself, a kit for assembling the support, a learning remote control, batteries, a power supply, audio-video cords 90 cm long and an instruction manual:
The small black plastic case has ventilation holes on top:
The bottom is sloping, without legs:
Although, of course, “lid” and “bottom” are in this case conventional concepts, because The attachment is designed primarily for vertical placement.
There is a USB connector on the front panel:
The inscriptions are made specifically for vertical placement:
There are also ventilation holes on one side (future top):
On the other side (future bottom) there are two self-tapping screws that block the lid (opening will void the warranty):
as well as holes for mounting the support:
consisting of an intermediate plastic spacer and two self-tapping screws.
The measured weight of the attachment itself is only 105 g, and the support is 40 g. Total assembled: 145 g.
Using a Phillips screwdriver, tighten the screws - the attachment becomes vertical:
The resulting structure has dimensions of 125 x 92 x 40 mm.
The antenna connector will be located at the bottom:
But of course, nothing will prevent you from putting the console on its side if necessary:
All the necessary connectors are located at the back:
Everything is simple here, the minimum required set is presented:
ANT-IN - antenna input and outputs for ordinary “tulips”: white AUDIO L - left audio channel, red AUDIO R - right channel, yellow VIDEO OUT - video and of course HDMI OUT . DC IN 5V 2A - input for the power supply.
Power supply standard +5V 2A, wire length 1.2 m, standard plug 5.5 x 2.1:
If necessary, it can be disassembled (with loss of warranty): the self-tapping screw is hidden under the double square icon.
And of course the main highlight is the learning remote control:
Its length is 185 mm and width is 47 mm. For a visual comparison of dimensions, dimensions with a similar remote control:
The remote control has a convenient shape:
In front of the remote control there is a block of buttons for controlling the TV - TV CONTROL:
All these 4 buttons: white POWER, TV/AV, VOL- and VOL+ can be programmed as you like, and not necessarily in the way they are signed.
The white POWER button is white for a reason, it is also an indicator of the remote control operation - when you press any buttons, it flashes red:
Although the colored buttons are not labeled, later, after pressing them, I found out that by default they have the following functions:
red - quick access to the menu for viewing PVR recordings (video recorder) green - Resolution (usually signed V-FORMAT) yellow - Image format (ASPECT) blue - Scheduler
those. if, for example, you need to quickly change the video mode without going into the menu, press the green button and the video resolution will change sequentially in a circle (for example, in PAL mode):
576i > 576p > 720p > 1080i > 1080P(50HZ)
The buttons are made of pleasant dense rubber, the clicks are clear. The signal bounces off the walls.
A learning remote control is convenient because you don’t have to use two remote controls—one for the TV and one for the set-top box. Only 1 remote control is used - from the set-top box: we turn on the TV with it and select the desired video input, and then turn on the set-top box. And all this with one remote control.
In addition, the TV remote control is often already in such a deplorable state that it barely works, the inscriptions have long been erased, the buttons have been chewed, and the new learning remote control of the set-top box will allow the old remote control to finally rest, being in reserve.
And of course, let's take a look inside:
on the board there is a technological inscription ABL7T01_T2_R836_DC1108X.A1 PCB.V1.0. And on the reverse side:
Technical details : UHF on BFG540W/XR, Rafael Micro R836 tuner, MStar MSD7T01 combined processor, 25Q32CSIG flash memory (4MB), 24 MHz quartz, DC-DC converters S15BKE and S10BLK, linear stabilizer AMS1117 T18. The radiator has standard dimensions of 14 x 14 x 10 mm, processor temperature +47°C, tuner temperature +45°C.
As you can see, with the MSD7T01 combined processor there are very few parts on the board, and even there are only 3 electrolytic capacitors: 220x10, 100x16 and 100x10, which will allow you to replace them with new ones after the end of the 2-year warranty if necessary. External power supply and 3 capacitors. Those. Looking several years ahead, this model has high maintainability.
The measured current consumption at +5V is about 580 mA (with power supply when an active antenna is connected). Those. Power consumption is only about 3 W.
Before connecting, I’ll note the standard but important Operating Rules on page 1:
4. Do not block ventilation openings. 5. Do not install near heat sources.
8. Unplug the device during thunderstorms or when not in use for an extended period of time.
WARNING : To reduce the risk of fire or electric shock, do not expose this apparatus to rain or moisture.
We connect the set-top box as described in the Manual. “Tulips” by color - to the set-top box and to the TV, the antenna - to the antenna socket of the set-top box. We plug the plug into the socket.
And on the TV remote control, press the TV/AV or SOURCE button, selecting the appropriate input.
In general, connecting any set-top boxes to a TV is no different from connecting a VCR or DVD player.
The indicator on the front first lights up red, then green. Loads in about 13 seconds.
On the screen, the choice in the start menu is immediately on the Search line, so we just click and wait:
FTA Channels - Searches for open channels only. This will be especially appreciated by residents of Belarus, where commercial multiplexes 2 and 3 are closed, but package 2 still has one open channel, “Belarus 5.”
I note that if you have an active antenna (but without its own power supply), designed for power from the antenna input of the set-top box, then nothing will be found.
You will need to go to the menu and in the Search for channels , turn on the item Antenna amplifier power - On and then select the Auto search :
But it happens that it still doesn’t find anything, or it finds, but not all channels, or everything, but shows “with squares”, in such cases (and not only) it is always better to use Auto Search, and Manual Search , selecting frequency channel of your tower, indicated at:
and looking at the % of the Quality , slowly rotate the antenna, achieving the maximum.
If the Quality jumps, then, as a rule, this means a weak signal. You need to twist the antenna or raise it higher. But sometimes it happens that it jumps due to overload - the signal is too strong. Usually, when the tower is nearby, and an active antenna (with an amplifier) is used. It is better to use a passive antenna (without an amplifier) near the tower.
During viewing, you can quickly monitor the Quality scale by pressing the INFO :
and, if necessary, adjust the antenna to the maximum of the Quality scale.
So, the channels have been found, by pressing the big OK/LIST button you can see their list and select:
As you can see, the default menu is in a pleasant translucent mode, allowing you to continue to follow the broadcast:
and if necessary, the degree of transparency can be changed.
the EPG button , you can view the program schedule for the week ahead:
Here you can immediately select programs for their subsequent automatic recording to a flash drive by pressing the OK or INFO :
Operate the Teletext function by pressing the TTX :
For the hearing impaired, some state channels have the ability to turn on subtitles (also via TTX):
Subtitling volumes will increase over time.
A short video that allows you to evaluate the speed of channel switching and the operation of the PVR (“video recorder”) function:
The firmware on the console was already the latest version, there was no need to update:
You should not try to flash DDT103 with firmware from DDT105, trying to get AC-3 audio support:
As with all other set-top boxes, Dolby Digital support is determined by a modification of the processor.
But I note that if you connect the set-top box using HDMI and the TV itself supports Dolby Digital , then change the Digital sound to RAW :
Dolby Digital sound can be decoded by the TV itself.
And let's move on to considering the older model DENN DDT105.
There is a noticeable difference everywhere - the presence of the inscription Dolby Digital AC3 Audio Codec :
and on the side:
This means that the media player can reproduce Dolby Digital (AC3) sound, which is quite common in movies downloaded from the Internet.
The package is also slightly different:
Here is a thick HDMI cable High Speed HDMI™ Cable 1.2 m long with a diameter of 5.5 mm:
Connecting via HDMI is relevant primarily for TVs with a diagonal larger than 32″, although you can notice the difference on smaller diagonals.
The instruction manual for DDT105 is also separate:
because in the Technical Specifications contains mention of support for the Dolby Digital (AC3) codec:
Externally there are no other differences:
Let's take a look inside:
Technological inscription: ABL7T01-T2-R836-DC1108X A1. Well, on the reverse side:
As you can see, everything is the same and there are no special chips on the board to support AC3 audio, because all this is determined only by modification of the processor.
From purely technical details, unification has occurred: the DC-DC converter here is the same S10BAA and all 3 electrolytic capacitors have the same capacity 220x10, which further simplifies possible repairs in the future, i.e. increases the maintainability of the product.
There is also no need to update the firmware, it is already the latest:
When operating any set-top boxes, do not forget about the following precautions :
2. Device installation
Do not install the device in the following locations:
— In places exposed to sunlight and near heating radiators. — In places with high temperatures (above 35 C) and high humidity (above 90%). — In dusty places (dust inside the device may cause damage).
3. When the device is not in use
When the device is not in use, turn it off. If the device is not used for a long time, disconnect it from the power source.
The last point is especially relevant in spring and summer, when thunderstorms occur frequently and unexpectedly. Therefore, when leaving home or at night, it is better to unplug the set-top box, TV and antenna power supply from the outlet.
A small fragment of the Dolby Digital support test:
By connecting with the console, you can see the download log and compare DDT103 and DDT105 with each other.
As you can see, the only differences are in the processor’s support for the Dolby Digital license :
DDT103
===== Check Audio Decoder Protection from hash-key IP ===== Hash Key Check DD Fail, no DD license!! Hash Key Check DDP Fail, no DD+ license!!
DDT105
===== Check Audio Decoder Protection from hash-key IP ===== Hash-key Support DD. Hash-key Support DD+.
For those who would like to use an old VGA monitor as a TV, you can order one of the converter models on AliExpress (from 200 rubles). There are both with sound output (20-30 rubles more expensive) and without output, i.e. You can simply use the sound outputs of the set-top box itself.
For example, :
This converter model supports all video modes except 1080i (50/60 Hz).
Before connecting to the monitor, it is advisable to first select the NTSC mode (i.e. 60 Hz) in the set-top box menu:
We connect the monitor and the plug from the computer speakers:
and if there is no image, use the green button on the remote control to scroll through the appropriate resolution:
480i > 480p > 720p > 1080i > 1080P(60HZ)
For example, 480p is a standard VGA 640x480 mode.
This way you can connect even the oldest VGA monitors, released 25 years ago.
Of course, if the monitor has a DVI input, then a regular adapter or HDMI = DVI cable is sufficient. And if there is an HDMI input, there are no questions at all.
Well, in conclusion, let me remind you that stable reception of digital broadcasting is determined by the choice of a normal antenna and its correct location.
Because Both models are similar, let's summarize:
Positive: a learning remote control with operation indication, if desired, the set-top box can be positioned not only vertically, but also horizontally, a minimum of parts, thanks to the combined processor, an external power supply, the DDT105 has Dolby Digital support and a thick HDMI cable included, and of course 2 years guarantees. Negative: the font in the instruction manual is very small, you need a screwdriver to screw the support.
In general, the DDT105 has excellent externally simple set-top boxes, but with a learning remote control and even a thick HDMI cable included.
3.8/5 — (40 votes)
You can ask questions about digital television on the DVBpro forum
Author: Alexander Vorobyov, July 02, 2021 | Permanent link to the page:
Possible problems and their solutions
If this is your first time debugging a digital set-top box on your own, be prepared for minor difficulties. We will also help you solve them. Please read this manual carefully before setting up your Denn digital set-top box.
What does error code 1 mean in Okko TV: reasons, what to do?
Denn box does not find channels
If your set-top box does not find channels, check that the antenna is connected correctly and the cable is intact. Also make sure that the set date and time are correct.
Does not respond to the remote control or the button does not work
Change the batteries and check the functionality of the infrared port.
No signal
The absence of a signal indicates a technical problem on the part of the broadcaster. If at least one is working, then wait until the system work is completed. If none of them work, delete them all and run the scan again.
Poor image quality
If the picture resolution does not suit you, you can always adjust it in the main menu. If the picture is distorted by interference, then turn the antenna in the other direction.
We constantly receive questions regarding the settings of digital set-top boxes. This is how it turns out, but most of the errors come from Denn DDT model devices. Of course, these set-top boxes can show digital channels. However, their setup is somewhat different from the others, and because of this, users have a lot of questions.
Today we will try to give detailed instructions for installing and configuring these set-top boxes. We will also provide information on solving the most popular equipment errors.
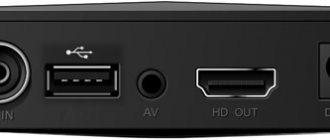
Connectors and their purpose
There are various connectors on the back of the device; we’ll briefly explain what they are for.
Figure 3. Connectors of the SDT-96 receiver from the SUPRA range
Explanation of the picture:
- Antenna output.
- Connector for connecting a satellite dish, UHF antenna or cable from a local provider.
- A socket for an HDMI cable allows you to connect a monitor or TV equipped with such an input (digital output can transmit sound and image).
- Sockets for the “Tulip” cable (transmits an analog video signal, as well as stereo sound).
Some devices may be additionally equipped with a “SCART” connector; a TV, VCR or DVD player with a video recording function can be connected to it.
In addition, you may find devices that have D-SUB (Fig. 5) or DVI outputs instead of an HDMI jack.
Fig 5. Digital set-top box with standard VGA (D-SUB) output
Please note that such interfaces do not transmit sound, so an additional connection using “tulips” will be required to transmit it.
Connecting the Denn DDT set-top box
Digital set-top box denn ddt 111
Currently, the price of the set-top box models denn ddt 111, 121, 131 varies around 1000 rubles. According to reviews, the device is quite reliable and performs its functions. Playback of digital channels on it occurs without delays or interference. For other points, the console contains:
- Possibility to work with 2 multiplexes DVB-T and DVB-T2.
- Play additional audio and video formats via USB.
- Additional “Mini Jack” connector for connecting speakers.
It is worth noting that viewing and connecting to digital channels here is done via the available HDMI input. Therefore, it is advisable to make sure in advance that your TV is equipped with this connector.
Otherwise, you can purchase an adapter for RSA cables (tulips). It costs around 200 rubles.
The adapter will not suit all TVs.
Note that in practice, the operation of such an adapter is not always adequate for one or another TV. On most models the picture will be perfect, but some TVs do not convert the format correctly and display everything in black and white.
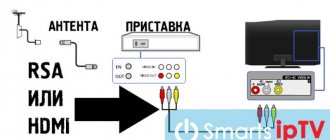
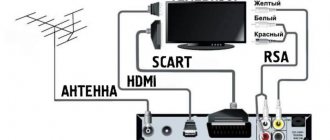
The general connection diagram will be standard and no different from any other
RSA (tulips) with an adapter or HDMI cable can be used as the main ones
Checking the signal quality
To make sure that you did everything correctly and everything is working well, you should check the quality of signal reception. This is not difficult to do. The receiver must have a button called INFO. By clicking on it three times, a window will appear on the screen with information about signal quality, channel number, frequency and encoding. If the two existing indicators are above 60%, then everything is fine and the signal level is quite acceptable.
Perhaps in your model of TV set-top box this button will be called something else. To find out what this button is called for you, look at the instructions and read the purpose of the buttons.
If your TV receives several multiplexes, be sure to check the signal quality on each of them. This is due to the fact that each of them is transmitted and received using different transmitters, so it is quite possible that the signal will be good in one multiplex, but not in the second.
The DENN DDT100 free audio/video signal receiver, from the Chinese manufacturer VVK, guarantees, without large investments, stable viewing of digital channels of the DVB-T2, DVB-T standard with decoding in MPEG2, MPEG4 formats. When a signal is supplied from the HDMI interface to a digital TV, the image resolution can reach 1920x1080 p. Reception/transmission of programs is carried out in the frequency range 177.5 – 865 MHz. The joint work of a modern processor and a sensitive tuner of the device can improve the quality of a “noisy” signal.
The presence of a USB 2.0 interface in the circuit allows you to expand the capabilities of the device. After connecting external media via the above port to the set-top box, the user has access to new functions:
- Changing playback modes of recorded files, entering a “pause” when viewing, fast rewinding the recording content in different directions (Time Shift).
- Replacing basic installation files with new software.
- Playback of media file formats determined by the technical capabilities of the device (Player).
- Programming is required to record the number of channels and time periods using a timer recording (PVR).
When the “Player” option is activated, the set-top box is capable of producing audio/video file formats: AVI, MKV, MPEG, AAC, MP3, OGG, MP3, AAC, WMA, OGG, FLAC, JPEG, BMP, PNG. For hearing-impaired viewers, it is possible to accompany the video screening with subtitles and teletext. For ease of use, a Russified menu is attached. The Electronic Program Guide (EPG) allows you to prioritize your TV listings for the upcoming week.
DENN DDT100 receiver, remote control with two AAA batteries, RCA 3x3 composite cable, instructions and warranty card are included in the package purchased by the buyer. The exterior of the case, made of budget black plastic, has a standard, inconspicuous design. The compact dimensions of the device made it possible to place on the front panel only a USB port, an IR signal receiver from the remote control, and an LED indicator indicating the status of the receiver modes. The rear panel communication sockets are represented by an antenna input (RF IN), an HDMI interface, RCA audio/video composite output connectors, and a voltage power cable entry point.
Features of DENN DDT100
- The ability of the tuner to receive and store up to 999 channels.
- Supports the function of changing the aspect ratio of the picture: 4:3, 16:9.
- Dimensions: 112 x 100 x 30 mm.
The ability to use an adapter (HDMI-VGA) to supply a signal to a CRT monitor, good image quality, and a convenient menu algorithm are among the competitive advantages of the set-top box. I didn’t like the problematic operation of the software of some models, the need to use an expensive antenna to maintain signal sensitivity, and the lack of an RF output for a high-frequency signal.
The state program for a phased transition to the digital television broadcasting standard DVB T2 is approaching the final stage - a gradual reduction in the number of analogue repeaters. This suggests that the time has come to join new technologies and switch to digital. We will talk about the equipment necessary to receive a television signal in the new format, as well as how to properly connect a digital set-top box (receiver) to a TV or monitor.
Searching for channels on the Denn set-top box
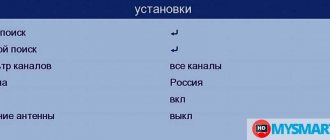
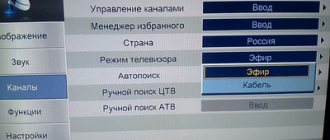
We figured out the correct connection. All that remains is to understand the principle by which the search for digital channels occurs. The menu of the Denn set-top box is somewhat different, so here we will show you everything in screenshots.
After you have turned on the set-top box, you will need to press the AV button on the TV. If it is not there, then you should switch to audio-video mode. If everything was done correctly earlier, the console menu should open. It will have several sections:
- Auto search settings.
- Manual mode.
- Filter.
- A country.
- LCN.
- Antenna power on/off.
- Manager.
- Menu.
We need a settings menu. To configure the channels of both multiplexes, you must do the following:
- If you do not care about the order of channels or do not have the proper experience in searching for them, then you can entrust this process to the set-top box itself and click “Auto search”. The device will independently go through all frequency zones and find those TV channels that have a strong signal strength. The channel list will be saved automatically.
- If the order is important, you can use a manual search. To do this, you need to go through a number of steps yourself. Find out the best reception frequency in your region using the CETV map.
- Specify the channel number when setting up manual search.
- Wait a few seconds and make sure that this channel gives the strongest signal.
- Click OK and wait until the set-top box finds the packages you are interested in.
Important! When entering the installation menu, turn on the antenna power switch. This way you use a signal amplifier when searching
Possible problems
No one is immune from them, and depending on a number of factors, such as the TV model, some problems may arise, which we will try to solve below.
- The image of digital channels is very distorted / They do not show . You need to check the digital reception in your region.
- Reset the set-top box to factory settings. To do this, go to the “General Settings” section and select “Factory Settings”. Enter the password “0000”. After this, perform an auto-search for channels.
- If you have an indoor antenna, you should replace it with an outdoor one with a good signal amplifier.
- Check the connection plug. If these are RSA (tulips), then they need to be connected according to the corresponding colors.
- The latest version of the software for your set-top box model should be stored on the drive. After this, you need to go to the settings menu and select “Update via USB”.
This is how the Denn prefix is configured. According to reviews, it is quite reliable, however, as you probably noticed, it has a number of features, which we talked about today. If you have any other problems with the device, please contact us in the comments.
- Operating Instructions
- TV accessories
- DENN
- DAA235
Device type: TV Accessories Manufacturer: DENN Model name: DAA235
Languages: DENN DAA235 instruction manual
(2 pages)
- Languages: Russian
- Type: PDF
- Size: 2.73 MB
- Description: Antenna
Preview
On NoDevice you can download the operating instructions for DENN DAA235. The user manual is necessary to familiarize yourself with the installation and operation rules of DENN DAA235. Instructions for use will help you properly configure DENN DAA235, correct errors and identify problems.
Digital terrestrial television channels of the DVB-T2 standard
If you bought a TV, antenna and set-top box just now, then when you open the welcome window, you need to click on the “Menu” button on the control panel. Next: “DVB-T setup” -> “Channel search” -> “Search mode”. Here you can both find the channels themselves and set the frequency.
To simplify the search process, you can first go to a special website with information to find out what frequencies the channels are broadcast on in your city.
If the antenna is directed correctly, then after a few seconds the “Signal Strength” and “Signal Quality” scales will be filled. If the level is good, then you need to click on “Search”, and the device will perform the adjustment itself.
If you do not know the correct direction of the antenna, you can rotate it very slowly and smoothly. In this case, you need to carefully look at the scales of intensity and quality. Once these scales are full, secure the antenna in this position and perform a search.
- How to connect and configure digital channels on a Denn set-top box
This is one of the easiest ways to set up a digital TV yourself. If automatic tuning turned out to be ineffective - the set-top box found few channels (or even did not find them at all), then you need to use manual tuning.
To do this, you need to delete all those channels that were found earlier. After that, select the manual search mode in the same way. A window will appear on the screen. In it you need to set the frequency on which all channels in your city are broadcast. You can find out the frequency on the Internet or from your service provider.
After the channels of the first multiplex have been found, you will need to find out the frequency for the second multiplex and start the manual search again. You can find many channels this way.
Checking the signal quality
To make sure that everything is done correctly, you need to find the “INFO” button on the receiver. (In some models, this button has a different name. To determine which button is intended for checking the signal quality, you need to look at the instructions.) This button must be pressed 3 times, as a result of which a window should appear on the screen with information about the signal quality, number channel, frequency and encoding. If the first two parameters are greater than 60%, this means that the signal level is acceptable.
If the signal is of poor quality (constantly changes its level) and shows 30% of the full signal, then the image quality will be very poor. In such cases, it is necessary to either raise the antenna higher, or install it in another place, or simply strengthen the signal.
If the TV can receive several multiplexes, you need to check the signal quality on each of them, because they work with different transmitters. It may well be that the signal will be good in one multiplex, but not in another.
As a legacy from analogue times, users have inherited a lot of television receivers that do not have a built-in tuner and cannot receive “digital” directly. They require additional equipment - a digital set-top box. Let's figure out how it connects to the TV.
How to connect a Denn set-top box to a TV to receive digital television
The TV broadcast connection is the same, regardless of the set-top box model (ddt 111, ddt 121, ddt 131, ddt 160). It consists of several stages:
- connecting to a TV and connecting a cable;
- search for TV channels, save detected broadcasts;
- additional settings and selection of display parameters.
Connecting the device
To connect a dvb-t2 set-top box, you just need to connect the antenna cable, power cord and cable for connecting to the TV to the device. When connecting an antenna cable, you should focus on the shape of the connector and plug, and when connecting a TV cable, on the color of the connectors, which indicate the correct location of the wires.
Initial settings
After turning on the receiver, the viewer has to choose:
- broadcast country;
- menu language;
- channel sorting mode (according to the decision of the broadcaster or the choice of the receiver owner).
Adjustment occurs using the remote control and switching arrows. This setting is necessary when you turn on the equipment for the first time or after resetting the settings to the basic level.
Basic Operations
Having set the starting operating parameters, the viewer is taken to the main menu, which consists of several items:
- settings – used to search for digital TV channels;
- channel manager for creating lists and distributing broadcasts;
- personal settings that allow you to connect subtitles, change the language and set up TV broadcasts;
- operating parameters;
- video;
- multimedia capabilities.
Program Manager
The channel manager allows:
- renaming TV channels according to the user's choice;
- creating lists and categories;
- blocking unnecessary broadcasts;
- air sorting.
To understand broadcast control, just follow the instructions on the TV screen.
Image Settings
To configure video, you need to open the AV section. It contains several points:
- digital sound (PCM);
- screen format;
- screen resolution;
- television format;
- adjusting the sound when using additional speakers.
The TV format requires special mention. This is what owners of old TVs need to change.
Search channels
Viewers don't have to worry about how to set up their Denn digital set-top box, as all they need to do to find channels is run an automatic scan. Fans of manual search need to know the reception frequency in advance. Different regions of the country use their own frequencies, so the necessary numbers will have to be clarified before scanning.
Setting the time
To set the correct time, you need to go to the “settings” section and select the appropriate item. After that, all that remains is to set the exact date and time and save the changes made. Other system parameters of the set-top box are also located here, including software updates and factory resets.
If you have any questions or complaints, please let us know
Setting options
A review of the digital terrestrial receiver would not be complete without mentioning that in the section with personal user parameters, viewers are able to:
- enable subtitles;
- activate the audio sequence.
But it is important to remember that the function will work if the TV program supports it. The set-top box cannot independently create audio and translate text.
System Settings
System settings have already been discussed above. Users are allowed:
- install software updates;
- perform a factory reset;
- set parental controls;
- select the time for the tuner to automatically turn off.
The full list is wider and contains additional functions for convenient control of equipment.
The process of connecting a digital set-top box to a new TV step by step
Important! All manipulations must be done with the equipment turned off. If you connect working equipment, there is a high probability of its failure.
Let us describe the order of our actions:
- You need to select the interface for connecting the set-top box to the TV. It can be analog (tulips, D-SUB, SCART) or digital (HDMI, DVI). The choice is made depending on the specific TV model. Despite the fact that many FULL HD television receivers have an analog input, it is better to feed them “digital”, since double conversion of the signal will negatively affect the quality of the “picture”.
This interface allows you to transmit video and audio, so the connection can be made with one cable.
If the TV does not have a digital input, it can be connected using any analog interface; the easiest way to do this is using tulips. In the case where the device only has a bulky SCART connector, you can purchase a tulip adapter for it. In this way you can connect almost any model, except for very ancient ones.
- We check the availability of the cable necessary for connection; it may come with the receiver or television set. If you cannot find one, you will need to purchase it.
- We remove the protective film from the set-top box (if any), install it in the chosen place and connect it to the TV. The cables are made in such a way that it is physically impossible to insert them into a connector not intended for this purpose. The exception is tulips, they can be mixed up. But to prevent this, manufacturers make nests for them in the appropriate color.
As you can see, the colors of the connectors match the colors of the sockets (4 in Fig. 3).
- Connect power to the console. If the network adapter is built-in, simply plug the plug into the socket; pre-connect the remote power supply to the corresponding socket of the receiver.
- We connect the provider’s cable, a decimeter antenna or a satellite dish to the antenna input (2 Fig. 3).
- We insert the batteries into the remote control, turn on the set-top box and the TV.
This completes the connection procedure, and you can begin setting up channels. If your TV does not have the interfaces listed above, do not worry, we will tell you how to get out of this situation.
Possible problems and their solutions
Given the ease of control of the receiver, configuration difficulties are practically eliminated. But sometimes it turns out to be impossible to avoid troubles, such as a black screen. In such cases, it is necessary to understand the reasons for what happened and correct the situation. A service call is usually not required.
Denn box does not find channels
If the set-top box does not search for channels, you should:
- check the correctness and reliability of the cable fastening;
- correct antenna position;
- cable integrity.
Also, sometimes difficulties arise due to errors in the basic settings, for example, an incorrectly specified country.
Does not respond to the remote control or the button does not work
In case of difficulties with the remote control, you should:
- change batteries;
- make sure that there are no obstacles between the receiver and the remote control, and that the receiver itself is not blocked.
Typically, it is these problems that interfere with switching programs and controlling the set-top box.
No signal
In addition to the already mentioned reasons for problems, technical work of the broadcaster leads to the lack of a signal. To make sure that the problem is on the broadcaster’s side, you need to turn on another channel. If at least one works, then you need to wait for the completion of preventive work or re-search if you know for sure that the problem is not preventative.
Poor image quality
If the image is poor and the reception of digital channels is poor, it is recommended:
- check the correct position of the antenna;
- change the video settings to the optimal ones for the TV you are using.
Also, sometimes the reason for a poor-quality image lies in the unreliable fastening of the antenna cable to the TV.
Laura Kalibekova (Articles written: 40)
Hello, our Denn console has a broken remote control. I can’t find the code through the universal remote control. To change channels. The indicator on the remote control works. But no changes
Hello, try holding down the power and mute buttons and enter code 128.
How can you make sure that the set-top box is working? Does she have some kind of indicator?
Hello, the console lights up green.
Hello, I can’t set up the channels, I do everything as stated in the menu and they are not found through auto search
Source
How to connect a Denn set-top box to a TV to receive digital television
The process of establishing a connection takes several steps:
- physical debugging via cable;
- custom presets for starting work;
- installation and administration of specialized software;
- parameters of the broadcast picture;
- search for channels and save them;
- basic system settings for correct operation.
Connecting the device
Let's start with the main thing - connecting the device to Smart TV. By default, the HDMI connector is used for this, which is found on almost all models of modern technology. But if it is not on TV, it is possible to purchase regular “tulips” with an adapter. The general scheme is simple - you connect the set-top box to the TV using a cable, and the antenna itself goes into the corresponding Denn sockets. The marker of a successful signal is a corresponding notification on the TV screen. To do this, select HDMI as the source.
How to set up digital television
How to set up DVB-T2 on your TV? The setup process is suitable for almost all receiver models. The design of windows, the names of buttons and menu sections may vary, but the general algorithm is approximately the same for everyone.
Connecting a device that supports the DVB-T2 standard to digital television and setting it up is not at all difficult. To do this, just insert the cable into the appropriate connector and perform some simple manipulations to configure the channels. If you are using an outdated TV model that does not support receiving this type of signal, you will need to purchase a special set-top box.
The TV must have a special input for connecting an antenna, as well as a tulip-type connector and an input with a video output (scart). If your TV has an HDMI input instead of a SCART connector, then this is a better option.
If you can make a double connection – both via the “tulip” and via HDMI, you will be able to switch from one cable to another. It is best to watch via HDMI, because... In this case, a higher quality image is obtained.
The distance to the transmitting station (tower) matters. Most often, to effectively tune a TV, it is recommended to install an outdoor antenna with an amplifier, and in city houses on the 4th-5th floor you can use an antenna with a “mustache” or in the form of a frame without an amplifier, but with the “signal amplification” option on the TV set-top box.
A receiver is a device designed to receive a signal and transmit it to a TV. The signal source can be a satellite dish, antenna, or the Internet. Connecting a digital set-top box to a TV can be done either directly or via DVD or via a monitor. But in this case you may need a special adapter.
How to connect to a TV and set up a receiver (digital receiver)
- Remove the device from the box and remove the protective film. The film must be removed, otherwise the device will constantly overheat.
- Cut off the protective sheath from the TB cable approximately 1.5 cm long from the end (both ends). Stripping the sheath must be done very carefully so as not to damage the shielding film that protects the central conductor.
- Carefully peel back the shiny protective film and screw the “F” connectors to the wires.
- Connect the cable to the TV and set-top box.
- Insert a bunch of “tulip” wires into the connectors of the TV and set-top box.
- Connect the antenna to the TV. The antenna must be installed on an external wall of the house or on a balcony. After this, you need to move on to the actual setup.
Instructions for connecting the Denn DDT 111 digital set-top box
We constantly receive questions regarding the settings of digital set-top boxes. This is how it turns out, but most of the errors come from Denn DDT model devices. Of course, these set-top boxes can show digital channels. However, their setup is somewhat different from the others, and because of this, users have a lot of questions.
Today we will try to give detailed instructions for installing and configuring these set-top boxes. We will also provide information on solving the most popular equipment errors.
Connecting the Denn DDT set-top box
Currently, the price for denn ddt 111, 121, 131 set-top boxes varies around 1000 rubles. According to reviews, the device is quite reliable and performs its functions. Playback of digital channels on it occurs without delays or interference. For other points, the console contains:
- Possibility to work with 2 multiplexes DVB-T and DVB-T2.
- Play additional audio and video formats via USB.
- Additional “Mini Jack” connector for connecting speakers.
It is worth noting that viewing and connecting to digital channels here is done via the available HDMI input. Therefore, it is advisable to make sure in advance that your TV is equipped with this connector.
Otherwise, you can purchase an adapter for RSA cables (tulips). It costs around 200 rubles.
Note that in practice, the operation of such an adapter is not always adequate for one or another TV. On most models the picture will be perfect, but some TVs do not convert the format correctly and display everything in black and white.
What is needed for this
To connect digital TV you will need:
- TV;
- Set-top box (receiver);
- Antenna.
Your TV should have an input into which you can insert an antenna, a tulip-type connector, and an input with video output (scart). If you have an HDMI input along with the scart connector, then don’t worry. It is also suitable for connecting a receiver. It's just that your model is newer.
Before buying a receiver, you should figure out which one is better and find out what parameters you should pay attention to in order to choose the most optimal model. If you don’t understand much about technology, and don’t want to spend your free time studying all these nuances, then you can contact a company that provides television broadcasting services in your city and get advice from their specialists. In addition, you can take advantage of promotional offers from the service provider. Often, if you connect to their services, you can receive a receiver as a gift.
A receiver is essentially an adapter that allows you to receive and transmit a signal to your device. He can receive it through the following sources:
- Satellite dish;
- Antenna;
- Through the Internet;
- Using other sources.
Searching for channels on the Denn set-top box
We figured out the correct connection. All that remains is to understand the principle by which the search for digital channels occurs. The menu of the Denn set-top box is somewhat different, so here we will show you everything in screenshots.
After you have turned on the set-top box, you will need to press the AV button on the TV. If it is not there, then you should switch to audio-video mode. If everything was done correctly earlier, the console menu should open. It will have several sections:
- Auto search settings.
- Manual mode.
- Filter.
- A country.
- LCN.
- Antenna power on/off.
- Manager.
- Menu.
We need a settings menu. To configure the channels of both multiplexes, you must do the following:
- If you do not care about the order of channels or do not have the proper experience in searching for them, then you can entrust this process to the set-top box itself and click “Auto search”. The device will independently go through all frequency zones and find those TV channels that have a strong signal strength. The channel list will be saved automatically.
- If the order is important, you can use a manual search. To do this, you need to go through a number of steps yourself. Find out the best reception frequency in your region using the CETV map.
- Specify the channel number when setting up manual search.
- Wait a few seconds and make sure that this channel gives the strongest signal.
- Click OK and wait until the set-top box finds the packages you are interested in.
Important! When entering the installation menu, turn on the antenna power switch. This way you use a signal amplifier when searching