We constantly receive questions regarding the settings of digital set-top boxes. This is how it turns out, but most of the errors come from Denn DDT model devices. Of course, these set-top boxes can show digital channels. However, their setup is somewhat different from the others, and because of this, users have a lot of questions.
Today we will try to give detailed instructions for installing and configuring these set-top boxes. We will also provide information on solving the most popular equipment errors.
Connecting the Denn DDT set-top box
Currently, the price for denn ddt 111, 121, 131 set-top boxes varies around 1000 rubles. According to reviews, the device is quite reliable and performs its functions. Playback of digital channels on it occurs without delays or interference. For other points, the console contains:
- Possibility to work with 2 multiplexes DVB-T and DVB-T2.
- Play additional audio and video formats via USB.
- Additional “Mini Jack” connector for connecting speakers.
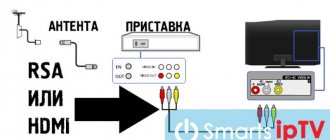
It is worth noting that viewing and connecting to digital channels here is done via the available HDMI input. Therefore, it is advisable to make sure in advance that your TV is equipped with this connector.
Otherwise, you can purchase an adapter for RSA cables (tulips). It costs around 200 rubles.
Note that in practice, the operation of such an adapter is not always adequate for one or another TV. On most models the picture will be perfect, but some TVs do not convert the format correctly and display everything in black and white.
The general connection diagram will be standard and no different from any other
Connection options
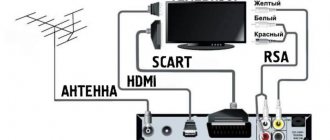
Via RCA
The simplest option in which an old TV will show digital broadcasts is to connect it through a “tulip”, “bell”, also known as a set of RCA connectors.
This is the oldest type of connector in use. Its basis was developed in the 1940s and is still successfully used in a bunch of different audio and video equipment.
The connection diagram via the “tulip” is as follows:
- Unplug the TV and receiver from the outlets.
- Connect the cable connectors to the sockets they fit into. Here you need to look at the markings. Typically, the color markings on the tulip plugs correspond to the connectors where they should be connected. But there are exceptions - there may be only two connectors, and the colors are different. In this case, be sure to connect yellow (video signal) and white (mono sound) - red can be neglected.
- Connect the antenna cable to the set-top box. It is this that serves as the source of the signal.
- Turn on the TV, go to the menu and select AV mode. The specific method depends on the model of the television receiver (setting the settings on the Orion device is very different from those used for the Horizon with a Soviet-made CRT).
- Set up channels on your digital set-top box. It is important here that the cord is not too long and that the antenna is correctly oriented.
- Save the configured channels in the set-top box's memory.
Searching for channels on the Denn set-top box
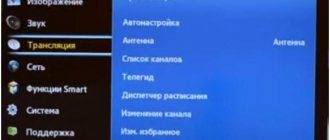
We figured out the correct connection. All that remains is to understand the principle by which the search for digital channels occurs. The menu of the Denn set-top box is somewhat different, so here we will show you everything in screenshots.
After you have turned on the set-top box, you will need to press the AV button on the TV. If it is not there, then you should switch to audio-video mode. If everything was done correctly earlier, the console menu should open. It will have several sections:
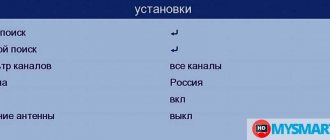
- Settings
- Auto search.
- Manual mode.
- Filter.
- A country.
- LCN.
- Antenna power on/off.
- Channel
- Manager.
- List.
- Personal settings
- Menu.
- Subtitles.
- Audio tracks.
- General settings
- Output settings.
- Media center
- If you do not care about the order of channels or do not have the proper experience in searching for them, then you can entrust this process to the set-top box itself and click “Auto search”. The device will independently go through all frequency zones and find those TV channels that have a strong signal strength. The channel list will be saved automatically.
- If the order is important, you can use a manual search. To do this, you need to go through a number of steps yourself.
- Find out the best reception frequency in your region using the CETV map.
- Specify the channel number when setting up manual search.
- Wait a few seconds and make sure that this channel gives the strongest signal.
- Click OK and wait until the set-top box finds the packages you are interested in.
- The picture of digital channels is very distorted / They do not show.
- You need to check the digital reception in your region.
- Reset the set-top box to factory settings. To do this, go to the “General Settings” section and select “Factory Settings”. Enter the password “0000”. After this, perform an auto-search for channels.
- If you have an indoor antenna, you should replace it with an outdoor one with a good signal amplifier.
- No image/black and white screen.
- Check the connection plug. If these are RSA (tulips), then they need to be connected according to the corresponding colors.
- In the case of a black-and-white image, there is a “TV Format” setting in the audio-video output settings menu. In it, you should sequentially select different display modes and, after saving, look to see if the image has changed.
- The console automatically reboots and turns off.
First, check all connectors and the power cord for wear. If everything is fine, then try updating the device. This is done using a USB flash drive. The set-top box supports flash drives no larger than 8GB. - The latest version of the software for your set-top box model should be stored on the drive. After this, you need to go to the settings menu and select “Update via USB”.
- Then the “flash drive” itself will open, in which you should specify the update file.
We need a settings menu. To configure the channels of both multiplexes, you must do the following:
Important! When entering the installation menu, turn on the antenna power switch. This way you use a signal amplifier when searching
Possible problems
No one is immune from them, and depending on a number of factors, such as the TV model, some problems may arise, which we will try to solve below.
This is how the Denn prefix is configured. According to reviews, it is quite reliable, however, as you probably noticed, it has a number of features, which we talked about today. If you have any other problems with the device, please contact us in the comments.
We constantly receive questions regarding the settings of digital set-top boxes. This is how it turns out, but most of the errors come from Denn DDT model devices. Of course, these set-top boxes can show digital channels. However, their setup is somewhat different from the others, and because of this, users have a lot of questions.
Today we will try to give detailed instructions for installing and configuring these set-top boxes. We will also provide information on solving the most popular equipment errors.
Possible problems and their solutions
If this is your first time debugging a digital set-top box on your own, be prepared for minor difficulties. We will also help you solve them. Please read this manual carefully before setting up your Denn digital set-top box.
Why Rostelecom IPTV does not work on TV and computer: reasons, how to fix it?
Denn box does not find channels
If your set-top box does not find channels, check that the antenna is connected correctly and the cable is intact. Also make sure that the set date and time are correct.
Does not respond to the remote control or the button does not work
Change the batteries and check the functionality of the infrared port.
No signal
The absence of a signal indicates a technical problem on the part of the broadcaster. If at least one is working, then wait until the system work is completed. If none of them work, delete them all and run the scan again.
Connecting the Denn DDT set-top box
Currently, the price for denn ddt 111, 121, 131 set-top boxes varies around 1000 rubles. According to reviews, the device is quite reliable and performs its functions. Playback of digital channels on it occurs without delays or interference. For other points, the console contains:
- Possibility to work with 2 multiplexes DVB-T and DVB-T2.
- Play additional audio and video formats via USB.
- Additional “Mini Jack” connector for connecting speakers.
It is worth noting that viewing and connecting to digital channels here is done via the available HDMI input. Therefore, it is advisable to make sure in advance that your TV is equipped with this connector.
Otherwise, you can purchase an adapter for RSA cables (tulips). It costs around 200 rubles.
Note that in practice, the operation of such an adapter is not always adequate for one or another TV. On most models the picture will be perfect, but some TVs do not convert the format correctly and display everything in black and white.
The general connection diagram will be standard and no different from any other
How to set up a denn antenna
DENN DAA235 manual in Russian in pdf format for the device: antenna. Read the instructions to become familiar with the functions and operating conditions, characteristics and troubleshooting methods. This user manual will help you use all the functionality of the product and increase its service life, provided that all the rules set out in the document are followed.
- Languages: Russian
- Type: PDF
- Size: 2.73 MB
- Description: Antenna
On NoDevice you can download the operating instructions for DENN DAA235. The user manual is necessary to familiarize yourself with the installation and operation rules of DENN DAA235. Instructions for use will help you properly configure DENN DAA235, correct errors and identify problems.
Do you want to watch your favorite TV channels in high quality for free? Take advantage of the DVB T2 digital terrestrial television service. In many countries this standard has already become the main one over the past few years. Unfortunately, in Russia it is just beginning to gain popularity. Today, 20 of the most popular Russian channels are already available, and in the near future the organization responsible for technology development promises to add another package of channels.
If you need to regularly pay a monthly subscription fee for cable television, then the benefits of digital terrestrial television are obvious - having only paid once for a set of equipment, after about a year its cost is fully recouped and in the future you watch TV for free. In addition, it is very rare that you need the entire package of channels that is provided by cable or satellite providers.
In today’s material we will tell you in detail what features the DVB T2 digital terrestrial television service has, as well as what you need to independently install and configure the equipment. Once you are armed with the knowledge, installing over-the-air antennas will be very simple and you can save significant money by not calling a professional. So let's get started.
Searching for channels on the Denn set-top box
We figured out the correct connection. All that remains is to understand the principle by which the search for digital channels occurs. The menu of the Denn set-top box is somewhat different, so here we will show you everything in screenshots.
After you have turned on the set-top box, you will need to press the AV button on the TV. If it is not there, then you should switch to audio-video mode. If everything was done correctly earlier, the console menu should open. It will have several sections:
- Settings
- Auto search.
- Manual mode.
- Filter.
- A country.
- LCN.
- Antenna power on/off.
We need a settings menu. To configure the channels of both multiplexes, you must do the following:
- If you do not care about the order of channels or do not have the proper experience in searching for them, then you can entrust this process to the set-top box itself and click “Auto search”. The device will independently go through all frequency zones and find those TV channels that have a strong signal strength. The channel list will be saved automatically.
- If the order is important, you can use a manual search. To do this, you need to go through a number of steps yourself.
- Find out the best reception frequency in your region using the CETV map.
- Specify the channel number when setting up manual search.
- Wait a few seconds and make sure that this channel gives the strongest signal.
- Click OK and wait until the set-top box finds the packages you are interested in.
Important! When entering the installation menu, turn on the antenna power switch. This way you use a signal amplifier when searching
Possible problems
No one is immune from them, and depending on a number of factors, such as the TV model, some problems may arise, which we will try to solve below.
- The picture of digital channels is very distorted / They do not show.
- You need to check the digital reception in your region.
- Reset the set-top box to factory settings. To do this, go to the “General Settings” section and select “Factory Settings”. Enter the password “0000”. After this, perform an auto-search for channels.
- If you have an indoor antenna, you should replace it with an outdoor one with a good signal amplifier.
This is how the Denn prefix is configured. According to reviews, it is quite reliable, however, as you probably noticed, it has a number of features, which we talked about today. If you have any other problems with the device, please contact us in the comments.
Modern television receivers are capable of broadcasting digital channels without connecting additional devices, but not all users have advanced TV models, so they are forced to use external equipment, the main element of which is a digital tuner.
The procedure for connecting it is not particularly complicated, but there are some nuances, about which information is given below.
Features of T2 digital television
Until recently, terrestrial television was associated with poor image quality, a large amount of various interference, and a minimal set of channels. It was necessary to manually tune each frequency separately, and different channels could operate in different bands, which led to the need to install several antennas or one multi-band one. In some cases, additional information could be received along with the signal, for example, teletext, when it was possible to receive information about a TV show or various entertainment content directly on the TV screen. Today, in the Internet era, such additional services have lost their relevance, but in the era of high-quality video and high-resolution screens, high-quality television pictures have become more in demand than ever. Therefore, a digital television standard was developed.
It is the use of digital technologies that has allowed us to reach a completely new level of quality. If earlier for this it was necessary to use exclusively satellite television, which entailed additional installation difficulties, and not everyone could afford the set of equipment, now it is enough to install and configure an almost ordinary decimeter antenna, in some cases an amplifier, as well as a television set-top box. And if you consider that many modern TVs already have a built-in DVB T2 receiver, then you can get by with just one inexpensive antenna.
Let's take a closer look at what advantages and disadvantages T2 digital terrestrial television has.
- Very high quality. If you have a modern plasma TV, you will initially be amazed at the incredibly clear picture.
- Absence of any interference. Forget forever what on-air noise and picture distortion look like.
- No subscription fee. All channels today can be watched absolutely free. In addition, there is no talk of introducing the board yet.
- Up to 20 of the most important Russian channels. Compared to the on-air three or four, this is just a fairy tale. We'll talk about the composition of channel packages a little below.
- Low cost of equipment. Forget about huge connection bills.
- Compatible with most modern TVs. Since many models support the DVB T2 format, you don't even have to buy a tuner.
- Possibility of high-quality reception with a regular antenna installed on the roof, or even with an indoor antenna in situations where you are close to the transmitting center. In this case, your investment will be minimal.
- Possibility of installation not only in a city apartment, but also somewhere outside the city. If you have a portable TV, you can even use DVB T2 digital television services while traveling. It can also be a great help if you live in an area that doesn't have cable coverage.
- A very simple setup process that almost anyone can handle without any difficulties or special knowledge.
What is the difference between digital television and analogue?
Almost the entire world already uses digital broadcasting (DV). Unfortunately, our country is still an outsider and the gradual transition from analogue to digital television began quite recently.
These two broadcast standards are fundamentally different from each other. A digital signal is a set of digital codes.
Thanks to this, the data reaches the user equipment without distortion, while the analog signal is subject to interference and is affected by the distance of stations. As a result, it can be stated that digital data transmission is ideal.
The set of codes is received by a special receiver, which decrypts them and broadcasts them to the TV. Such a unit is already built into modern TVs by the manufacturer, but in the case of outdated television receivers, it is necessary to connect additional equipment - a “receiver” or, as it is popularly called, a “set-top box”.
There is a large selection of devices on the market today, but the essence of the process of connecting them is the same for all models.
After connecting the set-top box, even to an outdated TV, the user will be able to enjoy the quality of digital television and watch their favorite shows and movies in high definition.
Antenna installation
It is almost impossible to list all special cases and conditions of admission in one article. Therefore, we will give only general recommendations that should be taken into account when installing a DVB T2 digital television antenna.
Room
Place the antenna on the windowsill and turn it towards the transmitting tower. Make sure there are no radio sources nearby, such as a Wi-Fi router. The distance between them should be at least several meters.
Indoor antenna D-Color Dca-115
Outdoor
External antennas also need to be turned towards the tower and securely secured so that wind or other weather conditions cannot disturb its position. It is best to first install a reliable bracket and attach it to the wall or roof of the house, and then attach the antenna to it. This will allow you to vary the position of the device. When installing, be sure to keep in mind that you will have to rotate it to fine-tune it, so do not fasten it right away, it is better to do this after completing the full installation.
General Tips
Required Equipment
To view DV you definitely need a receiver. First, it is recommended to study the instructions for the TV, since many TVs, for example, from and Philips, are already equipped with the necessary equipment.
This is indicated in the user manual and in this case there will be no need to incur additional financial expenses for the purchase of the set-top box.
If the TV is not equipped with such a unit, then based on the user’s personal needs, you need to buy a receiver with a suitable set of functions.
For example, if a TV owner prefers to use flash drives to watch movies recorded on them, then it is better to ensure that the set-top box has a USB connector.
The components included with the device include everything necessary to quickly put it into operation.
Typically this list includes the following:
- Instructions;
- “RCA” wire or as people used to call it: “Tulip” or “HDMI” cable;
- The tuner itself, that is, the set-top box;
- Cardboard box with a picture of the device and its brief characteristics;
- DU;
- Batteries for remote control;
- Power unit;
- Warranty documents.
Sometimes the list of components of individual budget models may lack a cable or other important element, without which it becomes impossible to connect the equipment.
In this case, you need to separately purchase the missing components and only then proceed to connect the device to the TV.
Solving the main difficulties
The most common problem that users encounter at home is when the TV cannot recognize the set-top box.
It is recommended to check the following:
- The performance of the receiver by testing its serviceability and functionality on another TV or by contacting a specialist;
- The correctness of all cable connections, as well as the absence of cable defects (they should not have abrasions, cuts, kinks or compressed areas);
- In the TV menu, correctly indicate the signal source.
Sometimes, after a certain period of operation, access to some channels disappears, and interference may also occur during broadcasting.
Such problems are caused by lost settings. It is recommended to update the equipment software and then use the “Auto Search” function or search and configure channels manually.
If this does not help, then it is likely that repair work is being carried out by your telecom service provider, which can be clarified by calling your provider's support line.
Source
Connecting and setting up the set-top box
In order to protect yourself and not damage expensive digital equipment, connecting all devices with wires must be done in a state disconnected from electricity.
For connection, it is recommended to use more modern interfaces, if available.
For example, if “HDMI” is present, then give preference to the connection through this particular connector. This will have a positive effect on the quality of signal reproduction.
If there is no digital input, you will have to use an analog interface, but it is better to give preference to RCA (tulip).
Setting up the AV receiver
The setup process is simple. It can be presented step by step in the form of the following stages of action:
- Turn on TV and receiver;
- Activate AV mode on the TV;
- Enter the receiver menu;
- Launch “Autosearch”;
- Wait for the process to complete;
- Save the list of detected channels;
- Ready. You can start watching.
AV/TV mode
To set up in this mode, you need to enter “AV/TV” using the TV remote control.
After this, the settings will be displayed on the screen, where the following columns are present:
You need to specify the column corresponding to the physical connection of the devices, for example, if the set-top box is connected to the TV via a tulip, then click “AV”.
Specify “HDMI when connecting with an HDMI cable.” When using a “comb” - SCARD.
Some TVs, after entering the “AV” menu, automatically switch to “AV1”, ..., “AV5”, etc.
In this case, you need to experimentally find the menu by simply searching through them and make the settings.
Necessary equipment
If theater begins with a hanger, then digital broadcasting begins with the purchase of equipment. What will the user need?
What is already there: standard set-top box equipment
The set-top box for DVB-T2 (the broadcasting standard used in European countries and Russia) usually includes the following:
- How to connect a D-color set-top box to a TV to receive digital TV
- The console itself. A digital tuner (receiver) that receives and converts a signal to transmit it to the ports of a TV receiver. Modern set-top boxes often have additional functions (recording to a flash card, delayed viewing, Wi-Fi support, etc.).
- Remote control. Almost all modern set-top boxes, starting from the middle price class, are equipped with IR remote controls.
- Power unit. It can be either internal, built into its body, or external. In the latter case, the kit includes an adapter that connects to an outlet and a connecting cable, from which power is supplied to the receiver.
Important: there are still old set-top boxes on sale that are designed for the DVB-T standard. They do not accept Russian multiplexes, so there is no point in purchasing them.
What else is needed: additional equipment
In addition to the set-top box itself, to connect you will need:
- Antenna. It is needed to receive a terrestrial or satellite signal. To watch digital TV from terrestrial repeaters, it is necessary to purchase a separate UHF antenna. It is not needed only in cases where “digital” is broadcast via cable broadcasting or if there is access to a community antenna with apartment wiring.
- Antenna cable and connecting plugs. Needed for . The rule usually applies: the higher the antenna is installed, the better the reception. But to connect it to the tuner you need a special coaxial cable. Since it is sold by the meter and cut to the length ordered by the buyer, you will need at least 2 more plugs to connect it to the antenna and TV receiver.
- RCA cable (bells). It transmits the signal from the set-top box directly to the input connectors of the TV. It usually has three plugs at the end: 1 for video and 2 for the right and left audio channels. This cable is used to connect the receiver to older TV models. The cable may be included with the set-top box, but sometimes it is missing. Then it will have to be purchased separately or replaced with the next type.
- HDMI cable. It is used for the same purposes as the bell, but is used in the latest models of receivers and television sets. Provides much better signal transmission, but cannot be used everywhere and therefore is usually not included in the kit.
Types of connections
Depending on what connectors the TV and set-top box are equipped with, the connection methods also differ.
The receiver can be connected to the TV via:
- “Tulip” - RCA wires;
- "HDMI";
- Coaxial cord (antenna).
RCA cable
This is the most common and widely used method of connecting a set-top box to a TV.
Although the video broadcast resolution is not as high as with the “HDMI” option, the difference is practically not noticeable to the naked human eye on a TV with small screens.
Due to the fact that each connector and plug of the Tulip connection is painted in a bright individual color, it is very difficult to make a mistake during the connection procedure.
The meanings of the color designations are as follows:
- Yellow for video signal;
- Red for audio output;
- White for audio input.
The user is only required to insert a plug of a certain color into a connector of exactly the same color. Then install the cable coming from the antenna into the “RF IN” connector.
If the TV does not have color “RCA” connectors, then the use of “Combs” is allowed.
It is labeled “SCART” on the back of the TV. You will need to use a cable with the appropriate plugs, as shown in the figure below.
HDMI connector
If the equipment has this type of connectors, then the quality of the image and sound will be significantly higher. In this case, you will need to make a connection via an HDMI cable.
It allows you to provide video resolutions reaching 1080p, and audio quality – 192 kHz.
Antenna cable
When the TV does not have more modern interfaces other than the antenna input, the set-top box can be connected to the TV via the “RF-OUT” connector.
For this purpose, it is necessary to use a special cord, as shown in the photo below.
Unfortunately, this connection method will lag far behind in broadcast quality, but consumer requirements for an outdated or old TV are initially low.
Over the past time, it has released several more models of set-top boxes under the “ DENN ” brand: the DDT100 receiver with a regular small remote control (like the previously reviewed DDT101), the DDT104 model with a learning remote control and a Dolby Digital (AC-3) license, and the latest DDT202 also with a learning remote control remote control, Dolby Digital license (AC-3) and other advantages that will be discussed below.
Despite the fact that a description of these models appeared on the website only recently (marked New), all of them have been sold in stores of various federal chains for a relatively long time.
Like the previous ones, they are all made on the latest MStar MSD7T01 processor and Rafael Micro R836 tuner.
Let me remind you that a significant difference between DENN set-top boxes is the 2-year warranty:
The kit includes the console itself in a glossy black plastic case, a +5V 2A power supply, a remote control, AAA batteries, audio-video cords and an instruction manual.
The box is marked with a 2-year warranty and the presence of a Dolby Digital license in the processor.
technical characteristics
are listed on the reverse side .
On the side, the presence of this AC-3 license is also noted. Icons list functions.
On the other side there is detailed information about the manufacturer.
As you can see, the console initially comes covered with a transport film, which must be removed to open access to the ventilation holes:
Unfortunately, the entire body is made of glossy plastic, which is undoubtedly beautiful at first, but is not very practical in everyday use.
The case indicates that the processor contains a paid Dolby Digital license.
Some may remember the old story with the famous one, where on the box it was written:
3. Built-in Dolby Digital and Dolby Digital Plus (E-AC-3) decoder
and the first batches actually contained AC-3, but then they stopped paying for the license in processors, and the boxes remained unchanged, misleading buyers.
And when they mark it with a sign on the case, this is a 100% guarantee of the presence of Dolby Digital inside.
At the bottom there are 4 legs: 2 plastic and 2 rubber, but it’s a stretch to call them legs, their height is only 1 mm.
I note that under the rubber pads there are self-tapping screws that fasten the upper and lower halves of the case.
From below, the front panel protrudes slightly forward.
For the first time, buttons appeared on the front panel of DENN set-top boxes - switching channels CH-/CH+ and power supply POWER.
And also for the first time a digital indicator with a clock :
Moreover, the brightness automatically decreases when switching to standby mode (Clock).
Well, those who are annoyed by even the reduced brightness can turn them off altogether:
And then nothing will be shown in standby mode.
All the necessary connectors are located on the rear panel. I note that for the first time, DENN models now have an ANT-OUT transit output.
ANT-IN - antenna input, ANT-OUT - pass-through output, HDMI OUT - HDMI output, yellow VIDEO OUT - video, white AUDIO L and red AUDIO R - stereo sound output, DC IN 5V = 2A - power input.
The ANT-OUT transit output is needed so that you can continue to watch old analog channels without plugging the antenna from the set-top box to the TV socket and back every time:
the ANT-OUT
output and the antenna socket of the TV with a television cable TV/AV button on the set-top box remote control and switch between analog reception by the TV itself and digital reception by the set-top box.
The ANT-IN > ANT-OUT pass-through also works in standby mode, but the +5V antenna power is turned off, so if your active antenna does not have a power supply, it will turn off.
Let me remind you that after 2021, only state analog channels in small cities (less than 100 thousand population) will begin to be turned off, and in large cities state channels will decide for themselves whether to turn off or continue to broadcast their analogue for some time.
No one will turn off commercial channels; they will also make the decision themselves - to continue their analogue channel in a small town or to turn on their digital channel. In each specific case, the decision is made individually by the channels themselves.
And those commercial channels that were not digital at all (for example, federal Che, Disney, Yu, TNT4 or various regional ones), as they were, will continue to broadcast in analogue (after all, they are not yet digital).
Like other DENN set-top boxes, it is equipped with a +5V 2A :
Let me remind you that such adapters are dismountable - below the CE mark there is a hole with a self-tapping screw.
If necessary, the external power supply can be easily replaced with.
And of course, the main advantage of this model is the learning remote control :
Side view:
The upper block of buttons can be learned from an old TV remote control, for example, to turn on, switch analog channels or adjust the volume of the TV itself:
When you press any buttons, the white top button blinks red:
and it also shows how you can check the functionality of any remote control - when pressing buttons, look at the front diode through a regular webcam or phone camera. After all, this is not visible to the eyes.
Let me remind you that the colored buttons are not labeled (and there is nothing in the instructions either), but by default they have the following functions:
red - quick access to the menu for viewing PVR recordings (video recorder) green - Resolution (usually signed V-FORMAT) yellow - Image format (ASPECT) blue - Scheduler
As noted in previous reviews, there are no questions about the operation of the remote control.
Unfortunately, like other DENN set-top boxes, it is equipped with this:
on the reverse side all contact details of the manufacturer are indicated (shown with high magnification):
The practical usefulness of such an Operation Manual is extremely low, because everything is written in such small print that even with normal vision, hardly anyone would want to break their eyes. One gets the impression that the manufacturer needs the instructions because it is necessary, and not for the consumer.
The only thing it is needed for is 5 s, where Training the remote control is described. By the way, this is the only page with normal letters:
To protect your eyes, the instructions can be downloaded from, and they are also in color.
When learning from an old TV remote control, it is advisable that it has normal batteries that have not yet run out. Well, after training, having removed the batteries, the old remote control can be sent to a well-deserved rest in the drawer.
When you turn on the set-top box, the standard DENN splash screen appears on the screen:
If your active antenna does not have a power supply, then the set-top box will of course not find anything, so first you need to use the MENU to go to the menu and turn on the power supply of the antenna amplifier :
I note that the frequency grid in the MV range is correct, ours, Eastern European:
If AutoSearch still doesn’t find anything or doesn’t show it well, then you need to point the mouse at your home and it will show the frequency channel numbers of the two nearest towers:
and then
manually select your channel number and look at the Quality :
The most important thing in broadcasting is the choice of antenna . Because the stability of signal reception will depend only on it.
90% of all requests in forums and support groups of various manufacturers are not related to problems with set-top boxes or DVB-T2 TVs, but to the initially incorrect choice of antenna and its placement. Especially in difficult urban conditions.
And, unfortunately, from the range that, for example, DENN offers, there are no normal antennas yet:
However, others have exactly the same monotony of the same weakly directional antennas, suitable only when the tower is somewhere nearby or simply visible through the window:
And no matter what the specific names of the models are, they are produced under various brands:
And the same antennas have now begun to be aggressively advertised on TV, for example, “” for 1990 rubles:
or "" for 3200 rub. 990 rub. allegedly for the Promotion:
They even created a separate website for this ordinary antenna, which costs 150 rubles in stores.
These antennas are advertised as receiving everywhere and many channels at once. And the need for a set-top box or DVB-T2 TV is not even mentioned.
Such advertising is aimed primarily at the elderly, i.e. for those who do not have the opportunity to look at various reviews on the Internet and generally compare and understand what is really needed in specific conditions.
And even if they cost as much as they ask for, then the antennas themselves should be just as effective for the money. However, you should not be fooled and expect efficiency from the simplest antennas - a ring frame and various dipoles.
The intrinsic gain Ku of all the above antennas is extremely low even under ideal theoretical conditions:
Moreover, this is only at the resonance frequency, and lower and higher - the already small gain drops even lower:
And the amplifier itself can be at least 20, at least 30, at least 40 dB, but it is not the amplifier that receives the signal.
Only the antenna design itself receives the signal.
But even of these weak antennas, an even worse choice is fixed antennas: suction cup antennas for a window or for mounting on a TV or hanging/gluing to some surface:
Because in this case the antenna cannot be adjusted; its position is fixed by the supporting surface.
In difficult urban conditions it is necessary to use directional antennas, for example, such as ():
or, for example:
or:
And thereby you will save yourself not only money, but most importantly, nerves during setup and further viewing.
Let me remind you once again that it is better to configure any set-top boxes or DVB-T2 TVs not by Automatic search, but by Manual tuning, select the channel number (frequency) and, slowly turning the antenna near the window, achieve the maximum Quality .
While watching, you can always evaluate the signal from the antenna - press the INFO :
The console is completely Russified:
TTX button ) also works normally, and you can, for example, turn on subtitles (888) for children on the Carousel channel, then they will not only hear the words, but also see how they are spelled correctly and how punctuation marks are placed in a sentence:
Those. watching TV unobtrusively turns into learning.
Channel switching can be seen, for example, in the review of DDT103/DDT105 or any other set-top box on the MStar MSD7T01 processor.
By the way, some cable operators broadcast not in the DVB-C cable standard, but in the old DVB-T, for example, St. Petersburg, so in such cases the set-top box is suitable for displaying all open cable channels.
So, let's take a look inside; to do this, you need to not only unscrew the screws on the bottom, but also remove the silver bezel from the front panel:
Inside the board is located quite freely:
When looking at the board, the first thing that catches your eye is the white DDT104 sticker:
Although the DDT104 looks different in design. Apparently 202 was initially planned as 104, but then plans changed.
Technological inscription on the board ABL7T01T2_R836_DC1306USB.A2.
ABL stands for a reputable OEM and the numbers 1306 are its model. Some customers don't even change the OEM model number, leaving it as is, for example, . This model is also known among us as . But in both cases, of course, they are equipped with a regular remote control and there is no Dolby Digital license.
If you look closely at the tuner block, you will notice that some kind of microcircuit is missing - this is an RF modulator. Those. If desired, it would be possible to order a complete set of the board with an RF modulator, but none of those listed did not do this, because the laws of the highly competitive set-top box market dictate their strict conditions, but DENN at least found the strength not only to pay for the Dolby Digital license, but also to choose an excellent full-size learning remote control.
In passing, I note that the previously reviewed DENN DDT101 is originally an OEM model.
Reverse board:
The technical details are the same: UHF on BFG540W/XR, Rafael Micro R836 tuner, MStar MSD7T01 processor, cFeon Q32C-104HIP EN25Q32C flash memory (4MB), 24 MHz quartz, DC-DC converters S15 BGJ and S10 BEE, linear stabilizer LD1117AG 18, AIP650E LED driver. Electrolytic capacitors 2 x 220x10 and 2 x 470x10.
The radiator has standard dimensions of 13 x 13 x 10 mm.
You can read more about technical aspects in the DDT103/DDT105 review.
Current firmware version:
Because The devices are similar, the firmware from DDT105 (and, accordingly, DDT103) also works great, of course, without the clause about the clock.
On June 5, 2021, firmware was immediately released for the three latest models 100, 104 and 202, but there is no point in updating, because... this is simply the date the description of the consoles themselves appeared on the official website. Although the consoles themselves have been on sale for a relatively long time.
Let me remind you that in MStar set-top boxes you can connect to the console (TX, RX, GND contacts). I will provide here an archive with boot and shutdown logs, an updated list of console commands, printenv and bdinfo output.
What is the other convenience of DENN DDT202, that it can be bought in any nearest store: from Kaliningrad to Vladivostok, from Sochi to Murmansk - and for only r.
If necessary, you can also order a directional indoor antenna there.
Positive: full-size learning remote control with operation indication, digital indicator with clock (can be turned off in standby mode), buttons on the panel, transitive antenna output, Dolby Digital license (AC-3), minimum parts thanks to the combined processor, external power supply, 2 year warranty, low price and availability throughout the country. Negative: easily soiled glossy case, low legs, very small font in the Operating Manual.
Overall, it turned out to be a very optimal set-top box in terms of price/functions: a full-size learning remote control, a Dolby Digital license, a digital indicator, buttons and all this for a minimal price.
4.3/5 — (17 votes)
You can ask questions about digital television on the DVBpro forum
Author: Alexander Vorobyov, 09 Jun 2021 | Permanent link to the page:
Setting up channels
Having completed the equipment connection procedure, you can turn it on and begin configuration.
If the user has a package of paid services from the provider, the number of channels will depend on contractual obligations, but even the number of free programs reaches two dozen.
A provider, for example, Rostelecom, provides a special card that is inserted into a module that decrypts encrypted signals.
To configure channels, you need to press the key on the remote control labeled “Input”, “AV/TV”, “Source”, etc. Next, specify the connection method.
In the menu that appears, click “Autosearch”.
Wait for the process to complete and save the detected list of channels.
If desired, programs can be grouped and arranged in a user-friendly sequence. They are now available to view.
To Soviet TVs
You need to do the following:
- Carefully remove the insulating layer from a wire one and a half centimeters long, as shown in the picture below (position 1);
- Next, bend the shielding braid (position 2);
- Cut off the protective layer of the central wire one centimeter long (position 4);
- Install the connector by rotating to the right (position 5);
- As a result, a bare wire two millimeters long should appear (position 6).
Use a prepared coaxial cable to connect the TV and set-top box.
This method will make any vintage TV smarter, for example, the Ruby CRT or even the Horizon tube.
How to connect two or more TVs to a set-top box?
Using the antenna jack, you can connect several “blue screens” to one receiver at once. For these purposes, special splitters are commercially available.
The only drawback of the method is that all connected TVs will function synchronously, that is, they simultaneously broadcast the same channel (after all, there is only one set-top box).
There is an option to connect, for example, two TVs to one receiver, using unused interfaces, for example, connect one TV via RCA, and the second using HDMI.
If there are no free connectors left, then you can buy an “RF modulator”.
This compact device is capable of providing each connected TV with a separate decoded signal. The main disadvantage of the device is its high price, which is sometimes higher than the cost of the set-top box.
Fine-tuning signal quality
You can, of course, accurately capture a signal of the proper strength and quality yourself, without the use of additional equipment. However, in difficult reception conditions, it is best to use a special device for tuning over-the-air antennas. What is such a device? Usually this is a small box with a mechanical dial or liquid crystal screen that displays the signal strength. On one side the power is connected, and on the other there is an input for connecting the antenna cable. Since adjusting the antenna based on the visual perception of the image on the screen is not the most reliable, such a device will greatly simplify your task.
- Take the device and connect the antenna cable to it, and also supply power either from the built-in batteries or from an external battery pack.
- Turn the antenna towards the receiver. If the direction is correct, the device will immediately begin to emit a sound signal, and the numbers or arrow will appear on the scale.
- If the device shows insufficient signal level, change the position of the antenna by turning it to the side, raising it higher or lowering it lower. Achieve maximum signal performance.
- Turn off the device, secure the antenna and you can start setting up the equipment.