Comparison table of Oriel DVB-T2 set-top boxes models
By and large, if you take the entire model range of released Oriel consoles, you will not find any significant differences in them. New devices may additionally be made of a metal case and may be equipped with Wi-Fi adapters. The rest: menu, format support, connectors, etc., remains the same.
| Options | 120/120D | 105/105D | 101 | 302/302D | 403D | 415D | 421D/421UD | 794 | 963 |
| Material | Metal | Plastic | Plastic | Plastic | Plastic | Plastic | Metal | Metal | Metal |
| Display on the body | + | + | — | — | — | + | + | + | + |
| Outputs for DVB-T2 | HDMI and RSA | HDMI and RSA | HDMI and RSA | HDMI and RSA | HDMI and RSA | HDMI and RSA | HDMI and RSA | HDMI and RSA | HDMI and RSA |
| WiFi | — | — | — | — | + | + | + | — | — |
| Remote control | + | + | + | + | + | + | +/+teachable | + | + |
| Nutrition | Internal 220V | External power supply 5V | External power supply 5V | Internal 220V | External power supply 12V | External power supply 5V | Internal 220V | External power supply 12V | Internal 220V |
| USB | + | + | + | + | + | + | + | + | + |
*Set-top boxes: 403D, 415D, 421D, 421UD – are additionally equipped with the ability to receive digital broadcasts from cable television.
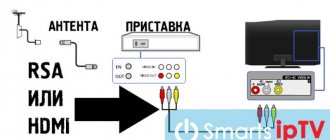
Diagram of options for connecting the Oriel set-top box to the TV
The Oriel set-top boxes come with RSA cables for connecting them to the TV via AV outputs. However, in practice, this option is not suitable for everyone and here it is necessary to further analyze all the options. The general connection diagram will be considered using the example of the most popular Oriel models - 421 and 963 . However, the connection principle itself will be identical for all models.
Possible options for connecting Oriel to a TV
The choice of one or another connection option is arranged in descending order, depending on the capabilities of the cable itself:
- First of all, you need to check if there is an HDMI input on your TV. This transmission standard is more acceptable and should be chosen first. The cable provides the best display (picture) and is also more durable than others. The cost of 1 meter of high-quality cable is from 200-500 rubles.
- If this option is no longer available, then further connections will have to be made via RSA (Tulips). They come in several types, depending on the number of plugs on each side. For Oriel there is not much difference. The main thing is that the TV is adapted to the connection.
- Older TVs, in most cases, will not have HDMI and RSA. These TVs will most likely have a SCART input. On the 961 model, such a connector is present initially and all that is required is to buy the appropriate SCART-SCART cable. It will cost you 200-300 rubles.
If you have an Oriel set-top box model without SCART, then you should buy an adapter with Scart-RSA. It costs from 50 rubles and is sold in all stores
Connecting additional audio systems to the receiver
In addition, various Audio systems can also be additionally connected to Oriel set-top boxes. For example, if you previously used a home theater or simply bought more powerful speakers and would like to use them in the process of broadcasting digital channels.
To achieve this, all models had a built-in input for coaxial cable (Coaxial). Using it, you can include additional sound sources in the system and make the display of TV channels more voluminous.
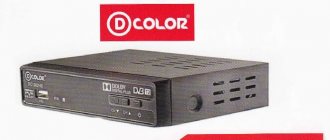
Oriel 120
Consumer-perceived benefits of purchasing cheap terrestrial receivers for a free digital audio/video signal, as opposed to expensive satellite receivers, the availability of high-quality images, additional capabilities; compactness; mobility. The listed requirements can be easily satisfied by purchasing budget devices, which include the Oriel 120 .
The device is capable of receiving and processing television channels in DVB-T/T2 format, adapting the signal to MPEG-2, MPEG-4 standards. The combination of the MSD7T01 control chip with the Rafael Micro R836 tuner indicates a more modern approach to model development compared to previous models. The technical capabilities of Oriel 120 provide for receiving an analog signal. Digital images are reproduced in HD, Full HD formats, with picture resolutions up to 1920x1080 p. The device is capable of receiving digital radio signals in the frequency ranges 174-230 MHz, 470-862 MHz.
Traditionally, devices of this type provide interaction with external, plug-in memory archives. Additional media connected to the set-top box via the USB 2.0 port allows the following processes to be launched:
- Quick recording of the selected channel or delayed copying using a recording timer (PVR function).
- Software update, changing standard settings to more modern software versions.
- Continuation of background recording while viewing is stopped, with the ability to start playback from the stopping point (Time Shift function).
- Playback of previously recorded media files with Full HD video quality, stereo sound (Multimedia function).
The Spartan package includes an Oriel 120 receiver, a remote control with a set of AAA batteries, a warranty card, and a user manual. The receiver body is made of black-painted iron sheet, the front panel is made of plastic. In the design of the exterior, the main emphasis was placed on the practicality of controls and displays, to the detriment of original solutions. The classic design with rectangular contours is “diluted” with a peculiar inclined shape of the command keys.
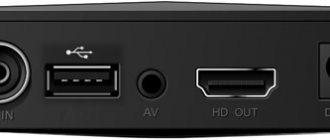
In the center of the front panel there is a green-lit display, an IR signal reception sensor, and a USB 2.0 port is built into the left. On the right side there are channel navigation buttons and a power button. The rear panel contains an HDMI interface, RF IN, RF OUT sockets (antenna input/output), 3 RCA composite output sockets, and a power cord input point. The power supply is built into the case.
Technical features of Oriel 120.
- Electronic navigator for EPG program programs.
- Manual, automatic search, channel adjustment.
- Ability to play files: AVI, MKV, MP4, HE-AAC, MP3, BMP, JPG.
- Subtitles, teletext, parental controls.
- Dimensions: 150 x 98 x 36 mm.
Good image quality, an ergonomic remote control, reliable operation in Player mode, and a clear menu interface are the advantages of the model. The disadvantages are a delay when switching programs, poor equipment, limited support for audio codecs, increased heating during operation.
Setting up digital channel search on Oriel
In order to catch all 20 digital channels, it is not enough just to know the instructions for the set-top box. Please check in advance whether you need a new antenna. The search process itself will be similar for all models of the company's receivers. Therefore, regardless of what model of console you have: 421, 963, 120, etc., the settings will be identical:
- First, select the signal display mode required in your case from the TV menu. It is taken depending on the method in which the console was connected. For example, if this was done using a tulip, then you should switch to AV mode.
- After this, you need to press the power button on the set-top box or its remote control.
- A welcome window will open. It will ask you to indicate your country and select a language. Typically this option is already set. It is better not to touch the remaining settings unless you know the exact ratios for the sides. Click OK.
- An automatic channel search should start. At the same time, the set-top box will pass through all frequency ranges in the visibility zone and find digital channels available for viewing. When finished, the list should save itself.
Manual search
If the set-top box, for some reason, could not find 20 channels or does not see signals at all, then you should reconfigure it in manual search. Its meaning is to set the device the exact frequency at which it will scan the entire flow of information and be able to provide you with the digital channels available on it. It's very easy to do this:
- Find out your frequency for DVB-T and DVB-T2 channels. To do this, go to the interactive map of CETV and look at the parameters of the television tower closest to you.
- Press the OK button on the remote control. The device should go to the menu.
- Select “Manual search” in the channel settings section
- After that, in the search mode, set “By channel” and select the number that was previously taken on the map. If the signal has not changed and the intensity graph shows 0%, then try also turning on the antenna power. It is used if you additionally use a signal amplifier.
Diagnostics of the Oriel 304 receiver
When opening the receiver, a swollen capacitor with a capacity of 1000 uF 10 volts was discovered, but before unsoldering it, we need to check whether our power supply is working or not.
Next, we measure the output voltage of our receiver, which should be 5 volts, but our device shows 2.28 volts, which means we have a swollen capacitor and the power supply cannot reach its operating mode.
Next, I always check the capacitor on the power supply of the PWM controller, usually they leak more and, as the esr device showed, a capacitor with a capacity of 10 uF 25 volts also needs to be changed; its esr is too high.
Connecting WiFi to Oriel set-top boxes
Some of the set-top box models presented in the table above have a built-in WiFi receiver and can easily connect to the Internet. This is very convenient and allows you to turn your device into a real multifunctional cinema. A wireless network allows you to:
- Watch videos on YouTube and Megogo.
- Find out the weather in your region.
- Connect to news feeds.
- Watch more than 20 channels using IPTV.
- Update the device.
To connect, you will additionally need to purchase an adapter, which is a Wifi antenna and connected via USB.
Firmware update and factory reset
When a new version of the set-top box software is released, it may not start working correctly with those TVs that previously had good contact with it. Therefore, in some cases it may be necessary to change the firmware of the set-top box to a new one, or if something goes wrong, return everything to the factory settings.
This can be done through the receiver menu:
- To do this, go to “Tools” and select updating the receiver via USB or via OTA.
- In the first case, the new firmware version should be installed on a flash drive.
- In the second case, wifi is required.
- If you want to reset all settings to default, you should select factory settings.
Password for resetting the device and entering the update menu: 1234
Contents of the main menu of the Oriel 314D receiver.
Section: "Program".
In this section of the menu, the first two items are of greatest practical importance. As the name suggests, selecting Edit Channels opens the Channel Editor. By default, you will need to enter the password “000000” to access the editor.
Configured channels can be moved around the list, skipped, blocked, deleted and grouped, for example, by topic, or renamed. But, in my opinion, the possibility of renaming in this case is not relevant, since the on-screen keyboard contains only Latin letters, the Cyrillic alphabet is simply absent.
When you select the “ EPG ” item, the electronic program guide (TV Guide) opens. From it you can go to the scheduler; to do this, just press the “OK” button on the remote control.
When creating a schedule, you can schedule both recording and viewing programs. It is possible to complete the task once, daily or even weekly.
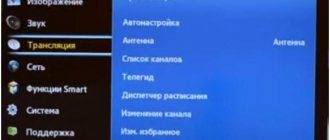
Section: "Image".
As you can see, this section contains settings for screen aspect ratio (proportions), resolution and TV format.
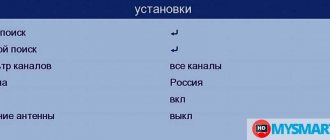
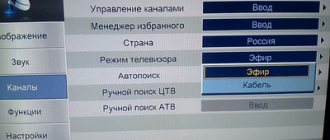
Section: “Search for channels.”
In this section, you can use automatic or manual channel search, change the region, and turn on/off the power supply to the active antenna amplifier.
Manual search for available TV and radio channels in the DVB-T2 receiver Oriel 314D is carried out only by channel number. The numbers and frequencies of TVKs (broadcast channels) for any region of Russia can be found on the main website of RTRS.RF, or on regional websites of digital terrestrial television. For example, in St. Petersburg, broadcasting is carried out on 35 (RTRS-1 channel package) and 45 (RTRS-2 channel package) channels.
After entering the channel number on which the broadcast is being broadcast, the screen will display the quality and signal strength values . Based on them, you can assess the situation with the reception of an on-air digital signal in specific conditions without any instruments.
Section: "Time".
The DVB-T2 digital standard supports time transmission, so by default the receiver is able to automatically set the desired value.
And in this section, if you set the value of the “ Setting mode ” item to Manual , if necessary, you can force the time zone to be selected.
In addition, here you can configure the period of time after which the Oriel 314D receiver will automatically turn off (from 1 to 12 hours with an interval of 1 hour). I would call this item not “Auto shutdown”, but “Sleep timer”, for example.
You can also simply “force” the receiver to turn on and off at a certain time.
When you select the “ Timer ” item in the “ Time ” section, the scheduler window opens. You already saw it when I showed it when I mentioned the electronic program guide (the “ EPG ” item in the “ Program ” section)
Here you can also add, view, edit tasks for recording or watching TV shows on a schedule.
Section: “Language settings”.
In this section you can change the language of the main menu, subtitles, audio and set digital audio parameters.
Section: "System".
This section, as its name suggests, contains system settings . You can enable and configure parental controls, change and set a password, restore factory settings, view device information, and update software. It can be noted here that there are currently no firmware updates for modern models of Oriel receivers, and they are unlikely to appear in the future. The range of DVB-T2 top boxes will be updated faster than the firmware for them.
Section: "USB".
This section includes a media player , which opens when you select the “ Multimedia ” item. It allows you to play music, digital photos and video files. Video playback is possible in HD and Full HD (1920x1080) quality. The Oriel 314B receiver supports the AC-3 ( Dolby Digital ) codec, which is quite common in films when you use, for example, some downloaded DVDRip.
Here, in the “ USB ” section, you can configure the aspect ratio, time and presentation mode when viewing images (item “ Setting photo viewing ”).
In the “ Subtitle Settings ” item, you can change the font size, background and color when displaying subtitles when playing movies.
PVR Setup item contains information and settings for an external USB drive (Flash, hard drive (HDD), etc.) if it is connected to the Oriel 314D .
Like any terrestrial digital DVB-T2 receiver, the Oriel 314D receiver supports the TimeShift function (Delayed viewing) and allows you to record TV shows to a USB drive.
The TimeShift function, when used, reserves part of the disk space of a connected USB device and performs background recording of the selected channel, thereby allowing you to pause while watching a program and continue watching from where you stopped. When you press the INFO button during recording, information about the recording status is displayed on the screen.
To quickly record the current TV show, just press the “REC” button on the remote control. All recorded information will be saved on a USB drive in the HBPVR Oriel 314D receiver will create it automatically.
In conclusion, I can say that the terrestrial digital DVB-T2 receiver Oriel 314D provides high-quality reception of a digital television signal , and also “knows how” to record it and “pause live”. The built-in media player copes well with playing files of the most common “network” formats. Oriel 314D supports Dolby Digital sound (AC3 codec) , and this is the only difference between it and its “brother” - the Oriel 314 . But in general, both of these models, the Oriel 314 and the Oriel 314D , are good modern set-top boxes for receiving public terrestrial digital television channels. And the affordable price of these devices also matters.
Reviews for Oriel consoles
Currently, the company occupies its niche in the field of sales of digital receivers. At the same time, users note the high reliability of the devices and adaptation to a large number of connection options. Some of the latest models of set-top boxes can be successfully connected to a TV using 3-4 connection methods.
This in turn makes these receivers universal. When selling them, you can be 99% sure that the device will be able to contact TVs and will not cause any problems during operation. The cost of the company's receivers today varies around 900-1200 rubles. This is affordable for most TV viewers. Moreover, for that kind of money you will also get the opportunity to connect to the Internet.
How to connect and configure the Oriel digital set-top box? The Oriel company produces a wide range of tuners for digital television. Consoles from the brand are of high quality. The price is available to every user. The receiver has many functions and connects to TVs. Supports DVB‑T/T2 broadcast standard. In addition to the main action, the receiver is equipped with a parental control option. Keep track of the channels you're watching on your home device. There is also the ability to turn on a timer and subtitles. Don't have time to watch an episode of the series live? Record your screen using a tuner.
Contents of the main menu of the Oriel 314D receiver.
Section: "Program".
In this section of the menu, the first two items are of greatest practical importance. As the name suggests, selecting Edit Channels opens the Channel Editor. By default, you will need to enter the password “000000” to access the editor.
Configured channels can be moved around the list, skipped, blocked, deleted and grouped, for example, by topic, or renamed. But, in my opinion, the possibility of renaming in this case is not relevant, since the on-screen keyboard contains only Latin letters, the Cyrillic alphabet is simply absent.
When you select the “ EPG ” item, the electronic program guide (TV Guide) opens. From it you can go to the scheduler; to do this, just press the “OK” button on the remote control.
When creating a schedule, you can schedule both recording and viewing programs. It is possible to complete the task once, daily or even weekly.
Section: "Image".
As you can see, this section contains settings for screen aspect ratio (proportions), resolution and TV format.
Section: “Search for channels.”
In this section, you can use automatic or manual channel search, change the region, and turn on/off the power supply to the active antenna amplifier.
Manual search for available TV and radio channels in the DVB-T2 receiver Oriel 314D is carried out only by channel number. The numbers and frequencies of TVKs (broadcast channels) for any region of Russia can be found on the main website of RTRS.RF, or on regional websites of digital terrestrial television. For example, in St. Petersburg, broadcasting is carried out on 35 (RTRS-1 channel package) and 45 (RTRS-2 channel package) channels.
After entering the channel number on which the broadcast is being broadcast, the screen will display the quality and signal strength values . Based on them, you can assess the situation with the reception of an on-air digital signal in specific conditions without any instruments.
How to connect an Oriel digital set-top box to your TV
The Oriel router is activated quite easily. Main device models:
- 4030
- 4150
- 403d
- 415d
- 740
- 213
- 101
- 314
- 421ud
- 963
- 4210.
Manufacturers of set-top boxes create conditions for quickly turning on the router. The device comes with cables for connecting to various television receivers.
Connect the devices using a cable and plug. Use a device such as a remote control. Explore the functionality, activate the options. Detailed instructions are below.
Connecting the device
You can connect the Oriel set-top box to your TV in the following way:
- First, install an appropriate external antenna on the roof of the house;
- stretch a special cable to connect all components;
- open the box with the tuner, take out the device and cables;
- examine the receiver from all sides;
- select the required port based on the TV model;
- CVBS SCART and HDMI “input” are most often used. The second is used in the case of two identical connectors on devices;
- HDMI connector is suitable for modern TVs. It provides high quality images.
Error 106 on LG Smart TV when connected to Wi-Fi and the Internet: how to fix it?
Initial settings
After connecting the two devices, turn them on using the "On" button. Wait for the “Start Menu” to appear. It will appear when the device is turned on for the first time. To select a specific section, use the “Up” and “Down” buttons. Select country, language, resolution. In addition, run an automatic channel search.
Basic Operations
The “Main Menu” item contains a list of sections:
- programs;
- image;
- search for programs;
- time and date;
- options;
- system settings
Use the remote control to switch sections and activate functions manually. The “Up”, “Down” and “Ok” buttons will help you access any folder.
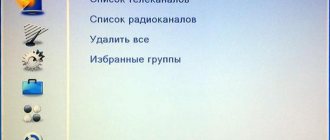
Program Manager
The “program manager” section formats any applications. Here you can turn on the electronic TV program guide and find out the TV schedule for each day. In addition, sort the channels in alphabetical order. Click on the remote control and activate the “edit” section. A password is required to login. In this section it is easy to rename or delete any TV channels. Create a personal list of programs. Turn it on as needed. Thanks to the timer option, it is easy to set sleep mode.
Image Settings
Click on the "OK" button and open "Image Settings". Set the desired TV format. Take care of the resolution and aspect ratio. Use standard settings or configure it yourself.
Search channels
The “Channel Search” section includes automatic and manual search and antenna power. The user will be able to find channels available to the package. First, set the country. Leave the remaining items as default.
Setting the time
Open the "Time" section. There are submenu parts in this folder. Everyone will be able to choose a country, time zone and region. Parameters except the timer are set by default. To set the mode, select a certain amount of time before automatic transfer to sleep.
Setting options
This folder consists of the following sections:
If you have any questions or complaints, please let us know
- menu language;
- subtitles;
- voiceover and digital video.
Select the option to watch foreign TV channels. Set to French, English, German or Polish. Set subtitles or audio for the text.
How to update the WEB browser on a Samsung Smart TV - step-by-step instructions
System Settings
The tuner has a number of built-in system settings. A popular option is parental controls. It is needed to track the amount of time a child spends online. Create a separate profile with a password and monitor your home computer. This folder contains information about the technical capabilities of the receiver.
How to set up the Oriel console without a remote control
The first step is to connect the Oriel set-top box to the TV, as indicated at the beginning of the article. If you cannot use the remote control, you will have to make settings using the control buttons on the set-top box itself. The front panel has all the required keys.
Due to the absence of most control buttons, you will not be able to use many options. For example, adding a channel to favorites and setting up the list will be problematic. Also, functions that require a password will not be available. But, running channel detection and adjusting the image is not difficult.