Server not found on Philips Smart TV - what to do if this message appears on the screen? Like all modern TVs, Philips has the ability to fail. These are not systematic breakdowns, but banal costs and wear and tear. One of the problems that owners of TVs of this brand face is a server search error. It is recorded both by owners of new devices and by those who purchased their device a long time ago.
What does "Server not found" mean?
The TV itself is not a channel receiver. They arrive at the TV through an antenna, which transforms its packets of information into a special web resource. This server is the source of the visual resource and network signal. If the device fails to establish contact upon startup, a message appears on the screen that reads “Error.” What does this mean:
- this should not be classified as a serious problem, since repairs or serious technical intervention are not needed;
- if the TV does not find contact with the information service, the device will not have channels or connect to the network;
- you will have to reconfigure the communication source again.
Setting up from scratch
Let's start setting up your Philips TV from scratch - as if you just brought it home. There is nothing complicated, just do everything step by step and everything will definitely work out. But if anything, you can ask questions in the comments.
Basic setup
- Connect to the network. Turn it on with the remote control. The TV should turn on - how it will behave is unknown, there are a lot of models, versions too. So your experience may vary. In my case this is true, in yours it may be different. But the essence will definitely remain the same. So watch and do likewise.
- Select the language - Russian.
- Choosing a country - Russia
- Time zone - just take a city in your own time zone. This won’t affect anything much, but the clock on the TV will run according to it:
- Method of installing the TV - how it was installed - on a rack mount or hung on the wall:
- Home or Store – choose Home. The Store is needed to demonstrate random videos in the Store (you've probably seen several TVs showing inviting demo videos). At home, we immediately switch the settings to combat mode:
- Settings for people with impaired hearing and vision - you can set them however you like, it won’t make it worse:
- And so he offers us to make the settings. Click “Start” (what did we do before?!)
Network connection
It would be possible to configure the channels, but first I suggest connecting to your wireless network.
Computers, software
27.02 09:39
Problems, hardware, prices, Linux, Microsoft
Forum members who own the miracle of SmartTV Philips. Yesterday I turned off the TV as usual. In the evening I started turning on the Smart (wired Internet, all other devices are working), it says that “the Philips server was not found.” I started looking for the reason, as always, on the Internet. I followed all the steps: reboot, update the software, but things are still there. I read on the technical support website that the Philips server may not be working (as a preventative measure). So the question is: is this function not working for everyone now, or should I start worrying?
Write a comment…
My TV, not Philips, has stopped finding and connecting to the network via Wi-Fi. I did all kinds of dances with a tambourine around it, I looked through everything I could on the internet, I didn’t do anything in the settings, I just didn’t pour holy water on it. In short. I found some useful advice, turned off the TV, unplugged the plug, waited ten seconds, turned it on and everything worked immediately. I immediately remembered that televisions with picture tubes had to be disconnected from the electrical network from time to time so that colored spots would not appear in the image.
This was the first thing I did. (Added at 11:07)
After the call I didn’t do anything. I turned it on in the morning: everything works. Better or worse than before, time will tell.
Phillips, frankly speaking! I didn’t work for a month, but it’s over. I took it in for repair under warranty and replaced the SSD board. I brought it home, and after 3 days it was covered again. I handed it over again and demanded the money back. The money was returned after 35 days. This was the first and last Philips product in my life.
And I had an old Philips TV, 10 years without any complaints. Both my husband and I have smartphones. And small household appliances: a food processor, a multicooker, also from this company.
smart philips? you have to be a brand fanatic to use this
In 12-13 they were quite good
So I'm out of luck.
My Philips smart TV works as always
Whose Internet is you connected to, what provider? My smart TV freezes periodically, so I think: is it the Internet or the TV? Was initially connected to Rostelecom wired, switched to the Sun
I called. The answering machine warned that maintenance work was underway on the server, the end time was unknown. Well, as usual, “sorry for the inconvenience”
Thank you, that means it’s not prevention.
I've already done all this. One by one. I'll call technical support this evening.
Load more
Check the Internet
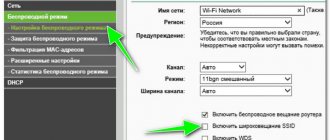
First of all, check your Internet connection. If you use a router for this, and this is the most acceptable way to watch Smart TV, then check if the settings on the device are lost. Check signal reception through the router on other connected devices. If the connection is missing only on the TV, but other equipment receives a Wi-Fi signal, try updating the router firmware. In most cases, this helps solve the problem.
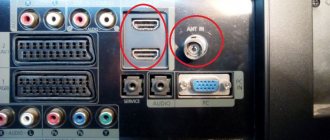
Also try connecting the network cable from your Internet provider directly to the TV via the LAN connector on the back of the case. If synchronization has taken place, contact your Internet service provider and check the correct parameters for full operation of television through the router. You should also be aware that the Wi-Fi signal may be weak due to interference from external sources and due to incorrect internal settings.
Clear Smart TV memory
Press the Home button on the TV remote control and select: Setup > Network settings > Clear Apps Memory
Note :
On TV models released before 2013, this menu may also be called: [Clear Internet Memory], [Clear Apps memory] or [Clear NetTV memory]. Once this process is completed, no confirmation message is displayed.
Installing and configuring applications
Due to the fact that smart television technologies do not stand still, but continue to actively develop today, it would be correct to consider the issue of installing applications on smart TVs produced by Philips, both on old models and on new ones. This is due to the difference in operating systems on which TVs run. For example, the oldest TV models support applications only from the company's App Gallery store, while third-party programs will not work.
Therefore, first we will provide instructions for installing applications from the manufacturer’s official store.
Installation from App Gallery
As Philips representatives assure, their store has a sufficient number of widgets for every taste, which can be downloaded and installed absolutely free. To do this you need to take the following steps:
- Open the main menu of your TV.
- Find the App Gallery icon there and click on it.
- You will be asked to select a region and shown a list of applications, among which you can choose the one that suits you.
- Select the selected application and add it to your widgets page.
After these steps, you can always launch it from your quick access page. As you can see, this option is very simple and requires a minimum of actions.
Installation using a flash drive
If you are unable to install the program directly from the Application Gallery, you can do it using a flash drive. To do this you must do the following:
- Download the archive with the desired application.
- Create a folder on a USB flash drive named “Userwidget”, having previously formatted the drive in FAT format
- Transfer the archive with widgets to this folder.
- Insert the drive into your TV and log into Smart TV.
- After your TV detects the connected device, you will see a message informing you that the installation of the program has begun.
- After a while, if everything was done correctly, the following message will appear indicating the successful installation of the application.
What to do if "Server not found, please try again later" on Philips Smart TV
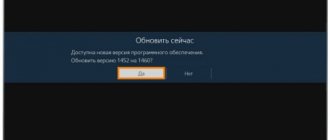
The first two steps are to check the cable through which the connection is made (or the operation of the Wi-Fi signal), and make sure that the software on the TV is not outdated. If everything is in order, then follow the steps strictly in order.
- Restart your TV. Restarting the power triggers a complete reboot of the Internet connection. If this is a simple packet conflict or a failure on the server itself, then rebooting the connection between Smart TV and the Internet will solve the problem in two minutes.
- Clear your memory. Often it is clogging of the internal storage that prevents the normal operation of individual options. To do this, click on the “HOME” button on the remote control, select the “Configuration” option, then “Network Settings”, and then “Clear Apps Memory” (clearing memory - in the Russian interface).
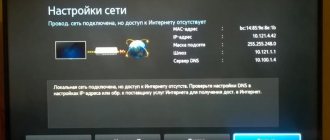
- Review the network presets, make sure that the TV is connected to the router, and Wi-Fi has access to the Internet. If the Smart TV does not receive a signal, it will not show the picture.
- If the date and time information does not match the Internet, then connecting to the server will not be possible. Crashes for this reason happen on phones, tablets, TVs and other devices. If the time and date do not match, then change them like this: TV Settings > Preferences > Clock. There, use the remote control to set the correct value and save the settings.
- Check the wireless signal strength - the “View wireless network settings” item in the main menu is responsible for this.
If the above methods did not help, then the last thing left is to re-set up the TV. Then go to the parameters, go down to the last item, and click on “Reset”. After this, the system will clear all installed programs and presets. Next, you wait until the reboot completes and set new parameters. This action solves 99% of problems on the TV.
What are the problems?
Usually the reason for the program to slow down and not function is that it is undergoing technical work to improve the technology. But there are others.
Error during playback
Sometimes it happens that the application was downloaded and installed without problems, but for some reason the videos in it do not play or are slow - an error occurs.
In this case, the program automatically searches for problematic algorithms and reports them in the form of numeric or alphabetic codes. The screen displays the diagnostic result - the sign and number of the existing error. With their help, you can easily determine the cause of the program failure and eliminate it yourself.
On mobile devices, you may receive an error called “The device does not support playing encrypted content.”
If a window with this error appears while viewing any content, it means that the device has been rooted. In order for the application to display movies correctly, Root mode (copy protection that prevents access to content) must be disabled on the device.
If you don't know if your smartphone/tablet is Rooted, install Simply Unroot. It helps to identify it and remove it if necessary.
Error while initializing the application
When the system cannot recognize the software initialization, update or reinstall it. If updating and reinstallation did not help, to solve the problem, enter DNS in the TV receiver settings:
What to do if the server is not found on Philips Smart TVs
To troubleshoot the problem, try the suggested methods;
- restart the TV;
- clean Smart TV running on Android;
- check that the Internet connection is correct;
- enter the dates correctly;
- inspect the wireless connection;
- reset the data and start again.
To perform the first method, disconnect the TV from the power supply. Then wait up to one minute. Next, turn on the TV again and wait until the router and SmartTV reconnect. This will allow you to create the correct connection.
To clear memory, follow the instructions:
- click on “Home”;
- go to “Configuration” / “Network settings” / “Clear application memory”.
In TV produced before 2013, these sections have different names. But the essence of the algorithm remains unchanged.
If you have any questions or complaints, please let us know.
Ask a Question
To test the network you need:
- click on “Home”;
- go to “Network settings” / “IP address”.
Please note that if the time is set incorrectly, connection is impossible. A message will appear indicating a malfunction. To change the date, follow these simple steps:
- Press the Home/Configuration/Preferences/Clock/Manual button.
The correctness of the date plays a significant role. A malfunction can only occur if the difference is no more than a few minutes.
Please note that it is not possible to indicate the time for the Netherlands. You must select a different country in the settings.
The TV needs a strong signal. To verify its correctness, do the following:
- After pressing the “Home” button, go to “Configuration” / “Network Settings” / “View Settings”.
- signal level - at least 60%.
Try to reduce this difference. Please note that after resetting and reconnecting, most of the data will be deleted. To implement, go to “Home” / “Configuration” / “TV Settings” / “Reinstall TV”. You will have to configure everything again, as well as download previously installed programs and files. Therefore, you need to start this method when the others have not worked.
For the TV to work correctly, try to install all the suggested methods. The results will be displayed on the screen. If after following all the options the error does not disappear, then it is rational to contact the service center. If the warranty period has not expired, then you can get help from a specialist for free. Don't forget to inspect all components for any deformations. If present, replace them.
Tatyana Kamaritskaya (Articles written: 94)
Site administrator and editor.
Tatyana is a true expert in her field. She is an ideological inspirer and communicates on a first-name basis with televisions. Its task is to check the relevance and availability of information. View all posts by this author →
Article rating:
Loading…
Server not found, try again later on Philips Smart TV: reasons, how to fix it? Link to main publication
How to check your network connection
If you are connected to the Internet, you can immediately go to watching movies or use Rostelecom to watch high-quality television. Otherwise, verification activities should be continued. Checking the connection of a Philips TV is practically no different from Samsung, with the exception of a few commands. If you have problems with the operation of Smart TV, then you definitely need to check the network settings of the TV.
Click on the button with the image of the House and go to “Configuration” - select “Network Settings”. After clicking on “View network settings”, you can see all the network characteristics of the device. Pay special attention to the “IP address” field; a number in the format 192.168.Х.ХХ should be indicated there. This will mean that the TV and router have found each other. If this condition is met, but the smart TV still does not work, then you should proceed to checking the router itself.
Often the router is located far from the TV, which does not allow you to connect to the network. Therefore, you need to either install the router in a different location or purchase a more powerful model. Sometimes the TV refuses to connect to the router, although all other equipment successfully uses the network. At the same time, a Samsung TV may have access to the Internet, but a Philips TV cannot; many will think that the problem is in the TV, but in fact it is hidden in the router. The solution is to update the firmware or install an alternative version for very outdated models.
Attention! When installing an alternative firmware version, there is a risk of damaging the router.
Sometimes a specific application or function does not work on Smart TV, so when checking the connection you should check several options, for example, the browser, the music application and the operation of Rostelecom.
Checking date settings
If the date set on the TV is incorrect, the SmartTV portal will not connect to the server and the message [Philips Server not found] will appear on the TV screen. To change the date, press the Home button on your TV remote control and select: • Setup > TV Settings > Preferences > Clock > Manual • It is important that the date is correct. For time, a difference of several minutes is acceptable.
Note. There are no date and time settings for the Netherlands in the menu. Follow step 6 and temporarily select a different country for installation.
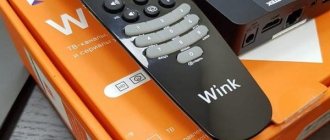
How to achieve empowerment in Wink?
Sometimes, in order for the Wink application to work correctly and to be able to use it to its full potential, you need to increase your permissions. The interface may vary depending on the device on which the service is installed, but the algorithm of actions is the same everywhere.
For maximum access, the sequence of actions is as follows:
- Go to the main menu of the device and go to the “Parental Controls” section.
- Go to the "Select Profile" section. Hover over the Main level and click Edit.
- Go to Content Display and select the Show option here.
- Go to "Age Restrictions" and select "18+" here. Uncheck the box asking for a PIN code.
- Click “OK” on the remote control and all changes will be saved. The current access level will change to “Current”.
After saving the changes, go to “My Settings”. Go back to the "Access Level" section and check if it is set to "18+".
Why Smart TV does not work on a Philips TV
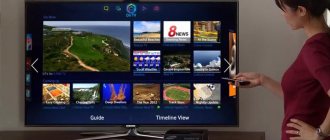
Modern TVs from global brands have amazing technologies and useful features that turn the device into a full-fledged computer. Smart TV allows you to watch movies, play music files, use search engines using the Internet, watch paid quality channels, for example, through Rostelecom. Moreover, there is no need to carry out lengthy settings and install additional software; just connect the TV to the mains and find your access point. It would seem that everything is very easy, but there are unforeseen situations, for example, smart TV on a Philips TV does not work even after performing all the steps specified in the instructions. Let's figure it out.
If the TV is connected to the Internet
In some cases, even if there is a network, the application refuses to function properly. If other devices reliably access the Internet, then faults should be looked for in the TV:
- Perhaps scheduled maintenance is being carried out on the manufacturer's server. You can find out about this on the official resource or from the company’s consultants.
- Smart TV is an application that is supposed to update automatically, but sometimes glitches occur and cause it to not work correctly. The solution is to replace the firmware, but this is best done in a specialized center.
Attention! Download the firmware exclusively for your TV model, otherwise you can completely damage the entire software, which is fraught with serious consequences, for example, you will never be able to use this or that application or will not take advantage of Rostelecom.
- In some cases, the cause of malfunctions is the failure of one or another technical element. The firmware can be replaced at home, subject to certain rules and regulations, but hardware failures can only be repaired by a specialist.
Services not paid for
If the subscriber does not have active subscriptions to channels, both TVs will not show, respectively, the server and client receivers. Therefore, it is worth checking your personal account balance on the official Tricolor website. To log in, the user will need a hardware (server) ID and a personal password.
If there is not enough money, the account is replenished. After this, funds need to be redistributed. This is done at the bottom of the personal account page. You must select the name of the channel package or service, enter in the field an amount sufficient for activation, and click the “Redistribute” button. Then it is recommended to reboot the receivers and check the operation of the channels.
Easy reboot
When the signal intensity changes, due to interference from the power supply network, voltage surges, the client-server system may begin to work incorrectly . The very first thing to do is reboot both devices. In this case, you need to follow this algorithm:
- the second receiver is turned off first;
- then turn off the receiver-server;
- The plugs of the devices are removed from the sockets for 5-10 minutes.
Switching on is done in the same order. The first is the client. After the server reboots, you need to wait for the channels to appear on it.
Setting up a DLNA server for a TV using the Home Media Server program
First, download and install the “Home Media Server (UPnP, DLNA, HTTP)” program. I recommend downloading it from the official website: https://www.homemediaserver.ru/index.htm. Click on the Download next to the EXE version. The file size is approximately 35 MB.
Save the file, then run it and follow the instructions to install the program.
Launch the program using a shortcut on your desktop or from the Start menu. First of all, we need to configure access to files on the computer. We can open only certain folders, all local drives, or even removable media for the TV.
In the program window, click on the Settings . We are interested in the first tab, Media Resources. There will already be three folders open there. These are standard. To open access to all local drives on your computer, check the box next to Local drives . To open access to removable drives, check the box next to Removable drives .
If you want to open, for example, only one local drive or folder, then do not check these boxes, but click on the Add . And in Explorer, select the drive or folder that you want to open for viewing on your TV. The folder will appear in the list. You can delete a folder by simply highlighting it and clicking the Delete .
I think the meaning is clear. You can open only one folder, which contains, for example, your movies. And you can open all disks. I recommend checking the box next to Local disks. Then, the My Computer folder will be displayed on the TV, in which you can view all files.
At this point, you can complete the setup by clicking the Ok . If you want, you can also go to the Server and change the name of your DLNA server. It will be displayed on the TV.
Click the Ok to exit the settings.
To start the DLNA server, click the Start .
If your TV is turned on and connected to the router, then in the program window, opening the Playback devices (DMR) , you will see your TV. This means everything is fine. If the TV does not appear, then check the connection, and see the tips at the end of this article.
The program can be minimized. You can proceed to setting up DLNA on your TV.