Greetings!
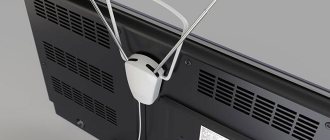
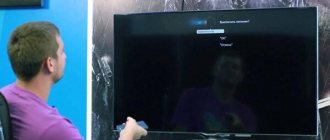
Today with Master Sergey we will show how the Samsung LE26S81B LCD TV tuner was repaired. This TV arrived with a bent antenna input connector and picture noise. In addition, the HDMI inputs did not work. On this TV, the main board was changed in another service. After that it started to work worse. There was noise in the image from the antenna input, as in the photo.
Introduction to the topic
During the operation of the set-top box, there is no guarantee that at some point some malfunction of the receiver will not be revealed. If the equipment is under warranty at this moment, then the right decision would be to take it to the service department. But if the warranty period has already expired, you can try to perform a simple repair of the TV receiver yourself.
Even if the receiver you are using is quite outdated, you should try to restore its functions at home. There can be many reasons for the breakdown of equipment that has worked for an impressive period of time. This includes obsolescence and drying out of radioelements and electrolytes. Damage can occur due to physical impact on the device - spilling liquid, falling, as well as due to software failures.
Carry out simple receiver repairs with your own hands
Recommendations
Without proper experience, you cannot be sure of the quality of your diagnosis and repairs, so it is better to contact a specialist. But if you've pinpointed the problem, you can fix it within minutes.
To avoid breakdowns, you must follow a few simple rules:
- Only authorized personnel should install and connect the equipment;
- protect the console from mechanical damage;
- do not violate the instructions for use.
For general principles of repairing satellite tuners, see below.
Content
Receiver malfunctions and their elimination
Before carrying out large-scale repairs, if the receiver does not want to turn on at all or when turned on it writes messages on the screen, for example, it says that there is no signal, you need to check the most likely reasons for the failure of the receiver:
- lack of power in the network, connection to the network;
- connecting the antenna to the corresponding connector;
- cable (antenna) integrity;
- integrity of wires;
- Incorrect software installation, which requires flashing the device, which can only be done by a specialist.
If all the described shortcomings have been eliminated, but the receiver still does not work, you will have to take it to a workshop or repair the TV receiver yourself.
In this video we will look at repairing the receiver:
Doesn't turn on
There may be few reasons why the receiver does not turn on or the TV does not show or nothing is displayed on the screen. If nothing happens when you try to turn on the set-top box, you should check the following:
- Is the toggle switch on the rear panel turned on?
- if the switch is in the “on” position and there is still no signal, the power supply will most likely need to be repaired;
- connecting the set-top box to the corresponding connector on the TV;
- Is the remote control working?
Having eliminated such connection errors, repairing the satellite receiver may not be necessary. If, when you turn on, in addition to the absence of a signal, the word “boot” appears on the receiver panel or all indicators light up at the same time, it means that the software has failed or the motherboard has burned out. Also, a motherboard failure is displayed on the display as “ER31”.
Important! It is better to replace the motherboard at a service center. Especially if the device is still under warranty.
A short circuit is indicated by the message “Short circuit!” In this case, the test can be carried out as follows - pull out the wire connecting the device to the converter. If the message does not disappear, then the tuner has failed. Also, a short circuit can occur in the wire or converter itself.
When using a card in receivers, a message may appear stating that the receiver does not see the card. The reason may be a malfunction of the card itself, improper installation, or a broken card reader. It is necessary to check the chip for dirt and deformation. If everything is in order with the card and card reader, most likely it simply does not fit the set-top box software. Can't find channels
If, when you turn on the satellite receiver, the TV does not pick up channels, and the message “no signal” appears on the screen, you need to determine the reason - in the receiver or the TV itself. If the set-top box is connected correctly, all the indicators on it are lit, and the Receiver Menu appears on the screen when you press the corresponding button on the remote control, but nothing is received, the reason is not in the TV. The receiver does not receive a signal for the following reasons:
- Bad weather conditions. In this case, you just have to wait until the storm subsides and the signal quality improves.
- Preventive maintenance that must be notified to the provider.
- Antenna displacement caused by wind, damage from falling of a heavy object, unreliable fastening. You can install and configure a satellite or antenna yourself by changing its position by 1 cm and waiting for the signal to appear. If you can’t set up the signal yourself, you can invite a specialist.
- The F-connector is loose or has completely come out of its connection to the equipment.
For high-quality setup of the receiver, contact a specialist for help.
- Damage to the cable in the area from the set-top box to the satellite or antenna. In this case, cut off the damaged area, strip the ends of the cable on both sides and connect with an F-connector. Secure the connection with electrical tape, and if the wire is damaged again, it must be replaced.
- Interference that occurs along the signal transmission path from the satellite. This could be a recently erected high-rise building, tree branches, or even lumps of snow. Methods for eliminating interference depend on the cause of its occurrence.
- If none of the reasons are identified, there is likely a problem with the converter. If this part of the circuit fails, it will have to be replaced. For the same reason, a situation arises in which there is no sound or picture on the receiver.
Basic functions of SSB board
- 1Performing operations at the user's command from the remote control or local keyboard. Execution of commands to turn on and off the device, switch to standby mode
- 2Adjusting image color settings: brightness, contrast, saturation, etc.
- 3Changing sound parameters to create the most favorable sound picture for the user
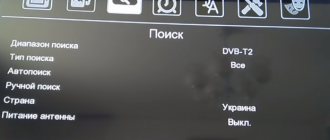
- 4Automatic or manual search for analog and digital television channels from the built-in tuner
- 5Fulfillment of individual user preferences and software updates
- 6Switching of connected external inputs and peripheral devices
This is not the full range of responsibilities of the motherboard, but only part of them. The development of television technologies, the introduction of Smart TV, multimedia and other innovations add new components and components to the SSB board. Below is a block diagram of the main board of a Philips TV on the TPM4.1E LA chassis, released into series several years ago:
The core of the motherboard is the MT8222 central processor, which performs most of the functions assigned to this unit, together with storage and information exchange devices DDR, SPI Flash ROM, NVRAM. EDID memories are designed to coordinate plug and play external devices into the TV chassis, allowing it to recognize and adjust to connected external equipment with little or no user intervention. A tuner and audio channel are required for the main board, and the WT6703 STDBY MCU processor executes commands from the control panel and keyboard. The video signal, converted according to a certain algorithm, is supplied via the LVDS bus to the matrix controller (Tcon), usually made as a separate unit, and then to the LCD panel.
Information transfer between the central processor and other components of the motherboard occurs via bidirectional communication lines SDA and SCL. In the event of a failure in the operation of any node or failure to receive a response about its normal state, the TV can be switched to emergency mode. At the same time, in Sony, Panasonic, Philips equipment, an error indication mode is activated, which can be controlled by the flashes of LED indicators on the front panel of the device. The number of flashes and their frequency may explicitly or implicitly indicate a problem area of the motherboard or other unit that is in critical mode. Information about errors is available in the service instructions for a specific TV model.
Returning to the block diagram, I’ll draw your attention to the Com Pair service output, designed for connecting a device of the same name for diagnostics, logging, and programming Philips TVs. Many modern television receivers have a service interface for connecting diagnostic equipment produced by the manufacturer for warranty service of the equipment. As we understand, this device is not available to the average consumer. Therefore, relying on your own strengths, you should not forget that diagnosing and repairing the motherboard of an LCD TV is the job of professional repairmen who have not only an understanding of the logic of the unit’s operation and the skills to restore it, but also modern diagnostic equipment and accessories.
The most popular defects in the main board of a TV are the following:
- 1Malfunction of one of the secondary DC/DC converters located on the Main Board
- 2Software failure in
to be continued…
Power supply repair
Not very expensive models of modern television set-top boxes do not have a high-quality power supply. If the receiver does not work after a thunderstorm has passed, then the cause of the equipment failure will most definitely be a malfunction of the power system. You can repair the power supply yourself if you have a soldering iron and a little experience in repairing electrical appliances.
By following the step-by-step instructions, you can easily diagnose and minimally repair receivers:
- First you need to unscrew the screws or bolts holding the cover of the device. After removal, you need to visually assess the integrity of all components of the board and the unit itself. There should be no swollen capacitors or burnt boards.
- If the inspection does not reveal the causes of the breakdown, then use a special multimeter to check the integrity of the fuses. If it is working, then we install it in place. If the fuse is faulty, it is worth finding out the reasons why it burned out. If you simply replace it with a new one, most likely the same thing will happen; the new spare part will also fail.
- Then, using a multimeter, all parts of the power supply circuit are checked one by one. The first thing to check is the capacitor. When taking readings from it in the “constant voltage measurement” mode, the value should be about 300 volts. If there is no charge, then check the remaining elements: fuse, transistor, diodes. If a short circuit is detected in one of them, the part should be removed and replaced with a new one.
- Diode breakdown may be indicated by the presence of alternating voltage at the bridge input. When checking, unsolder one end of each diode and ring them one by one, while swapping the ends of the multimeter. A serviceable element passes current in one direction; if it changes position during testing, it should not pass current. If this happens in both positions, then the diode is broken.
Attention! If there is a problem with one of the diodes, all of them must be replaced at once, even those that are currently working, otherwise the breakdown will occur again.
- When checking the primary windings of a transformer, the alternating voltage across it should be about 150 volts and vary slightly all the time. The fact that it does not “float” may indicate that the cause of the failure is in the microcircuit. In this case, it is replaced and the AC voltage indicators are measured again.
- If everything is in order with the primary winding, alternating voltage is present, you should measure the readings at the input of the unit. In the absence of voltage, the diodes of the secondary circuit ring. After repeating the procedure on the diodes and identifying the faulty one, it is replaced. If this did not help to find out why the receiver still does not turn on, most likely the reason is in the primary circuit microcircuit.
It is quite easy to identify and eliminate the causes of satellite receiver malfunction if you have minimal experience in handling digital equipment. If you are unable to figure out the cause of the breakdown on your own, it is better to trust a specialist.
See also
- monitor construction, main types of monitor malfunctions,
- RAM faults, RAM faults,
- I/O port repair, com repair,
- motherboard performance, processor performance,
- ultrasound block diagram, ultrasound functional diagram,
- diagnostics of active elements, diagnostics of passive elements,
- video card fault diagnosis, video card repair,
- ata disk failure, ata disk,
- motherboard malfunctions, motherboard diagnostic equipment,
- malfunctions of the HDD hardware, their nature of manifestation, algorithm for their elimination,
- troubleshooting methods for finding faults and the causes of inoperability of electronic devices,
- drawing up a troubleshooting algorithm,
- power supply malfunction, algorithms for finding faults in the PC power supply,
- fault diagnosis algorithm, troubleshooting,
- network equipment malfunctions, network diagnostics block diagram,
That's all! Now you know everything about TV repair. Remember that it will now be easier to use in practice. I hope that now you understand what TV repair, monitor diagnostics, TV repair, monitor repair are and why all this is needed, and if you don’t understand, or have any comments, then don’t hesitate to write or ask in the comments, I will be happy to answer. In order to gain a deeper understanding, I strongly recommend that you study all the information from the category Diagnostics, maintenance and repair of electronic and radio equipment
Write answers to questions for self-test in the comments, we will check, or ask your own question on this topic.
What to do if the T2 signal periodically disappears
Again, more details are needed. A common case of intermittent signal loss is in:
- An amplifier that burned out after a thunderstorm.
- Oxidized antenna contacts.
- A power supply that has failed.
- Damage to cable insulation.
- Problem with the tower (can be found out by asking neighbors about the problem).
Most likely, the reason is on your side and it is not connected with the receiver and TV, but with the antenna equipment.