How to connect a Denn set-top box to a TV to receive digital television
The process of establishing a connection takes several steps:
- physical debugging via cable;
- custom presets for starting work;
- installation and administration of specialized software;
- parameters of the broadcast picture;
- search for channels and save them;
- basic system settings for correct operation.
Connecting the device
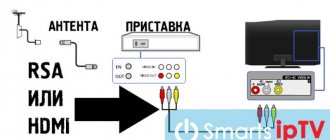
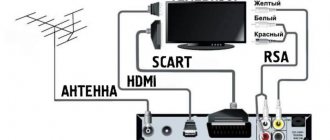
Let's start with the main thing - connecting the device to Smart TV. By default, the HDMI connector is used for this, which is found on almost all models of modern technology. But if it is not on TV, it is possible to purchase regular “tulips” with an adapter. The general scheme is simple - you connect the set-top box to the TV using a cable, and the antenna itself goes into the corresponding Denn sockets. The marker of a successful signal is a corresponding notification on the TV screen. To do this, select HDMI as the source.
Why did Russia 1 channel disappear on digital television: reasons, how to fix it?
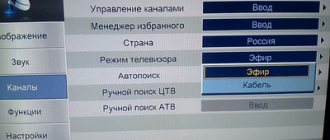
Initial settings
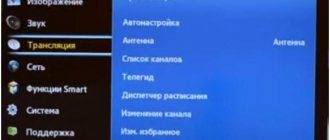
After this debugging, point the remote control at the screen, and select the “AV” section. In the settings section you will need to configure the following parameters:
- automatic search;
- manual mode;
- filter for adding channels and radio stations;
- region of registration (indicate your country of residence);
- LCN.
- activation of power from the antenna.
In the channel section there is a complete list and its manager (adding, deleting, renaming, moving, etc.). There are also personal settings - adjusting the appearance of subtitles, the main menu, and adjusting the sound. Here it is also possible to regulate the purpose of the wire outlets. You can adjust all these parameters to suit yourself or leave them at “default”.
Features of initial settings:
- if it doesn’t matter to you in what order the channels are saved into memory, then run auto search without special commands;
- auto search finds frequencies with high signal strength, identifies them and saves them (this applies to all frequency zones that exist in the region of operation);
- if the order of display and saving is important to you, select manual search;
- when using manual settings, you are asked to set the numbering, frequency band, frequency, BIIP.
Basic Operations
When you have specified some basic parameters, the main menu appears on the TV screen. Its main operations are as follows:
- narrow settings for searching for digital broadcast channels;
- file manager - distribution into folders, renaming, deleting, moving;
- personal presets - subtitles, interface language;
- multimedia performance and video playback.
Program Manager
A tool such as a file manager allows owners to perform the following actions:
- change channel name;
- create thematic blocks and folders - films, news, children's, national, sports, music, and so on;
- block and encode third-party broadcast streams;
- sort the air.
Image Settings
Picture quality is one of the most important parameters for the viewer. The perception of information and comfort depend on this. Therefore, in the Denn digital cinema it is possible to adjust the following indicators:
If you have any questions or complaints, please let us know
Ask a Question
- RSM - digital sound stream;
- screen format and resolution;
- TV format;
- additional speakers, equalizer, volume.
Why doesn’t IPTV Player show on the computer and TV: reasons, how to fix it?
Search channels
Initially, the console is sold without special settings. When you bring it home, connect it to the antenna and Smart TV, you will be able to watch shows and your favorite movies. But before that you will have to perform one simple step - run an automatic scan. The system will look through the list of active frequencies and save those that are received in your region. Different areas have their own frequencies, but the guidelines for starting a search are approximately the same everywhere:
- open the installation;
- select auto search;
- confirm;
- wait for the process to complete;
- click “Save”.
We emphasize that interrupting the scanning process is prohibited.
Setting the time
Time and date are indicators on which synchronization with the network depends. If they do not match the network settings, many actions will be limited. To prevent the cinema from malfunctioning, set the current time data in the main settings.
Setting options
The digital receiver has several interesting user features - displaying subtitles and active audio. You can enable or disable these parameters in the main menu using the remote control.
System Settings
Basic system presets allow the owner to:
- update and change the software package;
- reset the device to factory settings;
- enable or disable parental controls;
- indicate automatic shutdown hours.
In the previous review, we looked at two older DENN models DDT103 and DDT105 with a learning remote control. Well, in this review we’ll look at the youngest model – DENN DDT101.
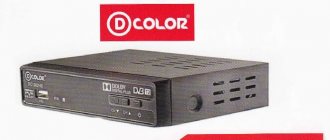
As with previous models, the design of the box is made in light colors:
and also with a stylized round stamp - 2 year warranty.
On the reverse side are the technical specifications:
And as you can see, they are completely identical to those of the DDT103.
On the side, icons show the main functionality, for example, the presence of Parental Control - control parental:
The QR code also contains a link to the site:
On the other hand, detailed information about the Importer and Manufacturer is provided with contact information:
The kit consists of the set-top box itself in a small plastic case, a power supply, a remote control, AAA batteries, audio-video cords and an instruction manual:
On the front glossy panel there is a USB connector, in the middle there is a photodetector and a red-green operation indicator:
There are slots on the sides of the lid for ventilation:
The sides are also perforated:
And the bottom also consists almost entirely of cracks. As you can see, there are holes for mounting on the wall, and the holes allow mounting in any vertical position (the distance between adjacent holes is 40 mm):
The two legs have rubber spots that prevent them from sliding on a smooth surface, and underneath them there are also screws that fasten both halves of the case.
Measured dimensions - 114 x 92 x 28 mm.
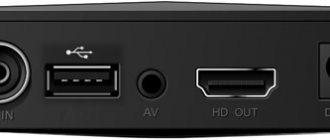
At the back there is a minimum set of connectors required to connect to an old CRT TV or to modern flat-panel LCDs:
ANT-IN - antenna input and outputs for ordinary “tulips”: white AUDIO L - left audio channel, red AUDIO R - right channel, yellow VIDEO OUT - video and of course HDMI OUT . DC IN 5V 2A - input for the power supply.
The power supply is the same as that of older models: +5V at 2A, wire length 1.2 m, standard plug 5.5 x 2.1:
Let me remind you that the self-tapping screw is located under the double square icon.
Unlike older models, this one uses a regular remote control, and a very small one:
Size 119 x 39 mm.
For a visual comparison of how it looks in the palm of your hand:
The buttons themselves are made of fairly dense, non-soft rubber, so everything feels good tactilely.
The colored buttons here are also not labeled, but like the older models, it turned out that they have the same purpose by default:
red - quick access to the menu for viewing PVR recordings (video recorder) green - Resolution (usually signed V-FORMAT) yellow - Image format (ASPECT) blue - Scheduler
Given the size of the remote control, it would be quite natural if it could ever accidentally get lost. But in this case, you can use a universal remote control, for example, Huayu DVB-T2+2: enter the combination POWER + SUB-T, thus obtaining a replacement for the lost one.
Looking inside, we will see a board with the technological inscription ABL7T01T2_R836_DC1108LX.A1, one-quarter smaller in size than the older models:
and on the reverse side:
Technical details : UHF on BFG540W/XR, Rafael Micro R836 tuner, MStar MSD7T01 combined processor, 25Q32CSIG flash memory (4MB), 24 MHz quartz, two S10BLE DC-DC converters, AMS1117 T18 linear stabilizer. Radiator 14 x 14 x 10 mm.
Those. As you can see, the composition is completely identical to the older models, and in fact the DDT101 is a copy of the DDT103, only with a regular remote control.
Electrolytic capacitors: one 470x10 and two 220x10, which, like the older comrades, favors possible simple repairs after the end of the 2-year warranty.
Having connected the set-top box to the TV, we find ourselves in a completely similar menu. More details can be found in the previous review.
I note that with any set-top boxes it is better to configure the antenna in Manual search by selecting a frequency channel:
and looking at the % of the Quality , slowly rotate the antenna, achieving the maximum.
Subsequently, if necessary, you can control the Quality INFO button twice :
Like previous models, the latest version of the software is already installed here:
If new firmware versions become available, detailed step-by-step instructions are posted on the manufacturer’s website:
And I repeat that you should not flash the set-top box using firmware from DDT105 or any other manufacturers in general, trying to get support for the licensed AC-3 (Dolby Digital) codec.
Support is determined by the modification of a specific processor batch - for a specific model. The same processor (in this case MStar MSD7T01) may or may not have an AC-3 license, depending on the order of a batch of processors for a specific set-top box model. Therefore, if you plan to often use the set-top box as a media player, then it is better to immediately consider purchasing the older model - DDT105.
Because the set-top boxes are identical, the speed of switching TV channels can also be estimated from the previous one.
As already mentioned, any set-top box can be connected to an old VGA monitor using a converter, thus turning it into a DVB-T2 TV:
The details and nuances of such a connection are described at the end of the previous review.
And in conclusion, I would like to remind you once again that the signal is received not by the set-top box, but by the antenna . on the correct choice of antenna and its location.
Positive: thanks to a modern combined processor, there are a minimum of parts on the board, the case has holes for wall mounting, two support legs are rubber-coated, external power supply, 2 years warranty. Negative: small print in the instruction manual, small remote control.
Overall, a good modern set-top box for receiving digital television, for example, in the country.
4/5 — (46 votes)
You can ask questions about digital television on the DVBpro forum
Author: Alexander Vorobyov, July 12, 2021 | Permanent link to the page:
Possible problems and their solutions
If this is your first time debugging a digital set-top box on your own, be prepared for minor difficulties. We will also help you solve them. Please read this manual carefully before setting up your Denn digital set-top box.
How to connect a Rostelecom universal remote control to a TV: codes, instructions
Denn box does not find channels
If your set-top box does not find channels, check that the antenna is connected correctly and the cable is intact. Also make sure that the set date and time are correct.
Does not respond to the remote control or the button does not work
Change the batteries and check the functionality of the infrared port.
No signal
The absence of a signal indicates a technical problem on the part of the broadcaster. If at least one is working, then wait until the system work is completed. If none of them work, delete them all and run the scan again.