When choosing a satellite operator, you should think in advance about how to set up your satellite dish . For example, when purchasing a large diameter plate, you will definitely need help in installing it . In this matter, the consolation is that this process does not have to be repeated , since the satellite is always in the same place relative to the earth.
Satellite TV dish
The operating principle of satellite TV explains how the signal is transported from the TV channel to your TV screen. But television broadcast will only be received if you have high-quality receiving antenna, since due to the low power (only 100-150 W) the signal is transmitted in the form of a narrow beam . It is this beam that the plate should catch. You can simplify precise aiming at the transmitter by taking an antenna of a larger diameter , then it will receive pulses from very distant satellites much more clearly and reliably.
How does a satellite dish work?
The principle of operation of the dish differs from the main functions of the terrestrial, digital, decimeter antenna in that it not only picks up the signal, but also reflects it like a mirror. Also, in digital broadcasting, all frequency conversions and decoding are handled by the receiver or the TV itself, and in satellite television there is an additional device for processing satellite bands, which is a detachable component of the dish - a converter . Due to the fact that satellite frequencies are too high (up to 12.75 GHz), a converter that understands them is attached to the dish, and they strictly monitor the absence of obstacles in the signal path. Extremely high frequencies are transmitted over vast distances , but are not very flexible; sometimes even raindrops can become a serious obstacle to them. This is why satellite TV may not work well when it rains .
The principle of operation of a satellite dish
The distance from the satellite to our antenna is tens of thousands of kilometers, so the signal attenuation is also very large, about 150 dB . In order for the signal to be powerful enough, it must be collected and concentrated in one place. Therefore, satellite antennas have the shape of a dish , and reflect the signal from all edges into the converter feed .
Receiving a signal from two or more satellites on one antenna
The operation of just one satellite ensures the broadcast of tens to hundreds of television channels , as well as a variety of radio channels. Also, one antenna can receive signals from several satellites , and not just from one. This happens when the required number of converters . When installing and configuring a satellite dish yourself, they are attached using clamps slightly to the side of the main converter . It is thanks to this that one antenna can receive signals from satellites that are dispersed even 25 degrees from each other.
Installing several converters on one plate
How to set up a satellite dish
And so let's first break down the entire complex technological process of transmitting a signal from a television company to your TV into separate points , compiled for better understanding in your own words . Then the satellite dish settings a map of the coverage area of all television satellites. And step by step we will consider the procedure for installing the plate at its permanent place of work.
The principle of satellite television distribution in your own words
- Our planet is spherical , if you do not take into account some of the nuances described in Wikipedia.
- The globe has an axis along which it rotates .
- Satellites accompany us in all kinds of orbits and distances .
- Certain types of satellites that are launched for the purpose of television broadcasting hover over the equator and accompany the Earth in its rotations at the same angular velocity. Such satellites are geostationary .
- Due to the geostationary satellite being at rest in relation to the planet to catch a television signal from it on a dish once and record it.
- Also, due to the immobility of the satellite, to determine their location it is enough to know the longitude .
- A television channel wishing to broadcast to a satellite must have a powerful transmitter antenna sending the broadcast to the satellite. The satellite, in turn, reads it and redirects it to the ground in its coverage area.
- To send a television signal, components built into a satellite are used - transponders . Each has its own frequency band and polarization.
- We install and configure to satellite plate from the satellite TV set, and how it works and what a converter is is described above.
The principle of signal propagation and reception by a satellite dish
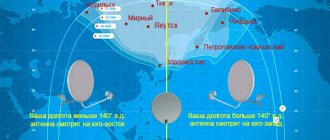
Satellite TV coverage map
Setting the characteristics for tuning a satellite dish to a specific satellite will now do without additional equipment. Using the coverage map is convenient and does not require special knowledge. It displays the entire planet and currently known For more comfortable work with the map, select its display that suits you best - map type . The map itself is presented on the website www.mapsat.ru, and we will describe the sequential steps for determining the angles of inclination, rotation and other parameters for installing a satellite reflector . Also, before purchasing satellite equipment, you can use it to determine the coverage of a particular satellite and the signal strength at a specific point. The map is interactive and updated online .
Satellite TV coverage map
Finding the necessary values for adjusting the satellite dish during installation:
Enter the name of the satellite.
Select the name (coordinates) of the satellite you are interested in in the “Select satellite” , or indicate the name of the satellite television operator (for example, MTS, Tricolor TV, NTV+)
Find the antenna installation address on the map.
To search for the coordinates of the satellite dish installation on the map, enter the address of the object in the “Address or object” (located in the upper left part of the map). If the system finds several addresses that match the search parameters, you will be asked to select one of them. When you select the required address, the map will automatically adjust to the object of interest.
An alternative method for finding your current address is to use the “Locate” . The method is especially effective if you are near the place where the satellite dish will be set up, and to access the map you use a device equipped with GPS (for example, a smartphone or tablet). In this case, the center of the map will be moved to the point with the coordinates obtained from the GPS device.
Specify the exact location of the satellite dish installation
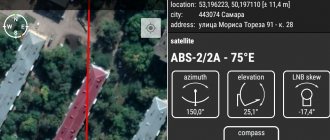
On the satellite map it is necessary to specify the coordinates of the antenna installation location as accurately as possible. To do this, the map scale is increased, “Map Type” switches to the display mode of satellite images Google Map or Yandex Map (depending on which map is more detailed for your region). Use the left mouse button to mark the mounting point of the satellite dish. A marker with a line directed towards the satellite will appear at the specified location. The location of the marker can be changed by dragging it around the map.
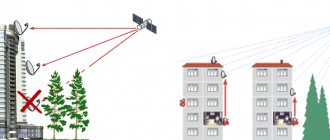
Make sure that nothing interferes with the reception of the satellite signal - the direction line to the satellite does not cross large trees, tall buildings, etc. If the line crosses a large object, you need to make sure that it will not interfere with the signal reception. To do this, you can use the “Calculate obstacles” . Drag the marker symbolizing the obstacle onto the object being examined. In the “Height of obstacles to be overcome” , the maximum height of an object that will not interfere with reception will be calculated. If an object located in the satellite signal path is higher than this value above the antenna, it may interfere with reception. In this case, you will have to increase the height of the antenna installation, or choose a different location.
Selecting satellite dish size
Different satellites over different regions transmit signals of different strengths. This parameter is called Radiated Power ( EIRP ). on the EIRP at the receiving point. You can determine the size of the satellite antenna required for reliable reception of satellite television from the table included with the receiving equipment. If you do not have such information, you can use the “Satellite coverage area map” (the Coverage area button).
After completing the above steps, all the necessary data for fine-tuning the satellite dish will be displayed above the map. From the antenna installation site, a direction line to the satellite will be drawn. If tuning to the selected satellite in a given location is not possible, the message “Reception of a signal from this satellite in the selected location is not possible!”
Step-by-step instructions for setting up a satellite dish:
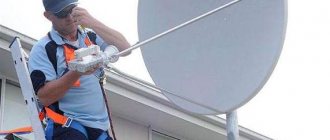
- Assembling and installing a satellite dish - Assemble the satellite dish, according to the attached instructions, install the converter on it (if a linear polarization converter is used, it must be rotated to the required angle; for a circular polarization converter, this setting is not needed). Attach the bracket to the installation location and hang the antenna on it.
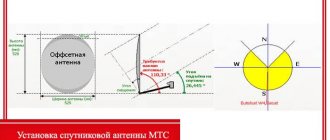
- Preliminary tuning by azimuth (angle in the horizontal plane) - Make an approximate adjustment of the antenna in the horizontal plane - pointing the antenna towards an object previously selected on the map (it is convenient to select an object on the direction line to the satellite). If the tuning is done using a compass, turn the antenna to an angle equal to the value “Magnetic azimuth” parameter (rotation is carried out clockwise from the direction to the North). If during installation you do not have the opportunity to use a compass (or installation using a compass is not possible due to magnetic anomalies), and there are no obvious landmarks for setting on the satellite map , you can adjust according to the sun. To do this, you need to click on the Direction to the sun , after which a line will be built on the map from the installation location in the direction of the sun (the construction is made for the current time and changes during the day). Having determined the difference in angles between the direction towards the sun and towards the satellite, adjust the antenna (during installation it is convenient to navigate by the shadow).
- Pre-setting by elevation angle (angle in the vertical plane) - Set the satellite dish tilt angle equal to the “Elevation Angle” . If using an offset antenna, be sure to subtract the offset angle. The offset angle value can be taken from the documentation for the satellite dish or from the manufacturer’s website; usually it is within the range of 18°-27°. Do not be alarmed if during the installation process you find that the antenna is directed towards the ground; this is quite a common occurrence for offset dishes.
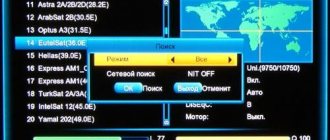
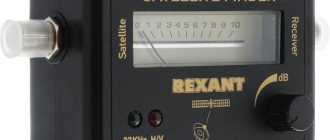
- Fine tuning to a satellite - If you do not use special devices to tune to a satellite, then connect a satellite receiver to the antenna. On the TV screen, in the settings of the satellite receiver, two scales will be displayed “Signal Strength” (Signal Level) and “Signal Quality” . Slowly rotate the antenna in a horizontal plane to the left and right by 10°-15°, trying to achieve a “Signal Quality” of more than 70. If after rotating the antenna this value was not achieved (or the “Signal Quality” value did not change at all), change the tilt of the antenna in the vertical plane a couple of degrees and repeat the above steps.
Cardsharing
Necessary equipment
The set of equipment from MTS for installing satellite TV is as follows:
- antenna;
- Cam module or set-top box;
- converter;
- bracket;
- 2 °F connector;
- coaxial cable;
- set of screwdrivers and keys.
In addition, you may need a plug, and also, if connecting two TVs, a divider.
Receiver setup
In order for the setup of MTS satellite televisions to be successful, you need to configure the receiver. Connecting a TV set-top box requires connecting the antenna cable using an HDMI cable to the TV connector. To completely complete the satellite TV setup and connect the receiver, you need to follow these steps:
- Insert the SIM card into the slot provided for this purpose.
- Turn on the set-top box and wait for the equipment analysis to complete and the 3G signal to initialize.
- Authorize the device using methods that will appear on the TV screen, usually this is a call to the call center or sending an SMS, in some cases the service will be carried out automatically.
- Create and save a user profile. At this stage, in the “Access Level” section, you can set the age threshold and change the password.
- Scan available channels.
TV module
To configure the module, you will need the following steps:
- Unplug the TV.
- Connect the antenna cable to it through the connector marked SATELLITE.
- Install the TV module into the CI port.
- Install a smart card in the TV module so that the chip on it points towards the TV image on the sticker.
- Turn on the TV.
- Go to the mode of viewing satellite TV from MTS, set the necessary parameters.
Settings for satellite TV from MTS
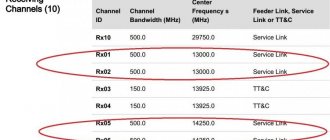
The MTS TV set using the STB Dune HD TV 251-S2 set-top box for watching satellite television does not require additional channel settings, everything will be done automatically. Manual settings will be required when using the Verimatrix CAM module. In this case, the satellite must have the parameters 75.0E ABS 2 MTS TV, the polarization is vertical linear, the position is 75° E., the module type is DVB-S, DVB-S2, QPSK, 8PSK, the speed is equal to 43 or 45 Msymb/ sec, and FEC – 5/6, 2/3.
Manual channel tuning
What settings are needed to watch channels? Manual settings are only needed for the CAM module. To do this, use a list of frequency ranges and transponders.
Features of connecting to MTS satellite TV
The satellite, thanks to which channels from MTS are broadcast, has a wide coverage area. This operator covers 90% of the Russian territory. The main feature of the provider is its focus on the quality of the received signal and image quality, the number of channels fades into the background. For some channels there are several versions of standard time. For example, if you did not have time to watch a movie or program at one time, then on this channel you will be able to see it on this channel, only in a different time zone.
Registration in your personal account for MTS satellite TV
Your personal account on the MTS website allows you to get many privileges. To register, you need to select the “My MTS” button, which is located in the upper right corner of the site, and then decide on the required satellite TV section. To register, you will need to enter your contract number and passport details. Such actions will later make it possible to manage services, view payment history, make settings, view the current tariff plan and change it, pay for the service, find out the remaining traffic, and more.
