What you need to know before purchasing a kit
If you entered into an agreement with MTS and purchased a Smart card to access the service, but refused installation, then you need to purchase an installation kit directly at the MTS showroom for setting up your TV yourself.
The satellite TV package includes:
- Satellite antenna;
- TV receiver with a slot for a Smart card and an HDMI cable;
- When connecting to MTS interactive TV, you need a receiver with a slot for a SIM card with unlimited Internet access;
- cable.
The set can be bought at the MTS store for 3-4 thousand rubles, or separately at various television equipment stores. If you need to save money, you can choose the second option.
Problems and their solutions
On phones with a weak video camera, the data will be poorly visible if you work during the day in bright sunlight. In this case, it is better to carry out setup work in the morning or evening.
If you set the adjustment accuracy parameter to a high level, it may be disrupted due to measurement error. The accuracy must be such that it ensures high signal quality. If you increase it too much, it will not improve it, but will only complicate the adjustment.
Sometimes it is necessary to determine the correct direction of a satellite dish in a location other than where the user is located. The program provides this opportunity. To do this, you need to activate the corresponding item in the settings.
While the program is running, you need to view advertisements. This can be disabled if you purchase the paid version. There are no other differences between these options. The free version is fully functional.
Assembly and installation of a satellite dish from MTS
Especially for its subscribers, MTS took care of those who decided to install a satellite television set. Here are the steps on how to set up an MTS TV satellite dish yourself:
- Use the SatFinder or Protractor as recommended by MTS to make adjustments using your phone. It can be installed on Android and iOS. It allows you to show on the spot the direction from specified points in the apartment to the satellite using a GPS signal.
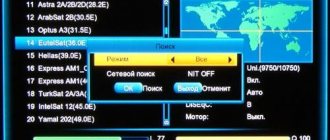
- MTS TV's satellite is ABS 2. To select it, click on the icon "Search" and select it from the list. Then, with your phone in your hand, stand at the desired point. A red line will indicate which direction from the house you need to point the antenna.
- For many Russians, the direction will be southeast. Additionally, there should be no obstacles in the form of other houses, hills, trees, or power lines between the installed satellite dish and the sky. Their presence will be a clear interference with the signal.
- Try to choose the mounting location so that the antenna is directed in the required direction and points upward.
Frequently asked questions when connecting
Considering the complexity of installing television equipment with your own hands, almost no one will be able to avoid difficulties. Most often they are associated with:
- searching for the correct azimuth and inclination angle;
- authorization;
- preparing the receiver for work;
- searching for information about the satellite and frequencies.
In addition, sometimes subscribers encounter unexpected errors that prevent them from enjoying their favorite programs and cause connection problems. Usually their solution does not take much time; the main thing is to understand the reasons for the difficulties that have arisen.
No signal
If the user completely lacks a signal from space, it is worth checking:
- are there any obstacles in front of the satellite dish that are interfering with reception;
- correctness of the chosen direction;
- connection quality and cable integrity;
- no interference in front of the converter.
It is important to emphasize that sometimes the source of interference is the person doing the installation himself. It should not be in front of the antenna and block the signal from space. Eliminating all mentioned sources of problems will restore the operation of the equipment.
No channels
The absence of channels indicates problems with authorization and initialization. To be able to watch digital TV, you should:
- make sure that the SIM card is inserted into the slot;
- make sure the connection to the receiver or cam module is secure;
- check the correct position of the SIM card (sometimes it turns out to be upside down);
- check the integrity of the SIM card.
It is important to emphasize that the lack of money on the balance or the incomplete identification process is not an obstacle to searching for channels during the initial connection, since access to television is provided free of charge for the first 5 days.
Quality problems
Difficulties with signal quality usually arise among those people who make connections without a device and without an application. The optimal solution to such troubles is re-tuning. To make it easier, you should focus on the position of the antennas on neighboring houses. But it is worth considering that third-party customers may use other satellites, so it is worth finding out in advance whether they are suitable as a reference. It is worth adding that sometimes poor reception quality is associated with sharply deteriorating weather.
Errors
If you encounter other errors or connection difficulties, you should call the MTS contact center. Consultants will explain how to set up MTS TV on a satellite yourself or accept a request for a technician to visit you. It is important to note that consultations with support operators are free, but a visit from a specialist requires payment. The cost depends on the client’s region of residence and the distance of the locality from the nearest dealership. It is interesting to add that the company’s specialists are ready to configure third-party equipment, regardless of which provider it belongs to.
How to install correctly - step-by-step instructions
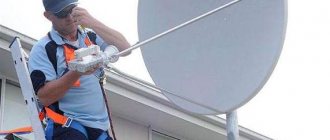
Once you have determined where to install the satellite dish, you should begin installing it. Here are the detailed steps on how to install the MTS dish yourself:
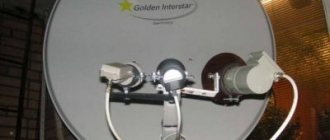
- Take a drill or hammer drill and create holes in the outside wall, attaching a bracket support to which the antenna will be mounted. The supports must fit firmly and keep the plate stationary even in strong gusts of wind.
- Do not neglect the instructions for the satellite dish. Use it to assemble the bracket, mirror (plate) and support rod. The instructions also indicate the necessary bolts for the fastenings. See which bolt to use for which mount.
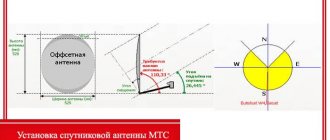
- Place the assembled structure on a support. Position the dish at the angles shown to you by SatFinder or the MTS map. Focus on the indicators: converter position - 26°, antenna tilt -6°, satellite direction degree 134°.
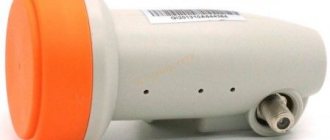
- Place the converter in the rod with its face facing the plate, then rotate it to the desired angle indicated by the card or program.
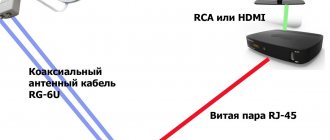
- Connect the antenna cable and the F-connector so that it fits tightly to the braid.
- Connect the converter to the cable and insulate the connection. You can use sealant or regular electrical tape. To prevent the cable from hanging down, it can be secured to the rod using the same electrical tape.
- Route the cable into the room and connect it to the receiver. In this case, the receiver must be turned off from the 220V network.
Preliminary preparation
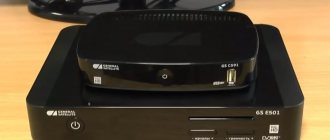
Having decided on the choice of provider and deciding to contact MTS, users must think about how to install the equipment. But before that, they will have to decide what kind of equipment they will need. You will have to choose between 3 options:
- a standard linear set-top box, compatible with any TV, but not distinguished by a large range of functions and options;
- an interactive set-top box that supports options and add-ons offered by modern operators;
- cam module compatible with modern smart TV.
When choosing a receiver, you need to focus on your own desires and the TV to which the TV is connected.
Setting up a TV to watch MTS satellite TV
To set up a satellite dish from MTS:
- Using the TV remote control, open the TV menu and select the HDMI (or similar, depending on the TV model).
- Wait a while before the menu starts and select the “Antenna setup” . You should now select using the receiver's remote control.
- Return to the antenna to loosen the retaining bolts. This is necessary to be able to rotate and tilt the rod, converter and the plate itself by 1-2 cm.
- Rotate and tilt the antenna and wait 5 seconds after each change of position. Then check the signal level on the TV in open settings. Help from a friend, neighbor or family member is recommended at this stage. If you are doing the installation alone, you can move the TV closer to the antenna to visually see what is happening on the screen. The signal is most often shown as two parallel scales (signal intensity and quality).
- Once the high signal is caught, secure the antenna with bolts.
- Next, go to Menu – Search – Channel settings and select the “Auto search” .
- Wait for completion and save all channels that the receiver has found by pressing "OK".
- Done, satellite TV on your Samsung TV is finally configured.
Coverage map
Before connecting to the service, you should familiarize yourself with the coverage map. This information is available on the company’s official website at the link: https://moskva.mts.ru/personal/podderzhka/sputnikovoe-tv/ya-uzhe-vash-klient/nastroyki/samostoyatelnaya-nastroyka-oborudovaniya/. Here you can also find detailed instructions on installing and configuring the antenna.
On the page you can see the map as a whole. Or you can enter a specific address. The better the reception, the darker the area is painted. In areas with less coverage, it is recommended to install a larger diameter plate. You can submit a connection request on the company’s online portal using the following links: https://moskva.mts.ru/personal/dlya-doma/checkconnect/moskva/sputnikovoe-tv or https://sputnik.mts.ru/ #.
Now you can go directly to how to install the equipment.
What to do if TV from MTS does not work
If the satellite dish is installed incorrectly (incorrect tilt/rotation angle), the signal will be weak or completely absent, try to point the antenna correctly. Check if you have set the initial parameters correctly. Also, make sure there is no interference in order to catch the satellite TV signal from MTS.
If you think that you are doing everything correctly, but there is no signal, or the receiver, CAM module, or other device in MTS is broken, issue a return.
Settings Features
The next stage of setting up MTS satellite TV is to prepare the receiver for operation. For this you will need:
- Insert the SIM card into the appropriate slot or connect the cam module to the TV.
- Wait for the 3g signal to initialize.
- Log in by choosing the appropriate method and simply following the system prompts.
- Set up basic equipment settings.
- Start automatic search for TV channels.
- Wait for the process to complete and save the results.
Authorization on smart TV will be a little more complicated, since users will have to specify more parameters. You can find out the exact data in the instructions for the equipment or on the provider’s website.
SatFinder
The most popular application. There are versions for iOS and Android. Unfortunately, its popularity has given rise to many clones of this program with the same or similar names, but much inferior in quality. The program is free, with a simple and intuitive interface. It perfectly determines the direction to the satellite, and, unlike many other applications, it is possible to select a specific satellite. The only thing is that to use it you need a smartphone with a good screen, otherwise satellites will be difficult to see on it.
How to use
Download SatFinder. Launch the applications and, holding your smartphone vertically, wait until the program determines your location. Your smartphone must have GPS functionality.
Next, select the ABS-2A satellite from the application menu, and it will help you point the antenna exactly at the coordinates of the selected satellite. The yellow arrows will indicate the direction in which to move the smartphone until it is pointing directly at the satellite, at which point the arrows will change to green and you will hear a beep. Next, you will need to rotate the antenna in the desired direction.
The video demonstrates the operation of the SatFinder application. We will talk more briefly about other applications.