INSTALLING AND CONFIGURING SATELLITE TV
Before you begin installing satellite television, you need to decide on the main points: - what channels do you want to watch:paid, free, scientific, entertainment, news;
- what is your monthly budget?
Do you agree to pay a subscription fee or want to watch only free channels;
-which satellites carry the channels you are interested in;- which receiver (receiver) do you prefer:
a simple one with a minimum set of functions and limitations in reception, or a modern HD tuner, with rich recording functionality, reception of HD and 3D channels, high quality channels and sound. Accordingly, the price of the latest receivers is higher;
- what antenna do you choose?
simple stationary or rotating; for rotating, a free view in the direction of the satellites is required.
Next, we will briefly discuss the steps for installing a satellite dish:
1. Selecting a location for installing a satellite dish
So you have decided on the channels and satellites.
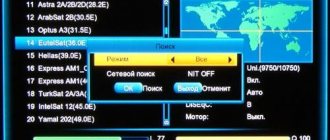
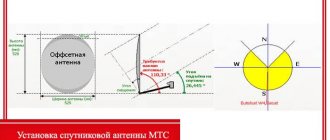
Now you need to choose a place to install the antenna. It is necessary to take into account that the satellites are located in the aisles from the southwest to the southeast. Elevation angle and azimuth - the main angles that are set on the antenna can be determined using the appropriate formulas; in practice, tables are used; these angles are individual for each satellite. The installation site must be open and free from any obstacles (houses, trees, power lines, towers) on the path from the antenna to the satellite. The video that you will find on this page quite clearly presents all the points regarding choosing a location, choosing equipment and setting up a satellite dish. 2. Mounting and installing the antenna
Assemble the antenna according to the assembly video. At the prepared site, it is necessary to install and secure the crossbar (support). When installing on the surface of the ground, the support must be filled with cement mortar and allowed to stand. When installing the mount on the wall of a building, holes with a diameter of 14-20 mm are drilled in it and anchor bolts and dowels are used. When installing the antenna on a balcony or loggia, a thin partition must be drilled through and the support must be tightened with long bolts. Next, we mount the antenna and point it at the desired satellite using the compass. We set the convector, connect a device to determine the signal strength or a control receiver with the transponder set. The position of the converter is determined by moving it in the holder while simultaneously assessing the quality of the picture on the TV screen. To do this, the antenna must be located in a place convenient for tuning.
EUTELSAT W4 (Eutelsat 36A) (36E)
Telecommunications satellite of Eutelsat , located in Geostationary Orbit at 36° East longitude. Launched into orbit on May 24, 2000. The satellite provides television broadcasting and data transmission in the territories of: Russia, CIS countries, Africa, Nigeria
Large satellite providers: ( Tricolor TV ), ( NTV + ), ( Tricolor Internet )
Available TV channels and other satellite transponders in Russia:
| Transponder and Polarization(Freq) | Symbol Rate(SR) - FEC | Channel/Provider | Encoding and Stream |
| 11727 Left | 27500-3/4 | Tricolor TV + Telepoisk (FTA) | DVB-S2 MPEG4 DRE |
| 12073 Left | 27500-3/4 | NTV + | DVB-S2 MPEG4 (HD) Viaccess 3, 4 |
| 12111 Left | 27500-3/4 | Tricolor TV | DVB-S MPEG2 DRE |
| 12174 Left | 4340-3/4 | TNV (Tatarstan) | DVB-S MPEG2 |
| 12190 Left | 20000-3/4 | Tricolor TV | DVB-S MPEG2 DRE |
| 12226 Left | 27500-3/4 | Tricolor TV + Inforkanal (FTA) | DVB-S MPEG2 DRE |
| 12245 Left | 27500-3/4 | NTV+ | DVB-S MPEG2 Viaccess 3,4,5 |
| 12265 Left | 27500-3/4 | NTV+ | DVB-S MPEG2 Viaccess 3,4,5 |
| 12284 Right | 27500-3/4 | NTV+ | DVB-S MPEG2 Viaccess 3,4,5 |
| 12203 Left | 27500-3/4 | Tricolor TV+Soyuz,Tv Mall(FTA) | DVB-S MPEG2 DRE |
| 12322, 12360 Right | 27500-3/4 | NTV + | DVB-S MPEG2 Viaccess 3,4,5 |
| 12341,12380 Left | 27500-3/4 | NTV + | DVB-S MPEG2 Viaccess 3,4,5 |
| 12399, 12437,12476 Right | 27500-3/4 | NTV + | DVB-S MPEG2 Viaccess 3,4,5 |
| 12418, 12456 Left | 27500-3/4 | NTV + | DVB-S MPEG2 Viaccess 3,4,5 |
When the satellite dish is configured for the Eutelsat W4 , it is also possible to receive TV channels and other channels from the Eutelsat W7 satellite
To receive TV channels from the Eutelsat W4 in MPEG2 format, you need a receiver with the ability to receive FTA (Not encrypted) channels, that is, any satellite receiver.
To receive TV channels in MPEG4 format, you need a satellite receiver with the ability to decode MPEG4.
To view the Tricolor TV , you need equipment with DRE decoding capability (DRE, DRS, GS receivers) or a complete set of Tricolor TV .
To receive TV channels from the NTV+ package, you need a set of NTV+ equipment.
NTV+ HD packages can only be received on specialized HD receivers
all NTV transponders and tricolor transponders on one satellite dish; the diameter of the satellite dish must be at least 0.6 meters for reliable reception of TV channels from operators. Please note that in order to receive NTV Plus and Tricolor on one satellite receiver, you need to install a CI module in the receiver to decode the channels of one of the operators.
Questions and answers
List of LG TVs for which an update is available when connecting directly to the Tricolor TV satellite dish and using the CI (CAM) module.
UPDATING YOUR TV FROM THE OPERATOR'S SATELLITE SIGNAL When an updated version of the TV software appears in the operator's digital signal, a dialog box about the found update is displayed.
- After pressing the “YES” button, you can continue watching TV on any channel.
- The update will be downloaded automatically, immediately after turning off the TV (using the remote control button) in the background. (Download time varies depending on operator data speed, TV model and can take up to 6 hours.)
- When you turn on the TV, a notification about a successful update will be displayed (depending on the model), or the software download will resume (if there was not enough time in the off mode).
Note: • When the TV turns off, it turns off the screen and switches to the OTA (software update Over The Air) service channel, where the digital stream of the software update file is broadcast. • If you answer “NO” in the update request dialog box, the TV will not update, and the next time you turn on the TV, this dialog box will appear every time until you agree to update.
ADDITIONAL INFORMATION To check the update (find out the current and updated version), go to the TV Menu “Menu/Settings” and press the red button (depending on the model).
For webOS and NetCast Smart TVs:
When you access the Software Update menu (must be in the ON position), the TV will display information about the current and updated software version, but the download progress bar may not be active (this is normal). It will become active if you are watching a TV channel from transponder 12303, L, 27500 (for example: 22, “TV-TV”).
FORCED UPDATE ON TV FROM SATELLITE (MANUALLY) To update OTA (SSU) from satellite manually, you need to switch the TV to the transponder containing the new software version (12303, L, 27500). It is recommended to switch the TV to channel number 22 “TV-TV”. The download should start automatically with a progress bar showing on the channel information bar (click OK while viewing the channel, depending on your model). After this, you can continue watching TV on any channel. The update will be downloaded automatically, immediately after turning off the TV (using the remote control button) in the background.
The software version and menu screenshots shown may vary depending on the model.
What should I do if my TV is not in the list of those updated via satellite signal?
If you do not find your model in the list of TVs that can be updated from satellite via OTA update, you can update the TV manually from a USB device. To do this you will need: • USB drive (FAT32, NTFS), with available space of 70MB (for non-Smart TV) and up to 900MB (for Smart TV) depending on the model. • PC (laptop) with Internet access. Connect the USB drive to the PC, visit the official LG website section SUPPORT > DOWNLOADING UPDATES
Enter the model name (on the back of the TV on the serial number or in the menu):
Create a folder on the USB drive named LG_DTV in the root directory. Place the downloaded *.epk file in this folder (you may need to unpack it from the archive first). Connect the USB drive to the TV. The TV will prompt you to update the software. Agree. (Perhaps, over the update proposal, a proposal to play media content will be displayed - REFUSE). (Depending on model). The TV will highlight the download status (if this does not happen, you can check the download status in the GENERAL > TV Details > scroll up menu). After installation, you need to restart the TV. Don't forget to reconnect the satellite dish cable.
Enjoy watching!
For more detailed information, contact the LG Electronics support service by calling the hotline: 8-800-200-76-76 Before contacting, check the TV model (on the back near the serial number) and software version. You can also update the TV software from a USB drive. To do this, visit the “Support” section on the website.
Quick installation and configuration of a satellite dish with your own hands.
Today we will learn how to quickly set up a satellite dish. We will tune it to the EUTELSAT 36A/B 36°E satellite. NTV Plus, Tricolor TV, Lebed are located there. But we are more interested in NTV Plus and Tricolor TV.
For this we need the antenna itself
with fasteners
And tools:
- Several anchors 6 mm in diameter and 6 cm long, or you can take 8 * 8;
- Keys;
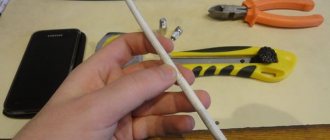
- Stationery knife;
- Wire cutters or pliers.
- We will also need a hammer drill to drill holes in the wall.
At home or somewhere convenient, you first need to assemble the antenna, i.e. Immediately fasten the rod that holds the converter, fasten the converter itself, all the fastenings and assemble the stand. We will mount it on the wall.
Before installing the mount on the wall, you need to decide on the place where we will actually mount it. The place should be free, there should be no trees or any additional wires around.
The fastening pipe must be attached to the wall so that it is as vertical as possible; you can measure it by level.
We place the pipe where we need it, use something like a screwdriver or a marker to make marks on the wall in the holes.
Then we remove the pipe and drill holes in the wall.
We install our mount on the wall, putting it on the 3 anchors already inserted in advance.
We carefully secure it all with anchor nuts.
Then we take the antenna in our hands, slightly loosening the mount on it, and put it on the pipe, securing it so that the structure holds well, but can move a little to the right/left.
To configure any satellite, arbitrary, there are a bunch of programs on Android and other platforms, as well as for computers.
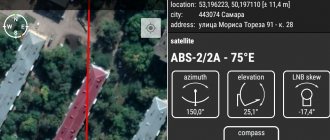
For example, you can install the SatFinder program on an Android phone
The program determines our coordinates and shows the satellite settings.
We are interested in the azimuth and elevation lines (elevation is the geographic direction in which the antenna should be turned).
LNB tilt – angle of rotation of the converter, i.e. the angle at which the converter should be rotated as much as possible for better signal reception.
In addition to this, we are interested in another program on Android - Clinomet.
This is a program that allows you to find out the tilt angle of your phone.
There are many more similar programs, not on Android, that allow you to measure the angle of inclination; you can use any available one.
When installing the antenna, you should first look around, perhaps there are clues around - other already installed NTV Plus or Tricolor TV antennas that will help us determine which direction it should be turned.
If there are any, you can approach another antenna that is already installed and configured. They all have the same design.
The bar that holds the converter should be at the same angle for everyone.
In order to measure what the angle of inclination of this bar should be, we lean the phone against it, having turned on the necessary program in advance, and we see the angle of inclination of 64 degrees.
The next steps are to get your bearings and figure out where the antenna is geographically directed. To do this, you need to approach the antenna from behind, strictly in the center, and look in front of you. It is necessary to find some landmark in the distance, to which we will direct our antenna during installation.
After which we return to our antenna and repeat the procedure, i.e. measure the angle of inclination of the bar. It, as we determined, should be 64 degrees. Then we stand behind our antenna strictly in the center, find our landmark in the distance and point the antenna exactly at it. And here he is:
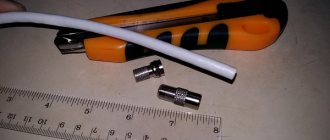
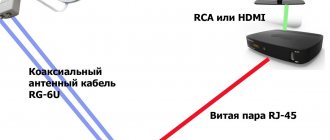
Then we screw the antenna cable to the converter.
Do not forget that you can only tighten the cable when it is not connected to the receiver or the receiver is turned off. Otherwise, there is a chance that the receiver will burn out.
Next, you can configure the receiver itself, just like we configure regular analog channels, i.e. We scan, look at the indicators of signal strength and quality. The most important thing is that we installed and configured the antenna itself, copying the settings from neighboring working antennas.
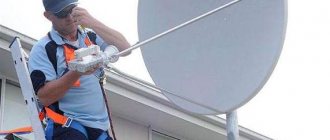
To prove that the antenna is configured correctly, there is a special device called Satellite Finder, with which we will check whether there is a signal from the satellite.
After we have screwed the antenna cable to the converter, the arrow on this device deviates, i.e. we conclude that the signal sensor shows us the presence of a signal from the satellite.
Using this device, you can adjust the antenna to achieve the highest possible signal level.
We fix it on our antenna, namely on the pipe that holds the converter, and carefully turn the antenna together with this device to the right/left.
By doing this, we look at what position of the antenna, the device’s performance will reach its maximum value.
After we have found a position for the antenna that is more favorable for us, it can be fixed.
At the beginning, we left the nuts on the rear mount uncompressed so that we could adjust the position of the antenna by turning it left/right.
After we have decided on the optimal position of the antenna, the nuts need to be secured.
As a result, we installed and adjusted the antenna both horizontally and vertically, and achieved the antenna position in which the signal value is maximum.
All that remains is to secure the antenna cable, using tape or clamps, and the antenna is ready for use.
Video review can be viewed at the link below
Like
- < Back
- Forward >
Choosing a location to install the antenna
Choosing the right location for the antenna is the key to high-quality television broadcasting. If the location chosen is not suitable, then no matter how hard you try, the dish will not be able to be tuned to the satellite.
How to install a dish antenna correctly
- The antenna must be installed only on the wall of the house located on the south side. If the apartment is located so that not a single window faces the South, you need to fix it where the South will be closer, and then start tuning to the satellite.
- When choosing a wall, you need to take into account the following: there should be no tall buildings or trees in the immediate vicinity of the dish; they can interfere with the signal.
- Another factor influencing the installation of the dish is its location relative to the TV. The closer they are to each other, the better the signal will be, and therefore the image.
Unfavorable places to install the Tricolor plate:
- glazed balconies and loggias;
- places without drainage systems;
- an area where the plate can be covered with snow;
- roofs with a gable roof or more, asymmetrical roofing.