Compared to terrestrial and cable television broadcasting, satellite television has many advantages. First of all, I would like to note the large number of channels. Thanks to such diversity, both adults and children will be able to find something exciting and truly interesting for themselves. The quality of the picture and sound also deserves special attention. As a rule, service providers connect a satellite dish to a television receiver. Installation fee is charged separately. However, knowing how to connect a satellite dish to a TV, you can easily cope with this task yourself.
What you need to install the antenna
A satellite dish, also known as an antenna, is a kind of mirror that easily reflects the signal from the satellite. This signal then goes to the converter, which transmits the data to the receiver. It is through the cable that is connected to the receiver that the television device receives the signal. Connecting satellite TV is not at all difficult.
What is needed for proper installation? A typical installation kit includes:
- The plate itself. It is she who transfers the signal received from the satellite dish to the converter;
- Brackets and anchors. They are needed for fastening. These elements are selected depending on the size of the plate;
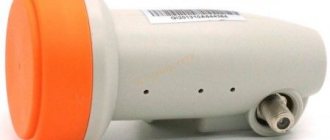
- Head, or converter. This device converts the signal received from the satellite into a digital one and transmits it further to the set-top box;
- Disek (Digital Satellite Equipment Control). This element is required to combine several converters;
- Cable. Regular TV cable;
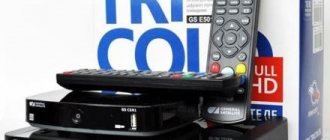
- Receiver. This set-top box will allow you to watch public channels. If the user plans to watch paid channels, then it is necessary to select a device with a card receiver;
- F-connectors. They are necessary for connecting cables.
Before purchasing a satellite dish, you should carefully read its starter kit. The contents of some models may vary slightly.
Connection nuances
When installing and connecting satellite equipment, there are a number of nuances that need to be taken into account. The main ones will be discussed below.
F connector connection
The television cable is attached to all devices using an F-connector. To connect it, you first need to cut off the top insulation by 10-15 mm and bend the shielding braid underneath onto the cable. Then you need to cut off the second layer of insulation and expose the central core.
Next, you need to screw the F-connector onto the television cable over the screen so that the cable core protrudes beyond its edge by 2-3 mm. Then you need to cut off the shielding braid protruding beyond the edges of the F-connector. The cable prepared in this way is connected to the converter, TV or disk.
Diseqc connection
Diseqc (or disek) is a device that is required to connect several converters . A cable must be connected from each converter to the disk and connected using an F-connector. In the same way, the cable from Diseqc is attached to the receiver.
Advice! The disk must be carefully hidden from moisture during precipitation. The cable connections do not need to be wrapped with electrical tape, as this will lead to the formation of steam. It is better to use heat shrink; it fits much more tightly to the cable and the F-connector.
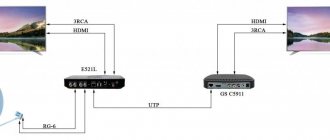
Multiswitch connection diagrams
A multiswitch or switch is a device designed to multiply a signal from one dish to several receivers, be it a receiver or a TV, and at the same time provide the devices with independent viewing of different channels in different polarizations.
On a note! Some multiswitches allow you to send a signal to one TV receiver from several independent satellite dishes, as well as from an over-the-air street or indoor antenna.
The cable length from the antennas to the multiswitch can reach up to 50 meters, and from the switch to receivers or TVs - up to 100 meters. For large lengths or multiple joints, it is recommended to use amplifiers; they will help compensate for signal loss.
The connection diagram is as follows. Wires from all antennas converge to the multiswitch, are connected, after which a cable runs from the switch to the connected devices (set-top boxes or television panels). Their number can vary from 4 to 80.
Multifeed assembly
A multifeed is a device that is used when installing additional converters on a satellite dish to achieve the correct angle and required height in relation to the central head . The use of several converters is relevant when the satellites are close to each other, and the angle between them is no more than 10°. In this case, the main converter is tuned to the satellite from which the weakest signal is received, because only part of the antenna reflector works for the additional heads.
The most common antennas in the Russian Federation are Supral. The multifeed assembly for them looks like this:
- a clamp assembled from two halves is attached to the converter and tightened with a connecting bolt;
- the clamp with the head is attached to one of the strips, after which it must be tightened with a bolt;
- the strip with a fixed clamp and the empty strip are installed perpendicularly in the adjusting bracket and tightened with screws;
- A free adjustment bracket is fixed into the head holder on the satellite dish, and a bar with the assembled multifeed is inserted into it at an angle of 90°.
The location of the multifeed in relation to the central converter depends on where the satellites are located. To make adjustments, tighten or loosen the screws on the brackets. Once the converters are set up, all connections must be carefully tightened.
Correct installation of the plate
It is best to install satellite dishes in an easily accessible place. This will allow you to easily and quickly fix the device or repair it in case of breakdown. The installation kit contains instructions that will help make the installation process quick and easy. By following the instructions, you can turn on satellite TV within a couple of hours after purchase. The following factors must be considered during installation:
- The bracket on which the plate is mounted must be attached very tightly. Otherwise, strong gusts of wind may tear the antenna off the roof or wall of the building;
- In order for the bracket to be stable, it must be installed correctly. For proper installation, the converter must be directed downward;
- In order for the cable to remain operational for as long as possible, it must be sealed and securely secured with zip ties or electrical tape;
- The plate must be mounted so that it can rotate freely in any plane. Thanks to this, it can be configured faster.
Initially, the antenna must be pointed south. In order for it to catch the signal well, there should be no obstacles or interference in its path, including buildings, trees, etc. Even the slightest obstacles can significantly degrade the quality of the received signal. Modern TVs are equipped with a DVB-S2 tuner. It allows you to watch satellite TV without a set-top box - a receiver. However, it is necessary to understand that dishes that are connected in this way will only be able to catch those channels that broadcast in a foreign language. To view domestic channels, you need to purchase a CAM module. This device is connected via a PCMCIA connector. You can purchase such a module either separately or together with the starter package.
How does satellite TV work?
In the direction of the southeast, south and southwest above the equator, at the same place relative to the Earth, satellites are located that receive the signal from the television broadcasting center.
The received signal is transmitted by satellites to Earth, covering large areas like the beam of an electric searchlight. In this case, the signal level itself decreases from the center to its edges.
It should be noted that the signal does not pass through natural and artificial barriers, such as walls, buildings, trees, etc. This factor should be taken into account when choosing a location to install the antenna.
The satellite signal is focused onto the convector using an antenna. After undergoing primary processing, it is transmitted to the receiver via an antenna cable. The receiver converts it to a television channel and then transmits it to the TV.
Connecting a dish to a TV without a receiver
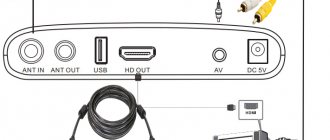
Connecting a satellite dish directly to your TV has both advantages and disadvantages. To connect, you need to connect a TV cable with an F connector to the LNBSatellite input. Immediately after this, you can configure the channels. On television devices of today's popular brands, such as Samsung, Philips, LG, etc., this process is very similar. Only the appearance of the menu and the names of items may differ.
After connecting the antenna, you need to turn on the TV, open the settings menu and select “Automatic channel search”. The satellite must be noted as the signal source. After this, the user will be able to select the desired satellite. Of course, to watch satellite TV you need an element such as a receiver. True, modern TV models are equipped with digital tuners. This tuner gives the user the opportunity to watch satellite TV without a receiver.
So, by going to the settings menu, you will need to specify which channels you need and which should not be shown. So, if the user plans to turn on and watch exclusively free channels, you should indicate that all encrypted channels should be skipped. Next, a search will be launched, during which channels are connected. Once it is completed, the user can immediately start watching satellite TV.
Satellite dish: installation and configuration (video)
Setting up a satellite dish yourself
.
Nowadays, satellite technology has come to almost everyone's home. And many people think that setting up a satellite dish is a complicated process. In fact, this is not so, and if you understand everything, then everything is very simple.
Today we’ll talk about self-assembly, installation and configuration of a satellite dish, or, as another way to put it, -0 dishes.
Setting up a satellite dish for dummies
Today, the most affordable set for satellite television can be purchased for $50-80. So it's time to switch to digital technologies in television broadcasting.
The kit includes:
— The receiver (tuner, receiver) is the most expensive piece of equipment. It should be chosen carefully, since the channel is broadcast in mpeg 2 and mpeg4 (better) formats.
— Antenna (mirror) — 0.7 -1.2 m. Designed to form the receiving beam into focus, where the signal itself is received.
— Converter (head). One or several, three mostly in our area. One per satellite. Universal with linear polarization.
— Multifeeds (mounting converters). 2 pieces
— Disek — switch between converters. Since the tuner can simultaneously receive a signal from only one converter, it is definitely needed when receiving two or more satellites.
— Coaxial (television) cable with a resistance of 75 ohms. It is advisable to take it with a margin of 3-5 meters.
— F connectors (plugs for connections). There are 8 pieces for three satellites.
— Bracket for fastening and a dowel or anchor for it.
Before you proceed to setting up satellite channels
. You need to set up a satellite dish.
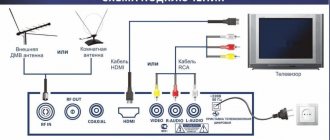
Connecting to a TV via a receiver
TV panels with a built-in tuner have several advantages over connecting through a receiver. First of all, there are no wires. Another advantage is convenient control. In a particular case, you will have to control the channels with two remote controls (one for the TV, the second for the set-top box). At the same time, connecting through an external receiver is simpler. To connect the set-top box you can use:
- Antenna input;
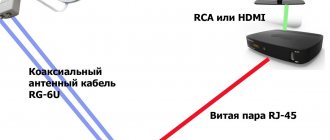
- The familiar “tulip” (aka RCA) is used as an analogue television transmission;
- HDMI;
- Hardware connector;
- SCARD.
When connecting the receiver through the “tulip”, the user receives a low-quality picture. You can get a high-quality and clear image if you connect an antenna via HDMI.
Do not forget that in addition to its main purpose, the receiver can also perform additional functions. For example, it can easily play video or audio from a flash drive. With it you can view family photos in digital format. In addition, the set-top box allows you to connect your TV to the Internet. After connecting all the necessary cables to the receiver, the satellite dish will be installed. You need to turn on the TV and set-top box, after which you can start setting up.
Setting up a satellite dish
Make sure the antenna is installed correctly and facing south.
Making settings on Sirius. Setting up satellite antennas yourself begins with setting the frequency 11766 and speed 27500 on the receiver. Select polarization “H”.
We see two bands on the receiver:
- red – displays the connection of the dish and satellite signal;
- yellow – shows the level of the received signal.
If the antenna is connected correctly, the signal level reaches 40%. In this case, the signal quality is zero.
We are approaching the culminating question of how to set up a satellite dish yourself. Set the initial position of the antenna all the way to the left and up.
Then we carefully turn from left to right and control the level of signal quality. If it is absent, lower the plate 2-3 mm down and repeat the procedure in the opposite direction - from right to left until it stops. We carry out this algorithm until a yellow stripe appears.
We control the tilt of the plate using specially marked numbers on its fasteners.
At this stage, it is difficult to independently orient the dish at height and at the same time control the appearance of the signal on the receiver. Therefore, it is necessary to involve an assistant in the work.
If the yellow bar indicator is within 21%, we fix the position.
We carry out more precise adjustments
Lowering the antenna slightly, we make a slight turn to the left. If the signal quality has deteriorated, we return to the starting position. We make a turn to the right, as well as up and down.
When the signal reaches 40%, we proceed to setting up the convector. We rotate first clockwise and then counterclockwise and achieve a signal improvement of up to 65-70%.
Setting up side convectors
Once the main plate is set up, the side convectors are much easier to set up.
We configure on Amos. On the receiver we set the frequency to 10722, speed to 27500 and polarization “H”.
For Hotbird the frequency is 11034, the speed is 27500 and the polarization is “V”.
The setup procedure follows the example of Sirius.
By bending the side brackets from the upper left corner to the right and gradually lowering by 2-3 mm, we achieve the appearance of a signal.
To improve the signal quality, we rotate the converters around their axis. First rotate clockwise and then counterclockwise.
So we figured out how to set up a satellite dish yourself. With some experience and a work plan, this is not difficult to do.
After final adjustment of the antenna, carefully secure the cable and turn on the SCAN function on the tuner. The tuner will independently scan the TV channels available for viewing and display a list of them.
After this, you can start watching TV shows.
Search channels
Setting up channels depends mainly on the device the user is working with. Thus, the Tricolor module without a receiver allows subscribers to watch satellite television at absolutely any time. Such a device replaces additional equipment. However, in order to connect such a module to a TV, the latter must have the appropriate connectors. It should be noted that all modern TV models are equipped with such a connector. But in older models it may be missing. You can determine the presence of a connector, as well as its location, using the instructions from the TV.
To manually tune channels using the Tricolor module (without using a receiver), you need to select and enable manual tuning on the TV. In addition, you need to enter the following parameters: modulation - QAM 64, transmission speed - 6900 ks/s. After this you need to enable search.
Don’t forget that the Tricolor module has several significant advantages:
- Allows you to unblock channels;
- Protects against illegal viewing attempts;
- Transmits only high quality signal;
- Allows you to save space;
- Significantly reduces energy consumption.
Thanks to fast and easy connection, as well as the above advantages, the Tricolor module is becoming increasingly popular. Moreover, with its help you can watch satellite TV without a dish. How is this possible? Initially, the phrase “satellite television broadcasting without a dish” seems absurd. However, in the common understanding of citizens of our country, “satellite television” does not mean receiving a signal from a satellite at all, but a set of channels that cannot be received on a simple antenna.
Tricolor without a dish will allow you to watch your favorite channels using Internet access. Movies and any TV shows in high quality are available to everyone at a network transmission speed of more than 10 Mb/s. It is very easy to access satellite channels in high quality. You just need to connect the input port of the Tricolor receiver and the output port of your home router. After this action, an automatic connection to the Internet will occur.
It should be noted that the Tricolor module was initially installed on a broadcast source such as a satellite. However, he can show without a plate. To do this, using the control panel through the installation menu, you need to set “Internet” as the broadcast mode. A general list of programs available for viewing will appear. You need to select one from the list and press the desired button on the remote control. Throughout the test period, Tricolor TV channels will be broadcast free of charge without a dish.
Setting up an antenna for a satellite
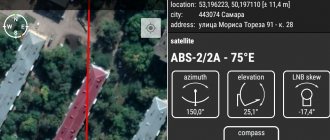
Having detailed background information, it will not be difficult to set up a satellite dish yourself. Today there is an application for mobile phones and tablets called SatFinder. In it you can select a satellite television provider or find a specific broadcaster by its name. The application produces the following data.
- Direction to the satellite on the map, allowing you to choose the correct side of the house for installing the antenna.
- Horizontal azimuth. This parameter describes how many degrees the plate should be rotated relative to the north-south direction. Today, every phone has a software compass that makes it easy to check the correct installation.
- The deflector is tilted vertically. You need to be extremely careful with this parameter. Some antenna manufacturers make a converter-deflector system. Other products require adjustment of the angle of inclination.
Having all the configuration data in hand, the user must mount, secure, rotate and tilt the antenna. Then you can do fine positioning. To do this, select an info channel on the TV (how to call it depends on the tuner and TV model). Then, by gradually turning and changing the tilt of the antenna, you should achieve maximum indicators in the lower corner of the screen.
Possible problems
Connecting a satellite dish yourself can be quite difficult. Especially for those who have never encountered such a problem before. When connecting, the most common errors made are:
- Incorrect plate diameter selected. If the antenna size is incorrectly selected, it may cause deterioration in sound or picture quality during adverse weather conditions. This problem can only be eliminated by replacing the plate;
- The traverse is installed incorrectly. It should be noted that it must be secured below the bracket, and not above it. If done incorrectly, there may be signal problems;
- Pass-through sockets are used. If you use this type of socket, the signal may disappear completely. It is best to use the finished sockets that come with the television sockets;
- Using splitters or splitters. This element is suitable exclusively for analog TV. The fact is that satellite channels are transmitted in a form that a conventional splitter is not able to pass through;
- Using a large number of connections. This leads to the loss of a useful signal, which means the reception quality deteriorates.
What problems can arise directly with the Tricolor TV module? The most common problem is no signal. What is meant by this problem? If there is no image on the screen, but there is noise or just blackness, this does not mean at all that there is no signal. This screen indicates that the receiver is not connected to the TV. It should be noted that the physical connection and the cord inserted into both connectors do not guarantee that the TV can be seen by the receiver. In this case there is a connection, but the receiver may still not work.
If the TV receiver shows the message “No signal,” the problem can be corrected. To do this, press the “Menu” button on the receiver’s remote control. If the main menu appears on the screen, it means that the set-top box is connected to the television device. If the menu does not appear and the “No Signal” message continues to appear on the screen, the problem may be that the TV does not see the receiver. In the latter case, you won’t be able to watch Tricolor TV.
How to watch encrypted channels on TV? To do this you need to get special access. A TV smart card allows you to get more features. Using the card, the equipment can decode encrypted channels. This means that the number of channels with the card on the TV will become much larger.
Now you know how to watch satellite channels on TV. It turns out that installing an antenna yourself is not at all difficult. An attentive person can easily cope with this task.
Check before purchasing
Before purchasing an antenna for your cottage or home, you need to make sure that its installation is possible and that nothing will interfere with the reception of the signal from the satellite. If there are multi-story buildings, tall trees or other obstacles around, the signal will be unstable, and the image on the screen will be of poor quality or will be interrupted. You also need to make sure that the necessary equipment is included in the kit. In addition to the dish, converter and receiver, the box must contain a television cable, fasteners, operating instructions, a smart card, a cable for connecting the receiver to the TV, etc. You can check the contents using the user manual.