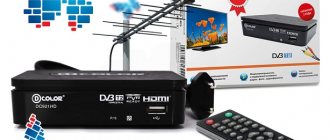
Comparison of models of DVB-T2 set-top boxes Selenga
Currently the company has 8 digital receivers. Their comparative characteristics are presented in the table below. It should be borne in mind that the list does not include functions that are present on all receiver models, for example: teletext, program guide, subtitles, etc.
| Options | T20D | T40 | T42D | T60 | T81D | HD80 | HD860 | HD950D |
| DVB-T2 support | + | + | + | + | + | + | + | + |
| Cable TV | — | — | + | — | + | — | — | + |
| USB | + | + | + | + | + | + | + | + |
| Display | — | — | — | — | + | + | + | + |
| Wi-Fi availability | + | + | + | + | + | + | + | + |
| Frame | Plastic | Plastic | Plastic | Plastic | Plastic | Plastic | Metal | Metal |
| Digital TV connectors | HDMI | HDMI and RSA | HDMI and RSA | HDMI and RSA | HDMI and RSA | HDMI and RSA | HDMI and RSA | HDMI and RSA |
| Tuner | Maxliner MXL 608 | RT836 | Maxliner MXL 608 | RT836 | Maxliner MXL 608 | RT836 | RT836 | Maxliner MXL 608 |
| power unit | External at 2A | External at 2A | External at 2A | External at 12V 1A | External 1.5A | External at 12V 1A | Built-in 220V | Built-in 220V |
*To view programs over Wi-Fi, you will need an additional adapter. On models T42D, T81D and HD950D, you can additionally watch the Megogo portal from YouTube and IPTV.
Selenga t2 ru firmware
the Youtube online service
is to use new
API KEYs
(keys for working with the YouTube API service).
This is Youtube's policy .
In the new firmware for the model range, made on the GX3235S, Selenga-
T42D
,
T81D
,
HD950D
,
T20DI
, the import of API KEYs from a USB flash drive is implemented.
The file youtube_apikey.xml
containing the key must be located in the root directory of the flash drive.
We insert the flash drive into the USB port of the set-top box and do the import using a simple scheme: Go to MENU – Youtube – Options (Red Button) – Import Api Key – OK.
If everything went well, we will see the inscription
“Import Api Key Successful!”
Let's look carefully at the photo: 1) Menu
2) Youtube options
3) Successful key import!
An example file youtube_apikey.xml can be downloaded here – Download “youtube_apikey.xml”
Structure of the youtube_apikey.xml file:
where xxxxxxxxxxxxxxxxxxxxxxxxx is the API KEY.
About the firmware:
Updating the software (firmware) of your equipment is carried out only in cases where any problems arise, or the update will add useful functions to the device. Flashing devices unnecessarily is not recommended, because... During the firmware update process, there is a possibility of equipment failure. If you are not sure that you can handle updating the firmware on your own, we recommend contacting the appropriate service center and qualified specialists.
Download SELENGA firmware file:
SELENGA T40 receiver firmware file : - SELENGA T40 without display, MSTAR 7T01 processor - download; — SELENGA T40 with display, MSTAR 7T01 processor — download; SELENGA T50 receiver firmware file : download; SELENGA T90 receiver firmware file : - SELENGA T90, MSTAR 7T01 processor - download; - SELENGA T90, MSTAR 7802 processor - download; SELENGA HD80 receiver firmware file : download; SELENGA HD860 receiver firmware file : download; HD860D receiver firmware file : download.
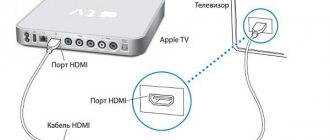
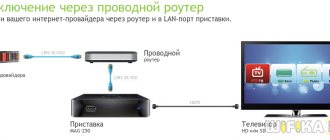
Connecting Selenga digital set-top boxes using the T42D and T81D models as an example
Remote control for Selenga set-top boxes
For visual indication of the connection process. We took the 2 most popular Selenga models at the moment: T42D and T81D. For convenience, all the company’s consoles are largely identical. Differences can only be in possible options for connections to the TV and internal filling. Everything else, including the remote control and menu, looks identical. Therefore, the instructions will be suitable for any Selenga model.
The general scheme for all options will look like this:
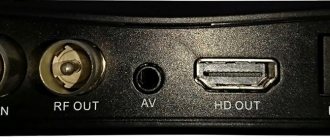
Uses RSA and HDMI
In this case, the connection can be made in 3 different ways:
- Via HDMI. It is a cable with a “flat” input and costs between 300-500 rubles. Usually it is not included with the console. However, if your TV has this input, then it should be used first. HDMI provides better image transmission and is more durable.
- Via RSA. They come in various configurations. The one presented is called 3.5 Jack / 3 RSA. The T42D model has inputs for 3RSA, not 1.
- In older TV models, there are often situations in which both connector options are missing. In this case, there is usually an input for SCART. To connect it, an adapter with 3RSA is used.
Thus, you can connect a DVB-T2 Selenga receiver in almost 90% of cases. The remaining 10% is due to various problems with the TVs themselves.
The main problems of Selenga set-top boxes
When using receivers, unforeseen situations are also possible in which the operation of the set-top boxes may be partially or completely disrupted. Fortunately, for most problems a very real solution can be given. We will try to sort out the most popular mistakes below.
The set-top box searches for few channels or does not search at all
- Recheck that the device is connected correctly.
- Check that the correct display mode is selected on your TV. If it is selected incorrectly, then there will be no pictures or menu of the console.
- Make sure you have selected the correct antenna.
- Try reconfiguring the console manually.
The console crashes and reboots on its own
- Reset your device to factory settings. The corresponding section can be found in the menu.
- Check for the latest firmware.
- Make sure the cable and power supply are working properly.
The console freezes
- If the tuner freezes when turned on, this is normal. This is how he establishes a connection.
- If freezing occurs on a regular basis, you will need to reset the receiver to factory settings and reconfigure the channels.
How to rename channels
This can be done in the “Programs” menu. There is a special option for editing TV channels.
How to connect Selenga to an old TV
Depending on the availability of certain inputs, you can connect the device via a Scart connector or an RSA adapter. There is information about this in the article.
Search and setup of all 20 digital channels on Selenga models
The search procedure is identical for all models of Selenga receivers. If there are any small peculiarities when connecting, then the menu will be the same everywhere and will not pose any special problems when setting up channels. First we will show the automatic search procedure on the set-top box:
- Turn on the TV and go to the display mode in which the set-top box was connected. If you connected the receiver via HDMI, you should select it in the list. RSA usually uses AV mode. Scarth should be named accordingly.
- After this, from the remote control of your Selenga model, press the power button. The console should boot. Click on the menu button.
- We are looking for the channel search section there, it is depicted in the form of the World Wide Web.
- To begin with, select Autosearch. The receiver will independently select the required signal reception frequency and find available digital channels. When finished, the list will be saved.
- If unforeseen circumstances arise. For example, less than 20 TV channels will be found. The setup will have to be done manually.
- To do this, before starting work, you should find out the reception frequency from the TV tower in your region. This can be done using the CETV card. Just enter your area on the map and look at the antenna parameters for both multiplexes. We will be particularly interested in the channel number.
- After this, we go to manual search and indicate the numbers previously found on the map. Click OK and the device will begin searching for a signal at the frequency you set for receiving digital terrestrial broadcasting.
Connecting Selenga receivers to WiFi
All Selenga models have the ability to access the Internet using a WiFi connection. You can adapt the set-top box for such work using a special adapter connected via the USB connector. It costs differently, depending on reception capabilities and distance from the access point. The average price is around 300 - 2000 rubles.
To enter the network, on the set-top box itself you need to:
- Open the USB section in the device menu.
- Select "Internet".
- Enter the network password, if required.
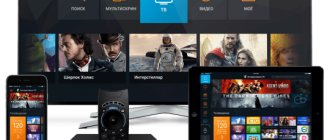
After connecting on the Selenga console you will be able to:
- Watch movies and videos from YouTube and Megogo services.
- Find out the weather.
- Use the Gmail service.
- Connect to IPTV.
- Set up an RSS news feed for any website.
In this case, the speed of a particular service will depend on the connection itself.
Connection problems
According to reviews, not everything goes so smoothly for everyone. If the device does not find any channels, you need to:
- on the Selenga remote control, find and press the “MENU” button,
- select "Search"
- then “Search Range”
- select auto or manual setting.
Manual search
If this does not help, then you should look for a connection problem. If all cables are connected correctly, in 100% of cases the problem is in the antenna. Most likely it does not accept the DVB-T2 standard. In this case, you will have to additionally purchase one that supports the desired type of signal.
Here, by the way, is a small life hack. Some users who encountered a similar problem caught the signal using ordinary copper wire, but for this the television tower must be very close.
Possible problems
Setting up a set-top box does not always happen immediately and without any problems. More often than not, users experience difficulties loading the playlist, complaining that the device “does not see” the list. Although it is saved on a flash drive according to all the rules. Or when you press the blue button on the remote, nothing happens.
First, you should make sure that the file system of the drive is FAT32. Experienced film experts claim that without fulfilling this condition, nothing will work. Then the playlist format is checked. It should be of the form playlist.m3u (where the first part before the extension is the name). And, if the list is created with any other extension (not m3u), it will also not be played.
Often the solution is to update the set-top box software, downloading the latest, most recent firmware version. Many questions are related to unstable playback of the playlist file. To avoid having broken links, it is important to download collections from trusted sources. Use self-updating sheets.
Where can I find playlists?
To start watching IPTV, you will first need to download a playlist. This is a special list of interactive broadcasts that contains links to channels. Looks like a list, saved in m3u format. On the Internet you can find and download many collections focused on various topics.
In fact, these are the same broadcasts about sports, animals, music, only broadcast via the Internet. You can download the current playlist here: https://smarttvapp.ru/tag/iptv-pleylist/. Sometimes such services are kindly provided by the providers themselves. Just enter “m3u”, “IPTV” or “playlist” in the search bar. And then save the file.
Recording a playlist to a flash drive
There are different ways to load channels into the receiver. Including from a USB drive. Mandatory requirement: m3u list format and no other. The step-by-step process looks like this:
- We save any playlist you like using a PC on a flash drive. The designation type is playlist.m3u, where the name is indicated instead of the playlist.
- We safely remove the drive from the PC port and insert it into the set-top box.
- Go to the “Settings” menu, there we find the “External playlists” section. Create a new playlist. The path to it should be usb://playlist.m3u.
- A shortcut to the list you just added should appear on your home screen. If it does not appear, refresh the page.
Sometimes you need to download a new firmware version. Other requirements include the type of file system on the flash drive (FAT32).