Television, when using digital technologies, makes it possible to watch programs in quality that differs from the analog version. Before setting up digital channels, you need to check the settings on your Sony TV to see if this modification supports this function.
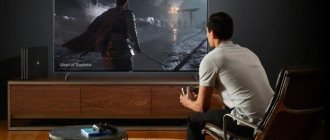
The lineup has both budget options, just for watching TV shows, and entire multimedia centers with the Internet for watching films and TV series, and gaming applications. Buyers can always choose the right device for themselves.
Checking digital broadcast support
Important! Before converting your TV to digital television, you need to clarify information about its capabilities on the website of the manufacturer SONY or the company's dealers.
Determining the TV model
Over the years of its existence, Sony has released a large number of modifications of devices, not all of them work with the DVB-T2 standard. It is possible to tune channels on the TV only after determining the device model.
This information can be found:
- on the packaging label;
- on the TV label;
- in the store’s payment documents and product instructions.
If your TV does not support digital TV
In a situation where tuning digital channels is impossible, there are several ways out of this situation.
It is necessary to purchase a modern model, since older devices do not support many functions, for example, they do not reproduce HD pictures. Today, new Sony Bravia TV models receive the signal directly without additional modules.
On other TVs, channel tuning is possible by connecting a receiver, which also needs to be adjusted for reception.
How to set up a Sony TV
Our company configures Sony TVs of any edition and modification. We configure and sort analog and digital television channels, connect the Sony TV to the global Internet, and connect various external recording and playback devices. We know how to set up a Sony TV . 8(926)-444-16-66 –> For your convenience, a consultation on setting up TVs has been organized.
Instructions for Sony TV
The instructions for the Sony TV contain all the necessary information for connecting external signal sources. The Sony TV has the following plug connections for connecting devices: 1) DC IN 19.5V
Connect the supplied power adapter, which converts AC mains voltage into direct current.
2) DIGITAL AUDIO OUT (OPTICAL)
To get the best audio quality, you should connect your home theater to your TV via fiber optic cable through this output.
3) AV2 COMPONENT IN
This input, according to the instructions for the Sony TV, can be used as a composite or component video input. When using a monaural device, connect it to the L (MONO) audio jack. For a composite connection, use AV2 for video signals, and connect audio cords to (L/R) COMPONENT IN for audio signals. To use as a component video input, use the Y, PB, PR connection to transmit video signals. To transmit audio signals, connect the cable to the channels (L/R). The TV will automatically detect the connection type. 4) AV1
Connection using a SCART cable.
5) LAN
Connection to an Ethernet local network.
6) CAM
Connection of a limited access module to pay television services.
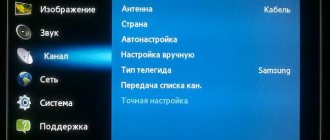
Automatic tuning of digital channels on Sony
To automatically configure digital TV channels, you need to pay attention to the following:
- whether the device is working for the first time;
- The TV was already in use.
If Soni Bravia is turned on for the first time, then you need to select: a language from the proposed list, the country of Russia.
To continue using the Parental Control function to view some programs, it is important to come up with a PIN code, re-enter it and save it in the device. In operation mode, indicate “home”, select the function: floor or table stand to adjust the sound quality. After this, the equipment will switch to auto-tuning mode for television broadcasting.
If the TV was already working, then to install digital TV you need to reset the settings using the “Menu” button, go to the “Options” item, where you specify ─ “Auto-tune digital channels” and confirm this action. Next, a choice of digital TV or digital TV will be offered along with analogue TV channels, where all ongoing broadcasts will be determined.
Important! You can scan channels on a Sony TV in quick and full mode, which will take about an hour to view the entire range of television broadcasts.
Tips for setting up your Sony TV
Every user can set up the TV correctly. Just follow the recommendations from the professionals. Setting the sound (volume, volume) is easier. Go to the corresponding tab of the main menu and select the optimal parameters.
Adjusting the image will take more time. In order for a clear and rich picture to appear on the screen, you need to adjust a lot of parameters. Now let's look at the basic subtleties of setting up a Sony TV.
Preparatory work
Save the image calibration chart below to a flash drive or external hard drive. Connect the memory drive to the TV via a USB connector. Open the picture for customization through the media player.
On new models running on the Android TV platform, calibration files are played from a DVD or Blu-Ray player. Because it is impossible to change settings through the Album application.
First, we set up the main indicators. To do this, you need to disable advanced options. Open the main menu and go to “Settings”, and then to the “System Settings” tab and the “Eco” subsection, here disable the light sensor.
Return to the main menu and go to “Settings” again, and then to the “Image” tab to deactivate the following functions: reality creation, smooth transition, noise reduction.
For highlighting, set the value to 7 or 8 points. For Picture Mode, select Standard. Once these changes are made, switch to the Advanced tab to deactivate all features.
Access the settings menu only through the HOME button. If you edit settings using the Options button, the settings will be applied to one signal source, and not to the TV as a whole.
Calibration
Start by checking that the image size settings are correct. The default settings enlarge the image. As a result, sharpness decreases. This manifests itself as moire, which can be seen in the outlines of the resolution bands.
To adjust the picture size, open “Settings” and go to the “Screen Control” tab to disable “Automatic Display Area”. Also disable the “Maximum Resolution” function. Now arrows are visible in all corners. The moire effect has disappeared.
Brightness
Calculate the darkest part of the grayscale band in the pre-downloaded chart. Adjust the brightness so that the black area (located on the left) is as dark as possible. Are there any differences between the left and right sides of the screen? Brightness is set correctly.
Contrast
Find the lightest part of the diagram. Adjust the contrast until the right side of the screen is as light as possible. The difference between the left and right sides of the diagram should be noticeable.
Sharpness
Increased sharpness is the cause of an unnatural image. To avoid this, adjust the sharpness. There should be no light outline along intersecting lines on the calibration diagram. Reduce the sharpness until the contour disappears completely.
Saturation of the color palette
Colors will be saturated when all transitions are viewed on the calibration chart. Look at the center of the scale to achieve a natural rendition of shades.
Sound settings
Select the sound mode - internal speakers or external speakers. There are no additional options. Just adjust the volume.
Extra options
Connect the antenna cable to the appropriate connector. Select the signal source "Antenna". Disable additional devices. Now the TV is ready to search for TV channels.
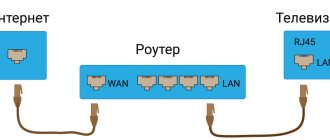
How to connect a TV to a router? This option is only available to owners of TVs that support Smart TV. Synchronization is carried out via a Wi-Fi router or by connecting a cable to the LAN connector.
Manual channel tuning
Setting up digital television using the manual control mode is necessary if any problems are discovered during auto-search or during additional digital broadcasting in an area where it is not desirable to reset existing television sources.
In the “Settings” section on Sony TVs, look for the “Settings” or “System Settings” item. Select the item “Setting up TV channels” and “digital”. Next, repeat the steps described above.
When the “Network ID” appears, you need to check with your operator to enter it manually:
- frequency for your region;
- region network identifier;
- name of the operating company.
After entering this data, you need to click on the “Search” button, which can last about an hour.
Page 38
Description of the remote control
The PROG + button and number 5 button have raised dots. They are convenient to navigate when controlling the TV.
Used to turn the TV on and off from standby mode. Note
To turn off the TV completely, unplug the power cord from the outlet.
– Screen mode (page 13)
In digital mode: (page 14, 15): Allows you to select options at the bottom
screen in the digital menus “Favorite Programs” and EPG (Digital
electronic on-screen TV guide).
In teletext mode (page 13): Used for Fasttext mode.
– Information / Hidden text display
• In digital mode: Displays a summary of the content you are viewing.
currently in the program.
• In analog mode: Displays information such as the current channel number
• In teletext mode (page 13): Displays hidden information (e.g.
How to add analogue channels
Although all of Russia is completing the transition to digital, local analogue TV channels still remain. To watch these programs using a TV without a built-in set-top box with a separate decoder you need:
- remove the antenna from the receiver;
- insert into the TV receiver socket.
You can also install a branched plug into the set-top box, into which a decimeter UHF antenna for digital and an antenna cable are simultaneously installed.
In television receivers with built-in decoders, an analog program is installed using the following steps: “Settings”, then selecting the ATV item, “Search for TV channels”. Sometimes such broadcasts are interrupted, so you need to use “Fine Tuning” to correct the situation. It is necessary to change the frequency indicators within small limits, tuning each found TV channel separately.
Cable analog viewing is possible through the remote control by changing the AV and TV modes, before this the TV antenna is plugged into the antenna groove, and the set-top box is connected to the video connector. If the old remote control breaks, you should definitely replace it with a new one, since settings without it are impossible.
When comparing digital and analogue television broadcasts, the quality of the image can be highlighted. With digital television, the image is clearer, without interference, since the quality of the television signal does not depend on environmental factors.
Repair and service guarantee
Repair of the remote control module will depend on the nature of the failure. If the user has filled it with water or any liquid, it is acceptable to solve the problem yourself. The first step is to disassemble the device and inspect the printed circuit board. Using careful movements, use a special solution to treat damaged contacts and microcircuits. If pressing the keys is too hard, the buttons cannot be restored and will have to be replaced.
Only the most experienced users are recommended to troubleshoot problems themselves; otherwise, it is recommended to seek professional help. Lack of experience and dexterity can lead to the formation of new damage. Replacement or repair of hardware components should be carried out by specialized services.
When it is necessary to perform service setup, for example, update the firmware, a technician can be called to your home.
If you purchase a TV from official representatives, it is recommended to study the warranty card. If its validity period is still valid, you should seek assistance from the place where the equipment was purchased. Do not forget that any product has a certain service life. When a device is outdated or worn out, it is more convenient and economical to purchase a new device.
Deleting and sorting channels
Unnecessary TV channels can be removed from the menu. Different TV models have different actions. So, for modern devices, in the setup menu you need to find “Digital configurations”, then ─ “Remove programs”, select a TV program and click “Ok”.
Some models do not contain such an option, so in the “Program Sorting” sub-item of the “Digital Configuration” section, the number of the unnecessary source is entered, and it is sorted to a further place in the list. This way you can distribute all TV channels, putting the more popular ones in the first rows.
Standard recommendations
Before connecting the device to the network, you need to check that all cords are connected correctly and that they are securely fastened. After turning on the TV, you need to wait a while so that the installation of the system is completely completed, only after that you can proceed to the basic settings of the Sony TV.
All actions are performed using the control panel. Parameters such as sound, image, Internet connection and speaker system must be configured in the “HOME” menu. This is the main tab; all the necessary settings for the Sony TV are performed in it.
Possible problems and their solutions
Often, after debugging digital TV channels, a failure occurs and there is no broadcast, what to do in these cases?
Important! Determine where the problem came from: from the service provider or the TV settings have gone wrong. You can find out from your neighbors by checking whether they have a program. Breakdowns may be affected by weather conditions such as rain and clouds.
In the event of a breakdown in which the suppliers are to blame, a complaint is filed through the website rtrs.ru.
In other cases, for example, during a power surge, the settings in the device may be lost. To correct the problem you must:
- additionally scan the range to detect TV channels;
- reset the factory settings using the instructions for a specific TV model, and reconfigure it with the TV channel search procedure.
It happens that instead of 20 digital channels, only 10 are received. This is due to the fact that two multiplexes operate at different frequencies and their broadcasts are broadcast from different equipment. Television equipment requires constant maintenance, as breakdowns are possible. In case of such malfunctions, you must contact your service provider.
Another breakdown is an image freeze, in which the picture falls apart, figures may appear double, a piece from the previous frame remains, sound disappears, and a black screen may even appear. Such a malfunction can appear only in one program, or in all of them at once. Reasons ─ external problems, such as: weather, scheduled preventive maintenance on the broadcaster, technical problems of the broadcaster.
You can solve the problem:
- reconfigure the antenna;
- buy an amplifier;
- change operator.
It is better to reconfigure the antenna using a tuner: external or built-in, which has an incoming signal meter. It needs to be rotated in a horizontal plane, focusing on the maximum intensity of the TV signal. Then the antenna is fixed, and you should check, using auto or manual adjustment, how many programs it receives.
Malfunctions may occur in the broadcast due to the set-top box; its settings may be lost: after repairs, after an emergency power outage, etc. Tuning is carried out according to the regional data of the multiplex, TVK compliance with certain frequency bands. Next, setting up the reception of TV channels is done manually.
Additional features of Bravia TV receivers
The Bravia TV series has many useful features, one of which is the TV Guide. To open it, you need to activate the Guide key on the remote control module. A window will open with a table containing information about the channels. The serial number of the TV program is indicated on the left side, and the airtime is indicated on the right. Using the “Info” button you can open a brief description of the program, and using the arrows you can control their positions. The TV Guide function allows you to create an individual viewing scenario. By recording or activating a timer, the user can store their favorite content in the memory of their TV receiver.
Another useful option is subtitles. Allows you to receive text translation in several languages. It is worth noting that not all TV channels have subtitles. To activate it, a special button on the remote control module is used; it may differ depending on the equipment model.
After the user has completed all the settings and performed an automatic or manual search, he will notice that some channels are closed. Usually paid programs are encrypted. Owners of Sony Bravia receivers can decode paid content. To do this, you will need a special device in the form of a CAM module, which is inserted into a special socket on the back of the TV. After connecting the module, it is recommended to go into sleep mode and enable the “Bravia” function, and then the restrictions will disappear.