More than ten years have passed since the moment when televisions, in addition to the function of simply watching movies, began to serve as a home multimedia center. This became possible thanks to the advent of Smart TV technology.
The Sony company, as one of the leading manufacturers of television devices, could not remain aloof from global trends in the development of this area. Today, almost all Sony Bravia TV models are equipped with the Smart TV function.
If you are the happy owner of a TV from this particular manufacturer or are planning to buy one in the future, then be sure to read our article. In it, we will tell you in a brief and accessible form how to properly configure Smart TV on Sony devices, how to work correctly with the new functionality, what problems may arise and what ways to solve them exist.
Connection
By cable
You can connect the Internet to the TV directly via cable, but this will only work if your provider does not use a PPPoE or L2TP connection.
We will not consider direct connection here, but will immediately move on to the issue of setting up Smart TV through a router. As an example, let's take connecting Samsung TVs with Smart TV to the Internet via a router via a LAN cable. For all models the procedure is almost identical. For other manufacturers, the Internet connection is configured in a similar way. To connect to the router we need a cable. The patch cord that comes with the router is usually short and is only suitable if they are located next to each other. A cable of the required length can be purchased at any computer store.
Connection diagram
We plug one end of the cable into any free LAN port on the router, and connect the other end to the network connector on the TV. It's located on the back panel and looks exactly like the network card socket on a computer.
Settings
Now open the menu on the TV and look for the “Network Settings” item there.
(on most models the path looks like this: “Settings” - “Network” - “Open network settings”). If connected via cable, a message will appear indicating that the cable is connected. You just need to click on the “Start” submenu that opens. That's it, you can use Smart TV.
Your TV model may require you to first select a connection method. In this case – “Cable”. And click “Next”. If you are using a static IP address, you will need to enter it using the on-screen keyboard at this point. If your router distributes addresses automatically, the TV will immediately connect to the Internet.
Via Wi-Fi
Wireless connection has the main advantage - you don’t need to entangle your apartment with a web of wires to connect several devices. If you want to use this particular method, choose a TV equipped with a Wi-Fi module. If you don’t have one, you can purchase an external USB adapter separately.
. Just check to see if it is compatible with your TV model.
We will assume that your router is configured, the Internet is working and there are no problems connecting client devices. On the TV we look for the same menu item “Network settings”
, as described in connecting via cable. Since the cable is not connected, you will be prompted to configure the connection by clicking the "Next" button. Select the connection method “Wireless network” and wait until available wi-fi connections are found.
From this list, select yours and use the on-screen keyboard to enter the password. If you have, the TV will connect to the Internet. If you use static IP addresses, you will have to specify the address manually.
It is also possible on some devices.
Via set-top box
Why such difficulties?
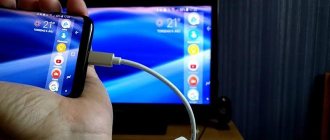
- you ask. After all, a set-top box is an extra device in the “TV - router - Internet” combination. Yes that's right. But only if your TV has a built-in Smart TV function. What if you have an old model, but want to try smart television? Or are you not satisfied with the functionality of yours? After all, as a rule, budget models have a minimal set of functions, and they do not always work well. You can turn a regular TV into a smart one using a Smart Set-top Box. The main thing is that there is an opportunity to connect it. The set-top box connects to the TV via an HDMI port
. On your TV you need to specify the HDMI port as the signal source. The TV set-top box itself is connected to the router via cable or via Wi-Fi.
Connection diagram
Below is a diagram in which the router is connected to the TV set-top box via an Ehternet cable. It is also possible to organize this connection via Wi-Fi.
After you have connected the set-top box to the TV, an image should appear on the screen. The consoles run the Android operating system with a special shell optimized for TVs.
Now you can use Smart TV even if your TV does not have this function.
Other Features and Notes
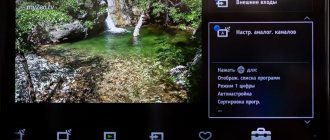
Living scenery
Live scenery function
allows you to use the TV as a photo frame, clock or interior decoration.
For example, you can turn on the Live Scenery
for the on timer, which will play your favorite image and sound at a certain time.
In future updates for the Living Scenery
, the number of materials allowed for selection will be increased.
Timers and clocks
Timers
You can set notifications for specific times using the on timer
,
sleep timer
and
alarm clock
.
On Timer
feature allows you to immediately turn on your favorite channel when you turn on the TV or upon entering.
Select Timers & Clock
from the apps, or select each timer individually using the menu (
Quick
Settings).
( An alarm
can be added using the + (
Edit
) function in the
Quick Settings
)
ForkPlayer for Sony Smart TVs
ForkPlayer is a program or, as it can also be called, a browser that can be installed on Sony TVs that have the Smart TV function.
It can also be installed on computers, devices running Android, and Smart TVs from other manufacturers. With this application you can watch online channels, movies and other videos from various sites for free.
Important
In addition, ForkPlayer provides access to view data that is also stored on a flash drive, a connected removable device, or in the built-in memory of a Smart TV.
This application is available to any user. You can download it either from the official or unofficial website on the Internet, or from the application and widget store. Today we will take a closer look at what capabilities ForkPlayer has for Sony Bravia Smart TV, and we will also talk about the ways in which you can install and configure this application.
This application has the same operating scheme as Opera mini, which was developed specifically for J2ME phones that do not support the ability to launch a full-fledged Internet browser. ForkPlayer for Sony Smart TV receives all content directly from sites, after which it processes them and converts them into its own format.
Modern Sony Smart TVs, of course, have regular Internet browsers, but they are often stripped down, without a Flash player, and when launching some sites they can give an error that is due to the fact that there is not enough built-in memory.
- ForkPlayer is much better in this regard, as it allows you to watch videos or listen to music from any site without any problems.
- In addition, this widget, installed on Sony Bravia Smart TV, already contains a list of the most popular sites and online cinemas.
- You can also create and save your own playlists. You can view them not only from Sony Bravia Smart TV, but also from your other devices on which ForkPlayer is installed. To make this available to you, you need to register on the official website of the application, go to your personal account and add existing devices to the list.
In addition, in ForkStore you can download and additionally install other unofficial applications for your Sony Smart TV. At the same time, it is worth considering that the configuration and installation features, as well as the availability of certain functions, may differ on different TVs depending on the year of their release.
There are several ways to install the ForkPlayer widget on Sony Bravia Smart TV. Now let's look at two basic instructions for installing it.
First, you will need to go to the TV’s network connection settings menu; In the window that appears, select manual installation; After this, a window will appear in front of you in which the initial DNS will be registered. Instead, you will need to enter 46.36.218.194. If this does not work, then instead enter DNS 85.17.30.89 or 217.79.190.156; After this, the connection to the network will begin; After the connection ends, launch the now.ru Theta or Lifeshow application through the Opera Store. As a result, the ForkPlayer widget will launch on your Sony Smart TV.
Method No. 2
First, you need to go to publsh.tvstore.opera.com and register there; After registering on the above site, you can receive an ID from the developer, which will be displayed on the Sony Bravia Smart TV in the Opera Store. In order to view it, you will need to go to the Menu and go to the About tab. It is worth noting that the ID number will only be valid for 15 minutes. If during this time you do not have time to enter it in the required field, then you will need to get it again. To do this, click on #ID; The ID received from the developer will need to be entered into the appropriate field on the above site; After this, you will need to enter the name of the widget and in the URL Loader column indicate a link to the site https://operatv.obovse.ru/2.5/ and save it all; As a result, a special category called Develop will appear in the Opera Store.
If you need access to sites such as tree.tv or 6p6.to, then you will also need to change the DNS specified in the network connection settings of the Sony Smart TV. Instead of the DNS available there, you should register 46.36.218.194 or 46.36.220.208.
About the manufacturer
The Japanese company Sony has become famous not only for its functional, but also for its truly high-quality home appliances. First of all, this applies to televisions, which are very popular today. The manufacturer is among the TOP 5 best companies producing TV equipment.
In 2005, the Bravia series appeared, which became a successful replacement for the WEGA brand. The new direction allowed the company to increase sales and take a leading position among manufacturers of set-top boxes and televisions.
The main distinguishing feature of new products from Sony is surround and clear sound, realistic colors and the presence of various additional functions that each model has.
Network connection
Internet access on Sony Bravia TVs can be configured in two ways: via WiFi or using a cable.
On a note! Connecting via cable is preferable because it provides a stable connection with the highest speed. This solution allows you to watch movies or other videos online without interruptions, slowdowns and fears that the streaming will be interrupted at the wrong moment. But wireless access to the network is more convenient, since it does not require a physical connection between the TV receiver and the router via cable.
Cable
To establish a wired connection to the Network, you need to connect the LAN connectors on the router and the back of the TV receiver with an Ethernet cable. Further actions depend on the operating system of the SMART device - Android or Linux (for example, KDL-40WD653).
- For Android-based devices, you need to press the “HOME” key on the remote control, then open “Settings” - “Network and accessories” - “Network”. After this, you will need to select “Network Setup” - “Simple” - “Wired LAN”, and then follow the instructions on the screen.
- For TVs with Linux OS, you need to press “HOME”, open “Settings” - “Network” - “Network setup” - “Set up a network connection” or “Wired setup”. Next, you will need to select “Simple” or “Automatic”, and then act according to the recommendations on the TV screen. Usually the connection is set up immediately, no additional manipulations are required.
On Sony Bravia TVs of different years of production, the menu may differ, as well as the names of sections, so it is recommended to look at the instructions for using the television equipment for a more detailed description of the connection.
WiFi
Connecting via WiFi can be done in two ways:
- using WPS technology, designed to simplify the wireless connection to the router and does not require entering a local network password;
- in the classic way, in which you need to know the name of your home WiFi network and its password.
Connecting via WPS is only possible if both the TV receiver and the router support this technology. It is also carried out in two ways: the first - using a button, the second - by entering a code. In the first case, you need to press “HOME”, then on the screen select “Settings” - “Network settings” - “Wireless settings” - “WPS (button)”. After this, you need to follow the instructions on the screen, where you will be asked to press the WPS button on the router and hold it until the connection is established. In the second case, you need to use the remote control with the “HOME” key to open the TV receiver menu, select “Settings” - “Network settings” - “Wireless settings” - “WPS (PIN)”. Next, you should also act according to the instructions on the TV screen. But with this connection, you need to open the router’s web interface from your computer and add a new device (TV), indicating the PIN from the TV receiver screen as confirmation. After this, the connection will be established.
To connect in the standard way - using a password from the WiFi network - you need to press “HOME”, and then select “Settings” - “Network settings” - “Wireless settings” - “Scan”. Next, in the list of found networks, you must specify your home one and enter a password to establish a connection.
For a detailed description of connecting to a WiFi network for a specific TV receiver model, it is recommended to look at the instructions for it, since on different devices this process may differ depending on the type of menu and the names of sections.
Features of the model range
Bravia stands for “Integrated Solutions for Perfect Sound and High Definition Pictures.” The flagships of this model range have a lot of features:
- 4K HDR video format supported;
- Low quality content is stretched to the maximum;
- powerful modern processors are used;
- the image is as realistic as possible.
Advantages and disadvantages
The main advantages of Sony TVs are:
- high image quality (regardless of the TV model and cost);
- using only modern and innovative technologies;
- a variety of models - both small TVs for a small room and huge devices;
- long-term operation of televisions;
- no glare and a wide viewing angle even in cheap models with a small screen;
- TVs are ideal for gaming;
- modern and stylish design of each model;
- wide and varied range.
Among the shortcomings, users note only the high cost. Some models, especially new ones, sometimes have exorbitant prices.
Possible problems when connecting SONY TVs to the Internet
A Wi-Fi connection may fail if the provider registers a permanent MAC address of the device and verifies its authenticity each time to prevent unauthorized access. Since the MAC address of the TV is different, the provider refuses to provide services and the connection does not occur. To solve this problem, you should contact your provider and find out if you can connect Wi-Fi to your TV.
If the provider (Rostelecom) asks for a login and password to install the Internet, then before connecting the TV via Wi-Fi, you must enter the required data.
Problems may occur due to the firewall. If this is the case, then you need to contact your provider.
Sometimes resetting the TV helps. To do this, open the menu item “Support”, “Self-diagnosis” and “Reset”. After entering the PIN and agreeing to the terms of the license agreement, the factory settings will be restored.
Important! If you cannot connect to the Internet even after fulfilling the requirements of the service provider, you should contact specialists for help. https://www.youtube.com/embed/oiyvWK85P_0
How to set up Smart TV on a Sony TV
The Smart TV function on a Sony TV is necessary to use all the entertainment or information services on the big screen that the equipment manufacturer provides. And to use smart TV, you must have an Internet connection via Wi-Fi or cable.
After establishing a connection between the router and the TV, subsequent operations must be carried out from the TV menu in the “Network” tab according to the following algorithm (the instructions are suitable for all models of the TV in question, for example, Sony Bravia):
- Select wired or wireless connection type. The preferred connection option is via Wi-Fi - this way the wires will not get in the way and spoil the appearance of the house.
- The user will be required to enter the password that was provided in an envelope by the service provider.
If the data is entered without errors, connecting to the Internet will take a few minutes. At the end of the operation, the TV will automatically prompt you to update the existing Sony firmware. It is advisable to perform this operation to avoid further errors and malfunctions of the device.
To do this, you need to confirm the action by clicking “Start download”. Once the download is complete, you will need to confirm the installation and the TV will automatically begin downloading. If the TV starts to turn on, and then turns on itself, then everything went well.
After these operations, the TV device will be almost ready to work with Smart functions; all that remains is to update the existing Internet content (a feature of Sony Bravia and other varieties of this model), as well as install the necessary applications.
To carry out the operation, you must follow the instructions:
- Press the Home key on the remote control.
- Go to the “Network” tab.
- Select the item “Update Internet content”.
Now you can go to the Sony store to select the necessary applications, which will be displayed in the “Processed” tab in the main menu. To install additional utilities, you can click on the “All applications” button, and then “Select from the list provided”. A list of useful programs that can be downloaded to your Sony Smart device will open.
To download the application you like to your personal menu, you need to click on it and click on the “Add to my applications” item. The utility will appear in the main menu on the right side of the screen.
Having completed all these steps, you can fully use the capabilities of Smart TV on your Sony device.
Possible problems
In most cases, problems on Sony TV related to Smart functions arise due to firmware that has not been updated for a long time (a warning message with network error 2123 or similar may appear on the screen).
In this case, you need to download the latest version of the program and thus get rid of the problem. Experts recommend checking regularly (once a month) for updates to keep your TV device in working order.
Troubles may also occur with the operation of some applications that are available thanks to Sony Smart TV. In this case, you need to update the system again, but within a specific, problematic utility.
To get rid of most problems, you need to download stable versions of installed programs from trusted resources.
As practice shows, most malfunctions arise not due to problems in the network or applications, but due to the actions of the users of Sony devices themselves - incorrect settings, poor connection of devices, and so on.
If the problem arises due to the fault of the manufacturers, then the company’s employees try to fix it as soon as possible by releasing new updates. Therefore, if you find a “bug,” you should go to the Sony Smart TV website and use the feedback to contact employees who can correct the shortcomings of the current official software. If the user wants to fully use his TV, he must register and authorize the Smart function in order to gain access to the full capabilities of the Sony device. And the attached instructions will help you carry out this operation on your own in a matter of minutes.
Conclusion
Modern technology does not stand still, but is constantly developing and improving. It is not always possible to keep up with the most “advanced” models, and at first they are very expensive. Therefore, it is better to purchase the equipment that best suits your personal needs and requirements. The main thing is that the device meets modern technological trends.
Buying a Sony Bravia is considered a good purchase for those who need a high-quality LCD TV with great capabilities (3D image, Internet access, LED, presence sensor and much more), but at an affordable price. And although the cost of the TV is still high, it meets the popular price-quality standard.
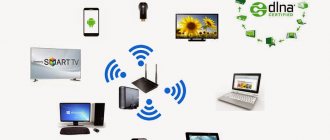
If the TV is with Smart TV, then we connect the Internet directly via Wi-Fi or cable
With connecting to the Internet via cable, everything is more or less clear. We need a regular network cable (twisted pair), which you can buy or make yourself according to my instructions: how to crimp a twisted pair into RJ-45.
Next, we connect one end of the cable to the router or modem, and the other end to the LAN port (Network) on the TV.
If your router is configured and distributes the Internet to other devices, then the Internet should work automatically on the TV. You can open the “Network” section in the settings, or something like that and check the connection status. If it doesn’t work automatically, you need to select a wired connection (wired network) in the settings. This already depends on the manufacturer of the TV and the Smart TV system installed in it.
I have already written several instructions on this topic:
- How to connect an LG TV to the Internet via cable (LAN)?
- How to connect a Philips TV to the Internet via a network cable (LAN) via a router
- Connecting a Samsung Smart TV to the Internet via a network cable
Everything is shown there in great detail.
What to do if there is no router/modem, but only a cable from the provider? If your Internet provider uses the “Dynamic IP” (DHCP) or “Static IP” connection type, then you can connect the Internet cable directly to the TV. Everything should work. If the connection is via “Static IP”, then in the connection properties on the TV you need to manually enter the addresses provided by the Internet provider.
If the connection is with a login and password (PPPoE, L2TP, PPTP), then you can connect to the Internet only through a router. This connection cannot be configured on a TV.
Connect via Wi-Fi
Nothing complicated either. There are simply TVs without Wi-Fi. When there is no built-in module, but you can connect an external USB adapter. Not an ordinary one, like for a desktop computer, but a branded one. From the same manufacturer as the TV.
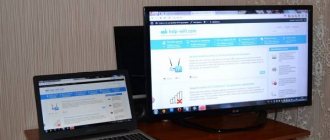
You can immediately go to settings and try connecting the TV via Wi-Fi. There you only need to select your wireless network from the list and enter the password. The photo below shows a Philips TV with Android TV.
If you don’t find wireless network settings there, or an error like “To connect to the network, check the network cable or Wi-Fi dongle” appears, then this means that your TV does not have a built-in Wi-Fi receiver. You need to either connect the Internet via a cable, or look for and buy a branded USB adapter. Which is suitable specifically for your model. There is another option, which I wrote about here: how to connect a TV without Wi-Fi to the Internet via Wi-Fi.
It’s better, of course, to find the specifications of your TV on the manufacturer’s official website and see if it has Wi-Fi, or if it supports external adapters (and which ones). You can follow the instructions at the beginning of the article (where we looked at the presence of the Smart TV function).
Instructions on the topic:
- How to connect an LG Smart TV to the Internet via Wi-Fi through a router?
- How to connect to the Internet via Wi-Fi on a Philips TV on Android TV? (Sonу TVs are also suitable).
On new LG TVs with webOS, you can connect to Wi-Fi in the settings, in the “Network” section.
On other TVs, including Samsung, the settings look about the same. Everything there is in Russian or Ukrainian - it’s not difficult to understand.
conclusions
What to do on the TV after connecting to the Internet? You can watch videos or other content through applications preinstalled by the manufacturer. Install other applications and games from the application store (each Smart TV system has its own), or open websites through the browser built into the TV. On Android TV it is called “Internet”.
31
Sergey
Various tips for setting up TVs
Method #2: Wireless connection via Wi-Fi
The use of wires to connect devices significantly simplifies the synchronization process, however, as already noted, it creates a number of problems, in particular with cable placement. To avoid these difficulties, we recommend trying wireless connection options. In particular, using the Wi-Fi Direct standard, which provides, as the name suggests, a direct connection, without the use of “intermediate” devices.
In the briefest form, the instructions on how to connect your phone to a Sony TV using the method in question look like this:
- You turn on both devices, after which you find and press the button with the house icon on the remote control.
- Go from the main window that will appear on the screen to the list of Advanced Setting parameters.
- Selecting the appropriate line headings, one by one, first activate the Built-in Wi-Fi option, and then, as soon as it is successfully enabled, the second - Wi-Fi Direct.
- After both operations are completed, the full name of the created internal network and the password required to access it will be displayed on the TV screen. This is the data you must enter on your phone. We recommend that you do not close the information page until the connection is established.
As a result of a successful connection, you will see a message about the start of synchronization. The process does not last long and should not be interrupted - otherwise you will have to initiate it again. In addition, during the process of establishing communication, you can activate or disable the automatic search for new devices available for duplication.
It happens that even a working TV starts to freeze after the first attempt to create a new internal network for direct connection. In this case, we recommend that you first restart the TV and try again, and then, if nothing works, reset the settings to their original settings.
Connecting an Android smartphone
Let's take a quick look at how to connect your phone to a Sony TV using this technology:
- First of all, you enable data transfer via Wi-Fi on the gadget that will be used for duplication.
- Select, by tapping on the corresponding line of the list displayed on the screen, the newly created network.
- Enter the access key displayed on the TV screen in the text line. After this, all you have to do is tap “Done” - the connection will be established automatically.
Once the connection is successfully established, you can select media files to play - or start duplicating the game process.
Transfer content to Android
The second stage of the process, which is impossible to do without, includes the following steps:
- In one of the upper corners of the gadget screen, find a button with an icon and click on it.
- By tapping on the title of the desired line contained in the list of available TVs, you determine which device the broadcast will start on. Sometimes this requires expanding the list first.
- As a rule, you do not need to confirm your choice: one click is enough.
- Click on the “Play” button.
- Check to see if the content you are playing has started to display on your Sony screen.