Modern mobile phones with the Android or iOS operating system on board can perform all the same functions as a computer, and can also replace a digital camera. But watching pictures and videos taken with a mobile phone camera on a small screen is not very comfortable, just like watching an interesting film or sports broadcast from the Internet.
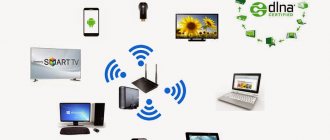
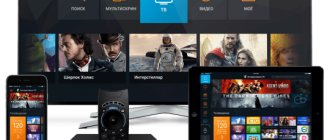
Interesting video content is best viewed on a big screen. And the ability to connect a mobile gadget to a TV receiver is a good solution. The user will be able to view videos, photos, films on the TV panel via a smartphone, launch various games, open Internet sites, and also demonstrate presentations. We'll tell you how to connect your phone to a Sony TV below.
Connecting your Sony BRAVIA TV to the Internet via Wi-Fi
Many people wonder how to set up Smart TV on a Sony Bravia TV via wifi. To take full advantage of your Sony Smart TV, you need to connect and configure it correctly.
As a rule, connecting Sony Bravia, Sony Trinitron or Samsung TVs is carried out in 2 main ways:
- via router;
- via Wi-Fi.
To connect directly, special conditions are needed, since the TV will only work if the “Internet provider” provides a dynamic IP. Setting up Smart TV on a Sony Bravia TV via wifi is carried out according to the following scheme: network cable - router - Wi-Fi distribution. The distributed signal can be used from any of the necessary devices.
Note! If your TV does not have Wi-Fi, you will need to buy a Wi-Fi adapter.
However, its acquisition will be advisable only if the equipment supports this technology.
Possible problems and their solutions
Often, after debugging digital TV channels, a failure occurs and there is no broadcast, what to do in these cases?
Important! Determine where the problem came from: from the service provider or the TV settings have gone wrong. You can find out from your neighbors by checking whether they have a program. Breakdowns may be affected by weather conditions such as rain and clouds.
In the event of a breakdown in which the suppliers are to blame, a complaint is filed through the website rtrs.ru.
In other cases, for example, during a power surge, the settings in the device may be lost. To correct the problem you must:
- additionally scan the range to detect TV channels;
- reset the factory settings using the instructions for a specific TV model, and reconfigure it with the TV channel search procedure.
It happens that instead of 20 digital channels, only 10 are received. This is due to the fact that two multiplexes operate at different frequencies and their broadcasts are broadcast from different equipment. Television equipment requires constant maintenance, as breakdowns are possible. In case of such malfunctions, you must contact your service provider.
Another breakdown is an image freeze, in which the picture falls apart, figures may appear double, a piece from the previous frame remains, sound disappears, and a black screen may even appear. Such a malfunction can appear only in one program, or in all of them at once. Reasons ─ external problems, such as: weather, scheduled preventive maintenance on the broadcaster, technical problems of the broadcaster.
You can solve the problem:
- reconfigure the antenna;
- buy an amplifier;
- change operator.
It is better to reconfigure the antenna using a tuner: external or built-in, which has an incoming signal meter. It needs to be rotated in a horizontal plane, focusing on the maximum intensity of the TV signal. Then the antenna is fixed, and you should check, using auto or manual adjustment, how many programs it receives.
Malfunctions may occur in the broadcast due to the set-top box; its settings may be lost: after repairs, after an emergency power outage, etc. Tuning is carried out according to the regional data of the multiplex, TVK compliance with certain frequency bands. Next, setting up the reception of TV channels is done manually.
Using the WPS standard
Problems connecting Sony Bravia TVs to Wi-Fi
The WPS standard greatly simplifies setting up a secure wireless home network and reduces it to pressing the WPS button on your wireless LAN router. Before you set up your wireless LAN, you need to find the WPS button on your router and learn how to use it correctly.
Important ! You can connect to a wireless LAN using WPS only if your wireless LAN router supports the WPS standard.
On the included remote control, press the HOME button:
- Select “Settings”.
- Open the “Network Setup” tab.
- Select “Wireless Setup”.
- Press the WPS button (WPS (Push Button)).
Wired connection of new TVs
Basically, a cable connection of an LCD or LED TV to a network is used when the device does not have a pre-installed Wi-Fi module.
Important! When setting up the Internet via cable, the connection speed remains maximum, unlike the wireless method, where it is partially lost.
You can set up a wired connection using a network cable or through a router.
Via network cable
If the Internet in the apartment will be used only on the TV, you can do without a router and connect the cable directly to the Ethernet port on the back of the device . Further actions will differ depending on the manufacturer of the equipment. The process of connecting a network cable to television receivers of the most popular brands will be discussed in the table below.
| TV panel brand | Connection algorithm |
| LG | First you need to open the menu through the “Home” button on the remote control, find “Settings”, then the “Network” tab. In the “Network connection” section, click “Set up connection” and select wired from the list of networks that appears. Next, you need to click “Update” for the TV to process the information, after which you will receive a notification about the successful completion of the operation. |
| Samsung | In this case, the network connection is usually configured automatically after connecting the cable. To verify this, you should launch Smart Hub and click on the browser or any of the applications. If they loaded successfully, then the Internet is working. Otherwise, you will need to open “Menu”, then “Network”, and then “Network Settings”. In the window that appears, you should activate automatic configuration by clicking on the “Start” button. If the process is completed successfully, a corresponding notification will appear. Otherwise, you need to open “Network Status” and select “IP Settings - Get Automatically”. If it fails again, the IP address, DNS and network mask will need to be specified manually. This information can be obtained from your provider or through your computer by opening the connection properties. Once the data has been entered, the connection will complete correctly. |
| Sony Bravia | To connect the cable on such TVs, you need to press the Home button, open “Settings”, then “Network”. Next, you should select “Update Internet Content”, after which you will need to wait until the server configures an available connection. |
For TVs from other manufacturers, setting up a wired Internet connection is done in a similar way. The detailed process will be described in the instructions for the device.
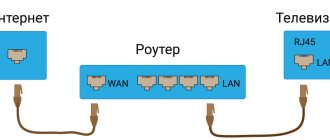
Via router
If your apartment has a home Wi-Fi network, you can set up a wired connection via a router . In this case, you need to purchase an Ethernet cable and connect both devices with it. Then you should turn on the TV, open the network settings and select a wired connection. To establish a connection, the TV panel must connect to the IP automatically, and if the process fails, you will need to enter the data manually. This process is the same for TVs of all brands, the only difference is in the menu interface and section names.
Connecting to WI-FI using a security key
Enabling Wi-Fi on Sony Vaio laptops
To set up a wireless network, you will need an SSID (wireless network name) and a security key (WEP or WPA key). If this data is not available, then you need to follow all the steps according to the instructions of your router or consult your Internet provider.
On the included remote control, press the HOME button:
- Select the “Settings” tab.
- Go to the “Network Settings” section.
- Open the “Wireless Setup” option.
- Select "Scan".
- Find your network from the list.
How to connect a TV to Wi-Fi using auto-configuration
Connecting an iPhone via Wi-fi Direct to another phone or TV
How can you access the Internet on a Sony TV using auto-configuration? The function allows you to connect the TV receiver with wireless access points from third-party companies. If they do not support this function, then the connection must be made using PBC (WPS), automatic or manual configuration.
Note! Before connecting your TV to Wi-Fi, you need to turn off SWL.
You can check whether a specific device supports the automatic configuration function on the company’s official portal
How to connect a TV to a phone wiredly
It's much easier to sync both devices using a cable. There are 2 proven methods for this and they are recommended to be used if there is no wireless Internet at home or the TV/phone model does not support certain functions for the connection.
USB
The method works with any Android-based device, even regular phones will do. The TV itself must have a USB port. The technique is the simplest, it makes it possible to use the gadget as a regular storage device where media files are stored. The main drawback is that only the data that is in the phone's memory will be reproduced, and not on the card.
The connection algorithm is as follows:
- The cable connects both devices.
- On the TV, select the signal source – (Source) USB port.
- If necessary, the activation mode is confirmed on the mobile device.
- The monitor shows the general structure of files and folders that are available after scanning and recognition by the TV software. The display of specific files depends on the TV model.
- To control and navigate, you only need to use the remote control.
It is better to use the USB cable that came with your mobile phone or use another original cord.
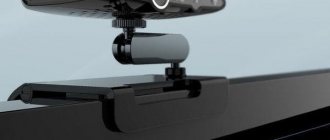
HDMI
The method is relevant for Android phones or any iPhone, but the TV itself must have an HDMI port. A cable or adapter is required for compatibility. The technique is suitable not only for viewing photos or videos on a big screen, but also for playing games and using the Internet. The smartphone screen is completely duplicated on the large Sony TV monitor. Based on the port on your phone, activation may require an adapter or the cord itself. On one side there will be an HDMI port and on the other a microUSB, Lightning or USB-C port.
The synchronization algorithm is as follows:
- The cable connects two devices.
- If you use an adapter, you need to insert it into your smartphone and connect the HDMI cable.
- Select a source for the signal on TV.
- The picture is automatically duplicated on the Sony screen.
An additional advantage of the method is the fast charging of the smartphone during image output. If the image is not shown on the TV, then you need to go to the smartphone settings to change the display resolution.
An HDMI cable provides better picture quality, audio quality and fast data transfer.
Setup using automatic configuration
You can set up a network using automatic configuration by performing the following steps:
- Place an access point (AP) and a TV nearby, and then turn them on. Since download times may vary, you may need to wait about two minutes. Before connecting your TV to a Wi-Fi router, you need to make sure that the network cable is connected to the router port. Otherwise, auto-configuration will only confirm the connection with the access point, but there will be no confirmation of connection to Wi-Fi.
- After a few minutes, connect the adapter to the TV. After this, a pop-up window will appear.
- After connecting, you should place the router parallel to the network adapter no further than 25 cm from it.
- You need to wait until the automatic connection occurs. Otherwise, a window indicating a malfunction will appear on the screen. To try again, you need to reboot the router, disconnect the adapter and start again from step 1. You can also choose another connection method: auto, manual or PBC.
- Place the AP in the desired location. If its parameters have changed, or a new access point is being configured, the steps must be repeated from the beginning.
TVs with built-in AirPlay support
At the beginning of 2021 (this is a few days ago, at the time of writing this article), news appeared on the Internet that some TVs will receive support for AirPlay 2 (as well as built-in iTunes). This is an official statement from Apple. Why they did this is not entirely clear to me. After all, it turns out that if you have a TV that supports AirPlay and iTunes, then there is no need for Apple TV. You can mirror the screen, stream music, or watch videos and photos from your iPhone, iPad, or Mac directly to your TV. No additional devices. And this is very cool!
At the moment, it is known that TVs from LG, Samsung, Sony and Vizio will receive AirPlay 2 support. Of course, not all TV models. A list of TVs that will have built-in support for AirPlay 2 has already been published. Some TVs will be released in 2021, and some (2021 models) will support this technology after a firmware update.
Here is the list of models:
Perhaps information about other manufacturers and models will appear later. The news is good, we will keep an eye on this topic. If some TVs do get support for AirPlay 2 and iTunes with a firmware update, then I think it will happen soon.
Write in the comments how you connect your iOS devices to your TV, which method described in the article you use, and what you think about the built-in AirPlay and iTunes service on TVs from the manufacturers listed above.
How to connect a TV to WiFi via PBC
If the access point has a PBC button, the procedure is as follows:
- Connect the TV receiver to the Wi-Fi adapter.
- Turn it on, press MENU on the remote control, and then go to the “Settings” section.
- Select the “Network” menu item.
- Enter the type “Wireless”.
- Open the “Network Settings” menu item.
- Press the red button on the remote control.
- Hold the PBC button on the access point for 2 minutes. The TV receiver will automatically receive the required settings and the network connection will take place.
- To exit, press the RETURN button.
BRAVIA. Setting up and using Wi-Fi Direct and Screen Mirroring features
You can connect to your TV directly without using a cable or wireless router (or access point). If necessary, it is possible to use the Screen mirroring function, which is compatible with Miracast technology.
To connect, you must select the duplication function on the TV and on the source device.
For more information, please refer to the list of Wi-Fi Certified Miracast devices, which can be found on the Wi-Fi Alliance website.
Connectivity with all Miracast compatible devices is not guaranteed.
Apple devices, such as iPhones, do not support Screen mirroring as of November 2014.
MHL and SlimPort
This type of connection requires a special connector for phones, but any TV that has an HDMI input will do. Most popular phone models are deprived of this kind of connectors, but still some manufacturers provide their brainchildren with such highlights. These include Samsung, Sony, LG and Nexus.
Differences between MHL and SlimPort:
- MHL technology. Cables of this type have two types of connectors - eleven and five channels, and the first are preferable only for Samsung phones. MHL cables require an additional power source, which is provided using a power supply connected via USB. This technology is capable of broadcasting images in quality up to 1080p (applies to modifications with interface version 2.0). The new Sony Xperia and Tablet models have version 3.0, capable of reproducing 4K quality;
- Slimport technology. The main difference from MHL is the freedom from an additional power source. The quality of the transmitted picture remains the same, but with a high-quality cable;
Pay attention to the final video clip:
Connecting your TV to the Internet using a LAN cable and Wi-Fi
Lately, many have been wondering how to turn on the Internet on a Sony TV using a LAN cable. You can connect your TV to the Internet via a router. First you need to make sure that everything is configured correctly and you can safely enter the World Wide Web. Connecting devices to each other using twisted pair cables can cause some inconvenience in the form of wires under your feet, but also ensure comfortable viewing of movies and TV shows.
Note! Connecting your TV to your Wi-Fi router via a LAN cable rather than a wireless connection can help avoid interruptions and lags when watching movies through apps, or when streaming video files from your computer to your TV.
To comfortably watch television, online video or broadcast media content from a computer to a TV via a router, it is advisable to have a high-speed connection and high-quality active network equipment.
In addition, this connection method can also give positive results and relieve discomfort, because the data transfer speed in a LAN network cable is higher than in a Wi-Fi radio channel. In addition, the Wi-Fi signal from the router is affected by external sources, and in some cases you need to diagnose the wireless network and find a less congested channel.
Wired connection via USB
Perhaps the easiest way to “connect” devices with each other. To find out how to connect your phone to a TV via a USB cable, you need to prepare just one thing - your USB cord (preferably the one that came with the gadget). In this way, you can combine almost any phone with internal memory. We will talk about modern smartphones on any operating system. So, insert the cable into the appropriate connector on the TV, and connect the other end to the phone. In the TV settings, using the remote control, select the USB signal mode, and on the phone we confirm the device’s transition to the external storage state. That's it, now you can play all media files from your phone on your TV screen.
- The disadvantage of this connection is the lack of use of a browser, games and utilities.
Automatic network setup
Wi-Fi networks have an additional security system that requires connected devices to transmit an access code. This is the password (a word or a series of letters and numbers) entered during connection security setup. Using auto-tuning involves entering a password through a browser.
To automatically install Wi-Fi Internet, you must:
- Press the button to open the “Internet Protocol Settings” item, and then press ENTER. Go to “Auto” and confirm the entry.
- Go to “Select Network” and press ENTER. Searches for available Wi-Fi networks. Once completed, a list of them will be displayed.
- In the list, using the navigation buttons, select the desired network and press ENTER. If the router is hidden (invisible), then you need to open the “Add network” menu item and write down the name and password.
- Select "Security" or "PIN". For most home networks, the first option is suitable. The security screen appears.
- Enter your password. It must match the code you entered when setting up your router or modem.
Screen sharing from MacBook and other computers to Mac OS via AirPlay
I checked everything on a MacBook Air. In this case, it is also necessary that the computer be connected to the same Wi-Fi network as the MiraScreen receiver. Or connect your laptop directly to the Wi-Fi network of the adapter itself.
When Mac OS sees that it is possible to connect to a wireless display via AirPlay, a corresponding icon will appear in the status bar. By clicking on which, we only need to select the MiraScreen adapter.
The image from the MacBook will appear on the TV screen.
By default, the TV has a separate display. But by clicking on the “AirPlay” icon, you can change the mode of broadcasting the screen to a wireless display. It is possible to duplicate both a separate display and an AirPlay display, or a built-in one. There you can also disable screen mirroring.
I think you will find a suitable regime for yourself.
From iPhone, MacBook and other devices, these MiraScreen/AnyCast adapters transmit not only the image to the TV (which in our case acts as a wireless display), but also sound.
Direct connection
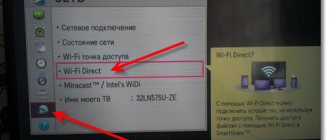
It is possible to communicate with an iPhone or Android mobile device without the mediation of a router. This feature becomes available when SWL is disabled.
Direct connection of a new device is carried out in the following way:
- A list of devices and networks opens through the “Select network” menu item.
- The blue button on the remote control is pressed.
- The message “Direct Wi-Fi connection to a mobile phone or computer” appears. The network may have limited functionality."
- Enter the SSID and security key on the connected access point.
If a security key is required, you should write it down. If the network is not working properly, you should check your login and PIN code. An incorrect key may cause the device to not function properly.
Network settings
If other methods do not work, you must enter the network settings manually. You must first obtain connection information. To do this, on a Sony Bravia computer running Windows OS, perform the following steps:
- Right-click on the network icon at the bottom right of the screen.
- Select “Status” from the pop-up menu.
- Go to the “Support” tab.
- After clicking the Details button, the network settings will be displayed.
Manual network setup
To enter network connection values manually, you must perform the following operations:
- Select “Internet Protocol Settings” and “Manually”.
- Enter the IP address using the number buttons on the remote control.
- To move to the next field, press the arrow buttons to navigate down, up and back.
- Enter the subnet and gateway mask.
- Go to the DNS input field. Enter numbers.
- When finished, use the button to select a network.
- After this press ENTER.
SWL connection
This function makes it possible to connect modern TVs to an access point that supports PBC. It is possible to establish a connection without a Wi-Fi router.
Before connecting your digital TV to Wi-Fi, the access point must already be connected to the wireless network. Normal operation of the adapter is only possible with USB port 1. Devices using the 2.4 GHz frequency are supported. 5 GHz frequency is not applicable.
Important! Direct connection of the TV receiver to a PBC-enabled device is possible when SWL is set to Enable and the Wi-Fi adapter is inserted into the USB port.
To connect using SWL you need to do the following:
- Select SWL and press ENTER to enable it.
- Open "SWL Connection".
If the message “Hold the PBC button of the connected device for 120 seconds” suddenly appears, you must follow these steps. For more detailed information, please refer to the operating instructions.
Once the TV is connected to the network, the countdown window will automatically close. If the connection cannot be established, try again after 2 minutes.
Deleting and sorting channels
Unnecessary TV channels can be removed from the menu. Different TV models have different actions. So, for modern devices, in the setup menu you need to find “Digital configurations”, then ─ “Remove programs”, select a TV program and click “Ok”.
Some models do not contain such an option, so in the “Program Sorting” sub-item of the “Digital Configuration” section, the number of the unnecessary source is entered, and it is sorted to a further place in the list. This way you can distribute all TV channels, putting the more popular ones in the first rows.