The development of digital file compression technology has led to revolutionary changes in the television broadcasting industry. This method of encrypting a television signal made it possible to broadcast a high-definition image using a minimum amount of information.
As a result, several digital television formats appeared, incl. broadcasting on the air using terrestrial towers. Below you will find information that will help you find out what digital terrestrial television is and how to set it up on your TV.
What is digital television
Modern television in the understanding of users is watching TV channels in high quality Full-HD, 3D and 4K. Indeed, with the ability to transmit a large amount of information, wide-format broadcasting mpeg-2, mpeg-4 has become possible. However, this does not mean that the user is watching digital TV.
From a technical point of view, digital television is considered to be broadcasting through the transmission of an encrypted digital signal in the DVB standard.
Today, digital TV is available in several broadcast formats:
- satellite (DVB-S/S2/SH);
- cable (DVB-C);
- terrestrial (DVB-T/T2).
The last of the formats is of greatest interest. Today, terrestrial digital television provides 20 channels for free, and its development is funded at the government level.
History of the development of terrestrial television
Initially, digital TV was considered only as a possibility of transmitting a large amount of information by compressing it. But by this time, all frequencies in the meter range were already occupied by analogue broadcasting, so the decimeter wavelength range (UHF) was allocated for digital channels.
In Russia, the European digital TV standard (DVB-T) began to operate in Russia in 2010. To decipher the signal into a familiar form, decoders and satellite receivers were used at an early stage, later digital set-top boxes with 20 channels appeared specifically for the DVB-T format, and modern TV models began to be produced with a built-in TV tuner.
The development of digital television has led to the rapid filling of broadcast frequencies, which has led to the difficulty of opening new television channels. The problem was complicated by the fact that in each country or region the frequencies are occupied by local channels. Subsequently, this problem was solved by switching to streaming TV channels. This made it possible to broadcast several TV channels at once in one digital signal and on the same frequency.
The introduction of in-stream broadcasting led to the discovery of a new standard for digital broadcasting, DVB-T2,
Which has several advantages:
- Simple broadcasting organization. The television company does not need to obtain an additional license allowing it to occupy a separate frequency.
- Fast territorial coverage. Equipment for retransmission on one frequency is cheaper.
- Minimum channels. The user only needs one physical channel to view a whole set of channels.
Despite these advantages, many countries are not committed to developing next-generation broadcasting and still support the DVB-T standard. Mostly, these are small countries that do not experience problems with a shortage of free UHF frequencies.
Terrestrial streaming is delivered in packages of channels called multiplexes.
In each country, a multiplex can include from 4 to 13 channels (for comparison, in Russia the digital package includes 10 broadcast programs).
With the discovery of DVB-T2, the decoder (receiver) improved and became more expensive, because more productivity was now required from him. This is due to the fact that the modulation (digit decoding speed) of T2 has accelerated 4 times (256 versus 64 QAM). Consequently, the decoder of the previous power could only cope with streams that broadcast no more than 4 channels in one packet.
Self-firmware via USB connector
1. format the flash drive into the FAT or FAT32 file system;
2. unpack the file from the downloaded archive into the root folder of the flash drive (just to the flash drive, but not to any folder on it!)
3. connect the flash drive to the receiver and wait for a message on the TV screen stating that the external drive is connected and recognized;
4. Next, press the MENU button to enter the “Main Menu” of the receiver, go to the “Tools” menu and press “OK”;
5. in the menu that appears, select “Update via USB” and click “OK”;
- How to connect an old TV to a digital TV set-top box
6. the set-top box will switch to bootloader mode, which will perform a number of operations with the update file (the process will be displayed on the screen as a color indicator and as a percentage);
7. After completing the update, the receiver will automatically reboot and turn on the first channel in the list for viewing.
Similar stories / 6
In Russia they will launch a program for the transition of state-owned companies to domestic softwareInternet / Angelina GorDIGITAL video blog - a new section of DIGITAL TVCompany news / TV set-top boxes of the provider “Dom.ru” began to be sold on OZONCompany news / Angelina GorDigital TV will be properly “promoted”Television / Stas KuzminV "Intersvyaz TV" has a free digital packageCompany news / Angelina GorRostelecom in the Urals began to transfer its set-top boxes to the Wink platformTelevision / Angelina Gor
More recently, digital television was perceived as something new and incomprehensible, but now every TV shows images in high quality, without interference, with excellent sound.
In order for the TV to show digital channels, you need a set-top box. In addition to broadcasting channels, it has wide functionality and capabilities.
With its help, you can stop TV broadcasting, rewind to the desired moment, record your favorite program and much more. In order for all functions to become available, you will need to update the device or, as they say, update the firmware.
How to flash a TV set-top box and improve its performance will be discussed in this article.
Channel list
Officially, digital terrestrial television began operating in the country in 2008 and developed in the DVB-T standard. But it did not gain popularity and a year later it was discontinued, and DVB-T2 digital TV began to actively spread. In 2014, the first digital television multiplex of 10 channels became available throughout Russia. They included federal channels, well known for analogue broadcasting.
The list of channels of the 1st multiplex (RTRS-1) is presented by the following programs:
- First,
- Russia 1,
- Match TV,
- NTV,
- Channel Five (St. Petersburg),
- Russia-K,
- Russia 24,
- Carousel,
- OTR,
- TVC (TV Center).
In the same year, the distribution of the 2nd multiplex began and today it is available to all residents of all major cities and suburban areas. The second package of digital TV channels mainly includes all-Russian programs.
List of channels of the 2nd multiplex (RTRS-2):
- REN TV,
- SAVED,
- STS,
- Home,
- TV3,
- Friday!,
- Star,
- WORLD,
- TNT,
- Muz TV.
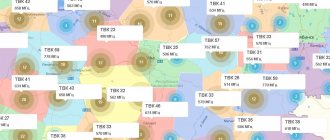
You can find out how many channels are available for viewing in your area on the website map.rtrs.rf. The map shows blue (RTRS-1) and red (RTRS-2) repeaters that transmit broadcasts from the 1st and 2nd multiplexes, respectively.
Today there are plans for the further development of digital TV in the country, incl. increase in broadcast channels.
At the moment, the 3rd multiplex is broadcast from the Ostankino Tower, including local channels and 30 programs are available to users in the Moscow region.
Which channels will be included outside of Moscow will be chosen by each region independently. It is not known exactly when the 3rd package of channels will be officially launched in Russia.
How to flash a TV set-top box (Step-by-step instructions)
Let us analyze in detail the process of flashing the firmware of the Rostelecom set-top box model MAG-250.
- Create a folder on your computer and place the previously downloaded server and program in it: mcast.exe and dhcp. In addition, you need to place two files bootstrap and imageupdate.
- Call the command line by pressing the Win+R keys. You need to enter the ncpa.cpl command in it. A network connections window will open, select the one we will use and right-click on it. By clicking on “Properties”, select the component (TCP/IPv4). In the window that opens, you will need to manually enter the IP address 192.168.1.1 and the mask 255.255.255.0.
- Connect one end of the network cable to the computer and the other to the set-top box.
- Turn on the set-top box and quickly press the “Menu” button, after which the device’s BIOS should open.
- Enable the dhcp server installed in a folder on the computer. To do this, in the command line, specify the path to the folder with the file, for example: C: Rostelecomdualserver.exe, and press the Enter key
- Run the mcast.exe program and specify IP 192.168.1.1, then click on the “Select” button. In the menu that appears, you will need to specify the broadcast addresses Steam1: 224.50.0.70:9000 and Steam2: 224.50.0.51:9001. Then, next to each stream you will need to press the “Start” key.
In the BIOS you should follow this path: Upgrade Tools – MC Upgrade .
During the loading process the following messages will appear sequentially:
Bootstrap message: Reception of an image is started!Bootstrap message: Writing image to flash.Writing image to flash successfull!
Then the device will reboot and start with the new firmware version.
What you need to connect
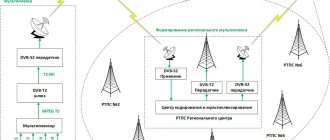
From the technical side, digital broadcasting works according to the same scheme as analog television.
The work cycle of the DVB-T2 standard includes the following stages:
- encoding the image into a compressed digital format;
- sending a signal from the broadcaster to the repeater;
- redirecting the signal from the repeater to the receiver;
- decoding of the received signal by the decoder;
- viewing the image as usual.
In this case, the broadcaster is also a repeater, and if the user is near him, the digital reception cycle excludes the 2nd and 3rd points.
But in all cases, the user needs 3 devices:
- antenna for receiving digital terrestrial television;
- decoder for decoding digital information;
- TV for viewing images.
However, in practice, these three devices may be represented by different equipment. To understand how free digital television works and how to organize it correctly, you need to consider each device separately.
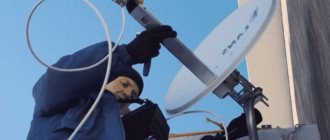
Antenna
A device for receiving a television signal from broadcaster or repeater devices. There are a large number of receivers, but they have one common property - receiving incoming and reflected signals in the decimeter wavelength range. It corresponds to a frequency range from 300 MHz to 3 GHz. However, only frequencies up to 900 MHz are used for digital broadcasting. The remaining UHF frequencies are allocated for the DVB-S2 satellite standard.
When choosing an antenna, you should also pay attention to the following criteria:
- Operating mode. Based on their power, they are divided into passive and active devices. The latter are more powerful, but more expensive and require more power consumption. In city blocks and suburban dacha areas, a passive antenna will also cope successfully. A receiver with an active operating mode should be considered when there are really problems with signal reception or the TV tower is located far away.
- Design. Antennas are also unidirectional, flat and spatial. They are distinguished by their ability to receive a signal in space - in a specific direction, along the entire horizontal plane or in a sphere, respectively. It is better to buy unidirectional outdoor antennas in a sparsely populated area when the repeater is located far away. All indoor devices are represented by flat receivers, because their operation is designed to receive a reflected signal. In conditions of uneven terrain and other interference, when you have to rely on several television towers at once, it is more reliable to install a spatial antenna.
Only choosing an antenna with a successful design and sufficient power can guarantee successful viewing of digital TV, because it is only possible with a good signal level.
Important! If analog TV is available with some interference at a low signal level, then there will be no digital channels at all. This is explained by the fact that when part of the packet data is lost (which is important for wireless communications), incorrect decryption occurs, as a result of which the user receives artifacts in the form of “cubes,” a broadcast delay, or a complete absence of an image.
Decoder
It is required to decipher (decod) incoming digital information into the usual video format mpeg-2/mpeg-4. Initially they were present in satellite receivers, because... satellite television was the first to broadcast digitally. Subsequently, digital receivers began to be produced that were designed to operate in the DVB-T/T2 standard. The set-top boxes are designed for 20 physical channels and several radio programs. This number of TVCs is required to watch on-air programs broadcast in the DVB-T format.
New TV models have begun to be produced with a TV tuner, which is a built-in decoder. Depending on the price and capabilities of the model, the tuner can decrypt only a specific or all digital formats - DVB-S/C/T.
In recent years, smart Smart TVs and set-top boxes have begun to be produced that can receive signals simultaneously from several receivers and decipher any information in digital form. With their advent, the organization of broadcast television became accessible, because Previously, this required the user to purchase several receivers and a duplexer.
This opportunity is also provided by universal receivers, but in terms of functionality they are much inferior to modern Smart devices. From the technical side, these are ordinary set-top boxes with several decoders, which resemble satellite receivers with 1000 physical channels and deep system settings (frequency, channel modulation).
TV
Its task is to receive the decrypted signal and display images to the user. Simply put, it is needed only for viewing, and when choosing it you do not need to follow specific criteria. In fact, this is a misconception.
You need to buy a TV taking into account two functions:
- Decoding the digital signal. The presence of a built-in TV tuner will allow you to watch digital TV without a receiver, which makes it possible to save a lot on equipment. When purchasing, it is important to check whether the TV supports over-the-air broadcasting, because... Each broadcast format requires a separate decoder.
- Screen resolution. It limits the clarity of the resulting image. The maximum pixel limit is the limit within which you can watch digital television. For example, if the screen only supports HDTV, then when broadcasting higher definition images (Full-HD, 4K), only this format will be displayed to the user.
In the latter case, it is important to pay attention to the hardware characteristics of the TV. Higher resolution broadcasts transmit more information and therefore require a higher bandwidth cable connection.
Now the most powerful is the coaxial wire connected via the HDMI connector. Without it, watching high-definition digital television will also become impossible, even if the pixel resolution of the screen allows it.
Checking your TV for DVB-T2 reception
You can find out about DVB-T2 support using:
- documents for TV;
- device packaging or factory stickers;
- entering the model into the Internet search bar.
In addition to the methods described above, the device owner can contact the company’s technical support. Phone numbers and online chats are available on the manufacturer's official website. Qualified specialists will help you determine the TV model and tell you whether it supports digital broadcasting.
Attention. TV models before 1998 do not have the ability to receive a digital signal. Despite the fact that DVB-T2 technology already existed on the market, until about 2004 it was impossible to purchase such devices.
You can also determine the presence of DVB-T2 by the Digital output and Digital input connectors, which are located on the back of the device. If there are any, the TV is highly likely to be able to accept the new digital standard.
Some well-known manufacturers indicate the ability to receive a digital signal using specialized symbols:
- LG. Devices released before 2021 contain the letter V or T at the end. On more modern models, the penultimate symbol is L.
- Samsung. The presence of a built-in tuner is indicated by the designations AB, AK, AT, SB, DK, ST, A, K, AU, U in the 4th character from the end.
- Philips. Support for digital broadcasting can be determined by the 5th letter in the name: T or S.
No less common TV manufacturers Panasonic and Sony do not indicate the presence of a decoder in the device name. In this case, you must use the recommendations described above: contact support, use the Internet, or read the official documentation.
Settings
Organizing digital television is simple, but requires attention and adherence to clear recommendations. Below is a step-by-step connection process.
Antenna installation
Before searching for channels, you need to properly install the antenna and connect to the TV. To find a good place for the antenna, just connect it to the TV directly and check the level of the recorded signal, because decryption does not affect it. High-quality operation of digital terrestrial channels is possible only with an indicator of 65%. The quality of the incoming signal is affected by the following factors:
- Distance from repeater. If it is far away, you need an outdoor antenna with a large long boom (from 2 meters). If the TV tower is closer than 10 km, an active indoor antenna will handle the reception.
- Presence of obstacles. In ultra-dense buildings, it is impossible to receive a digital signal directly from the tower. You need a flat or spatial antenna with the ability to catch the reflected signal.
- Cable length and quality. When transporting it, the signal deteriorates greatly and you need to try to minimize the distance from the antenna to the TV (receiver). If this fails, you will need to use an active antenna and use an amplifier.
If all factors are taken into account and the right antenna is selected, there will be no problems with signal quality.
Important! There is no need to try to achieve 100% signal level. This is impossible, because it is weakened in the air as it spreads. 70% - 85% is quite normal!
Attention! Packages of the 1st and 2nd multiplex are broadcast from different repeaters (RTRS-1 and RTRS-2) and to view 20 digital TV channels, the antenna must receive a signal from both emitters. If both TV towers are installed in different directions, only a flat antenna can provide reception from them.
Advice! How to connect digital terrestrial television to 20 channels if RTRS-1 is nearby and RTRS-2 is far away? A powerful unidirectional antenna will help here, which will receive the first multiplex from a more distant television tower, which will be next to RTRS-2. In this case, all closer RTRS-1s are ignored.
Connecting equipment
If you are using a modern TV model with a TV tuner, just connect the receiver to it using an antenna cable. It is connected, like a HF analogue broadcast receiver, to the RF IN connector.
When using a receiver, the connection situation becomes much more complicated. It is necessary to simultaneously consider the connectors present in the devices and the resolution of the TV. If you are using a smart HDTV, the connection is made only using an HDMI cable. Other wires do not have enough bandwidth for high definition broadcasting.
If the TV has only a “tulip” connector (RCA: a wire with 3 plugs in white, yellow and red), its screen resolution is designed to display images with a clarity no higher than Full-HD (1080p), with which most channels broadcast digital TV DVB-T2.
Old TVs, in addition to the antenna input, have only one twisted pair connector (AV: a wire with two yellow and white plugs). This cable is capable of transmitting images in Full-HD format, but the resolution of such a TV will not be higher than 720p (HDTV).
Before the next setup step, you need to check that the receiver is connected to the TV correctly. The first step is to check the signal level. If it is below 55% - 65%, the problem is an unsuccessful installation of the antenna; you need to return to the description of the previous setup step and check it in all respects. If 20% signal or lower is displayed, a faulty receiver or cable is used because This is a normal indicator without a connected TV antenna.
If the signal level is more than 65%, you can begin tuning digital channels.
An easy way to connect your TV to TV channels via the Internet
To watch channels without having to buy an antenna or additional equipment, you can connect your TV to the Internet. For this, Smart TV technology is used, built into most modern models.
If there is none, watching television channels via the Internet can be configured using the appropriate cable and WAN connector, which is present in some older models.
You can also purchase a special device with built-in software. Usually these are small boxes or flash drives with Android TV, which require a USB connector to connect.
You can also watch TV channels for free by connecting a laptop or computer to the TV. In this case, an HDMI cable is used. On such a TV, not only is it possible to watch channels, the user can also play games, surf the Internet and much more. In fact, the TV becomes a second monitor.
Search channels
The procedure is performed using a different method in each case, depending on the search requirements and the connected equipment.
Below are step-by-step instructions for setting up digital terrestrial television reception.
Auto search
A useful and convenient option that will help you find digital TV channels quickly and without user intervention. All you need to do is select the range, i.e. UHF (UHF) and start auto search. The TV will find and save the programs you need within a few minutes. Depending on the number of broadcasting multiplexes, from 1 to 3 physical channels will be occupied.
Along with its convenience, this function has a big drawback - it erases all previous channels. Therefore, if analogue broadcast programs are present, they will disappear. In these cases, manual channel search helps.
Manual mode
It allows you to customize digital channels using custom settings. To do this, just switch to the physical channel corresponding to the broadcast frequency, select the UHF band and use fine tuning of the channel.
You can do it differently - select several physical channels yourself and enter the frequency, and also set the modulation value - 256 QAM. The broadcast frequency and TVC number can be viewed on the website map.rtrs.rf.
To do this, you need to click on the repeater icon, its names and broadcast characteristics will open.
Advice! If a Smart TV is connected and an analogue broadcasting antenna (AV) is connected, just select the “Antenna” signal source, then select “Find analogue and digital channels”. With these settings, you can find all channels using auto search, without worrying about analogue broadcast programs.
Search via receiver
The principle of setting up digital TV using a set-top box is similar, the only difference is that the programs will be placed on the physical channels of the receiver. Before searching, you need to switch the TV to the physical channel corresponding to the connector to which the receiver is connected.
Further actions depend on the type of connected set-top box:
- Digital DVB-T/T2 receiver. A simple, cheap device that supports 20 TVCs and is the easiest to set up. Channel search is performed by auto tuning.
- Smart receiver. Supports decoding of any broadcast formats in the DVB standard. If, at the time of searching, other channels are already configured on the set-top box (for example, frequencies of satellite TV or cable), in order to save them, you must first select the “Antenna” radiation source. In this case, a search will be performed in the frequency range 298 - 874 MHz. The search will ignore other frequencies and the channels broadcasting on them will be saved.
- Universal receiver. These Combo set-top boxes also work with any digital broadcast format. But unlike Smart devices, they are not able to distinguish signals by the method of reception and each is perceived as ordinary radiation at a specific frequency. Because of this, during auto-search, tuning occurs in the entire UHF range and previously existing channels are erased. Therefore, on such receivers you can only set up digital terrestrial television using a manual search.
Analogue broadcast programs when using the receiver remain on the physical channels of the TV. Their work is not in danger, because... TV settings do not change.
Why do you need firmware?
In the domestic market, the most popular devices are from Rostelecom and Cadena. They pick up all free Russian television channels.
Negative factors include the lack of some services. The device itself is a modified foreign set-top box, and unnecessary functionality has been removed.
For domestic consumers, the interface is made in Russian. The Cadena console regularly receives updates, which are published on the official website. They mainly affect the interface and menu design. The receiver provides a TV program for the week ahead, support for subtitles and teletext, parental controls and many other useful functions.
- How to install and where to point the antenna for digital television
For those who like to record certain broadcasts, this function is provided. To do this, you need the appropriate firmware version and a memory card with enough capacity to record video.
In the future, the recorded material can be played back using the media player built into the console.
Possible problems with no signal
Options for problems and ways to solve them when a weak signal level is received have already been discussed above. Therefore, only the reasons for the lack of television will be considered here if the level of the recorded signal is satisfactory (from 55%). After completing all connection and configuration steps, the user can receive:
The following results:
- Everything works successfully, shows 20 channels. The setup was completed successfully.
- Shows 10 channels. You need to go to the website map.rtrs.rf and find RTRS-1 and RTRS-2 repeaters within a radius of 50 km from the area. If there is only one, at the moment the 1st multiplex (10 channels) is broadcasting in the area and it will not be possible to connect 20 channels. If both are present, then they are in different directions and you need to use a flat or spatial antenna. For unidirectional devices, the reception coverage of the boom does not exceed 135°.
- Shows all channels, artifacts pop up. Incorrect signal decoding due to loss of part of the packet data. The repeater is far away, you need to connect an antenna with a long boom.
- All channels work well, but the delay is more than 10 seconds. If you are using a Smart TV and this is the case with all channels, you need to synchronize the device to accurately adjust the time. If the delay is only on some programs, or the cable cannot cope with processing incoming information, you will need to connect a more powerful wire.
- No image. When registering a clear signal, this situation is only possible when the receiver is turned on. You need to check whether the wires are connected correctly or using an unsuitable receiver. You need to make sure that it supports VMI-T2 (DVB-T is also not suitable, these are completely different digital standards that have nothing in common except broadcasting).
Preparation
If the image on your TV has deteriorated or doubts creep in that digital TV is not working as it should, you should think about updating the software.
It is necessary to prepare for this process. To do this, you will need to download the necessary files and have a computer or laptop.
Firmware for a TV set-top box from Rostelecom is done using a computer with a free Ethernet input.
The set-top box will be connected to it. In addition, you will need a network cable that will connect the set-top box and the computer.
The software you will need is mcast.exe and dualserver (or its equivalent). You need to download the latest firmware files from the company's website. They will be called " bootstrap " and " imageupdate ".
It is not recommended to flash the device using third-party tools if at least one official update has not been installed.
Cadena devices will require a USB flash drive with a capacity of up to 8GB formatted in FAT32. The firmware downloaded from the site will be recorded on it.
Tips for use
In order for an antenna with an amplifier to serve for many years and not stop picking up a digital signal, it is necessary to follow a number of recommendations. First of all, you should pay attention to the quality of the fasteners, since most often the unit is located on the external wall of the building or a rod, the fittings for fixing must be selected from metal, otherwise during precipitation or wind the part may break off and fall. Before installation, you must carefully study the manufacturer's instructions and recommendations.
Metal bracket
Point the antenna in the correct direction so that the amplifier does not tune channels several times. If the unit does not find the necessary programs, then when entering the digital value of the range, it is better to write the standard on paper so as not to enter the same number several times.
To connect the plug from the amplifier to the TV, it is better to use PVC electrical tape; it is wrapped around the junction of the cable and the metal rod. This will allow the contact to be securely fixed, and the line will not be damaged during manipulation.
After most digital broadcast channels have been found, they need to be sorted, for which it is better to use the receiver settings. To do this, set the unit to setup mode and in the dialog box we place the channels of interest in the first lines, and the rest can be blocked or deleted.
Since the voltage in the network, especially in rural areas, is not constant and has fluctuations, it is better to use a stabilizer that connects to a 220 Volt network and performs current equalization functions.
You should not purchase antennas with an amplifier that are made in China. Why? Because in most cases, such products are made of low-quality material, and after the equipment is installed, its service life becomes limited.
It is not recommended to carry out preventive work on the connected amplifier station, since any manipulation with electric current can be hazardous to health. Also, you should not place the antenna amplification and power supply unit near heating radiators and other hot appliances, since these parts may create interference or completely fail when the temperature rises.
Thus, in order to answer the question of how to properly install an antenna with an amplifier, and what units to use for this, you must study the manufacturer’s recommendations, as well as the installation and operating instructions.
An alternative way to flash the MAG-250 console
The best option for an alternative device update is DNA firmware.
Thanks to it, functions such as:
- TV program from Yandex;
- recording broadcasts to disk;
- autostart of iptv broadcasts from Rostelecom;
- Recovery after the update occurs automatically.
It is important to install the original version before installing alternative firmware. Otherwise, problems often arise with updating the device.
The DNA firmware process itself occurs without the use of a network cable. To work, you will need a flash drive with a capacity of up to 8 GB, formatted in FAT32.
Then, on the USB drive you should create a folder with the name of the device and install the firmware files there: “ Bootstrap ” and “ imageupdate ”. In the future, there are two options for updating the device:
- from the internal portal;
- from BIOS.
In the first case, you need to go into the settings and go to the service menu by pressing the “ SETUP ” button. Selecting “ Update software ”, select the option “ via USB ” and click “ Start update ”. Before starting the process, you will need to click the “ Check ” button.
The program will check for the presence of the necessary files on the flash drive. If all requirements are met, the “ Start ” button will light up.
A common error: “Invalid file header.” In this case, it is recommended to reformat the USB drive to FAT32. In addition, you should check the name of the folder on the flash drive. It must be without spaces, for example, MAG250. If this does not help, then you should use the firmware option from the BIOS.
After connecting a USB drive with files, you need to reboot the device. In this case, you should hold down the “ Menu ” button. After the menu appears, select “ Upgrade Tools ”, then go to “ USB Bootstrap ”.
If everything is in order with the information on the flash drive, the process of updating the software version will begin. The successful completion of the installation will be indicated by the message: “ Writing image to flash successfull ”.
Then, the device will reboot and will start with the new firmware.