How to set up a Sony TV? First, adjust the picture and sound settings. Then proceed to search and save TV channels. Users are offered two modes - automatic and manual.
Modern TV models from the famous Japanese brand support all digital signal standards. The search for TV channels is carried out through the built-in receiver. Additionally, you don’t have to buy a receiver and connect it to the TV.
Step-by-step instructions for setting up channels have been developed especially for users who have not previously used Sony TV equipment. We will also consider the features of adjusting image, sound and other important parameters.
Connecting your Sony BRAVIA TV to the Internet via Wi-Fi
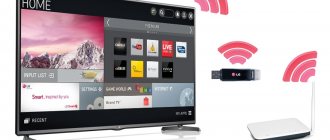
Many people wonder how to set up Smart TV on a Sony Bravia TV via wifi. To take full advantage of your Sony Smart TV, you need to connect and configure it correctly.
As a rule, connecting Sony Bravia, Sony Trinitron or Samsung TVs is carried out in 2 main ways:
- via router;
- via Wi-Fi.
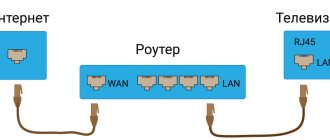
To connect directly, special conditions are needed, since the TV will only work if the “Internet provider” provides a dynamic IP. Setting up Smart TV on a Sony Bravia TV via wifi is carried out according to the following scheme: network cable - router - Wi-Fi distribution. The distributed signal can be used from any of the necessary devices.
Note! If your TV does not have Wi-Fi, you will need to buy a Wi-Fi adapter.
However, its acquisition will be advisable only if the equipment supports this technology.
Tips for setting up your Sony TV
Every user can set up the TV correctly. Just follow the recommendations from the professionals. Setting the sound (volume, volume) is easier. Go to the corresponding tab of the main menu and select the optimal parameters.
Adjusting the image will take more time. In order for a clear and rich picture to appear on the screen, you need to adjust a lot of parameters. Now let's look at the basic subtleties of setting up a Sony TV.
Preparatory work
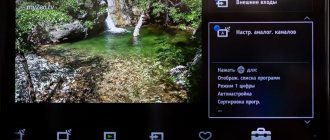
Save the image calibration chart below to a flash drive or external hard drive. Connect the memory drive to the TV via a USB connector. Open the picture for customization through the media player.
On new models running on the Android TV platform, calibration files are played from a DVD or Blu-Ray player. Because it is impossible to change settings through the Album application.
First, we set up the main indicators. To do this, you need to disable advanced options. Open the main menu and go to “Settings”, and then to the “System Settings” tab and the “Eco” subsection, here disable the light sensor.
Return to the main menu and go to “Settings” again, and then to the “Image” tab to deactivate the following functions: reality creation, smooth transition, noise reduction.
For highlighting, set the value to 7 or 8 points. For Picture Mode, select Standard. Once these changes are made, switch to the Advanced tab to deactivate all features.
Access the settings menu only through the HOME button. If you edit settings using the Options button, the settings will be applied to one signal source, and not to the TV as a whole.
Calibration
Start by checking that the image size settings are correct. The default settings enlarge the image. As a result, sharpness decreases. This manifests itself as moire, which can be seen in the outlines of the resolution bands.
To adjust the picture size, open “Settings” and go to the “Screen Control” tab to disable “Automatic Display Area”. Also disable the “Maximum Resolution” function. Now arrows are visible in all corners. The moire effect has disappeared.
Brightness
Calculate the darkest part of the grayscale band in the pre-downloaded chart. Adjust the brightness so that the black area (located on the left) is as dark as possible. Are there any differences between the left and right sides of the screen? Brightness is set correctly.
Contrast
Find the lightest part of the diagram. Adjust the contrast until the right side of the screen is as light as possible. The difference between the left and right sides of the diagram should be noticeable.
Sharpness
Increased sharpness is the cause of an unnatural image. To avoid this, adjust the sharpness. There should be no light outline along intersecting lines on the calibration diagram. Reduce the sharpness until the contour disappears completely.
Saturation of the color palette
Colors will be saturated when all transitions are viewed on the calibration chart. Look at the center of the scale to achieve a natural rendition of shades.
Sound settings
Select the sound mode - internal speakers or external speakers. There are no additional options. Just adjust the volume.
Extra options
Connect the antenna cable to the appropriate connector. Select the signal source "Antenna". Disable additional devices. Now the TV is ready to search for TV channels.
How to connect a TV to a router? This option is only available to owners of TVs that support Smart TV. Synchronization is carried out via a Wi-Fi router or by connecting a cable to the LAN connector.
Using the WPS standard
Problems connecting Sony Bravia TVs to Wi-Fi
The WPS standard greatly simplifies setting up a secure wireless home network and reduces it to pressing the WPS button on your wireless LAN router. Before you set up your wireless LAN, you need to find the WPS button on your router and learn how to use it correctly.
Important ! You can connect to a wireless LAN using WPS only if your wireless LAN router supports the WPS standard.
On the included remote control, press the HOME button:
- Select “Settings”.
- Open the “Network Setup” tab.
- Select “Wireless Setup”.
- Press the WPS button (WPS (Push Button)).
Connecting to WI-FI using a security key
Enabling Wi-Fi on Sony Vaio laptops
To set up a wireless network, you will need an SSID (wireless network name) and a security key (WEP or WPA key). If this data is not available, then you need to follow all the steps according to the instructions of your router or consult your Internet provider.
On the included remote control, press the HOME button:
- Select the “Settings” tab.
- Go to the “Network Settings” section.
- Open the “Wireless Setup” option.
- Select "Scan".
- Find your network from the list.
How to connect a TV to Wi-Fi using auto-configuration
Connecting an iPhone via Wi-fi Direct to another phone or TV
How can you access the Internet on a Sony TV using auto-configuration? The function allows you to connect the TV receiver with wireless access points from third-party companies. If they do not support this function, then the connection must be made using PBC (WPS), automatic or manual configuration.
Note! Before connecting your TV to Wi-Fi, you need to turn off SWL.
You can check whether a specific device supports the automatic configuration function on the company’s official portal
Standard recommendations
Before connecting the device to the network, you need to check that all cords are connected correctly and that they are securely fastened. After turning on the TV, you need to wait a while so that the installation of the system is completely completed, only after that you can proceed to the basic settings of the Sony TV.
All actions are performed using the control panel. Parameters such as sound, image, Internet connection and speaker system must be configured in the “HOME” menu. This is the main tab; all the necessary settings for the Sony TV are performed in it.
Setup using automatic configuration
You can set up a network using automatic configuration by performing the following steps:
- Place an access point (AP) and a TV nearby, and then turn them on. Since download times may vary, you may need to wait about two minutes. Before connecting your TV to a Wi-Fi router, you need to make sure that the network cable is connected to the router port. Otherwise, auto-configuration will only confirm the connection with the access point, but there will be no confirmation of connection to Wi-Fi.
- After a few minutes, connect the adapter to the TV. After this, a pop-up window will appear.
- After connecting, you should place the router parallel to the network adapter no further than 25 cm from it.
- You need to wait until the automatic connection occurs. Otherwise, a window indicating a malfunction will appear on the screen. To try again, you need to reboot the router, disconnect the adapter and start again from step 1. You can also choose another connection method: auto, manual or PBC.
- Place the AP in the desired location. If its parameters have changed, or a new access point is being configured, the steps must be repeated from the beginning.
Selection of TV channels broadcast
After the TV is connected to the antenna, the owner must follow the instructions. It tells you how to set up channels on your TV, as well as what to do next. The user will be asked to select a method for receiving and transmitting the signal. For example, we only plan to set up digital television on a Sony TV. In this case, you need to click on the appropriate link, after which the search for digital TV operator channels will begin. Also, the TV owner can give preference to cable television, choose over-the-air broadcasting and carry out analog setup.
After this, select the following parameters in a separate tab:
- network ID;
- scan type;
- frequency.
Important! If necessary, you can change the default data. After confirming the action, the TV will automatically find and display all available TV channels.
How to connect a TV to WiFi via PBC
If the access point has a PBC button, the procedure is as follows:
- Connect the TV receiver to the Wi-Fi adapter.
- Turn it on, press MENU on the remote control, and then go to the “Settings” section.
- Select the “Network” menu item.
- Enter the type “Wireless”.
- Open the “Network Settings” menu item.
- Press the red button on the remote control.
- Hold the PBC button on the access point for 2 minutes. The TV receiver will automatically receive the required settings and the network connection will take place.
- To exit, press the RETURN button.
Sony TVs are manufactured on standard chassis developed in-house. Different Sony TV models may belong to the same chassis. Setting up TVs that have the same chassis is almost the same.
In different models, the service menu is available using different key combinations on the control panel or on the front panel of the TV. The following options for launching the service menu are possible:
Press P+ and P- and turn on the network.
or
Turn on the power and enter the “Stand-by” mode. Press the [On screen display], [5], , [TV] buttons on the remote control. The TT symbol will appear in the upper right corner of the screen. Status information will be on the screen. To display the menu, press [Menu] on the remote control.
In other words: from standby mode, quickly press the i+, 5, Vol+, TV buttons one after another. You should know that:
- Stand-by mode is a mode when the TV set is plugged in, the power button on the TV itself is pressed, and the TV is “extinguished” (turned off). The TV goes into this mode if you press the TV switch off button on the remote control.
- The i+ button (aka OSD, On Screen Display) is a button with i+ symbols in a window.
- The TV button is the button at the top left of the remote control if the remote control is native. A blank screen is drawn on it.
Turn off the power to exit the service mode. The power is turned off using the power button on the control panel.
Below is information about the Sony KV-14M1K TV, which has a BE-4A chassis (the same group includes the BE-4 chassis). The range of possible adjustments available in the menu is as follows:
| Adjustable Parameter | Meaning | Range of values |
| 16:9 OFF (screen format) | Selected | ON/OFF |
| System (sound standard) | Selected | BG-L, BG-DK, UK (UK), Eire (Ireland), BG |
| Text (Teletext mode) | Selected | EAST/WEST/OFF |
| AGC (AGC) | Adjustable | 00-63 |
| PLL (PLL) | Adjustable | 00-63 |
| B&W Delay signal) | Adjustable | 00-63 |
| Ver Size (vertical size) | Adjustable | 00-63 |
| Ver Breath (vertical curvature) | 00-63 | |
| Par. Amp (parabola amplitude) | 00-63 | |
| Par. Tilt (parabola tilt) | 32 | 00-63 |
| V. Linear (vertical linearity) | Adjustable | 00-63 |
| Com. Corr (correction in corners) | 00-63 | |
| V. Cen or EW (centering according to vertical) | Adjustable | 00-63 |
| V. Position (vertical position) | 42 | 00-63 |
| H. Center horizontal) | Adjustable | 00-63 |
| Blue HWB | Adjustable | 00-63 |
| Green HWB | Adjustable | 00-63 |
| Red HWB | Adjustable | 00-63 |
More information about setting up your TV can be found in the attached service documentation.
BRAVIA. Setting up and using Wi-Fi Direct and Screen Mirroring features
You can connect to your TV directly without using a cable or wireless router (or access point). If necessary, it is possible to use the Screen mirroring function, which is compatible with Miracast technology.
To connect, you must select the duplication function on the TV and on the source device.
For more information, please refer to the list of Wi-Fi Certified Miracast devices, which can be found on the Wi-Fi Alliance website.
Connectivity with all Miracast compatible devices is not guaranteed.
Apple devices, such as iPhones, do not support Screen mirroring as of November 2014.
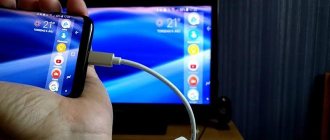
Connecting your TV to the Internet using a LAN cable and Wi-Fi
Lately, many have been wondering how to turn on the Internet on a Sony TV using a LAN cable. You can connect your TV to the Internet via a router. First you need to make sure that everything is configured correctly and you can safely enter the World Wide Web. Connecting devices to each other using twisted pair cables can cause some inconvenience in the form of wires under your feet, but also ensure comfortable viewing of movies and TV shows.
Note! Connecting your TV to your Wi-Fi router via a LAN cable rather than a wireless connection can help avoid interruptions and lags when watching movies through apps, or when streaming video files from your computer to your TV.
To comfortably watch television, online video or broadcast media content from a computer to a TV via a router, it is advisable to have a high-speed connection and high-quality active network equipment.
In addition, this connection method can also give positive results and relieve discomfort, because the data transfer speed in a LAN network cable is higher than in a Wi-Fi radio channel. In addition, the Wi-Fi signal from the router is affected by external sources, and in some cases you need to diagnose the wireless network and find a less congested channel.
How to set up a Sony TV (calibration)
Picture Mode
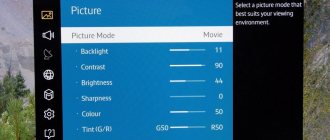
The settings menu contains image and screen settings. Here you'll find everything from simple picture presets to detailed settings for color, brightness, and more. To access your Sony TV's full picture settings, open the Picture menu, where you'll find both basic and advanced settings.
The menu begins by selecting one of the preset image modes. Without resorting to adjusting each picture parameter individually, this is the easiest way to adjust the picture on your Sony TV.
• Vivid: This mode is not entirely color accurate. But the image has clear contours and high contrast. • Standard: Provides acceptable quality for most TV and video. • Prof. cinema (Cinema Pro / Cinema 1): The image is optimized to recreate the “film” effect. • House. Cinema (Cinema Home / Cinema 2): The image is optimized for watching movies at home in a dark room. • Game: This mode's settings are optimized for gaming on your TV. • Graphics: It is better to switch to this mode when viewing text and tables. • Photo: settings are selected for comfortable viewing of photos. • Custom: In this mode, all settings can be customized to your liking. • Dolby Vision Light: Mode for bright rooms. • Dolby Vision Dark: Mode for dark rooms.
Sony Picture Mode Settings
Let us first describe what this or that group of settings regulates. Then we will proceed to a detailed analysis of what regulates each specific parameter in its group.
• Resetting the picture settings for the selected mode: in case changing the settings does not lead to the desired improvement in the picture on the screen, the parameters of the current mode can be reset to the Sony factory settings. • Auto Picture Mode: This option allows the TV to select its own mode by analyzing the type of content being displayed. We usually disable this mode if we do not want the image to change on its own. • Netflix Calibration Mode: This option is enabled in native apps if you are streaming video that supports this calibration. Displays content without changing the creators' intent. • Light sensor (Ambient light sensor - on OLED TVs): adapts the brightness of the image to the lighting conditions of the room. We turn it off first, just as we turn off the power saving mode in the system settings. • Brightness: this group of parameters, in fact, allows you to adjust the picture to your liking, including adjusting contrast, color temperature, saturation, etc. • Color: here you adjust parameters related to saturation and color shades. • Sharpness: here are the parameters that control the sharpness of the picture and are responsible for the smoothness of the contours. • Motion: Options that improve the display of moving objects. • Video: Set HDR mode and color gamma. • Add. color temperature parameters: used for professional calibration using special equipment.
Detailed (advanced) picture settings can also be accessed through the ACTION MENU button on the remote control.
Automatic network setup
Wi-Fi networks have an additional security system that requires connected devices to transmit an access code. This is the password (a word or a series of letters and numbers) entered during connection security setup. Using auto-tuning involves entering a password through a browser.
To automatically install Wi-Fi Internet, you must:
- Press the button to open the “Internet Protocol Settings” item, and then press ENTER. Go to “Auto” and confirm the entry.
- Go to “Select Network” and press ENTER. Searches for available Wi-Fi networks. Once completed, a list of them will be displayed.
- In the list, using the navigation buttons, select the desired network and press ENTER. If the router is hidden (invisible), then you need to open the “Add network” menu item and write down the name and password.
- Select "Security" or "PIN". For most home networks, the first option is suitable. The security screen appears.
- Enter your password. It must match the code you entered when setting up your router or modem.
How to set up digital television on a Sony TV?
We have already touched on the topic of how to set up channels on a Sony TV, but did not delve into the specifics of choosing parameters. Now we will indicate those parameters that may be useful when searching for TV channels. If you selected the “On-Air” mode, the scan will start automatically. In the “Cable” option, you need to make additional settings.
What we pay attention to:
- Operator selection. In this line it is better to set the “Others” option.
- Quick or full scan. The first option is preferable for those who know the network frequency of their own provider. In other cases, it is better to run a full search of all networks.
- After completing the search, some TV channels may be of poor quality. If all the settings are correct, but the signal is still weak, it is better to filter out unnecessary channels. We can add them to the end of the list during sorting or simply delete them; it is unlikely that there will be a desire to watch channels with strong noise.
Direct connection
It is possible to communicate with an iPhone or Android mobile device without the mediation of a router. This feature becomes available when SWL is disabled.
Direct connection of a new device is carried out in the following way:
- A list of devices and networks opens through the “Select network” menu item.
- The blue button on the remote control is pressed.
- The message “Direct Wi-Fi connection to a mobile phone or computer” appears. The network may have limited functionality."
- Enter the SSID and security key on the connected access point.
If a security key is required, you should write it down. If the network is not working properly, you should check your login and PIN code. An incorrect key may cause the device to not function properly.
Solving possible problems
Complex devices often work with errors. The more multi-component the device, the greater their likelihood. Let's consider a number of popular problems:
- Applications or online services do not work correctly. The sites open normally. Most likely a firmware update is needed.
- A set of applications has disappeared from the list of programs that open from the “SEN” menu and when selected from the “+” button. After resetting the settings, it happens that the TV takes a long time to update the list of programs. If the program directory does not appear, make sure you have Internet access. It is checked by logging into the Internet through a web browser with the “WWW” icon. This is a built-in program and is always present. If there is no work, check the network again. If the browser is working correctly, return to the main menu. From the “HOME” button, enter “Network Settings” and select “Update Internet Content”.
- Occasionally, sites require downloading additional plugins during operation, more often Flash. Is it possible to download them and make the TV work normally? Unfortunately this is not possible. The device's built-in browser does not accept updates. To view such sites, try downloading versions adapted for mobile devices.
- During operation, the download speed changes, and sometimes it disappears completely. It is worth checking the availability of access from other devices to make sure the router is working. Try rebooting the access point. Sometimes a small glitch causes the download to slow down.
If this does not help, disable IPv6 routing. This is done through system settings from the computer.
To disable this function on Sony, go through “HOME” to “Settings” with the “suitcase”. From there - go to “Network” and “IPv6 Settings”.
In the settings, disable routing by confirming by pressing the “No” key.
The second solution is to eliminate interference. The router must be nearby and within line of sight. Concrete reinforced walls, dense obstacles and other devices may cause interference. All wireless connections in the apartment should be turned off.
It is always worth considering that the power of a TV processor is much lower than that of a computer and processes a limited range of tasks. The speed of loading sites, running games and other programs is much less than computer ones. And that's okay.
Network settings
If other methods do not work, you must enter the network settings manually. You must first obtain connection information. To do this, on a Sony Bravia computer running Windows OS, perform the following steps:
- Right-click on the network icon at the bottom right of the screen.
- Select “Status” from the pop-up menu.
- Go to the “Support” tab.
- After clicking the Details button, the network settings will be displayed.
List of applications on Smart TV from Sony Bravia
After switching to Smart TV mode, a window will open.
On the left there will be a column with suggested current channels, and on the right there will be an empty field where you can later add your favorites.
To view the full list, tap the All Apps button at the bottom of the screen.
Here you can see channels on different topics: applications for watching exclusively movies in excellent quality (ivi.ru), various music TV channels, portals for cartoons, TV series, regular user videos (YouTube) and much more.
For lovers of a more classic set of entertainment, there are also state channels, for example, Channel One or STS.
In addition, Smart TV from Sony Bravia has the “Opera TV Store” function, which allows you to expand the capabilities of regular TV viewing.
Opera TV Store app
Here you can improve image quality, see even more information, play online games and much more.
Games on Sony Bravia
Manual network setup
To enter network connection values manually, you must perform the following operations:
- Select “Internet Protocol Settings” and “Manually”.
- Enter the IP address using the number buttons on the remote control.
- To move to the next field, press the arrow buttons to navigate down, up and back.
- Enter the subnet and gateway mask.
- Go to the DNS input field. Enter numbers.
- When finished, use the button to select a network.
- After this press ENTER.
SWL connection
This function makes it possible to connect modern TVs to an access point that supports PBC. It is possible to establish a connection without a Wi-Fi router.
Before connecting your digital TV to Wi-Fi, the access point must already be connected to the wireless network. Normal operation of the adapter is only possible with USB port 1. Devices using the 2.4 GHz frequency are supported. 5 GHz frequency is not applicable.
Important! Direct connection of the TV receiver to a PBC-enabled device is possible when SWL is set to Enable and the Wi-Fi adapter is inserted into the USB port.
To connect using SWL you need to do the following:
- Select SWL and press ENTER to enable it.
- Open "SWL Connection".
If the message “Hold the PBC button of the connected device for 120 seconds” suddenly appears, you must follow these steps. For more detailed information, please refer to the operating instructions.
Once the TV is connected to the network, the countdown window will automatically close. If the connection cannot be established, try again after 2 minutes.
Automatic channel search
Setting up a Sony TV begins with searching for TV channels. On new models it is performed automatically. To start the operation, you need to hold down the “MENU” button for a few seconds; standard settings for searching for TV channels will appear on the TV screen.
During the procedure, interference and channels found by the device will be displayed on the TV screen. When the search operation is completed and the channels are in the correct order, the screen will function normally.