Users often ask how to connect a TV to a Windows 10 and 7 computer via hdmi in order to use a large screen as a second (or main) monitor.
The connection process itself is very simple, but to implement it you need to choose the right type of cable, as well as make a number of settings to correctly display the picture on the TV receiver display.
Connecting a TV to a Windows 10 computer
Connecting your TV to a Windows PC via an HDMI cable rather than via Wi-Fi is the easiest way to use a large screen as a monitor for playing movies or running games. This connection has a number of advantages, including transmission of high-definition content, support for audio and video signals, and ease of connection setup.
Cable selection
One of the important steps in connecting a TV to a Windows PC is purchasing a cable. The HDMI standard is constantly changing, but that doesn't mean the updated versions are better than their predecessors. The backward compatibility option allows each subsequent device to receive all the features of the previous standard.
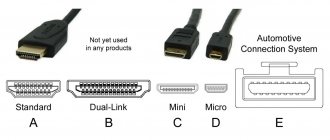
You can determine the types of this cable by their number, the most common are versions 1.4 and 2.0, the second is the best.
There are other definitions of cable versions:
- Deep Color. This standard is intended for television receivers capable of transmitting more than a trillion colors;
- V.Color. Used for modern high-resolution television screens with an improved color range that is not available to television receivers using RGB technology;
- Standard. Wire for data transmission in resolution 1920x1080 up to 15 meters;
- High Speed. The signal in Full HD resolution is transmitted at 7.5 m, but this increases the response time of the display.
Connecting to a TV
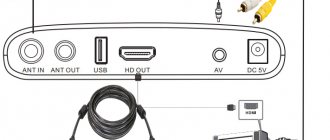
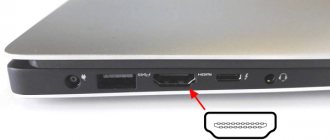
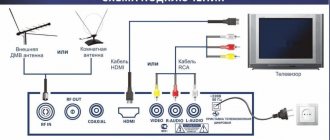
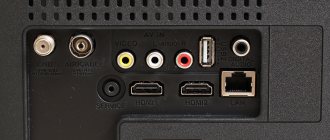
To connect a laptop or PC running Windows OS to the TV via HDMI, you need to connect both devices with a cable. It is recommended to turn off the equipment first. The required connectors are usually located on the back of the system unit, on the sides of the laptop, on the back or side panels of the TV set. If the TV is hanging tightly to the wall, you won’t be able to use a regular cable; you will need to purchase an additional corner adapter. It connects to the connector, and the cable is inserted into it. If the system unit does not have an HDMI connector, you can use an adapter from VGA or DVI to HDMI. It should be taken into account that when using adapters or adapters, the picture quality will decrease. After the cable is connected to both devices, you need to turn on the equipment and set the required signal source in the TV settings by clicking on the “Input” or “Source” button.
If your television receiver has several HDMI ports, you can determine the required one by searching through it or by looking at the designation next to this input. After the port is determined correctly and the equipment connects successfully, the loading screen for Windows 7, 8 or 10 will appear on the TV screen.
- How to connect a laptop to a TV via HDMI? Using the example of an LG TV
If the PC does not see the TV via HDMI and the “No Signal” notification appears on the screen, you need to diagnose the cable and make sure that it is working. To do this, you can connect it to other equipment or connect the laptop to the TV via another HDMI cable. When you first start the connection, the computer monitor (laptop display) and the TV will have an identical image, and the maximum resolution will be set. To customize the picture to suit the user’s needs, in Windows 10 you need to right-click on the desktop and select “Display Settings”.
Here the user can set the resolution for the new screen, assign landscape or portrait orientation, and also configure how the displays work together. There are also options available such as screen mirroring (the image is the same on both displays) or extension (you can run different applications on each monitor). In addition, one of the screens can be turned off if it is not needed. If there is no sound on the TV when connected via HDMI, you need to make adjustments in the Windows settings. To do this, you need to understand how to enable sound in the system parameters. The user will need to click on the speaker icon in the Windows OS tray (on the right side of the control panel), select “Sounds”, then “Playback”.
In the list of devices, you need to find the connected TV and assign it as the default device. If the TV receiver is not displayed in this list, to configure the sound, you need to click in an empty area of the window and select display of disabled and disconnected devices. If the sound via HDMI on the TV still does not work, you need to reinstall the drivers for the video adapter.
Connection on Windows 7
Connecting a TV to a computer running Windows 7 is done in the same way as to a PC running Windows 8 and 10. The only difference will be in the appearance and names of the system partitions that will need to be opened to adjust the image settings or if the PC does not transmit sound to the TV. Thus, a quick change of operating modes with displays is opened the same way on all versions of the OS - with the key combination Win+P. For Windows 10 and 8, the menu is called Project and appears vertically on the right.
It contains modes such as Computer Screen, Repeating, Extend and Second Screen. On Windows 7, the menu opens horizontally and contains the same modes, but under different names: “Disable Projector”, “Duplicate”, “Expand”, “Projector Only”. To adjust image settings, on Windows 10 use the “Display Settings” section. On Windows 7 you need to select "Screen Resolution".
Conclusion Connecting a TV to a computer running Windows OS via HDMI is very easy; to do this, just connect both devices with a cable, turn it on and select on the TV to display the image from the corresponding connector. Controlling the TV from a smartphone on Windows Phone or Android with this connection is not available; all operations are performed using a mouse and keyboard, and the TV receiver is used as a large screen.
If problems occur with sound output, you can determine why the computer does not output an audio signal to the television receiver and correct the error in the settings of your laptop or PC.
Good day to all! And so, we have another interesting and quite voluminous question - how to connect Windows 10 to a TV. Several thoughts immediately come to mind. First of all, for convenience, probably the surest way is DLNA. This technology allows you to play videos, view photos, listen to music that is on your computer or laptop - on your TV.
In this case, the computer or laptop, as well as the TV, must be connected to the same network. Moreover, the connection can be either via cable or Wi-Fi. But I repeat once again, both devices must be connected to the same router network.
- How to connect a TV to a computer via HDMI
The second method is not very convenient, but probably the simplest in technical terms and in setup - this is a regular direct connection via an HDMI cable. There is nothing complicated there, but in the article I will tell you exactly this method. It makes no difference what kind of Windows you have: 7, 8 or 10 - the instructions are suitable for all OSes.
HELP! As practice shows, not everything always works out the first time, so if something happens, immediately write your questions in the comments, and I will help you.
Content
HDMI port is not working properly
This HDMI connection problem can be caused by various hardware failures, but the exact cause is difficult to determine. The following possible fixes will be performed to get rid of this issue when a connection is established using a Windows 10 device:
- Check the equipment physically.
- Use hardware and video playback troubleshooters
- Update, rollback, or disable graphics drivers.
- Reset your monitor.
- Miscellaneous fixes.
If you usually create a system restore point, you can try to undo any changes to your computer by performing a system restore. It is also recommended that you perform these tasks below only in Safe Mode.
1] Check the hardware physically
You can try cleaning dust from components such as your computer's graphics card. I would recommend using a small blower or wiping down the components with a soft cloth. Make sure you don't damage any parts with moisture or harm any chains when performing this task. Check to see if it is physically damaged.
Make sure you do this very carefully. Because even a small bruise can cause your computer to stop working and may incur financial costs. If you are unsure, you can ask a qualified professional to do this for you.
2] Use hardware and troubleshooting tools when playing videos
Start by opening the Windows Settings app. Navigate to the following path: Update & Security > Troubleshoot.
Select the option called Play Video.
Then click Run the troubleshooter.
Follow the on-screen instructions and check whether your problem is fixed or not.
You can also run Hardware Troubleshooter.
3] Update, rollback or disable graphics driver
You need to update or rollback the driver. If you have just updated any driver and the problem started after that, you need to roll back the driver. If you haven't, updating your graphics driver to the latest version may help.
From the WinX menu, open Device Manager. Select the driver and open Properties with the right mouse button. Then go to the "Driver" section. Rollback is only available if the update was the latest. If it doesn't, click Update Driver and Windows will automatically check for problems.
This error usually occurs due to drivers related to the graphics drivers listed in the Display adapters section.
4] Reboot your monitor
You can also try resetting your TV or monitor using the hardware keys and see if that fixes your problems. Consult your TV or monitor manual for more details on this. This is so because it varies from product type to product type and manufacturer to manufacturer.
5] Miscellaneous fixes
You can also try a few different fixes that will help you get rid of the problems you are experiencing.
- Disconnect the HDMI cable from both the source and destination, and then reconnect after a few minutes.
- Check if the cable you are using is in working condition.
- Change the video source and destination and check if any of them are inoperative. This will help you narrow it down to a specific device failure if that is the case.
- Check if your settings are being applied as intended for the Project my screen option by pressing Win+P on your keyboard.
DLNA server in Windows when connected via Wi-Fi and cable
Almost all modern TVs support DLNA technology, which allows you to watch movies from your computer on your TV. The idea is that the TV and computer are connected to the same network. Next, the computer is “shared” or in another way, a shared folder is created - this is necessary so that other devices on the network can see this folder. That is, so that the TV can play and view the files that are in it. Then there are two ways.
The first way is to use standard Windows tools and configure the DLNA server yourself. The second way is to use special programs that come from the TV manufacturer. There's really no difference. I have already described both of these methods in a detailed article here. There, using an example and pictures, I talk in detail about the connection. Don’t look at the fact that the word “Wi-Fi” is in the name - in fact, it makes no difference how exactly you will be connected to the router: via cable or wirelessly.
If you have an LG TV, then you are welcome to read this article. There I talk about the original official SmartShare program, which is easy and quick to set up.
There is another way - using Miracast WIDI technology. My colleague wrote about it in this article. The technology does not work stably in some cases, but sometimes it is much more convenient than those I mentioned above. The main problem with Miracast is that not all laptops support it, and the connection occurs directly via WiFi.
Using an LG webOS 3.0 TV as a wireless display
In addition to being a playback device, the TV can be used as a wireless display.
In this case I am using LG webOS 3.0
Select “Display Options”.
I connect the wireless display, click on the “Connect to wireless display” button.
I choose the model of my LG WebOS TV.
After all these steps, my TV became 2 devices.
Now about screen resolution. The fact is that the wireless display does not provide a resolution higher than 1920x1080. Click on “Advanced screen options”
Select 1600x900 (recommended).
The resolution is set to 1600×900.
Connection and setup via HDMI
- We take a cable of the required length and connect it to one of the inputs on our TV. The most important thing is to connect it to the correct input. If possible, find an input named “PC” or “IN” and insert it there.
- And of course, the second end must be inserted into the same port on the laptop. Luckily there aren't many of them there. Make sure that it sits tightly in the groove and does not fall out.
- Now you need to select the desired input on the TV. To do this, take the remote control and select the appropriate button - it is usually called “INPUT”.
- You should, in theory, immediately see an image of the laptop screen on your TV.
- If this does not happen, then on your computer simultaneously press the “Win” key (located between “Ctrl” and “Alt”) and the English “P” key. Next, simply select one of the options. The best options are “Repeating” and “Second Screen Only”.
If there is no picture, check that you are connected to the TV correctly. Some models have separate input ports labeled "IN". You can also try all possible inputs on both your TV and laptop. If this does not help, then go to my article on solving this problem at this link.
No sound
- Find the speaker icon in the lower right corner of the screen and go to “Playback Devices”;
- The “Playback” tab should contain all possible devices. Your TV should be there with the name - right-click and then select “Set as default”. The connection may not have the name of the TV, but the HDMI port number.
If there is no sound or this connection does not exist, then most likely there is a problem with the drivers for the video card. On this occasion, I already left the previous link in the previous chapter - the problem with the image and sounds is solved there, so it’s better to go there. But you can also ask your questions in the comments.
If you decide to connect your TV to a computer or laptop on Windows 10, now I will show you and tell you how to do it. We will connect in two ways: via a wireless Wi-Fi network, and using an HDMI cable. Under Wi-Fi connection, I will enter the connection via a Wi-Fi router, and the DLNA technology setting. When using a computer, you can watch movies, photos, and listen to music on TV. Well, is connecting using an HDMI cable a regular HDMI connection? With this connection, we will have the TV as a monitor in Windows 10.
- Connecting a laptop to a TV via an HDMI cable: tips and setup details
Honestly, there is not much difference whether you have Windows 7 or Windows 10. Both connecting to the TV via HDMI and Wi-Fi is practically no different. But let’s look at the example of a laptop with Windows 10 installed. I think this article will be relevant and useful for a long time.
How to choose the right TV screen
After weighing the pros and cons of TVs instead of monitors, it's worth deciding on the type of screen that's best suited for your PC. Among modern display production technologies, LCD and plasma panels are distinguished by quality. The latter are already fading into the background due to their short service life.
It makes no sense to use kinescope models to connect to a personal computer. They do not support modern video and audio formats.
And when choosing LCD TVs, it is worth remembering about the varieties of these types of equipment. For example, Samsung produces a TV with a Super Amoled display with brighter and better color reproduction.
We connect the TV to the laptop (Windows 10) via Wi-Fi. DLNA setup
We will not consider setting up Wi-Fi Direct technology (when you can connect your TV to a laptop without a router, wirelessly) and Miracast (not all devices support this technology). These are topics for separate articles.
If you want to connect your TV to your computer via a wireless network, you can do this as follows:
Despite the fact that they are written using Windows 7 as an example, setting up a DLNA server on Windows 10 will proceed in exactly the same way. I checked that the DLNA server running on a laptop with Windows 10 installed is displayed on the TV without any problems.
I have instructions from the links above for LG and Philips TVs. But a server launched using the methods described above will work without problems on other TVs: Samsung, Sony, Toshiba, etc. Set up DLNA using the “Home Media Server (UPnP, DLNA, HTTP)” program (as I did in article for Philips TV). It can be called universal.
I think we've sorted out the wireless connection. Let's move on to the wires.
Connecting via HDMI in Windows 10
If you have Windows 7, then see these instructions for connecting an LG TV to a computer via HDMI.
We take a regular HDMI cable. We connect one end of the cable to the TV into the HDMI connector. There can be several of them, connect to any one.
We connect the second end of the cable to a laptop or desktop computer.
If the picture from the computer does not appear on the TV, then most likely you need to select the signal source on the TV. There should be a special button on the remote control. Typically, it is signed INPUT, or SOURCES. Click on it and select the HDMI connector to which we connected the cable as the source.
An image should appear on the TV.
In Windows 10, you can control the second screen. In our case, this is a TV. In the top ten this is called “Projection”. To call this menu, just press the key combination Win+P . A menu will appear on the right where you can choose one of 4 options.
You can, for example, display the image only on a TV.
That's all the settings.
If the sound on the TV does not work when connected to Windows 10 via HDMI
It is possible that after connecting the TV to the computer, the sound will play not from the TV speakers, but from the laptop speakers or connected speakers. This can be easily fixed.
Right-click on the volume control icon in the notification bar, and select Playback devices .
Your TV should be on the list there. Right-click on it and select Set as default .
The audio will now come from your TV's speakers.
194
Sergey Various tips for setting up TVs
While watching movies stored on the HDD, or playing games, you had a question. How to make this activity more convenient. Use a second monitor. A TV will do instead. Let's look at how to connect a computer to an HDMI Windows 10 TV.
Content
Wired methods
The type of wired connection you choose depends on what connectors your TV and computer or laptop have. The optimal interface for multimedia is HDMI. It allows you to simultaneously stream high-definition digital video and audio to your TV. An HDMI connector is available on almost all digital TVs, even quite old ones, as well as on laptops. HDMI ports are less common among system manufacturers. More traditional for PCs: DVI for digital video transmission and an analog VGA connector. But the problem of port incompatibility is easily solved with the help of adapters. However, signal transmission through adapters does not always work correctly, so matching ports is preferable.
Other types of interfaces are less common or less convenient for connecting a computer to a TV, so we will leave them outside the scope of this article. It is also worth considering that all options except HDMI-HDMI and HDMI-RCA involve video transmission only. For parallel audio broadcasting, you will also have to use a 3.5 jack (computer) - RCA (TV) cable.
Let's look at the connection using Windows as an example. The cable should be connected with the devices turned off, so as not to burn the ports. On the TV remote control, press the INPUT or SOURCE button. From the Input List or Source menu, select the appropriate port (in this case HDMI).
On your computer, you need to right-click on the desktop and select “Screen Resolution”, thus opening the screen settings. If the connected TV is not detected automatically, use the “Find” button. Once the TV is displayed here as a second screen, you can select it as the main screen and change the resolution.
The Win+P key combination activates a special menu in which you can select the option to select an image on the TV screen. If you select “Computer Only”, the picture will only be on the computer, if “Projector Only” - only on the TV. You can also expand or duplicate the image. If the resolution of the TV is significantly higher than that of the monitor, in the “Duplicate” mode the picture on the TV screen will be unclear. The “Expand” mode will allow you, for example, to simultaneously play a video on TV while doing other tasks on your PC.
Why HDMI
This is an interface that transmits high-resolution video data and a copy-protected audio signal.
This is the best connection option.
Advantages:
- Simplicity. Transmission occurs over one cable;
- Transfer efficiency. The data does not require additional compression;
- Large bandwidth allows you to broadcast high quality films;
- Copy protection technology.
HDMI supports screen resolution of 2560X1440 pixels.
Let's consider what to consider when choosing.
Length
- Five meters. Diameter seven millimeters (28AWG);
- Ten meters - eight millimeters (26AWG);
- Fifteen meters - nine millimeters (24AWG);
- Twenty meters - ten millimeters (22AWG).
Cable type
- Standard Standard. Supports 1920x1080 resolution. Data is transmitted up to fifteen meters. Use to connect any devices;
- High Speed High Speed. Full HD resolution signal is transmitted up to 7.5 meters;
- Deep Color. For connecting TVs displaying trillions of colors;
- Color. The color range is not available on TVs using RGB technology.
There are these types of cables: Consider these features when choosing. If the TV and laptop are more than ten years old, these connectors are not installed on it. Use a connection method without HDMI. For example, VGA interface. If the TV is old and the PC is new or vice versa, buy an adapter.
How to connect a laptop to an HDMI TV
Find HDMI on your laptop (or PC): Look where the port is located on your TV. Connect your devices using a cable.
Turn off your laptop and TV when connected. Otherwise, they may fail as a result of an electrical discharge.
The TV screen will begin to show the same image as the monitor. If there is no signal, make additional settings.
Peculiarities
Some TV models do not automatically detect the signal source. Therefore, on the television remote control, find and press the button: Depending on the TV model, the name may differ. A menu with connection sources will open. Select a port. Look it up by the number of the connector where the cable is connected. On the back of the TV.
General recommendations
Perform a visual check of the ports. Please note the following damage:
- Broken or oxidized port contacts. Replace them:
- Dust. The sound is intermittent. The image is distorted;
- How the port is installed. If it wobbles when physically impacted, fix it. Contact employees of specialized centers for help.
Try expanding your screens. This will immediately seem unusual. After working in this mode, you will see the advantages of using this option.
How to connect a laptop to an HDMI TV Windows 10
The PC treats the TV as an additional monitor. Therefore, settings are made in its parameters. Press “Win + I”, go to: The “Display” tab will display the connected monitors. How to determine the screen number? Click the "Detect" button. The numbers will be displayed on the monitor and TV. Below, find the “Multiple Displays” option. Select screen operation mode:
- Duplicate. The same images will be displayed;
- Expand. One image is a continuation of the other;
- Show on one screen.
How to connect a computer to an HDMI TV Windows 7
Right-click on the Desktop and select “Resolution”. Click “Define” to find out which number belongs to the TV or monitor. Check your TV resolution. The information is in the instructions. Modern models support Full HD resolution. As in the screenshot.
Settings
For Windows 7 it is different. LMB on the TV thumbnail. Set its resolution in the appropriate field. If you do not perform this action, the picture will not be clear. Select operating mode:
- Show desktop on 1 or 2. Disable one screen;
- Duplicate. The same image is shown;
- Expand. When you go beyond the boundaries of one screen, go to the next.
Conclusion
Try expanding your screens. This will immediately seem unusual. After working in this mode, you will see the advantages of using this option.
Hello! Today I will show you how to connect a TV to Windows 10. You can very easily and quickly connect a laptop or computer to any modern TV. See the instructions below and write comments if you have questions. Go!)
In the taskbar, at the bottom left of the screen, open the Start menu, Win button. In the window that opens, click on the Settings tab or icon.
In Windows Settings, click on the System tab.
In the display settings, at the bottom, click on the Connect to a wireless display tab.
A window will open on your right. The search for the device will begin. Wait 5-10 seconds. You will be shown the name of your TV. Click on it.
Note. Older displays may not always connect automatically. To try to connect them, click the Detect button (previous screen).
During connection, instructions should appear on the TV screen. Follow it.
You can project the image from your TV onto your computer or laptop. At the bottom of the window, click the Project to this PC tab.
You need to enable projection.
You need to select the Available everywhere on secure networks option.
You can add any device yourself. Click on the Add Bluetooth or other device tab.
In the window that opens, you can select the device type:
- Bluetooth. Mice, keyboards, pens or audio and other types of devices;
- Wireless display or docking station. Wireless monitors, TVs and computers that use Miracast, or docking stations;
- Xbox controllers with wireless adapter, DLNA and more.
Select a type and click on it. Then the search for your device will begin in the window that opens. Make sure your device is turned on and discoverable. Click on the device name and follow the instructions.
Question details
Good afternoon, Pavel.
Try updating the video driver while the TV is connected.
To update your video driver, boot your computer into safe mode, remove your current video adapter, and then check for driver updates.
- Boot your computer into Safe Mode, right-click the Start button, and select Device Manager.
- Expand the Display Adapters list, right-click the listed adapter, and then click Uninstall. Check the box next to Uninstall the driver software for this device, click OK, and restart your computer.
- After your computer restarts, press the Windows key +I to open Settings. If this doesn't work, click the Start button and select Settings.
- In Settings, select Update & Security > Windows Update > Check for updates.