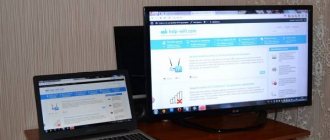
Synchronizing your laptop and TV will allow you to view content on the big screen. Connecting a regular laptop running Windows OS to a TV is not difficult. However, we are talking about a device from Apple. Therefore, the synchronization process will be significantly different. Few users know how to connect a MacBook to a TV.
Now let’s analyze the specifics of connecting Apple laptops to TV. The proposed options are suitable for MacBook Air and devices of other models. Follow the instructions carefully to ensure the image appears on a large screen. Many users encounter certain problems - we will analyze them and also offer effective solutions.
Options for connecting a MacBook to a TV
Conventionally, all existing methods can be divided into two groups - wireless and wired. The necessary cords and adapters are not included in the basic package of TVs and laptops. Therefore, they will have to be purchased separately. How to connect Mac to TV? The user must make his own decision. Much depends on how exactly and in what mode the TV will be used.
Note that the TV model is not of fundamental importance. Connecting a MacBook to a Samsung or Sony TV will be absolutely no different. All available options allow you to use your TV as a large monitor. This means that the laptop acts as a projector.
MacBooks are designed to synchronize with other Apple technology. Therefore, if you do not plan to use devices from other manufacturers, then you will need to perform a few additional steps to avoid compatibility issues. Let's get down to business. First, let's look at how to connect a MacBook to a TV via an HDMI interface.
Via HDMI cable
Absolutely all modern TV models are equipped with an HDMI interface. Therefore, this method of synchronizing equipment can be called a priority. Creating a connection will not pose any particular difficulties. Since the whole process comes down to connecting the cable plugs to the appropriate connectors.
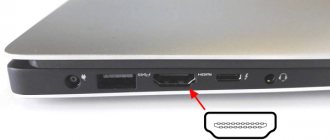
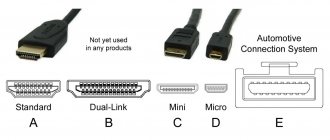
If you have never connected any devices to your laptop before, then start by looking at the video signal ports. Interface layout may vary depending on your MacBook model. To set up your iMac with HDMI, plug the cable into the connector on the back of the device. The video output on the MacBook Pro is on the left, and on the MacBook Air on the right. The Mini-Display port, into which the HDMI adapter is inserted, looks slightly different.
When all the necessary cables and adapters are prepared, it’s time to move on to connecting the MacBook to the TV. To do this, follow these simple step-by-step instructions:
- Insert the HDMI adapter into the video output port on your Mac laptop.
- Connect the HDMI cable plug to the adapter.
- The second end of the cord must be inserted into the corresponding connector on the TV, which is located on the side or on the back panel.
- If the laptop was turned off, then turn it on.
- Take the TV remote control and select “HDMI” as the signal source.
The laptop will automatically detect the new connection. The desktop will be configured to display high definition. If the picture does not appear on the big screen, it means that the user inserted the cable into the wrong connectors. It is possible that the signal source was selected incorrectly.
Modern TV models are equipped with 5-6 HDMI interfaces. Analyze them. Select the port that allows you to transmit audio and video signals. Synchronization will be considered complete when the laptop desktop appears on the big screen. Now you know how to connect your MacBook to your TV.
If you are satisfied with the default settings, then you can proceed to play the content. However, keep in mind that at this stage the TV is used as an external display. To view content through applications, you need to perform a few additional steps. As a result, the functionality of the device will increase significantly.
We should also talk about sound reproduction. By default, the audio signal is not transmitted to the TV. Therefore, the sound is played through the laptop speakers. It is very uncomfortable. Therefore, it is better to carry out an in-depth setup so that the sound is played through more powerful TV speakers.
As noted earlier, the MacBook initially uses the TV as an external display. The laptop desktop is displayed on a large screen. This is a good option for those users who need a large external monitor. However, if you want to watch TV shows, various videos and movies, or play video games, then it makes sense to think about setting up mirroring.
Instructions for setting up mirroring:
- Open the section with the laptop system parameters.
- Select the "Display" section.
- Switch to the Options tab.
- Check the box next to the “Synchronize monitors” command.
- Save your changes.
This setting is ideal if you are using a TV designed to play 720p content. To watch video in high definition format (1080p.), you need to reduce the resolution or use an external screen as the main one. Otherwise, the symmetry of the picture will be broken.
Instructions for changing the main display parameters:
- Connect your laptop to your TV using the HDMI interface.
- Open system settings on your laptop.
- Select the "Display" section.
- Switch to the Options tab.
- Move the white line from the small display (laptop) to the large external monitor (TV).
This is how the TV turns into the main screen.
The configuration system proposed above will significantly modify the device configuration. The computer screen will be used as a desktop. The TV will become the main desktop on which menus and all kinds of applications are displayed.
We've sorted out the video setup. It's time to talk about sound. If a powerful audio system or speakers with excellent sound are not connected to the laptop, then it is better for the audio signal to be played on the TV. The built-in speakers in the MacBook are not capable of providing clear and natural sound.
If the TV and laptop are synchronized via HDMI, then the sound must be adjusted manually. When the cable is inserted into the appropriate connectors, and the laptop desktop is displayed on the large screen, you need to do the following:
- Open the basic settings of the MacOS operating system;
- Select the section called "Sound".
- Go to the Output tab.
- In the list that opens, find the “Type” item.
- Select HDMI and then save your changes.
The output tab mainly always displays the number and series of the TV model. Not every user knows exactly what the technology they use is called. Therefore, it is wiser to focus specifically on the “HDMI” inscription, and not on a little-known combination of Latin letters and numbers.
Once the user switches the audio output, they will lose the ability to change volume settings through the laptop operating system services. To increase or decrease the volume, you need to use the TV remote control.
Via Wi-Fi
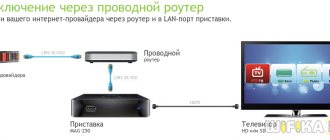
With a wireless connection between a TV and laptop, everything is much more complicated. To display an image on a TV via Wi-Fi, in the “Screen Mirroring” mode, you need to use a branded Apple TV set-top box. Instructions:
- Connect your laptop and set-top box to your home Wi-Fi network.
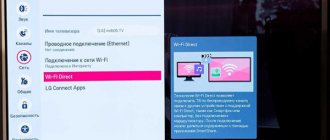
- Open the laptop operating system settings.
- Go to the "Displays" section.
- In the "AirPlay Display" line, select "Apple TV".
- Apply and save your changes.
Connecting a TV via Apple TV will allow you to stream video from the Safari browser and Quick Time player. You can also use the TV as a monitor, as is the case with an HDMI connection. Please note that to perform wireless synchronization, the laptop must be updated to MacOS 10.8 or higher.
What to do if there is no Apple console? There are alternative synchronization methods using special software. The idea is to create a DLNA server for subsequent wireless transmission of content from a laptop to a large TV screen.
There are many different programs. Users who do not want to get confused in a large number of parameters, but simply want to broadcast photos and videos to the TV screen, should download the PS3 Media Server utility. Instructions for creating a DLNA server:
- Go to the Navigation/Sharing tab.
- In the field located at the very bottom, indicate the path to the directory containing films, music, and TV series. You can specify multiple folders.
- Save the settings and simply run the desired file.
The DLNA server will stop working as soon as the laptop goes into sleep mode. Open a command prompt and then type "pmset noidle". This command will prevent the laptop from going into sleep mode.
There is nothing complicated about this setup. You just need to follow the instructions.
System requirements to use AirPlay
- iMac (Mid 2011 and later);
- Mac mini (mid 2011 and later);
- MacBook (early 2015 and later);
- MacBook Air (Mid 2011 and later);
- MacBook Pro (Early 2011 and later);
- Mac Pro (Late 2013 and later).
AirPlay also supports peer-to-peer networking, allowing your friends to connect their Mac or iOS devices to the Apple TV without having to enter a password or connect to Wi-Fi. To use the feature, you will need an Apple TV 3 (model A1469) or later, or any Mac 2012 or later running OS X Yosemite 10.10 or later.
Video on the topic:
To bookmarks
Many of us have at least one TV with “the makings of a mind” in our apartment. In the line of every serious electronics manufacturer, such models already prevail over simple panels.
The benefits of a smart TV are not as many as advertising promises: the browser is antediluvian, there are few applications, the interface is buggy and often slows down.
Even the latest models do not want to be used for viewing websites, YouTube, or even the weather. Do all this much faster on a smartphone or tablet.
Not everyone knows that there is an intermediate solution that can cover most of our needs.
On the Mac App Store you can find a whole set of applications from the developer AirBeamTV BV. This team already has five programs in its arsenal for displaying images from a Mac on the screens of smart TVs.
Each application is designed for all smart models of a specific manufacturer (Samsung, LG, Sony, Philips and Panasonic).
Screen mapping for Samsung TVs Developer: AirBeamTV BV Version: 1.3.9 Price: 749 rub.
Screen mapping for Panasonic TVs Developer: AirBeamTV BV Version: 1.3.9 Price: 749 rub.
Screen mapping for Sony TVs Developer: AirBeamTV BV Version: 1.3.9 Price: 749 rub.
Screen mapping for LG TVs Developer: AirBeamTV BV Version: 1.3.8 Price: 749 rub.
Screen mapping for Philips TVs Developer: AirBeamTV BV Version: 1.3.8 Price: 749 rub.
The installed application will appear in the Mac menu bar. When you start it for the first time, you will need to install an audio driver to transmit sound. To do this, select “Learn to enable audio” in the application menu and download another application.
After this, the program menu will display any smart TV of a suitable model that is connected to the same network as the Mac. One click and the picture from the monitor will be mirrored on the TV screen.
No additional options or capabilities have been provided yet, however, this is enough to stream movies, TV series, music or photos.
All you need to do is take a wireless mouse and use it as a remote control.
Unfortunately, the application is still under active development. Not all TV models are supported correctly. Sometimes there are delays in image output or the image freezes.
To avoid wasting your money, download the demo version of the program from the developer’s website before purchasing.
This solution has a right to exist and for many can replace an expensive set-top box.
Thanks to re:Store for the useful and interesting information.
To bookmarks
- Mac App Store,
- useful software for everyday life
Possible problems
What should I do if the output image is too small or there are black bars? The best option is to scale the screen. Not all content stretches to fill the entire screen automatically. Therefore, after setting up the connection, the user will be faced with the fact that a black frame appears on the sides.
Similar problems appear during the streaming of various movies and TV series. The image quality will also be unsatisfactory. This is due to the low resolution. If you use VLC or Quick Time players, then everything can be solved by playing content in 1.5x or 2x resolution. Therefore, you can do without screen scaling, if such functions are available to you.
First, you should activate the screen scaling option, if you have not done so first:
- Open the laptop operating system settings.
- Go to the "Accessibility" section.
- Switch to the "Zoom" tab.
- Activate zoom features.
- Save your changes.
Be sure to check the box next to “Smooth image”. This allows you to reduce pixelation parameters during upscaling. However, this may cause the picture to become excessively blurry. Therefore, it is also better to avoid significant scaling. Otherwise, the image will lose its naturalness.
To start playing content, launch the player. Move the mouse cursor to the center of the video. You can now use the zoom feature to minimize the black bars on the sides, as well as the top and bottom. This work can also be done with gestures. Swipe the “Control” key, and then change the picture by lifting two fingers up or down – zoom in and out, respectively.
The quality of the broadcast image should increase significantly. It is impossible to solve the problem of low resolution 100%. However, getting rid of black stripes is absolutely possible. In some situations, changing the zoom factor in the browser can also work if the content is played online.
There is nothing difficult about synchronizing an Apple laptop and a TV. To set up image broadcasting, you need to follow the instructions provided. Using additional steps, you can eliminate problems associated with sound playback and poor quality images.
How to stop streaming a video
The process of turning off screen casting from your Mac to your TV is the reverse of turning it on. For example, to turn off YouTube video mirroring, click on the AirPlay icon and in the list of devices that appears, uncheck the box next to the connected device.
You can also disable it from the Control Center:
In addition, the active AirPlay status will be displayed with a special icon and in the menu bar. From here you can also turn off the broadcast.
♥ ON TOPIC: How to hide files and folders on Mac (macOS) from strangers: 3 ways.