A TV synchronized with a PC increases its functionality significantly. That's why many people are interested in how to connect a computer to a TV via HDMI. Even old TV panels have this interface, and a suitable cable can be found in any digital equipment store. The connection process itself is simple and can be done in several ways.
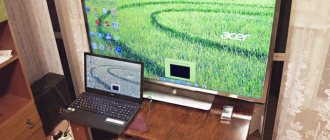
It all depends on the goals: broadcasting from a PC to a large screen, using the TV as a large monitor, or whether they need to work simultaneously. In this case, HDMI outputs the image along with sound. The methods are effective for both plasmas and new LED panels. Such synchronization of equipment is quite convenient: on a large screen it is easier to work with documents, it is more comfortable to watch movies, and playing games is a pleasure.
What you need to connect your TV to your computer via HDMI
To connect a PC to a TV you will need:
- HDMI wire;
- TV and computer with the appropriate interface;
- adapter if there is no such connector.
Checking the connectors
Old computers may not have HDMI.
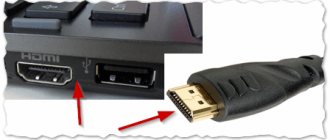
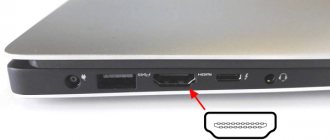
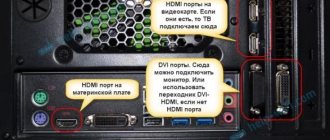
First, look to see if the equipment has the necessary ports for connection. The HDMI input on a TV is usually located on the side panel or side (usually in two places at once in newer models). As a rule, there is a signature above them.
Next they study the computer, or rather the system unit, at the back of which there should be an HDMI output. It is located on the motherboard (newer models with integrated graphics) or on the video card. Older computers may not have HDMI, but DVI instead.
In this case, take an adapter from DVI to HDMI. Another situation is when the PC case only has VGA. Yes, there is an adapter for it, but the sound will not be transmitted, since the output is not digital.
High-quality adapters cost from 1000 rubles. It’s better not to buy cheaper ones - they “reduce” the quality of the picture and sound.
Cable
There are Standard and High Speed HDMI cables.
The HDMI cable is not included in the basic package of a PC or TV, so you buy it separately. You can find it in any electronics store. There are wires from 1 to 20 meters long.
The cables themselves are also different. There are Standard and High Speed varieties. The former are capable of transmitting images in 720p, 1080i format from a computer to a TV. They are affordable and produce a pretty decent picture. The latter support formats from 1080p to 4K. They are taken if you plan to watch 3D films or Deep Color.
The length of the wire plays a significant role. Recommended – 5 meters. This cord is cheap, and the distance is enough to transmit audio and video without loss. If 5 meters is not enough, you can take more, but then the technical specifications for the wire must indicate a built-in repeater that amplifies the signal.
If the product is questionable and it is not clear whether there is a repeater or not, it is better not to take such a cord, otherwise you will have to put up with artifacts and sound interference.
On laptops, instead of HDMI, a microHDMI port is more common. To connect it to your TV, you will need an HDMI-microHDMI cable or adapter.
Fraps
Fraps are so common that the verb “fraps” has even appeared in gamer jargon. This software gained such popularity primarily for its intuitive setup and operation, and ease of use (the distribution takes only 2 megabytes!).
True, for the full version (without restrictions on the length of recorded videos) they are already asking for money - almost 40 bucks. The program can not only record video from the screen (in parallel with microphone recording, if necessary), but also take screenshots. There are all sorts of related functionality, such as FPS calculation and overlay output in toys, but today’s post is not about that.
Pros: Simpler than ever and almost always works out of the box. Cons: you have to pay for pleasure.
Connection methods
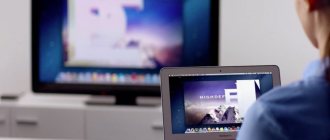
Everything that happens on the computer (games, surfing the Internet, watching movies) can be broadcast on a large TV screen. This is not difficult to do - just connect 2 high-tech digital devices to each other with a suitable cable and configure it.
As a second monitor for PC
DVI connector
Let's take an old Samsung TV as an example, which has 2 HDMI connectors. On a PC, this connector is located on the video card side. The monitor itself is connected to the computer with a DVI cable. The appropriate wire is inserted into the connectors, and the TV and PC are turned on.
If the image from the computer appears, good. If not, you need to tinker with the permission.
HDMI input as signal source
The picture may not appear immediately, but instead the message “Cable not connected”, “No signal” or “Check cable connections”.
For Samsung equipment, there is a button on the remote control that is responsible for the video signal source - “Source”. Press it and select the desired connector (HDMI1, HDMI2, HDMI3 - depending on the one used, they are numbered on the case). Next, press the button to confirm your selection.
The main thing is that the image from the monitor is displayed on the TV screen, and then you can change the image output mode, already in the Windows settings.
Record programs while streaming
Streaming platforms have gotten us all very used to this.
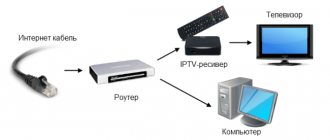
Right now, with a couple of clicks on the control button of our TV or set-top box, we can access all of these services to quickly and easily watch an endless amount of content. However, it should also be said that although it may seem strange, there are users who need to be able to record certain programs. For example, sports events, talk shows, news, etc. In other words, all these are contents that are usually transmitted only once because they have an "expired" symbol.
A couple of years ago, VHS or Betamax VCRs were used for this type of thing and later models HDD disk recorders. Over time, all this logically went into oblivion, and the recording function was integrated directly into Smart TV. So, by simply connecting a mechanical hard drive or SSD (even a flash drive is good too) you can record whatever traditional TV channels are broadcasting and you can watch it as many times as you want.
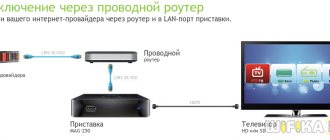
So let's see how to record with the major TV brands in the market. Yes, if you are a user of Movistar TV, Vodafone TV, etc., and you have a decoder provided by the company itself, all you have to do is look at their options to see (or check) what they have there is this recording option.
If the device itself does not give you this option, some operators offer this option by hiring an additional service. This way you can also find out about the cost, options offered, etc. D. And evaluate whether you are interested or not.
However, leaving these cases aside, we are going to focus on what most users will have access to yes or yes at home simply by having a Smart TV: recording programs to an external HDD or SSD.
How to configure the created connection
Inserting the wires correctly is half the battle. The connection still needs to be properly configured. At the same time, it is better to connect devices when they are turned off. Next, turn on the TV and start the PC. When the computer boots up, proceed to the settings:
- Right-click on an empty area and select “Screen Resolution”.
- In the window that appears, you can see which screen is set as the main one. In the “Multiple Screens” section, if it is “Display the desktop on only 2 screens”, replace it with “Duplicate these screens”.
- If everything is correct, “Multiple monitors” will appear opposite “Screen”.
- Confirm the changes with the “Apply” and “OK” buttons.
The resolution itself is set automatically and, as a rule, the maximum possible. You can customize it for yourself. If you set it to large, the font will seem too small and difficult to read.
Extra options
Having set a comfortable resolution, proceed to additional settings:
- “Screen” - “Screen resolution” - “Advanced settings”.
- Here, in the drop-down list, set the refresh rate that is supported by the TV.
- Set the color rendering quality – the “True Color (32 bits)” parameter.
- In the “Monitor type” item, select the TV connected to the computer.
After each change, a window appears where you need to apply or cancel the selected value. It’s convenient to immediately look at the TV - if something is wrong, you can always return it to how it was.
Sound output
It happens that the connection is made correctly, but there is no sound despite the fact that the HDMI interface is used to transmit video and audio. It is likely that the problem is in the PC settings. The solution is simple, you don’t even need to pull out the cable. Working method for all Windows OS:
- There is a column icon in the lower right part of the screen; click on it with RMB (right mouse button).
- A context menu will open where you select “Playback devices” or “Open sound options”.
- All available devices will be displayed in the window that opens. There will also be a TV there (the manufacturer is indicated, for example, LG).
- Right click on it and select “Set this device as default”.
- Confirm the changes with the “Ok” button.
What programs can be recorded on external storage media.
There are restrictions for recording; you can record TV programs broadcast over the air, cable, satellite, but provided that these programs are broadcast without encoding. If encoding is used (for example, a CI+ module is used), recording such a TV program is impossible.
You also cannot record videos you watch via HDMI from various sources. And it is impossible to record the TV program you are watching on the Internet. All this is done to protect the video from copying.
Installing Multiple Displays
To broadcast the image to several monitors and a TV at once, use the “Display image on multiple screens” option. To enable it, go to settings – “Monitor type” and there, in the drop-down menu, select the appropriate item.
Windows OS will also offer Display Mirroring and Desktop Extension. The first option is that the desktop is simultaneously broadcast to all connected devices. To display the picture correctly, it is recommended that all monitors be of the same format (for example, 16:9). Otherwise, the image will be distorted.
When you activate the “Desktop Extension” option, each connected screen will be assigned its own number. To find out which one is where, press the “Determine” button. The number assigned to it will light up on each display. If necessary, the monitors are swapped, which is done from the menu. How to check the correctness of the settings: when the cursor is at the edge of one screen, it will appear on the border of the other.
Most of the settings are performed using the proprietary software of the video card. For example, for GeForce it is NVidia. To enter the menu, press RMB on an empty space on the screen and select “NVidia Control Panel”. Utility for AMD Radeon – Catalyst Control Center.
Connecting your TV to your computer via an HDMI port is a simple matter. The main thing is that both devices have the appropriate interface. And if it is not there, there are special adapters on sale. Screen duplication is one thing; you will still need to tinker with the settings, but there is nothing difficult here for an experienced PC user.
How to download music to a flash drive from a laptop or computer
Before downloading your favorite songs to a flash card, you need to determine which device you will use it on in the future. It would seem, what's the difference? The fact is that devices that play back recordings read drives with the fat32 file system, while some flash drives are formatted for the nfts system.
You can avoid problems with reading files after you have managed to download songs and go on a trip if you first check the drive and, if necessary, format it.
- open “my computer”, find the connected flash drive;
- right-click, find the “format” option, click on it;
- select fat32 and confirm formatting.
The next important step to take before copying music is to make sure that you are going to download it in mp3 format. These types of files can be read by most reading devices.
If for some reason the song format is different, do the following:
- look for it in mp3 format;
- convert an existing file.
The preparatory stage does not end here. It will be more convenient to transfer songs if you collect them in one or several folders and download them together. Otherwise, you will have to jump through several folders, wasting time and sometimes forgetting something important.
After completing the preparation, we move on to the downloading process itself. The first, most common method is to manually move audio recordings from one device to another.
- insert the flash drive into the connector of your computer or laptop;
- go to the folder with the prepared melodies;
- select audio files, click “copy” or ctrl+c;
- go to the drive, right-click “paste” (ctrl+v). The copying speed depends on the number of songs, the weight of the files, and the speed of the devices;
- make sure that you managed to transfer all the files and they are readable.
You can upload sound recordings through total commander. In this case, before your eyes, on the one hand, there will be the source from which you download the songs, and on the other, the contents of the flash card.
Another principle applies if you decide to transfer music from your PC to the card via the Windows media player application:
- open the player;
- select the album you want to download;
- Open the “sync” tab and drag the album into it. To transfer a melody, you can right-click on it and also click “sync”;
- connect the flash drive;
- Click "sync".
You can transfer music from your PC to a flash drive manually by clicking “copy” and “paste”. You can also reset it using the windows media player application.
Checking functionality
I download the OBS software.
It is open, respect to the developers. On my old desktop on the Q6600, of course, I agree to encode - but the parameters are so disgraceful that I switch to a modern laptop. Everything is great there, hardware encoding. I leave all parameters at default. Quality - high, medium file size. Since I don’t have 4K TVs, I don’t have any videos either – I Google it. Found it here www.hdclub.ua/avpedia/videos/4k-uhd-roliki/ I took the first one, about jellyfish. Why him? And it is the largest in bytes. Well, Bit rate: 245 Mb/s
Mediainfo of the test video
General Unique ID: 74186002185508636652484954243900783544 (0x37CFB44D6BAD48AD49653FBBCC363BB8) Complete name: D:\jellyfish_250_mbps_4k_uhd_hevc_10bit.mkv Format: Matroska Format version: Version 4 File size : 897 MiB Duration: 30 s 97 ms Overall bit rate: 250 Mb/s Writing application: Lavf56.3.100 Writing library: Lavf56.3.100 Video ID: 1 Format: HEVC Format/Info: High Efficiency Video Coding Format profile: Main @High Codec ID: V_MPEGH/ISO/HEVC Duration: 30 s 97 ms Bit rate: 245 Mb/s Width: 3,840 pixels Height: 2,160 pixels Display aspect ratio: 16:9 Frame rate mode: Constant Frame rate: 29.970 (29970/1000) FPS Color space: YUV Chroma subsampling: 4:2:0 Bit depth: 10 bits Bits/( Pixel*Frame): 0.986 Stream size: 879 MiB (98%) Title: Writing library: x265 1.8+190-75d1c62d8f0c:[Windows][64 bit] 10bit Encoding settings: wpp / ctu=64 / min-cu-size= 8 / max-tu-size=32 / tu-intra-depth=1 / tu-inter-depth=1 / me=1 / subme=2 / merange=57 / no-rect / no-amp / max-merge= 2 / temporal-mvp / no-early-skip / rdpenalty=0 / no-tskip / no-tskip-fast / strong-intra-smoothing / no-lossless / no-cu-lossless / no-constrained-intra / no- fast-intra / open-gop / no-temporal-layers / interlace=0 / keyint=250 / min-keyint=25 / scenecut=40 / rc-lookahead=20 / lookahead-slices=8 / bframes=4 / bframe- bias=0 / b-adapt=2 / ref=3 / limit-refs=3 / no-limit-modes / weightp / no-weightb / aq-mode=1 / qg-size=32 / aq-strength=1.00 / cbqpoffs=0 / crqpoffs=0 / rd=3 / psy-rd=0.30 / rdoq-level=0 / psy-rdoq=0.00 / signhide / deblock / sao / no-sao-non-deblock / b-pyramid / cutree / no-intra-refresh / rc=2 / pass / bitrate=262000 / qcomp=0.60 / qpmin=0 / qpmax=51 / qpstep=4 / cplxblur=20.0 / qblur=0.5 / ipratio=1.40 / pbratio=1.30 Default: Yes Forced: No Encoded date: UTC 2016-02-05 16:43:32 Duration_Source: General_Duration
We connect - as in the photo
Test video - on a flash drive The flash drive is plugged into an Android media player, the review is set to 4K60Hz The output is an HDMI 2.0 cable, from this kit Cable to the video converter being reviewed Video converter - to the USB 3.0 port of the laptop. In the photo we see the moment of capture - the jellyfish are swimming.
It didn't take me long to understand the capture program. On the captured video - the Android player is turned on, since it has 4K - it shows what resolution it is - the video is shown as above
I put the capture result in a cloud drive, as it will be re-encoded on YouTube again
Media info of the capture result
General Unique ID: 140700520943022444740398957669505062636 (0x69D9EF450F1367A8DD44111163D456EC) Complete name: D:\2020-10-22 22-55-20.mkv Format: Matroska Format version: Version 4 File size: 97.7 MiB Duration: 2 min 12 s Overall bit rate mode: Variable Overall bit rate: 6 197 kb/s Writing application: Lavf58.29.100 Writing library: Lavf58.29.100 ErrorDetectionType: Per level 1 Video ID: 1 Format: AVC Format/Info: Advanced Video Codec Format profile: Format settings: CABAC / 2 Ref Frames Format settings, CABAC: Yes Format settings, Reference frames: 2 frames Codec ID: V_MPEG4/ISO/AVC Duration: 2 min 12 s Bit rate mode: Variable Maximum bit rate: 40.0 Mb/s Width: 1,920 pixels Height: 1,080 pixels Display aspect ratio: 16:9 Frame rate mode: Constant Frame rate: 60.000 FPS Color space: YUV Chroma subsampling: 4:2:0 Bit depth: 8 bits Scan type: Progressive Default: Yes Forced: No Color range: Limited Color primaries: BT.709 Transfer characteristics: BT.709 Matrix coefficients: BT.709
Audio ID: 2 Format: AAC LC Format/Info: Advanced Audio Codec Low Complexity Codec ID: A_AAC-2 Duration: 2 min 12 s Channel(s): 2 channels Channel layout: LR Sampling rate: 48.0 kHz Frame rate: 46.875 FPS (1024 SPF) Compression mode: Lossy Title: simple_aac_recording Default: Yes Forced: No
A few words about sound. The test video turned out to have no sound track, so the jellyfish are silent. But there is sound in the output video - these are the sounds of the player interface when buttons are pressed. I think this is enough to demonstrate functionality.
Instructions and equipment
We see a completely blue connector of the device and clearly a USB 2.0 extension cable to it - this is strange...
Manual