Hello.
I think many people know and have heard that you can connect a second monitor (TV) to a laptop (computer). And in some cases, it is impossible to work fully without a second monitor: for example, accountants, financiers, programmers, etc. And in general, it is convenient to turn on, for example, the broadcast of a match (film) on one monitor, and slowly do work on the second :).
In this short article, I will look at the seemingly simple question of connecting a second monitor to a PC or laptop. I will try to touch on the main issues and problems that arise in this case.
Connection interfaces
Remark! You can find out about all the most common interfaces in this article: https://pcpro100.info/popular-interface/
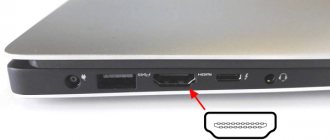
Despite the abundance of interfaces, the most popular and in demand today are: HDMI, VGA, DVI. Modern laptops usually have an HDMI port, and sometimes a VGA port (example in Fig. 1).
Rice. 1. Side view - Samsung R440 laptop
HDMI
The most popular interface, present on all modern equipment (monitors, laptops, TVs, etc.). If you have an HDMI port on your monitor and laptop, then the entire connection process should go without a hitch.
By the way, there are three types of HDMI form factors: Standard, Mini and Micro. On laptops there is usually a standard connector, as in Fig. 2. However, pay attention to this as well (Fig. 3).
Rice. 2. HDMI port
Rice. 3. From left to right: Standard, Mini and Micro (a type of HDMI form factor).
VGA (D-Sub)
Many users call this connector differently, some VGA and some D-Sub (and manufacturers are not guilty of this either).
Many people say that the VGA interface is reaching its end (perhaps this is true), but despite this, there is still quite a lot of technology that supports VGA. This means he will live another 5-10 years :).
By the way, this interface is available on most monitors (even the newest ones), and on many laptop models. Manufacturers, behind the scenes, still support this popular standard.
Rice. 4. VGA interface
On sale today you can find many adapters connected to the VGA port: VGA-DVI, VGA-HDMI, etc.
DVI
Quite a popular interface. I should immediately note that it is not found on modern laptops, but on PCs it is (most monitors also have it).
DVI has several varieties:
- DVI-A - used to transmit only an analog signal;
- DVI-I - for transmitting analog and digital signals. The most popular type on monitors;
- DVI-D - for transmitting a digital signal.
Important! The sizes of the connectors and their configuration are compatible with each other; the only difference is in the contacts involved. By the way, please note that next to the port, it usually always indicates what type of DVI your equipment has.
Options for connecting a PC to TV
To use a TV as a monitor, you need to choose the optimal connection method and connect the devices according to a common circuit. After this, the quality of audio and video transmission is checked. And only then do they enjoy watching films.
You can connect TV to PC using the following methods:
- A wireless connection involves creating a local network or a direct connection via Wi-Fi with special adapters or built-in modules in the TV.
- Wired connection via appropriate connectors. Available interfaces include HDMI, VGA, DVI.
When choosing a connection method, you must take into account that not all wires support the transmission of both audio and video. Therefore, it is better to choose modern connection methods such as HDMI 2.0 and higher.
Advice. You can choose tulips to connect devices, but they have low bandwidth and will not be able to broadcast Full HD and stereo sound.
General connection diagram
You can use your TV as a monitor. To do this you need:
- See what wired connection options are available on PC and TV.
- Decide on the availability of a wireless connection or via a local network - for Smart RV.
- Select the optimal cable or adapters.
- Carry out synchronization according to the instructions for the selected method.
- View files and videos from your PC on your TV screen.
Remember that the distance from the TV to the viewing position should be much greater than from the PC monitor. Therefore, it is recommended to work at a computer as part of the basic configuration of the device.
How to choose a cable and adapters for connection
To begin with, I recommend inspecting both the laptop and the monitor to determine what interfaces they have. For example, my laptop only has one HDMI interface (so there's really no choice).
Rice. 6. HDMI port
The connected monitor had only VGA and DVI interfaces. What’s interesting is that the monitor doesn’t seem to be “pre-revolutionary”, and there was no HDMI interface on it...
Rice. 7. Monitor: VGA and DVI
In this case, 2 cables were needed (Fig. 7, 8): one HDMI, 2 m long, the other - an adapter from DVI to HDMI (in fact, there are quite a lot of such adapters. By the way, there are universal ones that provide all kinds of interfaces for connecting one to another).
Rice. 8. HDMI cable
Rice. 8. DVI to HDMI adapter
Thus, having a pair of such cables, you can connect your laptop to almost any monitor: old, new, etc.
How to connect sound from a computer to a TV
Despite the fact that both video and audio are transmitted via the HDMI port, it often happens that sound is heard only from the computer speakers, but there is no sound on the TV. The most common reason is settings.
Right-click on the speaker shortcut and find “Playback devices” in the proposed menu.
Then, in the “Playback” section, find the inscription next to the HDMI Output device and mark it. At the bottom of the window that appears, click “Default”, then “Ok”. After all manipulations are completed, the sound will be heard from the TV, and not from the computer speakers.
2. Connecting a monitor via HDMI to a laptop (computer)
In principle, when connecting a monitor to a laptop or desktop computer, you won’t see much of a difference. Everywhere the same principle of action, the same actions.
By the way, we will assume that you have already chosen the cable for connection (see article above).
1) Turn off the laptop and monitor.
By the way, many neglect this action, but in vain. Despite this seemingly banal advice, it can save your equipment from damage. For example, I have encountered several cases where a laptop’s video card failed due to the fact that they tried to connect them “hot” with an HDMI cable without turning off the laptop and TV. Apparently, in some cases, residual electricity “struck” and disabled the iron. Although, a regular monitor and a TV are still slightly different equipment :). But still…
2) Connect the cable to the HDMI ports of your laptop or monitor.
Then everything is simple - you need to connect the monitor and laptop ports with a cable. If the cable was chosen correctly (use adapters if necessary), then there should be no problems.
Rice. 9. Connecting the cable to the HDMI port of the laptop
3) Turn on the monitor, laptop.
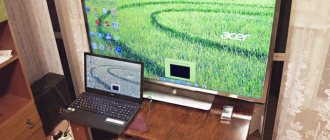
When everything is connected, turn on the laptop and monitor and wait for Windows to load. Usually, by default, the same picture appears on the connected additional monitor as is displayed on your main screen (see Fig. 10). At least, this is what happens even on new Intel HD cards (on Nvidia and AMD the picture is similar; you almost never have to go into driver settings). The picture on the second monitor can be corrected, more on this in the article below...
Rice. 10. An additional monitor (left) is connected to the laptop.
How to customize screen display
All options for using a TV as a computer monitor and methods of connecting equipment were discussed above. The last thing left is that not all users like to watch movies on two displays at the same time. To do this, you need to configure the display of screens via your computer:
- Right-click on an empty space on the desktop.
- Go to settings and select screen display.
- You can install: only on a PC, only on TV, expanding space (the TV will be a continuation of the PC), duplicating screens.
The optimal option is considered to be only on TV for viewing various content.
Important! Remember that a TV will not be a complete replacement for a computer monitor. It doesn't have the display capabilities of most editors and video editing programs. Therefore, it is recommended to switch screens only when you need to view photos, videos or clips.
3. Setting up a second monitor. Types of projection
A connected second monitor can be “made” to work in different ways. For example, it can display the same thing as the main one, or maybe something else.
To configure this moment, right-click anywhere on the desktop and select “Display Settings” in the context menu (if you have Windows 7, then “Screen Resolution”). Next, in the parameters, select the projection method (more on this later in the article).
Rice. 11. Windows 10 - Screen settings (In Windows 7 - screen resolution).
An even simpler option would be to use special keys on the keyboard (if you have a laptop, of course) - . Typically, a screen will be drawn on one of the function keys. For example, on my keyboard it is the F8 key; it must be pressed simultaneously with the FN key (see Fig. 12).
Rice. 12. Calling the second screen settings.
Next, a window with projection settings should appear. There are only 4 options:
- Computer screen only. In this case, only one main screen of the laptop (PC) will work, and the second one, which is connected, will be turned off;
- Repetitive (see Fig. 10) . The image on both monitors will be the same. It is convenient, for example, when the same thing is displayed on a large monitor as on a small laptop monitor when presenting some kind of presentation (for example);
- Expand (see Fig. 14). Quite a popular projection option. In this case, your workspace will increase, and you will be able to move your mouse from the desktop of one screen to another. It’s very convenient, you can watch a movie on one and work on the other (as in Fig. 14).
- Second screen only. In this case, the main laptop screen will be turned off, and you will work on the connected one (in some form analogous to the first option).
Rice. 13. Projection (second screen). Windows 10
Rice. 14. Expand the screen to 2 monitors
The connection process is now complete. I would be grateful for additions on the topic. Good luck to all!
It’s not that everything was better before, but it was definitely simpler. The abbreviation HDMI stands for High Definition Multimedia Interface, that is, a high-definition multimedia interface.
By connecting a monitor via HDMI, you may find that the image is very blurry and does not occupy the entire area of the screen—there are black bars (margins) at the edges and lacks the required clarity. Moreover, we see this picture both during boot, and in the BIOS, and in Windows.
First of all, we make sure that the HMDI cable is in good condition and its length should not exceed 5 m.
Disable auto-scaling on the monitor. You may have to select the “Fit to screen” option in the monitor menu.
If your computer has a video card, built-in or external, AMD Radeon, then we try to correct the image using the AMD Vision Control Center (Catalyst Control Center) drivers. Find the “My Digital Flat-Panel” item and select the “Scaling Options” sub-item.
A slider will appear that needs to be moved to zero.
The image should now return to normal. When updating or reinstalling drivers, you will have to repeat the procedure.
If you have a video card from Nvidia, then you need to launch the Nvidia Control Center (Nvidia Control Panel) by clicking on the tray icon or right-clicking on the desktop and selecting the appropriate item.
Next, in the menu on the left, select “Adjust desktop size and position” (adjusting the size and position of the screen) and set “Overscan” to the “Do not scaling” position.
When connecting the TV to the computer, the TV and computer must be turned off, only then connect the HDMI cable. Turn on the TV first, then the computer. Switch the TV to display the signal via HDMI.
Modern flat screens are capable of displaying images without distortion over the entire surface, including the edges. Yet many TVs use what's called Overscan technology: the image is electronically enlarged by about 5% and cropped at the edges so that LCD and plasma TVs show the same portion of the image as CRTs.
As a result, the number of pixels of the video card and the screen do not always match - the sharpness of the image deteriorates. In this case, even the Windows “Taskbar” may end up in an invisible part of the screen.
Most TVs allow you to turn off this magnification. On some models this function is called “Underscan”, on others “Only Scan” or “Pixel for Pixel”.
But it also happens that the Overscan function is always active when connected via HDMI and DVI. Many graphics cards smooth out this, making the overall image smaller. In this case, the entire Windows “Desktop” fits on the screen, but, unfortunately, pixel-accurate image transmission is impossible. Thus, TVs with a switchable Overscan function are more preferable.
If you don't have a monitor connected to your computer, you may see that the resolution on your TV does not match the screen or will remain black. Additionally, connect to the system unit via a VGA or DVI monitor. It will show the image and this will allow you to configure the correct resolution for the TV in the video card driver.
Finally, if the previous options did not help, try connecting the TV via a DVI -> HDMI to DVI adapter of the video card, but the sound will have to be connected via a separate cable to the TV or output from the computer to speakers.
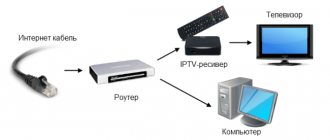
How to use a home local network
You can use the TV as a monitor by connecting it via a local network. To do this, you will need to install and configure a DLNA server on your PC. There are quite a lot of similar applications available for free on the Internet, for example “Home Media Server”. Let's look at the connection using its example.
DLNA connections are also supported by Smart-TVs. To create a shared network you will need:
- Launch software, for example, “Home Media Server”.
- Go to settings and find the “Devices” item. Click on “Search” there.
- Wait for the search to complete and select from the list of TV devices.
- Go to settings again and enable media service.
- Find the “Add” button, specify the hard drive packs that are allowed to be accessed from the TV. You can immediately move the “My Computer” folder there, where all local files are contained.
- Click on the save “OK” button. Scanning will begin. After that, launch the media server again and click on the “Launch” button in the main menu.
After synchronization, all folders open for access will be displayed on the TV screen.
Important! Before starting the process, you need to connect an Internet cable (LAN) to the TV. Then, go to the menu through Source or Input. And you can switch files using the TV remote control.
Connecting a TV via HDMI in Windows 10
1. Make sure your computer and TV are turned off.
1. Connect one end of the HDMI cable to the TV in the HDMI connector, the other to a laptop or desktop computer.
2. Turn on both devices.
3. On the TV you need to select the signal source. There should be a special button on the remote control, usually it is labeled INPUT or SOURCES or HDMI (see the instructions for the TV). Click on it and select the HDMI connector to which you connected the cable as the source.
4. On the computer, press the [Win]+[P] keys simultaneously.5. In the “Project” window that appears, select the projection type, depending on your preference: - Computer screen only (Display desktop only on the first screen) - Repeated (Duplicate screens) - Expand (Extend screens) - Second screen only (Display desktop only to the second screen).
You may need to adjust (change) the screen resolution on your computer to a resolution that your TV supports (see your TV manual). If you do not synchronize image extensions on the monitor and TV, then on one of the devices it may turn out to be cropped.
6. Confirm the changed parameters “Apply” - “Save changes” - “OK”
7. To properly connect sound, you need to right-click on the computer the sound adjustment icon on the taskbar (notification area - tray) and select “Playback devices”.
Installation of updates fails in Windows 10
When you try to install updates from Windows 10 Update, you may receive a message: "Updates failed with errors: 0x80073701, 0x800f0988."
Intel Graphics Windows 10 Driver Package DCH 26.20.100.7463
On November 14, 2021, Intel introduced graphics driver package version DCH 26.20.100.7463 for Windows 10 64-bit systems.
AMD Radeon Software Adrenalin Edition Driver 19.11.2
AMD Radeon Software Adrenalin Edition Driver 19.11.2 includes support for the new Star Wars Jedi: Fallen Order.
Skype - version 8.54
Skype version 8.54 has received a number of improvements in terms of translating conversations into different languages.
Windows 10 Cumulative Update 1903 KB4524570
On November 12, 2021, Microsoft released cumulative update Windows 10 Build 18363.476 (KB4524570) for Windows 10 May 2019 Update (version 1903) and Windows Server 2021 (1903).
© 2000-2019
- 312 530
- Author: admin
- Date: 07/20/2013
- How to connect a TV to a computer via HDMI, but so that the image is duplicated on the computer monitor, in other words, the image needs to be on both the monitor and the TV? I have a large collection of films and cartoons on my computer, including digital high-definition Blu-ray and HD formats. I really want to watch all these films on my new TV. The TV is in another room. How to do this and how long should the HDMI cable be? I seem to be connecting everything correctly, the computer is connected to the TV using an HDMI cable, and to the monitor via a DVI cable. There is an image on the monitor, but not on the TV, only the inscription on the black screen “Cable not connected” “Check cable connections and source parameter.” Your articles How to connect a laptop to a TV via HDMI and How to connect an Acer laptop to a Philips TV, How to connect a SONY laptop to a TV via HDMI, How to connect a laptop to a Toshiba TV I read, I do everything as written in them. In the TV settings, I select HDMI from the list of all available video sources, but there is still no image from the computer. Dmitriy.
- Hello Admin, in short, this is the case: I bought a new TV with a screen resolution of 1920x1080, connected the TV (as a second monitor) to the computer via HDMI, everything is basically fine, there is a picture on the TV, but I can’t set the resolution correctly on the monitor. The computer monitor does not support the maximum TV resolution of 1920x1080. The maximum that can be set on my monitor is 1280x1024. Therefore, on the TV the resolution is normal 1920x1080, but on the computer monitor everything is a little flattened. In principle, the resolution on the monitor is not important to me, the most important thing is that everything is fine on a large TV, but still, maybe there is some solution to the problem?
- Maybe you can help me, I have a simple system unit with a video card with an HDMI output and a TV with an HDMI input. I sometimes want to use the TV instead of a monitor, but many people do this, for example, to watch movies, of which I have a lot. I really want to watch all these films on my TV, but I can’t, or rather it works, but not quite. When I connect the TV to my computer via HDMI
, there is no sound, but the picture is very good. The operating system is Windows 7, I tried several HDMI cables, maybe it’s not them, but the operating system settings?
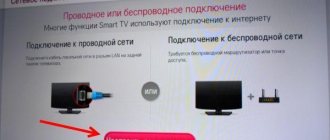
Wireless connection via Wi-Fi
You can turn a TV into a computer monitor without wires if your equipment has a Wi-Fi module. It is included in Smart TVs and most laptops as standard. To connect, you will need a home router with a wireless network to which both devices can connect. It is through it that the equipment is synchronized.
Pairing can be done using two technologies: Miracast or Intel WiDi. They do not require a router if the laptop runs on an Intel processor version 3 or older. You also need to check whether the computer has built-in Wi-Fi and a graphics chipset from the manufacturer. Laptops automatically support WiDi.
Important! To use a TV instead of a monitor wirelessly, your laptop must be running Windows 7 or higher. You will also need to install the Intel Wireless Display utility on it.
Laptops most often have Windows 8.1 or higher. They automatically support Miracast type connection. For them, you only need to check whether Smart TV supports it. Otherwise, the TV will need an adapter - a special flash drive installed in the USB connector.
Diagram for connecting devices via Wi-Fi
To connect your TV as a monitor to your computer via a wireless network, you need to:
- Go to the TV menu and activate synchronization via Miracast/WiDi. By default, the option is already enabled on smart TVs. For example, on Samsung equipment it is called “Screen Mirroring”.
- To connect via WiDi, you need to install the Intel Wirelles Display application on your PC. It installs quickly. When finished, you need to find the “Wireless Monitor” key.
- Pass the security check - enter the code on your laptop, which will appear on the TV screen.
After these simple steps, the computer monitor will appear on the TV screen.
Important! To use Mirakas technology on a PC, you need to open the Charms panel in Windows 8.1. To do this, hover your mouse over the lower right corner. Select the “Devices” subsection, then “Projector” and “Add a wireless display”. If there is no command, the TV does not support Miracast and an adapter is needed.
What if instead of a monitor we take a regular TV?
Duplicating the computer screen onto a TV will allow you to display the image on a large plane. You can also adjust the picture quality, select the desired resolution and increase the flicker frequency. However, at first you will have to put up with the inconvenience. Headaches may even begin, but they will go away in a couple of days. In this case, it is recommended to move further away when increasing the display size. At the same time, it becomes possible to look at the entire working surface and reduce the impact on vision. But not every device is capable of interacting with a PC.
TVs suitable for working with a computer
TVs are not suitable for interacting with a PC:
- CRTs equipped with a cathode ray tube;
- projection.
More modern models equipped with appropriate menu items and connectors in the rear will suit:
- liquid crystal, inside of which an IPS matrix is installed;
- LED TVs;
- plasma models.
If the device supports digital broadcasting, then it is guaranteed to be compatible with a PC.
TV instead of a monitor: choosing a screen type
Practice shows that it is more convenient to use an LCD TV as a second monitor. Because it compares favorably with energy consumption, price and durability compared to plasma models. LED screens are a direct continuation of LCD, an improved version, so you should use this or that TV based on the fact that you own it. As for the diagonal, it is recommended to select an aspect ratio that is comfortable for the user to work with, or similar to the size of the previous display.
What is HDMI?
This is a modern multimedia method of transmitting a signal (not only video and sound) at high speed and without loss of quality.
Avoids the use of multiple cables. It is very simple to implement in practice. For example, your PC's video card has a built-in HDMI output. This means that you can use a special cable to connect your computer to any display with the same interface. Most modern monitors and high-resolution TVs support this technology. In addition, even tablets and smartphones are equipped with such connectors (mini-HDMI), which allows you to transfer image and sound from a compact device to a large screen (or projector).
Since the signal is transmitted in its pure form, without conversion, its losses are minimized. As a result, we get a clear picture and high-quality sound (provided that the appropriate source is used).
Which is better: monitor or TV?
The answer to the question, monitor or TV for a computer - which is better to choose for home use depends on the personal preferences of the user. Using a “native” display on a computer will reveal itself to be the highest level of synchronization. In this case, the screen will automatically turn on when the system starts and will stop working when the session ends. And you don’t have to configure it further; just insert the wire into the corresponding hole on the video card and wait for the drivers to be installed.
If you use the TV as a monitor for a computer, you will first have to configure it for the desired display type, find the connected device, etc. And quite often, the initial setup may seem difficult for inexperienced users.
The advantages include
Connecting your computer to a TV will allow you to play computer games or watch videos in big screen mode. In addition, most LCD screens have the ability to change the resolution and flicker frequency at any time through the internal PC settings or using the remote control.
An increased flicker rate will ensure smooth frames while playing games or watching dynamic scenes in videos. Computer monitors, on the other hand, refresh the screen less frequently.
TV instead of a monitor: disadvantages
Before displaying an image on a TV, the user will have to spend time setting it up. After all, simply inserting the wire into the appropriate connector is not enough. In addition, you will need to display the menu on the screen, find the appropriate item and select the display mode. And after turning the PC on and off, the display will have to be started and turned off with a separate button, which is also somewhat inconvenient.
The contrast level, “softness” of shades, etc. can be adjusted. However, the color depth will still differ slightly from the same characteristics on a computer screen. For example, black and white colors will not have enough depth. And it may take about 20 hours to get used to the new screen.
In addition, television screens (starting from ) take up a lot of space. They may not fit on a computer desk. And it won’t be possible to take in such a colossus right away. The load on the video card will also increase. After all, you will have to output and support a larger number of pixels. In addition, the TV monitor is less flexible physically; the angle of inclination is not adjustable.
Preparation: check the HDMI ports on the TV and computer, select a cable
First we need to check if our devices have the necessary ports. We also need an HDMI cable to connect. Let's look at everything in more detail. If you have everything, then you can proceed directly to connection and configuration.
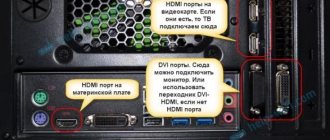
- The HDMI input on a TV is usually located on the side, or on the back panel (sometimes, both). They must be signed and numbered. They look like this (Philips on the left, LG on the right):
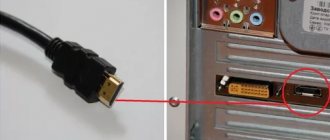
If your TV has at least one such port, then everything will work out. - Next, take a look at the back panel of your computer (I mean the system unit). There we need to find an HDMI output. HDMI can be on the motherboard (integrated graphics on new boards) or on the video card. But even if you have this port on the motherboard (as I have in the photo below), and there is a separate discrete video card with an HDMI output, then the TV must be connected to the video card.
I took a photo of the system unit in a horizontal position. In my case, the TV can be connected to the HDMI output on the video card. If your computer does not have an HDMI output, but has DVI, then you can buy a DVI-HDMI adapter. And if you only have the old VGA, then you can also use a VGA-HDMI adapter, but then the sound will not be output to the TV, since VGA is not a digital output. If you want to connect a TV and monitor to your computer at the same time, you will need either two HDMIs, or HDMI and DVI. We will also need the appropriate cables. - The HDMI cable must be the length we need. If I'm not mistaken, they exist up to 20 meters. If you do not have a separate cable, you can use the one with which the monitor is connected. If you have it connected via HDMI. I have this cable:
The most common, inexpensive cable.
If you have ports on both devices and have a cable, then you can connect.