Is it possible to connect a TV set-top box to a laptop: a complete analysis from a specialist
Hello everyone and I’m in touch with you, Bearded Man!
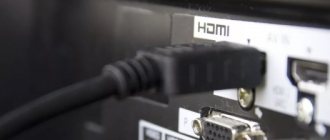
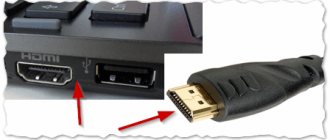
Another very interesting letter arrived in the mail with a question: how to connect a TV set-top box to a laptop. But how?! - take it and connect it. You can use HDMI or another similar cable. Another question is that it will be impossible to watch TV channels in this way. Finally: is it possible to connect? - Yes! Will there be a result? - No! On a laptop and computer, all HDMI ports that are commonly used are “OUT” ports and not “IN” ports.
That is, from there the signal goes to another device - for example, to a TV, monitor, projector. But the monitor has an HDMI input. This is where you can connect your set-top box.
Types of AV receivers
How to connect an AV receiver to a computer? This question is asked by people who want to watch movies or play games on a computer, accompanied by high-quality, comprehensive sound that only an audio system can provide. Buying a receiver that would connect it to a PC is half the battle. It is equally important to connect it correctly.
Today, receivers sold on the audiovisual equipment market are equipped with several universal interfaces that make connection with other devices available. The most popular interfaces are the following:
- "Tulip". This is the name of the composite connection method to transmit stereo and video signals.
- Component method. This method is well suited for working with video files.
- HDMI connection. It transmits not only a video signal, but also multi-channel and surround sound.
- Digital way.
We will look at how to connect a Yamaha receiver to a computer. Why was he chosen as an example? Many users note that these devices are considered long-lived in the market for such equipment.
Other ways to connect television
Another way is to use a special TV tuner receiver to capture video. Which will also be connected to the TV set-top box, and then to the USB port on the laptop or computer. The problem will be precisely that you will have to buy additional equipment. Do you need it? If you can make everything much simpler. One way is to set up IPTV. The service is provided by almost all modern providers and comes with the Internet.
To do this, you will additionally need to purchase a set-top box from the operator for mere pennies, but at the same time, television can be viewed on all devices that are connected to the router. So TV will be on the TV and on the computer. We have separate detailed instructions for setting up IPTV here.
An even simpler way is to watch television and any channels through a regular browser or special programs. In this case, all this will use a regular Internet connection. If you are interested in this particular option, then you are welcome here. It briefly talks about watching television programs on a computer or laptop, at no additional cost and free of charge.
But you need to understand that not all television programs will be available to watch for free. True, as in any place, it is also possible to purchase individual programs via the Internet, which contains almost the entire list of well-known channels. As you can see, connecting a TV set-top box is not particularly necessary. And this device itself is temporary and will fade into oblivion in a few years, since it is essentially a “crutch” for careless TV manufacturers.
Another option is to watch movies and listen to music from your computer via DLNA on your TV. Alternatively, you can install it nearby and watch. If you are interested in this option, then go here.
Source
Start using the service
How to connect the Tricolor receiver to a computer? We recommend using the instructions above. Now let's look at how to start using the account you just created:
- Highlight the saved “Receiver” entry.
- Click on "Connect". After this, the device should begin connecting to the server.
- Next, Total Commander will display a set of receiver files in the window if the connection was successful. It is worth noting that you can work with the documents and folders that appear in the same way as with the structural components of the Windows system. To change anything, you should select a folder or file, and then select “Files” from the top menu. Next - “Change attributes”. After this you can start editing.
- In the “Change Attributes” window that opens, specify the required value for the attribute. For example, 755. Next, you just have to click on “Ok”.
- That's it, the connection is complete.
How to connect a receiver to a computer? The connection can be made directly. In some cases, a switch or router is required. In this example (we have analyzed it), the receiver must have settings similar to those applicable on the computer’s network adapter.
Wired methods
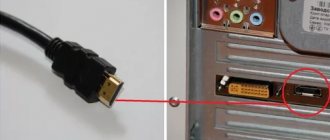
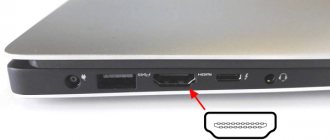
The type of wired connection you choose depends on what connectors your TV and computer or laptop have. The optimal interface for multimedia is HDMI. It allows you to simultaneously stream high-definition digital video and audio to your TV. An HDMI connector is available on almost all digital TVs, even quite old ones, as well as on laptops. HDMI ports are less common among system manufacturers. More traditional for PCs: DVI for digital video transmission and an analog VGA connector. But the problem of port incompatibility is easily solved with the help of adapters. However, signal transmission through adapters does not always work correctly, so matching ports is preferable.
Other types of interfaces are less common or less convenient for connecting a computer to a TV, so we will leave them outside the scope of this article. It is also worth considering that all options except HDMI-HDMI and HDMI-RCA involve video transmission only. For parallel audio broadcasting, you will also have to use a 3.5 jack (computer) - RCA (TV) cable.
Let's look at the connection using Windows as an example. The cable should be connected with the devices turned off, so as not to burn the ports. On the TV remote control, press the INPUT or SOURCE button. From the Input List or Source menu, select the appropriate port (in this case HDMI).
On your computer, you need to right-click on the desktop and select “Screen Resolution”, thus opening the screen settings. If the connected TV is not detected automatically, use the “Find” button. Once the TV is displayed here as a second screen, you can select it as the main screen and change the resolution.
Wireless methods
For such a connection, devices must have Wi-Fi functionality and support this technology. Laptops have a built-in Wi-Fi adapter by default. The system unit will have to be equipped with an adapter - external or internal - if it does not exist. Methods for setting up Wi-Fi on a PC are discussed in this article. The TV must also have a Wi-Fi module and support Smart TV or DLNA.
There are two main ways to connect a computer to a TV: via a Wi-Fi router using DLNA technology and via Miracast/WiDi. DLNA technology allows you to transfer media content between devices on a local network. The computer and TV must be connected to the same Wi-Fi router. There are various ways to run a DNA server on a PC.
The simplest one: open the folder with video files on your PC, right-click on the video of interest, and select “Transfer to device.” The corresponding TV should appear here immediately or after some time. After selecting the TV, the player window is activated, where you can control playback and adjust the show list.
To access all files on your PC from the TV, you need to run the DLNA server. This can be done using special software (Home Media Server, uShare, xupnpd, MiniDLNA) or built-in tools.
In Windows 10, go to Control Panel → Network and Internet → Network and Sharing Center. From the menu on the left, select “Media Streaming Options.”
Open and enable streaming, thereby launching the DLNA server.
Next, specify its name and configure access rights for all devices. You can now access the server from your TV using the Media or similar app.
Another connection method is Miracast technology, implemented based on Wi-Fi Direct. Unlike DLNA, you can view not only content stored on your PC, but also content that is played in real time in the browser, with the highest possible resolution and surround sound. To transmit a signal in this case, you only need to have two compatible devices in transmitter-receiver mode; a router is not needed.
To start a wireless Miracast connection, you need to find and turn on the Miracast receiver in the “Network” section of the TV settings. On the PC, press WIN+P, in the window that opens, activate “Connect to a wireless display”, after which the search begins for a device ready to receive content. When the TV appears, click on it and wait for the connection. Confirm the connection on the TV.
Source
View via network card
Another option for watching TV programs on a computer is to install a special network card into it that can recognize a satellite signal. The card is connected to the Tricolor antenna, and special software is installed on the computer that allows you to watch TV channels.
Important! This option is suitable for both desktop PCs and laptops.
The most common viewing programs today are:
- ProgDVB;
- MyTevii.
The first utility is paid, although it may be possible to find it on torrents. The second program is provided free of charge, complete with a satellite modem or network card from the manufacturer Tevii.
The interface of the listed software allows you not only to watch TV shows from a satellite dish, but also to watch regular video from a computer. In addition, the capabilities of the programs allow you to record video from television.
Advantages and disadvantages
Unlike the operator's proprietary application Play.Tricolor, the programs we have indicated are undemanding to the operating system. They can be used on both Windows and Linux, without installing additional emulators. All that is required from the user is to spend some time setting up.
Installing this software does not solve the question of how to watch Tricolor via the Internet on a computer, since the device will still receive a TV signal through the operator’s antenna. But they make it possible to avoid buying a TV and make do with the equipment available in the house to watch channels. By the way, you don’t have to buy a receiver either.
Find out how to pay for Tricolor with a bank card.
We advise you to find out what features Tricolor smart cards have.
Read: how to decode Tricolor channels.
The disadvantages of this scheme include:
- the need to conclude an agreement with Tricolor;
- not full access to broadcasting services (some channels may not be available in players);
- unusual interface (if the subscriber has used the receiver before).
In addition, it should be taken into account that in case of broadcast failures, communicating with the technical support of the TV service provider will be quite problematic. All their settings are designed to work through set-top boxes.
We have listed all the possible ways to watch Tricolor TV channels on a computer. Unfortunately, there are no opportunities to watch programs from this operator directly via the Internet yet. Only combined options are available to subscribers. But the company is working on this problem by developing its Online TV service, so perhaps the situation will change in the coming years.
Usually people install satellite dishes to receive a signal through the receiver to the TV. But if you figure out how to connect the receiver to a computer, you can not only broadcast the signal to the PC, but also update various applications used on the satellite television receiver.
All about connecting a TV set-top box to a laptop
The main purpose of set-top boxes is to connect to televisions. However, in some situations, the most appropriate solution would be to connect a set-top box to a computer or laptop monitor. It’s worth taking a closer look at why this is needed and how to make the connection correctly.
Why is it necessary?
The advantage of a laptop is that it is more convenient to use in many cases, including when watching TV channels. It is a mobile device that can be easily transported. The only drawback of the laptop is the small screen, which is not very convenient for watching TV shows or movies.
It is in this case that a TV set-top box becomes the solution. It is worth noting that recently laptop manufacturers have been releasing many models with a built-in T2 tuner, but most of them are expensive.
The most preferable option would be to purchase a laptop with the ability to connect an external T2.
The benefits of using a set-top box are obvious. It allows:
If desired, the user can transfer the recording of the film or program to other Internet resources, having previously processed the video. Today you can buy various consoles in stores. Experienced experts recommend giving preference to combined types, with which you can receive a signal from analog and digital channels.
Surround modes and digital audio processing
You've already breathed a sigh of relief after completing calibration and are eager to play your favorite 4K Blu-ray movie as soon as possible. There are still a couple of settings left: surround sound modes and digital sound processing functions.
DSP (digital audio processing) refers to a range of options, from Dolby or DTS processing modes to specific ones for drama, fantasy, adventure or gaming genres that emphasize certain aspects of the sound. There are even effects that simulate the acoustics of a cathedral, concert hall, New York jazz club or the Roxy Theater in Los Angeles.
You can experiment endlessly with options from the last category; Yamaha models are equipped with some of the best sound ambience software available to create a finely tuned and compelling experience.
But since we prefer to add minimal or no coloration to the sound signal, let's move on to those few modes that bring sound quality to the fore. Look for options with names like "straight", "direct" or "pure direct" - in them the receiver provides the most accurate signal transfer from source to output.
Each manufacturer has its own range of modes, but in most cases they turn off that part of the circuits that is not currently required, which helps reduce the level of distortion and eliminate interference, and therefore increases the purity of the signal.
On the other hand, your model may support special modes for playing back Dolby Atmos or DTS:X soundtracks (on Blu-ray discs, these are recorded over standard tracks for 5.1- or 7.1-channel sets). For example, the Sony STR-DN1080 to play a signal in Atmos or DTS:X must be in AFD (automatic format decoding) mode - the receiver display should display a message that it is decoding the soundtrack in Atmos format (if this message is not present, then you get something else out of it).
And one more consideration: if you plan to listen and watch different types of content using the AV receiver - movies, sports, video games, stereo music - it is worth creating bookmarks with your own settings for each of them. A special cinema mode for movies, two-channel stereo for listening to music, DSP settings for video games - all this will allow you to do without reconfiguring sound parameters every time you change the format.
Connection methods
There are several options for using a laptop with a TV set-top box. However, none of the methods is possible without connecting the device to the Internet. Therefore, first you need to provide access to the resource. The first two connection options are based on the use of Internet TV and cable.
The most popular and convenient way is to use a computer to play TV programs through an external T2 tuner.
Before setting up channel reception, you will need to install a special program, which is recorded on the disk that comes with the set-top box.
To operate such a system, you will need to ensure the correct connection not only to the TV, but also to the laptop. To do this, you need to install special drivers that will allow the computer to connect to the tuner. To save the changes made, it is better to restart your PC. If all steps are completed correctly, a shortcut for the TV set-top box will appear on the laptop desktop. After this, you should connect the T2 tuner using a USB cable, then the system will determine the algorithm for playing programs independently.
How is the setup carried out and is it possible to download satellite TV
You won't be able to download satellite TV to a regular computer. The signal is transmitted and received via satellite, and it is not enough to simply download and install the program.
You will need a receiver to receive the signal; it is what ensures the system operates. To watch TV for free, you can download files for sharing on the website of any operator and sign up for an inexpensive subscription.
Now let's talk about how to set up a TV tuner on your computer. If you purchased a small internal card, it must be installed in the appropriate slot on the motherboard. The card should fit freely into it and should be latched.
Don't forget to connect an external antenna to receive the signal. You can pick it up yourself and install it from the street side, simply connecting the cable to the PC.
How to set up:
- Insert the disk with the installation drivers into the drive; it is usually included in the kit.
- Go to the “Installation Wizard” and confirm your desire to install the drivers.
- After installation, reboot your device and log into the OS again.
- If the disk was lost or the manufacturer simply does not supply it, then find the drivers on the website of the company that produced the receiver.
- Once completed, your PC is ready to use TV networks.
Connecting the receiver to a monitor from a computer
For those who need another screen, but buying a new TV is not yet in their plans, there is another option - using a computer monitor. Its correct connection to a DVB-T2 set-top box will ensure comfortable viewing of your favorite TV channels in digital quality.
Today it has become possible to connect a TV set-top box to any computer monitors: both new and old. Some models are equipped with an integrated speaker, eliminating the need to purchase acoustic devices. Before connecting two devices, it is recommended that you carefully examine all the inputs and connectors on the monitor. Users whose set-top box and screen were manufactured in approximately the same period will be most lucky. In other cases, the connection will also be valid, but some difficulties may arise in the process.
The most successful option are hybrid tuners that have VGA and HDMI output. If the device is also equipped with tulip-type connectors, you can easily connect devices for audio playback. If the receiver and monitor have different interfaces, you will need to purchase a special adapter. An important parameter is the length of the cable used. For each type of product, maximum characteristics are provided.
To prevent signal attenuation and choose the optimal cord length, it is recommended to adhere to the following recommendations:
If the connection fails and an error message appears, it means that the devices are not compatible with each other or that the wrong cable was selected for the connection.
Watching programs on a monitor involves two options: one is access to terrestrial television, and the second is streaming video on the Internet. In the first case, a standard DVB-T2 tuner is used. You just need to connect the device to the monitor, choosing the correct method, and over-the-air broadcasting will become available. In the second case, you need a device equipped with the Android operating system. Connection is made via HDMI or RCA connectors.
Purpose and principle of operation of the receiver
An audio/video receiver is actually a multi-channel amplifier equipped with digital audio decoders, a tuner and signal switchers, which is used in home theaters. This multifunctional device is exactly where surround sound begins.
The most popular models are five-channel receivers that support basic sound systems. There are also seven- and nine-channel systems that are capable of amplifying and switching the latest formats such as Dolby Atmos and DTS X. Receivers are also used for listening to music, providing amplification and transmission of streaming network content to playback equipment. Using the receiver, you can even provide signals to sound systems located in different rooms - multiroom systems. This is what the back panel looks like on an AV receiver, for example, the Pioneer VSX-LX503.
It is clear that such a multi-component AV receiver is a rather complex device, and therefore requires certain knowledge and care when connecting it.
Receiver connectors for digital TV
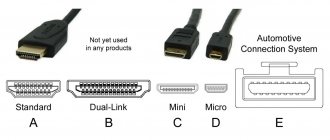
To connect a set-top box to a personal computer or monitor, you can use various connectors. Each device has ports depending on its category and year of manufacture. The following interfaces can be used to connect two devices:
Connecting a TV set-top box to a monitor does not require much effort; the main thing is to choose the right connection method, and then the user will receive a full-fledged device, in no way inferior in capabilities to a regular TV.
How to connect Smart TV to a computer
The connection of two devices is carried out using both wired interfaces and wireless technologies. Data exchange can be achieved via a Wi-Fi radio channel. Setting up laptops is easier because they have built-in modules. For personal computers, you need to buy a special device that will provide wireless synchronization.
Modern Samsung or LG TVs support Smart TV technology, so connecting them to a computer via Wi-Fi is not accompanied by any difficulties. If older models do not provide wireless connectivity, they will require a special adapter that plugs into the USB port.
Connecting a computer and TV is carried out in several ways, depending on what purpose the user is pursuing. Wireless synchronization is needed in two cases: when the TV receiver will be used as a monitor or to play various files from the PC hard drive. To establish a connection between two devices, both must be part of the same wireless network.
An important step is setting up a DLNA server. It sounds scary, but it's a simple matter of opening access to folders where media files are stored. You must set the Wi-Fi network settings on your computer to “Home” mode. After this, you will be able to connect to folders called “Video”, “Music” and others. To ensure quick access, you must perform the following steps:
If the DLNA connection is successful, you can open the receiver menu and view the list of devices with which the connection has been established.
Source
Setting up an FTP connection
To connect to the receiver from a computer, you will need an FTP client. You can use any program like FileZilla, but it is more convenient to connect through Total Commander.
- Launch Total Commander and expand the FTP menu.
- Select "Connect to server".
- Click the "Add" button.
- In the “Server” line, write down the IP address that you assigned to the receiver.
- In the Account and Password fields, enter the value “root” and click “OK”.
The connection has been established. Receiver files will appear in the Total Commander windows that you can work with. For example, in the “newcamd.list” file you need to enter connection information that the provider will provide. All files are opened and edited through the built-in Windows Notepad tool.
Why is it necessary?
The advantage of a laptop is that it is more convenient to use in many cases, including when watching TV channels. This is a mobile device that is easy to transport. The only drawback of the laptop is the small screen, which is not very convenient for watching TV shows or movies.
This is where a TV decoder becomes the solution. It is worth noting that in recent years, laptop manufacturers have released many models with a built-in T2 tuner, but they are mostly expensive.
The most preferable option is to buy a laptop with an external T2 connector.
The benefits of using a set-top box are obvious. This allows:
If necessary, the user can transfer the recording of a film or program to other Internet resources by pre-processing the video clip. Today you can buy various decoders in stores. Experienced specialists recommend giving preference to combined types, with which you can receive signals from analog and digital channels.
Calibration
Let's move on to the longest and most tedious part of the AV receiver setup process.
Most receivers come with a microphone for setup. Connect it and start the auto-calibration procedure after receiving the invitation; it will measure the characteristics of the speakers and room parameters, adjust the distance to the speakers and their volume levels, and for more “sophisticated” (read, “expensive”) receivers, it will also optimize the sound in accordance with the situation.
We recommend performing auto-calibration immediately after connecting all sources to get rid of this process once and for all and quickly start listening to your new home theater.
Additionally, the system will not sound optimal without calibration. After connecting the microphone, follow all on-screen instructions exactly and go all the way from start to finish. Some calibration functions will take only a few seconds, others may take five minutes or more because multiple parameters are being measured. In the second case, you can go and make yourself a cup of tea.
If you have installed Dolby Atmos speakers, please inform the receiver before calibration begins.
Enter the manual speaker setup menu (it may be hidden somewhere deep in subfolders) and specify their configuration - these can be speakers with Atmos function, emitting sound upward (for example, KEF R50), or installed on the ceiling - after which the receiver will be able adequately calibrate them. He will need to know the height of the room, so have a tape measure.
It is also necessary to indicate the number of subwoofers in the system - one or two. Set the volume to about half, calibrate, and then adjust if necessary while watching a portion of the movie.
If during calibration one or more speakers show an error during the measurement process (or the system does not recognize their presence), check whether they are connected to the correct outputs; sometimes this indicates that the speaker is out of phase.
Most calibration systems today work quite accurately, but it's always worth taking a second look at the manual settings and double-checking distances and volume levels - and fixing what needs fixing. Trust your ears: if something sounds unpleasant, it means that something is installed incorrectly somewhere, and it can be corrected.
It often happens that the receiver perceives large speakers as small ones - or vice versa.
If you're as meticulous as we are, you can measure speaker levels using a sound pressure sensor or use a smartphone app - they do a pretty good job.
Do not forget that if you change the composition of the speaker set, move the speakers or rearrange the furniture in the room, you must perform a full calibration again. So don't move the microphone too far away.
Connecting the receiver to a monitor from a computer
For those who need another screen and don't have a new TV, another option is to use a monitor from a computer. Correct connection to a DVB-T2 decoder will ensure comfortable viewing of your favorite TV channels in digital quality.
Today it has become possible to connect a decoder to any monitors from computers: both new and old. Some models are equipped with a built-in speaker, eliminating the need to purchase additional acoustic devices. Before connecting two devices, you should carefully check all the inputs and connectors on the monitor. The luckiest users will be those who own a decoder and screen manufactured during the same period of time. In other cases, the connection will also be acceptable, but some difficulties may arise in the process.
The best option are hybrid tuners that have both VGA and HDMI outputs. If your device also has spring-loaded audio connectors, you can easily connect devices to play audio. If the receiver and monitor have different interfaces, you will need to purchase a special adapter. An important parameter is the length of the cable used. Maximum specifications are given for each product type.
To prevent signal attenuation and select the optimal cable length, it is recommended to follow these guidelines:
If the connection fails and an error message appears, it means that the devices are not compatible with each other or the wrong connection cable was selected.
There are two options for viewing broadcasts on the monitor: one is access to terrestrial television, and the other is streaming video over the Internet. In the first case, a standard DVB-T2 tuner is used. Simply connect the device to the monitor by selecting the appropriate method, and over-the-air broadcasting will become available. In the second case, you need an Android device. Connection is made via HDMI or RCA connectors.
Tuner: some options
Watching satellite TV on your computer is possible through multiple devices. The tuner may differ in the dvb standard, the ability to receive digital TV in a certain format. You can choose a dvb tuner that not only plays digital TV on a standard computer, but also works in analog mode. This makes for a more comfortable viewing experience.
There are two options in which the dvb tuner is provided:
- Special module for installation in a PC.
- Separate receiver.
A standard internal TV tuner for your computer is considered the most compact solution. Such a device is a small card, and the internal receiver is inserted into a special PCI connector located on the motherboard. This satellite TV tuner for a modern computer is easy to use and can provide viewing of many channels. But compared to external dvb, its capabilities are limited. A standard tuner with dvbc technology is much preferable for a computer.
But what are the differences between dvb t2 and dvb c for a computer? dvb t2 technology is used on a computer to enable viewing on terrestrial networks, and you may need to download certain programs. The second option is used specifically for connecting via satellite. An external tuner is connected to the switch and antenna to receive the signal; some devices can be connected directly via USB.
Is it possible to connect the set-top box via HDMI
Usually, yes, if the set-top box and computer have an HDMI port. But if the computer has only one port, and the set-top box does not have it, then there is no point in “cheating” with VGA-GDMI adapters. How to connect a digital TV set-top box to a laptop via HDMI? Follow the general algorithm for connecting a TV tuner.
Make sure this model is suitable for pairing with your computer. Install the drivers and software, after pairing the same TV tuner with your laptop via USB cable (for initial settings), open the software and follow the instructions.
Setting up your TV
When connecting the T2 tuner cable to the TV
If the settings were completed successfully, the laptop desktop will appear on the TV screen.
PC setup
Once your TV is set up, you can start adjusting the settings on your laptop. First, you can adjust the image quality. This is especially important if this is the first time HDMI output from your laptop to your TV. If you don't adjust the quality, the image will be blurry.
The configuration will require:
As you change the resolution, keep an eye on how much the image quality improves or deteriorates. You can also connect your laptop to your TV:
Once all parameters have been defined, the setup is complete. The user can start watching television programs.
Functionality of AV receivers
Let's look at the key features of these devices:
- A rich set of different tuner settings.
- Possibility of automatic tuning of spatial sound. Using a microphone, the system itself determines the following parameters: speaker sizes, distances to them, volume for each speaker, etc.
- A wide variety of surround sound programs.
- Digital decoders that help decompose stereo into a multi-channel sound circuit, where all speakers are fully used.
- Supports various application modes: cinema, music, video games.
- A built-in converter that, when connecting various devices (computers, various players, video cameras, game consoles, etc.), allows you to use a universal HDMI cable to output images.
- Possibility of analog connection of an external decoder.
- Support for a second zone (additional stereo acoustic system).
- Trainable remote control point.