I decided to prepare an article about connecting a laptop to a TV (although it’s probably correct to connect a TV to a laptop). Let's consider the connection via an HDMI cable, using the example of an Asus laptop and an LG TV with Smart TV. This article is suitable for almost any laptop: HP, Acer, Asus, DEL, etc. And for all TVs: LG, Samsung, SONY, Toshiba and others. Yes, some points may differ: the location of the HDMI connectors, the appearance of the settings, buttons, etc. Using these instructions, you can display the image from your laptop to your TV. I forgot to write about the operating system. It doesn’t matter whether you have Windows 7 or Windows 10, everything will work out. And yet, your TV may not have a Smart TV function. There should only be an HDMI connector, which nowadays is on every not very old TV.
If you want to display an image from a laptop on a TV to watch movies, games, work, etc., then HDMI is best suited for this. Yes, there are wireless technologies such as Miracast, DLNA, Intel WiDi, Samsung has some of its own proprietary video transmitters, and others. But they are not universal. I'll explain now. For example, via Intel WiDi or Miracast, there will be a delay in image output. Definitely not playing games. And DLNA technology is intended exclusively for watching videos, photos and listening to music.
It turns out that the connection via HDMI cable is the most reliable and universal. Although not the most convenient. I always want to get rid of wires. In addition, both image and sound will be transmitted via HDMI from the computer.
Now I will show you how to connect everything, how to set the necessary parameters on your TV and laptop. We will also consider popular problems that very often appear when connecting devices in this way.
We will need:
- TV with HDMI input.
- Laptop or desktop computer with HDMI output. If there is no HDMI, but there is DVI, then you can buy a DVI-HDMI adapter.
- HDMI cable.
What is needed to connect a laptop to a TV via HDMI
To connect a laptop to a TV via HDMI, you don’t need any special equipment or fancy adapters or adapters. In most cases, you will only need one cable. But, in order to make sure that the connection is possible, you must first check the availability of connectors.
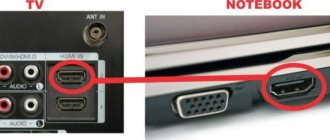
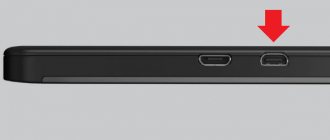
First, your laptop must have an HDMI connector. It is usually located on the left side of the device, but can also be on the right. The picture below shows what this connector looks like and where it is located on the laptop.
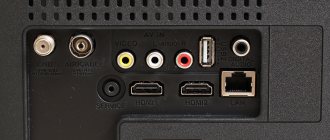
Secondly, the HDMI connector must be present on the TV. In the case of a TV, it can be located on the side or back of the device. Please note that there are two types of HDMI connectors on a TV: IN (input) and OUT (output). To connect a laptop you need to use HDMI (IN). If there are several such connectors, then you can use any of them. They are all equivalent and work the same.
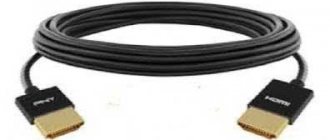
Well, of course, you need the HDMI cable itself, which you will use to connect the laptop to the TV. When choosing a cable, you need to pay attention first of all to its length. It should be sufficient for convenient connection, but no more than 10 meters; when using longer cables, a noticeable decrease in image quality is possible, especially with high image resolution.
Cables also differ in the HDMI versions they support. These versions play a role only when transmitting images with higher resolution. To connect a TV with Full HD resolution, an HDMI cable of any version will be enough.
To connect 4K TV you need a cable with version 1.4 or higher. But, this is the minimum value at which the screen refresh rate will be 24-30 Hz. The best option for 4K resolution is a cable with version 2.0 or higher. If you use a cable with version 2.0, you will be able to get a 60Hz refresh rate.
No sound
First, check that the sound on the TV is not at zero (0). If it still doesn’t exist, then you need to configure it on Windows itself. In the lower right corner of the screen in the tray, right-click on the speaker and select “Detect audio problems.”
If this item is not there, or the problem is not resolved, then go to the “Playback Devices” section. Your TV should be displayed there - right-click on it and then select “Set as default” from the list. At the very end, don’t forget to click “Apply”.
If there is still no sound, then the problem is a little deeper, but there is no need to worry and it is quite easy to solve. I have a separate article on this matter with a solution - go here. You can also always contact me in the comments.
How to connect a laptop to a TV via HDMI
As for the connection procedure itself, everything is extremely simple. All you need to do is plug one side of the HDMI cable into the connector on your TV and the other into the connector on your laptop. The HDMI cable is the same on both sides, so it can be connected to either side. In this case, the connection can be made with the equipment turned on, nothing bad will happen from this.
After connecting one side of the cable, connect the other. The HDMI cable fits into the connector quite tightly, you will need to apply a little force. But, do not overdo it, so as not to break the connector.
Once the laptop and TV are connected to each other using an HDMI cable, you can begin setting up the laptop and TV.
Port Definition
Users who want to know how to display an image from a laptop to a TV should remember that it is possible to use not only a wired, but also a wireless connection. Both topics are quite extensive and require detailed consideration. The first option is the easiest to implement and many people choose it. First you need to decide on the ports that are on your TV and laptop. Most often, manufacturers equip their products with the following interfaces:
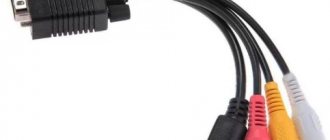
DVI - there are three types of this protocol and recently digital DVI-D has been actively used. It is present on all modern video adapters for desktop PCs and quite rarely on laptops.- VGA is an outdated interface that, although still in use, is rapidly declining in popularity. Its main disadvantage is the transmission of only an analog signal at a maximum resolution of 1600x1200 pixels.
- S-Video is an old interface that is not used on modern PCs and laptops. Can only be used to connect older devices.
- HDMI is present in all modern TVs and laptops. It is most often used to display images on a TV.
Today there are two versions of HDMI - 1.4 and 2.0. All top TV receivers are equipped with ports of the new standard, and in budget ones you can also find 1.4. The differences between them are in the information transfer speed (10.2 Gb/s versus 18 Gb/s), as well as the number of audio channels. Connecting a computer to a TV using HDMI is quite simple and does not require drivers. However, keep in mind that to play 4K video you will need HDMI version 2.0.
How to connect a laptop to a TV via HDMI
After you have connected everything, the laptop and TV need to be configured; without this, the image will not appear. First, you need to press the “Source” button on the TV remote control and select HDMI from the list that opens. If there are several HDMIs in the list of sources on your TV, you just need to select the one you need (the one to which you connected the cable).
If you are lucky, after switching the TV to the HDMI signal, the image from the laptop will appear on its screen. But, if this does not happen, then you will need to delve into the laptop settings. If you have Windows 7, then you need to right-click on an empty space on the desktop and go to “Screen Resolution”.
After this, a window with screen settings will appear. There are several options here that allow you to control how the image is displayed. In order to transfer an image to a laptop, you need to open the “Screen” menu and select “Multiple Monitors”. After this, the image should appear on the TV screen. In addition, in the screen settings you can change the image resolution, its orientation, and also configure the way the TV operates. There are 4 different ways of working:
- “Duplicate these screens” - the image on the TV completely duplicates the image on the laptop screen.
- “Expand these screens” – the TV screen is used as a second monitor for the laptop, expanding the user’s workspace. With this method of operation, it becomes possible to move windows between the TV and the device screen.
- “Display desktop only on 1” – the image is not transmitted to the TV, only the device screen is used.
- “Display desktop only on 2” – the image is displayed on TV, but is not displayed on the device screen.
If you use the Windows 10 operating system, then to configure your monitors you need to go to the “Options” menu (Windows-i key combination) and go to the “System - Display” section. All the same settings are available here as in Windows 7, with the exception of the resolution, which is selected automatically.
Also in Windows 10, you can quickly switch between monitor connection methods. To do this, press the Windows key combination-P (Project) and select one of the options: Computer Screen Only, Repeating, Extend, and Second Screen Only.
In addition, settings for connecting external monitors are also available in the video card drivers. For example, if you have a video card from NVIDIA, then you can right-click on the desktop and select “NVIDIA Control Panel”.
After opening the “NVIDIA Control Panel”, you need to go to the “Display - Change Resolution” section. Here you can change the resolution and refresh rate for each of the connected screens.
In the “Display - Install multiple monitors” section, you can define the connected monitors, select the main monitor and change their position relative to each other.
Similar settings are available in drivers from other manufacturers (AMD, Intel). But they are unlikely to be useful to you, since in most cases the settings that are available in Windows itself are sufficient.
No image
The first problem is when when connecting HDMI from a laptop there is no image on the TV. Then you need to look at the configuration for using the second screen. Right-click on a free area of the desktop and go to “Screen Resolution”.
The “Screen” line should have a setting to display multiple devices. There is no need to change the resolution, and it is usually set automatically, but it can be adjusted if it is not displayed correctly on the second screen. Also make sure that in the line “Multiple screens” there is a value “Duplicate desktop...”.
You can also switch modes very quickly using shortcut keys. Find the "Windows" key on your keyboard - it may have the inscription "Win" or an operating system icon. And the second key is the English letter “P” (not Russian). Press these two keys at the same time and you will see a window like this.
The first option completely disables data transfer to the second screen. Duplication – simultaneously displays the image on both devices. As for the expansion, I think you already guessed - in this form you can use a second monitor to expand the work area. A useful thing for programmers and designers. Well, the last one - outputs only to the TV.
If there is still no image, then there are problems with the drivers for the video card - see the instructions here.
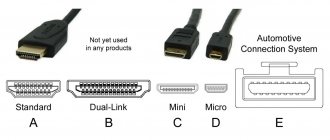
What types of HDMI connectors and adapters are there?
The HDMI cable must be of high quality and match the desired image parameters. Today, there are several modifications of HDMI connectors, each of which meets specific image requirements. Their choice depends not only on the maximum capabilities that this or that cord provides, but to a greater extent depends on the capabilities of the TV monitor itself:
- Standard – a traditional connector that supports normal screen resolution (1080 pixels). This type of cord supports image transmission no more than 15 meters.
- High Speed – a connector that supports the same image resolution as the “standard” type, but due to the accelerated transmission of the video signal, requires a cord length of no more than 7.5 meters for a faster response.
- Deep Color is a cable that offers maximum color rendition. But such a connector will work correctly and perform all functions only for modern TV models that support over a trillion shades in the color palette.
- Color - a cord with the maximum range of colors, but used only on the latest models of TVs. Screens using RGB technology will not accept this type of color rendering.
HDMI versions are constantly being updated and improved. At the moment, version 2.0 cords are considered optimal for high-quality work.
Usually, one cord is enough to view files on a computer through a television monitor. But sometimes, depending on the device model and their location, you have to purchase special adapters:
- Adapters will be required in cases where TV and computer models are not equipped with HDMI jacks. Typically these are models released before 2010. Older laptops and other devices do not have an HDMI output, but if they have DVI video outputs, you can connect a cable through them using a DVI-to-HDMI adapter.
- The cord can even be connected via a USB port using a USB-HDMI adapter.
- Certain older TVs only have a VGA port, in which case you will need a VGA to HDMI adapter.
This type of connection is not digital, so you won't be able to stream sound through your TV. - A separate difficulty when connecting a cable to the inputs of a PC and a TV screen is when the screen is wall-mounted. In this case, it is impossible to connect the cable connector to the input located on the back of the TV, which is located close to the wall. In such a situation, a special corner-type adapter (bent at an angle of 90 degrees), to which a regular cord is attached, will help out.
- For those who plan to connect several computers or other devices via a cord, you can purchase a special type of adapter - a Switcher. It connects several signal sources to one port at once, and you can change these sources using the remote control supplied with the console.
Having selected the required cord and purchased the necessary adapters, you can begin connecting your computer to the TV.
Other solutions
Not every user wants to use a cable to connect two devices. You can connect your laptop to your TV wirelessly using the Miracast or Wi-Fi Direct protocols , with which you can connect directly, bypassing the router. However, in such a situation, each of the connected devices must support the appropriate protocol.
If the necessary modules are not built into your TV or laptop, you can purchase special adapters that connect to the USB connector. In addition, a home media server (DLNA), which must be installed on a laptop or PC, is also perfect for solving this problem. All top TV models support this technology.
Originally posted 2018-04-30 04:47:37.
Outputting images to the projector via Wi-Fi
On a Windows 10 laptop, go to Start | Options | System | Display" and on the right side in the "Multiple displays" section, click on "Connect to a wireless display". A vertical curtain will appear on the right side with the “connect” menu and a list of detected devices.
In our case, this is Samsung 6 series (49), but to connect to the projector, a corresponding display device, for example, a Wi-Fi dongle, will appear in this list. Click on the selected model, and then on the wireless device itself, agree to the connection request. It should be noted that the connection may not occur on the first or even on the second try, because... the computer needs time to transmit the signal encryption keys to the dongle. But after it is connected to the laptop via WiFi, you can broadcast video from another room.
Setting up your TV
The difficulty lies in the impossibility of creating universal instructions for setting up all TVs. Even in different models of the same brand, the steps for connecting external devices sometimes differ.
In short, you need to move on to selecting the image source. Usually this is a button on the remote control, which is popularly called “exit”, located in the top rows.
Click on it and you will see a list of all possible sources for displaying images on the screen: antenna, USB flash drives, card reader (if available) and HDMI.
So you need to activate it by highlighting it and pressing the selection button (usually “OK”).
The advantages of such a connection
If we take a closer look at the advantages of this method of connecting a computer to a TV, we can immediately highlight the image and sound quality, which remains at a high level when using this interface. There are a number of other advantages:
- The ability to watch IPTV for free from online portals, without connecting to cable or satellite television.
- Film viewing in any format and in high quality. HDMI assumes high picture resolution (reaches 2560 by 1440 pixels).
- Convenient viewing of small images or documents on a large TV screen.
- Increased comfort and maximum immersion in the gaming process.
- Communication on Skype and other video messengers will become more interesting thanks to the ability to consider small details. This feature will also be an advantage when participating in or conducting online seminars and conferences.
- Cheap connection (the wire is inexpensive).
- Easy to connect and use. In fact, just one wire is needed to transmit both image and sound, which greatly simplifies device setup.
The advantages of working through such a cable are undeniable: installation requirements and price are minimal, and the quality of image and sound will improve significantly if the cable is chosen correctly. There is no need to place the computer (laptop) and TV nearby either, since the cord can be up to 20 meters long.