To do this, we will use the Tool developed by our German friends! Android TV App Launcher Builder
It is a web application in which we fill in the required fields and add resources. As a result, the finished application is compiled for us.
Link to the application itself: https://atvlauncher.trekgonewild.de/
Now a little explanation of what to enter and where: App Name (max 15 characters):
ChromeATV
(Here we need to enter the name of our application, 15 characters maximum in English)
App Package (eg com.android.application):
com.android.chrome
- (this is perhaps the most important point, here we write the name of the application package for which we need an icon in the launcher). How to find out the name of the package of the application you need: In the smartphone market, install the free Package name Viewer application - the application is very simple and only serves to display the names of application packages. We install the application without an icon on the smartphone and look at the name of its package.
App Category:
This parameter has 2 meanings: Applications and Games. Depending on the value, the application will fall into one or another Category Strip.
App Logo (PNG only):
Here we have to select an icon for the application (it will be displayed in the settings, all applications tab). The icon can be easily found in Google Chrome or pulled out from the APK using a regular archiver.
App Banner (PNG/JPEG, optional):
— this point interests us more, because we don’t just want to display an icon in the menu, but make it attractive)) The Google standard for a banner displayed in the AndroidTV launcher is a 320x180 pixel image without transparency. Here we are: we search on the Internet, we draw, we ask someone to draw a banner of the required size. While searching for the Chrome icon, we came across a suitable image: Banner just needed to be adjusted to the size we needed.
If all fields are filled in and all files are selected, press the Generate APK
We wait a couple of seconds and we receive a ready-made APK of the icon program for our application, they will also show us what the banner will look like:
Click the Download APK button and save the finished application shortcut to your PC.
Source: 4pda.ru
Troubleshooting on Sony Bravia TVs
Smart TVs from the Sony Bravia line, like any other household appliance, break down. This does not happen very often, but since we are talking about a high-tech product, breakdowns of these devices have their own characteristics. In particular, many of the problems are similar to computer ones. This means that the technician who will have to repair the Sony KLV 32s550a TV must have a good understanding of the software.
This TV may have some problems
One of the main reasons for problems with smart TV is its integration with Internet networks, both wireless Wi-Fi and wired Internet. This integration creates a risk of virus infection. The latter can cause:
- lack of response to the remote control;
- lack of image;
- lack of sound;
- inability to find the antenna;
- unexpected shutdown.
But the impact of viruses on the operation of software is not the only problem that owners of such TVs have to face. Mechanical damage is an equally common cause. The most common breakdowns due to impacts, falls and exposure to water:
- TV not turning on with blinking indicator;
- not working buttons;
- the picture becomes monochromatic;
- strong snow-like noise;
- the screen turns black or white;
- TV turns on or stops working after turning on for no reason;
- no decimeter channels;
- violation of synchronization between picture and sound;
- problems with image scaling relative to screen size;
- linearity violations;
- clear signs of physical damage on the case.
In this video you will learn more about repairing such a TV: Every time, to find out the cause of the breakdown, correct, professional diagnostics is necessary. For it, a number of methods and special equipment are used, available only to masters who deal with such equipment. We're talking about:
- microscopes of binocular models;
- vacuum grippers;
- oscilloscopes;
- multimeters.
In addition to these tools, software specialists conduct software testing.
There are breakdowns that cannot be corrected by other methods other than replacing the broken part. This is the case, in particular, with matrix failure. Any damage cannot be repaired. Be it chips on the glass, cracks or internal damage to the display unit.
In addition to the matrix, the X1 Extreme processor, which is responsible for exactly how the image is displayed, also breaks down. It is on this that the increase in resolution to 4K HDR (that is, 3840 by 2160 pixels) depends. Without 14-bit signal processing, colors would be segmented and gradients would not be smooth enough. Thanks to the processor, even with an 8-bit source, you can watch videos with maximum quality. Replacing a processor can be quite expensive.
In addition to the processor, the following are subject to replacement:
- power circuits;
- backlight lamps;
- kinescope modulators.
Attention! All these and some other parts cannot be repaired if damaged. Which requires contacting a licensed service center.
Connection errors
Network problems can be frustrating as they can result in apps not loading, movies being buffered, music not playing properly, or other errors.
Sony TV won't connect to WiFi
The device in question depends on the device's router IP address to stream audio or video. If a device is assigned an incorrect IP address, it causes network problems such as inability to connect, errors when attempting to connect, or service unavailability.
If your Sony TV does not connect to the wifi network, you need to check the network status of the device to ensure that the IP address is correct.
- On the supplied remote control, you need to press the HOME or MENU button.
- Select Settings.
- In the “Settings” category, select “Network”.
- Under Network Settings, select View Network Status.
The network settings of the device in question will vary depending on the model. You must read the manual to find specific model information.
Sony TV does not see wifi
If the TV no longer sees only a specific access point, but sees others, then most likely the wireless router has switched to a radio channel that is not supported by the TV.
Sony Android TVs operate on Wi-Fi channels 1 to 11.
You should go to the settings of the router (access point) and manually set the Wi-Fi channel from 1 to 11.
Network error
The following factors may cause network problems:
- Incorrect password entered on the device when using a secure network
- Slow internet speed
- Distance from router to device
- Software updates performed on the device
- Interference from other wireless devices, etc.
If a configuration failure occurs when receiving Sony Internet content when trying to access content, e.g. Netflix or YouTube video services, you need to follow these steps to fix the problem:
- Check if the problem is resolved after completing each step.
- Check to see if you receive an error message when accessing another online video service or content.
Note! If the error occurs only when trying to access one specific service, that service may be temporarily unavailable. In these rare cases, you should try again later. If a network error occurs, writes Sony Bravia “the Internet is not available,” you must adhere to the following algorithm.
- Test your Internet connection using another device, such as a smartphone or computer, to see if the Internet is available.
- Make sure your router or cable modem has an active wired or wireless Internet connection.
Some routers have a Wi-Fi Multi Media (WMM) setting that helps control video streaming. If you are using a wireless connection, you will need to change this setting to control latency and jitter when transmitting content.
- If you are using a wireless gaming adapter for connection, you should make sure that it is configured correctly.
- Reboot your router or cable modem.
- Unplug the power cord from the outlet for a minute.
- Plug the power cord back into the outlet and wait until the blinking lights indicate that the modem or router has completely restarted.
- Update Internet content.
- For TVs, run network diagnostics.
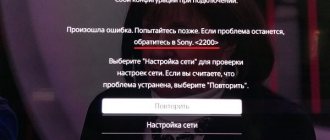
Users of SONY equipment often encounter the Sony Bravia 2200 error. It manifests itself in the form of a disconnected network connection when trying to access the World Wide Web. The TV refuses to load content. Error: 2200 appears regardless of the TV model: “Configuration failed when connecting. An error has occurred. Please try again later. Error 2200."
Configuring DNS servers with error 2200
The TV may display a 2200 message when attempting to access a network connection under the following circumstances:
- Internet signal lost
- unstable internet speed
- Internet videos are not displaying
- Apps suddenly disappear when watching internet videos.
To fix this problem (Sony Bravia connected without internet), you need to do the following:
- Turn off the TV.
- Unplug the TV's power cord.
- Unplug the router and modem power cords.
- Connect the router and modem power cords after two minutes.
- Connect the TV's power cord.
- Turn on the TV.
- After five minutes, update the TV's Internet content several times.
When using a wireless router, the connection between the TV and the router may be unstable due to radio waves. If wireless Internet does not work on your Sony Bravia TV, then to eliminate any possible radio wave interference, you must:
- Turn off the power to other wireless devices.
- Connect the TV to the router using a wired LAN connection.
Doesn't turn on
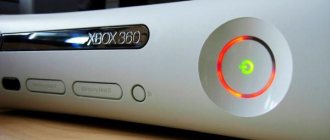
Unfortunately, the owner of any TV device at some point is faced with the question of why the TV does not turn on. There can be quite a lot of reasons for this. Some of them are determined by the characteristics of the light signal of the indicators burning on the front panel.
There are three such indicators:
- red;
- orange;
- green.
The first of them indicates a lack of power, while the second indicates that the timer is on. The third one informs you that the TV is on. But, as noted above, some features of their operation may indicate the type of failure that leads to the inoperability of the TV.
There are 3 alert indicators
So, if the light on the panel is blinking, then this is one of the main signs of problems: a blinking light, especially if the red indicator is blinking, indicates the presence of a software error. In some cases, the problem can be solved independently. For this:
- the TV is completely disconnected from the network, even the cable is disconnected;
- after a five-minute pause, turn it on again.
If the equipment still doesn’t work, then they turn to the experts. If the indicator flashes in series of 8 flashes, then the settings reset procedure is carried out.
A constantly flashing orange light is a clear sign of a software update in most cases. The latter can only begin if the smart TV is connected to the Internet. A loss of Internet connection sometimes causes the procedure to freeze, which can be corrected by disconnecting from the network.
If a consumer is faced with a non-working TV due to a software update, he should consider that:
- at this time the remote control does not work;
- the normal duration of the procedure is up to ten minutes, so patience is required;
- The TV cannot be disconnected from either the power supply or the Internet.
If the TV does not turn on at the end of the procedure, this is often a sign of incorrect installation of programs. Help from a professional is the best solution.
Sometimes the TV turns off spontaneously when the screen goes out after a couple of minutes of operation and, having gone out, does not want to turn on again. Most often, this problem is solved by resetting all settings to factory settings, since its cause is software conflicts.
No image
A fairly common problem with all smart TVs is the absence of an image on the TV screen. At the same time, we are not talking about the case when it does not turn on at all, but about the situation when there is sound but no image.
There are two possible reasons for such a breakdown:
- problems with the power supply;
- problems with the backlight inventory.
In the first case, the only solution is to replace the broken block. Secondly, there are two possible solutions. In the first case, the faulty LED is excluded from the circuit without replacement. In the second case, they change the LED strip.
Important! In some cases, more serious matrix malfunctions are possible. To identify them, you will need professional diagnostics, which on average costs about a thousand rubles.
No backlight
Among the breakdowns that Sony Bravia owners have to deal with, TV malfunctions related to backlighting are one of the most common. Its main symptom is a constantly flashing red light in the absence of an image. This means that, when turning on his device, the owner is faced with the fact that it responds inadequately to the remote control. Additionally, sometimes error message 13 appears.
There may be no backlight for a number of reasons
This breakdown can only be solved by replacing the light bulbs. The safest way to get new light bulbs is to contact a service center. Although, with proper skill, independent repairs are possible. The main problem that you will have to face in this case is the correct identification of the lamp that has broken. The fact is that the TV has protection that does not allow this to be done without special equipment.
First of all, they look for a way to bypass the protection. The easiest way to do this is to eliminate the sensor responsible for unbalancing the lamps. On the TV board it is marked as balancer_err. To make it stop working, the first pin of connector CN67 is disconnected from this connector, thus disconnecting the inverter from the power supply.
Disabling the protection sensor allows the TV device to turn on in normal mode. To accurately identify the problem lamp, turn on the green and white field signal. After that, replacing the light bulb itself is quite simple.
Identifying the causes of a network error
The cause of network error 1107, which indicates a loss of Internet connection, may be a malfunction of the TV itself or the servers. First, you should contact technical support and, having explained the situation in detail, wait for an official response. Perhaps the server is undergoing maintenance or repair work and you need to calmly wait a while to return to watching TV.
It is also advisable to contact the provider and find out if there are problems on their side. If everything is fine on the servers and the Internet service provider, then perhaps there is a malfunction in the gadget itself or the devices connected to it. We can take several steps to improve the operation of the Sony Bravia TV. You just need to follow all instructions carefully.
Error code 2200 may also occur in Sony Bravia.
Diagnostics
To find out the reasons why the Sony TV does not see wifi, you should run network diagnostics. To do this you need:
- Click on the network connections symbol at the bottom of the screen;
- Click on network diagnostics in the window that opens;
- Wait until the check is completed;
- In the network troubleshooting section, look for a message about an unsuccessful attempt to correct the error in an automatic form.
The reasons for the lack of automatic connection can be various factors. To solve the problem, you need:
- Try to temporarily disable the antivirus program (perhaps the reason is that it is not working correctly);
- Reboot the DNS client service along with shutting down the computer if the problem is a failure of the Windows client.
In cases where the above methods do not have a significant impact on the situation, you should try resetting the DNS cache by typing the Win+R key combination and entering “ipconfig/flushdns”.
Trying to fix error 1107 in Sony Bravia
First, let's try to check the functionality of the network connection, as Sony recommends on the official website. We perform diagnostics in the “Help” section by first pressing the Home button on the remote control.
Select “Internet Connectivity Symptoms” or “Network” -> “Configuring and diagnosing network connections” and diagnose network access.
The result can be either a “Failed” or “Everything OK” diagnosis. If there are problems with the Internet connection, then first we try to simply turn off the power to both the TV and the router. After a few minutes we check the functionality. If network error 1107 in Sony Bravia continues to appear and prevents you from connecting to the Internet, then you may need to do one or all of the following:
- Update TV software.
- Restore the TV to factory settings.
- Limit the number of gadgets connected to the router, as this can slow down the Internet.
Did these steps not help? We proceed as follows.
Changing channel settings
If we receive a response from Sony technical support or our provider about temporary problems, we try to get around them by introducing new parameters for the proxy. To do this, go into the settings of the Sony Bravia TV and look for the section that talks about proxies. Then we do this:
- Open any search engine (Google, Yandex) and type free proxy list.
- We monitor the first sites in the search results and find the latest proxy data posted.
- We use the latter as new network access points. Where you need to indicate your country, select the one where we are (!).
- Be sure to save all data and update it.
It may be that access to some applications will remain closed; in this case, you just need to wait for the servers to work properly or for the provider to restore the line.
IP blocking
Also, the cause of network error 1107 in Sony Bravia TV may be the activities of Roskomnadzor, which has caused a stir among users recently. If the IP address of the TV accidentally ends up in the lists of suspicious connections, then in this case nothing depends on our actions. All that remains is to wait until the IP is unblocked. Currently, active work is already underway to restore the normal operation of services that accidentally fell under the sanctions imposed against the Telegram messenger.
Changing the type of network access
What should we do if we find out that there are no problems on the servers or on the part of the provider? This means that the problem is in our TV or the devices connected to it. If we usually use a Sony Bravia connection to the network via Wi-Fi, then we change the output type to cable.
The reason is that some of the updates are not “friendly” with a wireless connection. After changing the connection to the cable, auto-downloading of new system files will begin. We are waiting for the process to complete and for correct installation, be sure to restart the Sony Bravia TV.
Source: lifehacki.ru
Error 1106 on Sony TV
To do this, we will use the Inventory developed by our German friends! Android TV App Launcher Builder This is an Internet application site in which we fill in the necessary fields and add resources. As a result, a ready-made application is compiled for us.
Link to the application itself: https://atvlauncher.trekgonewild.de/
Now there are a few explanations of what to enter and where: App Name (max 15 characters): ChromeATV (Here we need to enter the name of our application, 15 characters maximum in British)
App Package (eg com.Android.application): com.Android.chrome - (this is perhaps the most important point, here we write the name of the application package for which we need an icon in the launcher). How to find out the package name of the application suitable for you: In the smartphone market install the free application Package name Viewer - the application is completely simple and serves only to display the names of application packages. Install the application without an icon on the phone and look at the name of its package.
App Category: This parameter has 2 values: Applications and Games. Depending on the value, the application will fall into one or another Category Strip.
App Logo (PNG only): Here we have to select an icon for the application (it will be displayed in the settings, all applications tab). The icon can simply be found in Google Chrome or extracted from the APK using a regular archiver.
App Banner (PNG/JPEG, optional): - this item interests us more, because we don’t just want to display an icon in the menu, but make it attractive)) Google’s standard for a banner displayed in the AndroidTV launcher is a picture of 320x180 pixels without transparency. Here we are : we search on the web, draw, ask someone to draw a banner of suitable sizes. While searching for the Chrome icon, we came across a suitable picture: All that remains is to adjust the Banner to the size that suits us.
If all fields are filled in and all files are selected, click the Generate APK button
We wait a couple of seconds and we receive a ready-made APK program icon for our application, they will also show us how the banner will look:
Click the Download APK button and save the finished shortcut application for yourself on your PC.