One of the reasons for the increased popularity of the service called “Cable TV” is the lack of need to purchase expensive equipment. The process of providing it cannot be called simple, so the possibility of some difficulties cannot be ruled out. One of the most common is the problem of not receiving an IP address when connecting to Rostelecom television. The appearance of such a message indicates that there was a sudden failure during data transfer.
What is a DNS server
To understand the issue at hand, it is first of all worth explaining the concept of DNS servers and the principle of their operation. In simple terms, such servers act as a conductor between the user and the final resource. That is, the user’s request goes to the server not directly, but through DNS. And he, in turn, forwards it to the WEB server. The latter processes the request and sends a response to the user's computer.
Thus, a DNS server is a tool for remote access that allows you to effectively and efficiently redirect requests to the desired domains through your IP address. There are a huge number of such servers around the world. Each of them is responsible for a specific area and works with specific servers. Like any other technical tool, DNS does not always work correctly and errors can occur.
Appearance due to antivirus
Some modern antiviruses and built-in firewalls can block Internet access completely. Then error number 651 also occurs.
There is only one piece of advice here - temporarily disable computer protection and use third-party utilities to clean viruses.
All recommendations for restarting the computer and equipment can also be applied.
After cleaning from viruses, it is recommended to resume protection and allow network access to the Internet in the firewall settings.
If the problem is not solved, the problem is in the settings of the connection itself.
Reasons for the error
All problems that may arise when using a DNS server can be divided into two categories:
- On the server side;
- On the client side.
As you might guess, in the first option the failure occurred in the DNS server itself. In this case, the user cannot do anything other than start using a different DNS server. In the second option, the problem is stored on the user’s computer, router or other device. In both situations, there is no connection between the device and the server, which makes it impossible to use the Internet.
The problem may occur regardless of the type of connection: cable or wireless. The “DNS server is not responding” error itself may appear when running the standard Windows diagnostic tool. If this happens, it is recommended to proceed with the resolution methods described below.
Clearing cache
If the methods presented above did not help, then the problem lies deeper. In this case, when the DNS server does not respond, you can clear the network options cache. To do this you will need:
- Open command line. You can find it by pressing Win+R (enter cmd) or in the standard applications folder. Right-click on it and click on “Run as administrator”. The interface of operating systems is different, so the location of the command line in Windows 8 may differ.
- Enter the following queries one by one: ipconfig/flshdns, ipconfig/release, ipconfig/registerdns, ipconfig/renew. These commands clear the cache.
- Close a window. To restart a computer.
In the Windows 10 operating system, you can use the network settings reset function.
Reboot the router and PC
The first and easiest method is to reboot all systems. It is quite possible that the failure is a one-time failure and will be corrected when the equipment is restarted. It is recommended to restart both the computer itself (or the device through which you access the Internet) and the router.
Run diagnostics
The next step is to use an automatic diagnostic tool. Although rare, there are situations when the system itself identifies a problem (if it comes from the client) and solves it. Follow these steps:
- Find the Internet connection icon in the system tray in the lower right corner of your computer screen. It may look different depending on the type of connection (cable or wireless).
- Right-click on it and select “Diagnostics problems”. It's worth noting that the name of the feature may differ depending on the version of Windows.
- A special “Windows Network Diagnostics” window will open. It will immediately begin checking your connection and identifying problems. You will have to wait a few seconds or even minutes. After this, the system will display the problems found and options for solving them.
Client side problem
Before calling the Rostelecom office with complaints, you need to check for problems or breaks on your part. Here's what we recommend you do to identify the source of your internet outage:
- Unplug and unplug the cable from your computer or router.
- Check the cable for integrity; there may be a break or fracture somewhere.
- Restart your computer. Perhaps the reason is systemic, and restarting the system will help solve it.
- Try inserting the cable into a different network card on your computer or into a different computer.
- Reset the router configuration and enter all settings again.
Connecting another device
Try connecting using other devices. If the problem appears there, then the error is either related to the router itself (or as it is also called the router), or comes from the server side. This step will help you more accurately determine the method of eliminating it. In the case when you are using a router, and it is possible to connect the network directly to the computer without intermediate devices (directly), try this. If everything works, then the problem is in the router...
If it is provided by the provider, then it is worth contacting the provider for a replacement. Otherwise you will have to purchase a new model.
Check settings
It's time to make changes to the DNS server usage settings. If you access the Internet only through one computer, then it is better to change the settings on it. If you use several devices, you can refer to the router settings. First of all, let's look at the procedure for changing settings for one PC. It is recommended to adhere to the following algorithm:
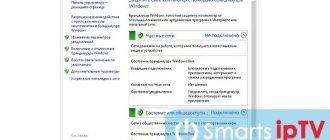
- Find the connection icon in the system tray again and right-click on it. Select "Open Network and Internet Settings."
- The next step is to go to “Adapter Settings”. If you use Windows 7 and earlier versions, this item will appear in step 1. If this is Windows 10, then you need to select the appropriate item in the window that opens.
- Now find your connection in the list that opens. This could be Ethernet or Wi-Fi. Click on it 2 times, then select “Properties”.
- In the list that opens, find the item “Internet Protocol Verion 4”, “IP version 4” or similar. Select it and click "Properties".
- Typically, the “Obtain DNS server address automatically” checkbox is selected here. If this is not the case, then check the box. At this stage it is worth trying several options. If automatic detection does not help, then manually enter the following options step by step and check the result: 8.8.8.8 and 8.8.4.4;
- 77.88.8.8 and 77.88.8.1;
- 48.194.36 and 213.158.0.6 - server from Rostelecom;
Clear DNS cache
It is quite possible that the problem is not in the DNS settings, but in the contamination of its cache. Luckily, cleaning it is quite easy if you follow the instructions. The method is suitable for any version of Windows. Follow the following algorithm:
- The first step is to open Command Line Interpreter. To do this, press the key combination “Win + R”. The standard “Run” utility will open. Enter the combination “cmd” in it and press Enter.
- In the window that opens, enter the following combinations step by step. After each of them you need to press Enter.
- After running all the commands, be sure to restart your computer and check the result.
Make sure the client's DNS service is working
Communication with the DNS client on computers occurs using a special standard Windows service. Sometimes problems arise with it. Therefore, it is recommended to check its functionality. To do this, follow these steps:
- Again you will need the Run utility. Press the key combination “Win + R” and enter the command “services.msc”, then press Enter.
- A window will open with all Windows services. Find the “DNS client” item in the list and double-click on it.
- In the “Startup type” item, the switch should be set to “Automatic”. If the “Run” button is not grayed out, click on it.
- Click on "Apply", close settings and restart your PC.
Check the drivers on the network card
It is possible that your network card is equipped with an old version of drivers, which does not allow it to function correctly. Although this problem is extremely rare, it is recommended not to rule it out. Do the following:
- Right-click the Start menu on your desktop and select Device Manager.
- Here you need to find your network card. It is located in the "Network Adapters" section. Find the desired item and click on it 2 times.
- The device details window will open. Go to the Driver tab. Here you can view its version, delete or update it.
Don't forget to restart your device after working with the drivers.
Check that your antivirus settings are correct
It is possible that the problem occurs due to incorrect antivirus settings. It is recommended to completely deactivate the program and check the ability to connect to the server in question after that. If everything works, then you need to change the antivirus settings. However, in each case they will be individual.
Blog about modems, routers and gpon ont terminals.
Subscribers of Rostelecom interactive digital television sometimes encounter a very peculiar error that can confuse an unprepared user. It lies in the fact that having turned on the STB set-top box at some point, he sees on the screen the inscription: “Error: No IP address” and the Reboot button. Rebooting the console does not lead to a positive result. What to do? Options for solving the problem directly depend on the cause of the error. Let's take a closer look at them.
1. The error appears due to problems with setting up the router.
The router port for a TV set-top box is usually configured so that it looks directly into the provider’s network, that is, the so-called transparent bridge. To configure a port for an STB set-top box, you need to find the IPTV section in the router’s web interface. As an illustrative example, consider the TP-Link router. In the Network section there is a separate IPTV subsection:
Now you need to select the port to which we will connect the set-top box. If you have 2 set-top boxes, then select 2 ports accordingly. Click the “Apply/Save” button.
Note: on different models of Wi-Fi routers, even from the same manufacturer, the web interface may not have such an item due to the lack of support for digital television, or because the port selection is added to some other section. For example, WAN.
Some router manufacturers have a special “IPTV Setup Wizard”, like on D-Link routers:
Here you just need to click on the desired port and click the “Change” button.
2. The cable from the TV set-top box is plugged into the wrong port of the WiFi router (modem or terminal). Often subscribers do not attach much importance to which port of the router the STB is connected to and, as a result, often confuse the LAN port and receive the “No IP address” error. When installing interactive television, the 1st or 4th ports are configured for the set-top box, but different Rostelecom branches may also use other ports. Therefore, you can either go to the router’s web interface and, in the port grouping section, see which port is in the IPTV group. If this option seems difficult to you, you can resort to a trick: turn on the set-top box in turn in each LAN port of the router (it’s better to start with the 4th) and reboot it. On the port that is configured for the STB set-top box, it will receive an address and load the interface.
3. Physical damage to the patch cord from the set-top box to the router. Carefully inspect the network cable from the set-top box to the router for possible damage - pinches, kinks. Carefully inspect the connectors - perhaps one of them was poorly crimped.
4. Problems on Rostelecom's side. Yes, this is not uncommon, unfortunately. There may be problems on the switch port to which you are connected, or further on the edge router, or the provider’s DHCP server may be malfunctioning. There is nothing you can do here and all you can do is call technical support. But if you checked the settings of your router before this, then talking with the operator’s employees will be much easier.
Thousands of Russian residents use interactive television from Rostelecom. And many have at least once encountered the problem that the message “IP address not received” appears on the TV screen. This message indicates an error and the inability to establish a connection to the provider's server. Such a problem can appear at any time, regardless of what equipment is used or how long it has been in operation. If the set-top box is rented, it is not recommended to interfere with its settings. But if the subscriber has purchased the equipment, he can try to solve the problem himself.
To troubleshoot the problem, you need to determine what caused the receiver to write about the absence of an IP address.
Contact Rostelecom technical support
If nothing described in the article helped, then it makes sense to contact specialists from Rostelecom technical support service. You can do this in several ways:
- Call 8 (800) 100 0 800 (free call throughout Russia);
- Use the feedback form on the official website at the link: https://rt.ru/;
- Visit your nearest sales office in person and receive professional assistance from a consultant.
In all cases, you will first be told to follow a few simple steps. If this does not help, then a date will be selected when a technician from the company can come and fix the problem.
Cable check
Often, users do not even suspect that the problem may be a torn or broken cable. Walk along the entire cable from the end point to the start point and carefully inspect the condition of the fiber.
If your cable is hidden under a plinth, cornice or other material, contact the operator by phone. The operator on duty will be able to remotely diagnose your connection and tell you whether the problem is with the cable.