Today, many organizations provide services for setting up digital TV. It’s not surprising, because few users know how to set up channels on a Philips TV. It's actually incredibly easy to do. There is absolutely no need to contact the service center.
It makes no sense to talk about CRT models released back in the 90s of the last century. Therefore, as an example, let's take TV from 2006 and younger. Smart TV-enabled devices have a special interface, so the channel setup process will be slightly different.
The specifics of broadcast settings also depend on the signal source. Digital TV can be connected without additional equipment. If the TV is equipped with a built-in T2 adapter. With satellite television the situation is somewhat different. These points also need to be taken into account.
The instructions for users of Philips TVs do not always spell out all the necessary actions. Therefore, an algorithm has been developed especially for you, taking into account possible errors and failures. Follow the instructions below.
Setting up digital television
Philips TV equipment differs from competitors' products not only in design, but also in the main menu (interface). Therefore, the algorithm for searching for digital channels will be slightly different when compared with devices from Samsung.
Setting up analog channels is more difficult than setting up digital channels. Follow professional advice.
Connect the TV to a power source (outlet). Turn on your device. On the remote control, press the “Home” button. On some models, this key has a house icon. The main menu will be displayed on the screen.
Open the tab called "Configuration". A list window will appear. Find the "Install" command. Click on this inscription, and then select “OK”.
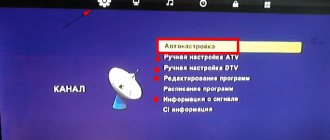
An additional menu will appear on the screen, in which you need to find the “Channel settings” subsection. Click OK. After this, a new tab will open in which you need to select the “Automatic installation” command. To start the process, click on the “Start” button.
In order for the TV to find all free TV channels and save them, you need to select the “Reinstall” command on the screen. Built-in automation will prompt you to select a state. You can choose any country, but only from Western Europe. Experts recommend choosing Finland or Germany. If only the Russian Federation is available, contact the service center to have specialists install the latest version.
Select the mode: search for analogue channels, cable TV or digital. We are interested in the last option. Select cable as the main signal source. Start automatic search by clicking on the "Start" button. Setup will take a few minutes. Wait for it to complete.
When TV channels from regular (free) multiplexes are found, click on the “Finish” button. There will definitely be no additional problems with finding TV channels. Follow the instructions provided.
There are often situations when, in the process of searching for digital TV channels, the TV asks for a password or PIN code - in this case, enter one of the following combinations: 0123, 1234. These are standard passwords that provide access to all functions.
If your TV model is not equipped with a T2 adapter, then be sure to turn on the tuner, and only then start searching for TV channels. Connect a receiver designed to search for digital channels to the TV. Connect the antenna cable to the tuner. The connection process will take several minutes.
No TV backlight
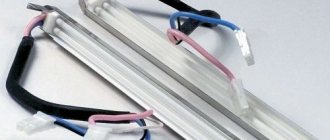
Turn on the TV and look closely at the screen. Is the image really missing completely? Or is it fuzzy and dark? If there is a picture, but the TV backlight does not work, this may indicate a fault with the power board or inverter. In rare cases, the LED backlight itself fails. It also happens that the backlight is absent only in a certain part of the screen, for example in the corners.
The inverter is part of the power chip on which a high voltage of about 1000 V is generated (without this, normal operation of the backlight is impossible). Therefore, carrying out independent repairs without the necessary knowledge and skills is extremely dangerous. If the LED backlight or inverter fails, the service may offer to replace it with an LED strip.
Source
Setting up satellite channels
To tune channels, you must first connect a special receiver and antenna to the TV. When all equipment is connected and working correctly, follow the step-by-step instructions:
- Turn it on the TV.
- Go to the “Settings” section.
- Select the "Satellite Installation" tab.
- “Search for satellite” and click on the “Start” button.
- Go to the Settings tab.
- Click on the "Satellite Installation" tab.
- Click on “Manual Installation”.
- Set the frequency (11766).
- Save the channels you find.
- Repeat the process, changing the frequency.
Finding channels doesn't take much time. Be sure to sort the channels on your Philips TV. There is no need to save absolutely all transmissions. It is better to tune only the most watched TV channels.
What to do if the reception quality is poor? Change the directivity vector of the satellite dish. Pay attention to how direction affects image quality. When the optimal position is found, fix the plate.
Setting up Smart TV channels
Modern Philips TVs support Smart TV. TV channels on such devices are configured a little differently. It is necessary to take into account all the features and subtleties of this process. The basic package includes a manual that describes in detail how to set up the TV.
If the instructions have been lost or there is no Russian version, then configure the channels according to the following principle:
- Open the main menu.
- Go to the "Installation" section.
- Activate the “Search for channels” command.
- Go to the next section and follow the prompts that pop up on the screen.
- The automation will ask you to select a country. Choose the one indicated on the back of the TV. If you have a model with the designation PFL, choose exclusively Sweden, since it is produced in this state.
- Go to the “Digital Mode” section, select a DVB-C cable from the list.
- The system will ask for permission to change some basic settings.
- When a new window appears, enter the transmission parameter in the “Network speed” column – 6.750.
What to do after this? Users are offered two modes for searching for television programs - full or quick scan.
A quick scan takes about 10 minutes in total. If you select the second option, the system will detect all available TV channels in about 30 minutes.
Quick scan:
- The frequency difference should be no more than 8 MHz;
- disable analogue channels if they have already been configured previously. Hover your cursor over the "Done" command to start the automatic search.
Full scan:
- select the “Manual tuning” option in the network frequency tab;
- set the frequency to 298 MHz;
- For the system to start the search, hover the cursor over the “OK” button.
If you followed the instructions and did not make mistakes, then in the end all TV channels available in your region will be found. Their number can vary from 20 to 32, depending on the city in which you live.
If you still cannot configure the channels, contact the service center for help. It is possible that the TV's T2 adapter is broken. Under no circumstances should you disassemble the device yourself.
Safety precautions...
Philips TVs
- Image
- Text
Safety precautions. . . . . . . . . . . . . . . . . . . . . . . . 2
Beginning of work . . . . . . . . . . . . . . . . . . . . . . . . . . . . . . 3
Using the remote control
control RC4401/01. . . . . . . . . . . . . . . . . . . 5
Using the Option button. . . . . . . . . . . . . . . . . . 7 Buttons on the right control panel
TV . . . . . . . . . . . . . . . . . . . . . . . . . . . . 7
Turning on the TV. . . . . . . . . . . . . . . . . . . . . . 8 Initial installation. . . . . . . . . . . . . . . . . . . 8Navigate through the menu. . . . . . . . . . . . . . . . . . . . . eleven
Using the TV setup menu. . . 12
Setting menu options
Image . . . . . . . . . . . . . . . . . . . . . . . . . . 14
Configure Sound menu options. . . . . . . 17 Using Ambilight. . . . . . . . 19Setting menu options
Possibilities . . . . . . . . . . . . . . . . . . . . . . . . . . 22
Search and save TV channels. . . . . . . . 25Rearrangement of channel numbering. . . . . . . . 27Selecting connection options. . . . . . . . . . . 28Manual network installation. . . . . . . . . . . . . . . . . . .29 Selecting the decoder program number. . . . . . . 29Resetting factory settings. . . . . . . . . . . . . . 30Software update
TV provision. . . . . . . . . . . . . . . . . . . . . . . thirty
Create a favorites list. . . . . . . . . . . . . . . . 31Media Browser. . . . . . . . . . . . . . . . . 32Teletext. . . . . . . . . . . . . . . . . . . . . . . . . . . . . . . . . . 35
Making video and audio connections. . . . . 37
Sidebar overview. . . . . . . . . . . . . . . . . . 38Rear panel overview. . . . . . . . . . . . . . . . . . . . 39
Connection:
VCR or device
DVD recordings. . . . . . . . . . . . . . . . . . . . . . . . . . . 40
two VCRs or
VCR and DVD recorder. . . . . . . . . . . . . . . . . . . . . . . . . . .41
satellite receiver. . . . . . . . . . . . . . . . . . 41DVD player, cable/
game console. . . . . . . . . . . . . . . . . . . . .42
DVD player or cable
prefixes . . . . . . . . . . . . . . . . . . . . . . . . . . . . 42
DVD player, satellite
receiver or cable box. . . . . .43
computer. . . . . . . . . . . . . . . . . . . . . . . . . . . . 44 home theater amplifiers. . . . . . . . 45
Selecting a connected device. . . . . . . . . . . 46Recording with a recorder
devices. . . . . . . . . . . . . . . . . . . . . . . . . . . . . 46
Buttons for audio control
and video devices. . . . . . . . . . . . . . . . . . . . 47
Troubleshooting. . . . . . . . . 48
Appendix 1. Setting up the remote control
remote control to work with Philips DVD or DVD/R. . . . . . . . 49
Appendix 2. Software update
software for Philips TVs using portable storage devices. . . . . . . . . . . . . . . .50
Appendix 3. Slideshow format with background
music for Philips TVs. . . . . . . . . . . . . . . . . . . . . . 53
Appendix 4. Philips TV - About work
digital cameras and USB devices. . 55
Appendix 5. About working with connected to
HDMI connector with external equipment. 56
Alphabetical index. . . . . . . . . . . . . . . . . . . . . 57Disposal. . . . . . . . . . . . . . . . . . . . . . . . . . . . . . . . 58 Product information . . . . . . . . . . . . . . . . . . . . . . . . 58
Content
RUS
1
If this manual does not contain the information you need and the Troubleshooting section does not solve your problem, you can contact your local customer care center or Philips service center by telephone. See attached prospectus for warranty information.
service all over the world. Attention. When contacting Philips Customer Care, please have the model and product number available on the back or bottom of your TV or on the packaging.
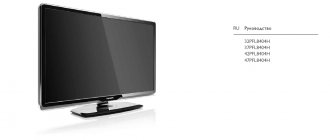
Model Number: 32PF9541/10 Product Number:
………………
About this user guide
This manual contains the information you need to initially install and operate your new TV. You can also use the hints that appear at the bottom of the TV screen.
How to set up Philips TV
Our technicians configure Philips TVs with all the necessary installations. Experienced specialists will set up television program channels and arrange them in a convenient sequence, configure the parameters for connecting the TV to the home computer network and access to the Internet, and optimize individual user settings. We know how to tune channels on a Philips TV! 8(926)-444-16-66 Call a technician in Moscow –> For your convenience, a consultation on setting up TVs has been organized.
Answers to questions on Philips TV
How to connect digital TV to Philips 37PF 9946/12
Can this model receive digital television through the receiver? The screen says NO SIGNAL. 02/10/2019, Voronezh.
This TV must be used in monitor mode, switching it to AV mode, and connect the signal from the receiver to the AV input. Program settings and channel switching are carried out not on the TV, but on the receiver.
Philips 50PUT6023/60 does not pick up digital channels
It picks up analogue channels, but it doesn’t work digitally. 12/19/2018, Satka, Chelyabinsk region.
You need to make sure that the DVB option is selected in the channel tuning mode. If everything is selected correctly, then there are no digital channels in your TV antenna cable.
Philips LC370WX1-Sl04 no switching
I have a Philips LC370WX1-Sl04 TV, I can’t switch from HDMI to antenna and the remote control doesn’t respond. But even without the remote control it doesn’t switch, the sound button works, but I can’t change the channel and I can’t go into the settings. 09/03/2018, Birobidzhan
The first step is to install new batteries and check that they are installed correctly. Check the functionality of the remote control using a phone camera. From a working remote control, go to the Menu and reset to factory settings.
Safety precautions, Safety precautions rus
Page 2
- Image
- Text
2
Safety precautions
RUS
Do not insert the plug into the electrical outlet or hang the TV on the wall until all connections have been completed.
• Install or hang the TV in
required location without interfering with the free circulation of air through the ventilation openings.
• TV cannot be placed in a limited area
space, for example, in a bookcase, etc.
• To avoid dangerous situations
Do not allow open flame sources (such as lighted candles) in the immediate vicinity of the TV.
• Avoid exposing the TV to sources
heat, direct sunlight, rain or water.
• Avoid contact with the TV
drops or splashes.
Do not touch, press, rub or hit the surface of the screen with hard objects as this may scratch or permanently damage the screen. Do not wipe the screen with a chemically treated cloth. Do not touch the screen with your hands or cloth containing oils (some cosmetics are harmful to the screen coating). Before cleaning the screen, unplug your TV. If the surface becomes dusty, gently wipe it with a dust-collecting cloth or other soft material, such as damp suede. Do not use acetone, toluene or alcohol as this may cause chemical damage. Do not use liquid cleaners or cleaning aerosols. If possible, remove droplets of saliva or water immediately. Long-term contact with them leads to deformation and discoloration of the screen.
A peculiarity of plasma panels is that long-term display of a still image leads to the appearance of afterimages on the screen. This is called phosphorus layer burnout. Normal use of such a TV involves displaying moving, changing images across the entire screen.
Examples of still images (this list is not complete, in some cases additions are possible): • TV and DVD menus: content lists
DVDs;
• Black bars: when appearing on the left and right
part of the screen with black bars, it is recommended to change the image format so that the image occupies the entire screen;
• TV channel logo: is a problem when
constant and bright display. Moving and low-contrast images are less likely to cause uneven screen aging;
• Vendor stickers: located in
bottom of the screen;
• Logos of paid channels and price lists: bright and
are displayed constantly or frequently in the same place on the screen. Examples of still images include logos, computer images, time displays, teletext and 4:3 images, still images or letters, etc.
• Philips Royal Electronics produces and
sells a variety of consumer products that, in general, like any electrical equipment, have the ability to emit and receive electromagnetic signals.
• One of the main principles of doing business
Philips is committed to taking all reasonable precautions to ensure the safety and health of users of its products, complying with all necessary legal requirements and operating accordingly. vii with EMF standards in force at the time of production of the product.
• Philips is committed to developing, manufacturing and
sell products that do not have harmful effects on healthy consumers.
• Philips confirms that its products, in the event
their correct use for their intended purpose, according to the scientific data available today, do not pose any danger during operation.
• Philips plays an active role in development
EMF standards and safety standards, allowing the company to anticipate further developments in the field of standardization for their rapid implementation in their products.
Advice
: Reduce contrast and brightness when viewing.
General
Static images on the TV screen
Screen care
Electric, magnetic and electromagnetic fields (EMF)
Pay special attention! The warranty does not cover damage caused by failure to take the above safety precautions regarding still images.
Installing batteries.
Your DirecTV 4 remote runs on 2 AA batteries (included with the remote).
Battery usage and safety:
- Use only new batteries of the correct size and recommended type.
- Do not mix old and new batteries, different types of batteries (standard, alkaline or rechargeable), or rechargeable batteries of different wattages.
- If you are not going to use the remote control for an extended period, remove the batteries. They can oxidize, which can damage electronic parts. WARNING: Dispose of used batteries properly. Do not burn or bury them.
Battery installation:
- Open the cover (located on the back of the remote control)
- Install AA batteries as directed on the bottom of the power supply container, observing + and - polarity.
- Close the lid. NOTE: When the DirecTV 4 remote stops working properly, remove the batteries for 10 minutes (to protect programming information)
Smartphones with universal remote control function
Modern smartphones are very multifunctional. In 2021, they are able to replace some of the usual equipment, without which we could not imagine our lives 10 years ago. For those who are tired of constantly buying batteries for the remote control, there is a “Virtual Remote Control”. It is compatible with all smartphones that have an infrared port. This is either custom software or installation software. Check your settings and find such an item there. If you haven’t found it, then go to the application store and download any one with a good rating. The principle of operation is approximately the same everywhere - select a category, trading model, and establish a connection.
Button labels.
PWR Turns the selected device on or off, or runs a macro that you have programmed for the Power button (see “Setting up a Power Macro”). TV POWER on off Turn the satellite Receiver and TV programmable to turn TV mode on or off. TV INPUT Switch TV Input to watch TV or video programs. Jump back, rewind, fast forward, skip forward, stop, pause or play tracks on the current disc. GUIDE Displays the software guide for the selected device. ACTIVE Access special features, settings, DIRECTV news and information. LIST Displays your TO DO program list (Not available on all DIRECTV Receivers). EXIT Exit the menu of the selected device, manual or program. Use the arrow keys to navigate through the software manual and OSD menu. Press SELECT to select options from the menu or manual of the selected device. BACK Returns to the previously shown screen. MENU Displays the menu for the selected device. INFO View current channel and program information. Press the YELLOW button to step through the available additional audio tracks. These colored buttons can give you more functionality. Refer to your DIRECTV Receiver's owner's manual. (Not available on all DIRECTV Receivers) Volume + – Increase or decrease volume. Mute Turns the sound off or on. CHAN + – Select the next or previous channel. Select next or previous chapter on some DVD players. PREV Returns to the last channel viewed. 1,2,3,4,5,6,7,8,9,0 Select channels directly (eg 09 or 31). DASH Changes between DIRECTV programming and cable channel programming. ENTER Send the input channel number on some TV models or make a selection from the device menu
Device programming
DirecTV 4 - The remote comes pre-programmed to control low latency DTV Models S001 - S004. For devices of other brands than default, follow these steps; otherwise, skip this section.
Before proceeding, find the codes for the devices you want to program in Factory Codes and write them down or highlight them. NOTE: To program TV/DVD, TV/Video/DVD, or TV/Video, use AV1 or AV2 mode.
1. Turn on your device (eg TV) and, if necessary, load media (eg DVD). 2. On the remote control, move the mode switch to the device you want to program (such as SAT, TV, AV1 or AV2). 3. Press and hold MUTE, then press SELECT (for 5 seconds until the LED blinks twice) and release both buttons. 4. Enter the device identification code according to the following table:
- Satellite receivers 0;
- TV 1;
- Video and DVD players 2;
- Audio amplifiers or audio amplifier/tuners 3.
5. Enter the first four-digit device code. The LED will blink once for each digit entered. If the code is correct, the LED will blink twice. NOTE: If the LED does not blink twice, repeat steps 2-5 and try entering the code again.
6. Point the remote control at the device and press Power (or PLAY if there is no Power button). The device should turn off. If it doesn't, repeat steps 2-6, trying each code for your brand until you find one that works. If you can't find a code that works, see Finding Your Code. 7. Repeat steps 1-6 for each device you want to control. For future reference, write down every working device code in a safe place.
Finding Your Code
If your device does not respond to the remote control after trying all the listed codes for your brand, or if your brand is not listed, try searching for your code. For example, to search for a code for your TV: 1. Slide the mode switch to the TV position. 2. Press and hold MUTE, then press SELECT (for 5 seconds until the LED blinks twice) and release both buttons. 3. Enter 9 9 1. The LED will blink twice. 4. Enter the device identification code according to the table in the “Device Programming” section. 5. Point the remote control at the TV and press Power. The remote will send an infrared code from its library to the selected device, starting with the most popular codes. If the TV responds, go to step 6. If the TV does not respond, press CH UP. The remote will try the following code. Continue until the TV starts to respond. NOTE: Press CH DOWN to try the previous code. 6. To lock in code, press SELECT once. The LED will blink twice. 7. To search for other device codes, repeat steps 1-6, replacing the appropriate mode (key) for the device.
How to find out the TV code
The first step is to find the pairing code. It is different for each company. You can find the Philips TV code for the universal remote control:
- in the instructions for the remote control itself;
- in the paper version of the manual;
- in the online manual on the manufacturer's website.
For the selection method, use the following values: 0021, 0061, 0151, 0291, 0301, 0331, 0391, 0661, 1021, 0931, 1391, 1401, 1571, 1081, 2511.
These combinations differ for each company and model, so you need to check with the official resources of the manufacturer.
Checking codes
If you have set up the remote use procedure in the Find Your Code section, you can find out which four-digit code works with your device.
For example, to find out what code is for your TV: 1. Slide the mode switch to TV 2. Press and hold MUTE, then press SELECT (for 5 seconds until the LED blinks twice) and release both buttons. 3. Enter 9 9 0. The LED will blink twice. 4. To view the code for the first digit, press 1. Count the number of times the LED blinks (for example, blink 3 times) and write down the number. NOTE: If the code digit is zero, the LED will not flash. 5. Repeat step 4 for the remaining three digits, using 2 for the second digit, 3 for the third digit, and 4 for the fourth digit. 6. To test for other device codes, repeat steps 1-5, replacing the appropriate mode (key) for each device you test.
Changing the volume lock
WARNING: Changing the volume lock settings may affect the performance of your TV cable/Satellite system. Please read these instructions completely before making any changes.
DirecTV 4 - The remote comes preset to allow independent volume control of each selected device (Master Volume Unlock). However, you can change the Volume Lock settings to Master Volume Lock so that the volume of one device controls the volume of all other modes. After this, perform Individual Volume Unlock on the selected device to set its volume for independent operation. NOTE: You cannot lock the volume in SAT mode, or in AV1/AV2 modes if these modes are set for the Satellite Receiver.
Volume Lock for One Mode (General Volume Lock) 1. Slide the mode switch to the position of the device you want to use to control the volume. 2. Press and hold MUTE, then press SELECT (for 5 seconds until the LED blinks twice) and release both buttons. 3. Enter 9 9 3 and then press SELECT. The LED will blink twice. Now, when you press VOL+, VOL-, or Mute, the selected device (for example, TV) will adjust the volume regardless of the current mode.
Page 23
Setting up locks and
You can display a clock on the TV screen. The clock displays the time transmitted by the television service operator. TV clock display 1. While watching TV
press the OPTIONS button. 2. Select [Clock], then press OK. The clock appears in the upper right corner of the TV screen. Changing the clock mode You can change the clock mode to automatic or manual. The default mode is Automatic, which automatically synchronizes the time with Coordinated Universal Time (UTC). If your TV cannot receive UTC signals,
2. Select [Setup] > [TV Settings] > [Preferences]. 3. Select [Clock] > [Automatic]. display temporary]. 4. Select [Auto] or [Manual], and then press OK.
Turning Daylight Saving Time On or Off You can turn Daylight Saving Time off or on, depending on your region. Before turning daylight saving time on or off, set the clock mode to
using [Auth. display Temp.] > [Manual]. 1. From the [Clock] menu, select [Daylight Saving Time]. 2. Select [Daylight Saving Time] or [Standard Time], then press the OK button. Daylight saving time will be turned on or off. Setting the clock manually You can now manually set the date and time. Before doing this, set the clock to
[Manual] mode. 1. From the [Clock] menu, select [Date] or [Time], then press OK. 2. Make a selection using the Navigation Button. 3. Select [Done], then press OK.
2. Select [Setup] > [TV Settings] > [Preferences] > [Sleep Timer]. 3. Press the Navigation Buttons to set the sleep timer. The sleep timer can be set for up to 180 minutes in ten minute intervals. To turn off the sleep timer,
Changing a Channel Lock
WARNING: Changing channel lock settings may affect the operation of your cable TV/Satellite system. Please read these instructions completely before making any changes.
DirecTV 4 - The remote comes preset allowing independent channel control of each selected device. However, you can change the Channel Lock settings so that the Satellite Receiver's channel keys (SAT mode only) will control channels in all other modes. NOTE: You can lock channels in AV1/AV2 modes if these modes are set for the Satellite Receiver.
Locking Channels 1. Slide the mode switch to the SAT position. 2. Press and hold MUTE, then press SELECT (for 5 seconds until the LED blinks twice) and release both buttons. 3. Enter 9 7 3 and then press CH UP. The LED will blink twice. Now when you press CH UP or CH DOWN, the Satellite Receiver will control channels regardless of the current mode.
Unlocking Channels 1. Slide the mode switch to the SAT position. 2. Press and hold MUTE, then press SELECT (for 5 seconds until the LED blinks twice) and release both buttons. 3. Enter 9 7 3 and then press CH DOWN. The LED will blink twice. Now when you press CH UP or CH DOWN, the Satellite Receiver will control channels regardless of the current mode.
Hiding TV Input
WARNING: Changing TV Input settings may affect the performance of your TV cable/Satellite system. Please read these instructions completely before making any changes.
You can turn off the TV Input selection. This can be useful if one device (such as SAT) provides incoming TV signals. NOTE: The TV Input key only works for a TV programmed in TV mode.
1. Slide the mode switch to the SAT position. 2. Press and hold MUTE, then press SELECT (for 5 seconds until the LED blinks twice) and release both buttons. 3. Enter 9 6 0. The LED will blink twice. Repeat these steps to turn TV Input back on.
PHILIPS
Entering the service menu:
1. quickly dial 062596i from the remote control (i-button “info”, )
2. A warning window appears in English.
Warning: access only for service center employees.
Unauthorized access may void your TV's warranty.
3. If you want to exit, just press Menu on the remote control.
If you want to enter, press the red button on the remote control.
• Helpful information
1. hours worked. SM—>Operation hours
2. matrix type. SM—>Options—>Display—>Screen
1. 062. LCD LPL WX5 SLB1 32″. LPL is a native Philips matrix. Most desirable option
PHILIPS 32PF9956/12(FTL3.1E)
If you try to adjust the volume, the message CENTER INPUT ACTIVE appears on the screen.
In the user menu, disable the “CENTER INPUT” function.
If not, then install a clean memory M24C32/64-WDW6 pos. 7F11
Entering the service menu:
# quickly dial from the remote control 062596i (i-button “info”, )
# A warning window appears in English.
Warning: Access only for service center employees.
Unauthorized access may void your TV's warranty.
# If you want to exit, just press Menu on the remote control. Exit Menu - press the red button on the remote control.
Helpful information
1. hours worked. SM—>Operation hours
2. matrix type. SM—>Options—>Display—>Screen
#062. LCD LPL WX5 SLB1 32″. LPL is a native Philips matrix. The most desirable option.
chassis 3A 17CE7630, 21CE7649/55/7590, 17CE7531/7650, 247771, 41CE8746.
percent MAB8461P
Press the (MONO) button on the TV keyboard. While holding it, turn on the TV with the remote control STAND-BY output
chassis A02.E 29PT8609/12
percent PNX3002E
Dial a combination of numbers from the remote control. (0) + (6) + (2) + (5) + (9) + (6) Next, press (MENU).
Exit - switch the TV to Standby mode.
chassis A8.0
Service default mode:
Close contacts 9040 and 9041, then to enter geometry (SAM mode), simultaneously press “VOL –“ and “VOL+“ on the TV panel.
STAND-BY output
chassis ANUBIS S ANUBIS S/DD
percent PCF84C844 PCA84C8844/133/107
Close contacts M31 and M32 (common wire) near the IC7710 chip. output POWER OFF
chassis AA5 17PT156B
percent TMP47C1637
Close pin S1 and place pin 7 of the processor on the ground) and then turn on the power button.
We got into SDM mode. Next, simultaneously press the (+) and (-) buttons on the TV. output POWER OFF
chassis CTV-530
percent Р83С055 (STV-530)
Close terminals 15 and 20 of the control processor. output (TV)
chassis D16-II 25DC2660, 28DC2070, 28DC2670
percent 80С31
Service default mode: Hold down the buttons on TV (VOL+) and (P+) and turn on the power switch.
Service Mode: Close control points M30 and M31 TV MODE output
chassis D2-MAC EUROCRYPT BBD-901
Login to the service: turn off the network, press and hold the (+) and (-) buttons on the front panel, turn on the network.
Memorizing any change is done via (OK). Output (STANBY)
chassis D2-MAC EUROCRYPT BDE-353
Login to the service: press the buttons on the remote control in the sequence: [P+] [P-] [CLOCK-BUTTON] [i-II].
Remembering any change is done via “OK”. Output (STANBY)
chassis E-6 28PT-4505
percent SAB-C502-2R20N
Turn on the TV in operating mode and dial on the remote control (TV) (i) (STOP) (TV) (i) (STOP) exit (STANBY)
chassis EM2E 32PW8506/58
press 062596 on the remote control and the (i) or MENU button.
chassis ES.1E 32PW8620/12
percent PNX3002E/N404
Press 062596 on the remote control and the (i) or MENU button. Exit the mode by switching to STANDBY mode.
chassis FL1.10 25PV7505 25SL550 33PT700A/712A
1. For SERVICE DEFAULT MODE – close points S24 S25 located on the SSP board. From the remote control, press (MENU) (Blue) (Red) (MENU+) (MENU OFF)
2. To activate SERVICE MODE, close control points S23 and S24 located on the SSP board STAND-BY output
chassis GR2.2
Proc. TMP47C1637
Close points M33 and M34 on the main board and press (install) from the remote control. output STAND-BY
chassis GR2.2AA 25RT400/42, 25RT410/42, 28RT400/42, 28RT450/42
Close points M33 and M34 on the main board and press the (INSTALL) button. STAND-BY output
chassis L01H.2E/AA 14HT3304/01, 21HT5404/01Z
processor TDA9552E remote control-PC2882
entering the service - 024995 MENU or 062596 + button (i), there is also a way to enter the service,
by shorting jumpers 9631 and 9641. then turn on the TV with the POWER button
removal code HOTEL-319753 and MUTE button
chassis L04E AA 29PT5460/01
percent TDA12020H1/N1D90
Dial a combination of numbers from the remote control. (0) + (6) + (2) + (5) + (9) + (6) Next, press (MENU) or (i+).
Exit - switch the TV to Standby mode.
chassis L6.1 21PT1342
percent TMP47C1637N,SAA5290
Method 1 is to close pins S1 and S2 on the processor (pin 14 of the IC7600 chip).
Method 2 - on the service remote control of the RC7150 model, press the DEFAULT or ALIGN button output STAND-BY
chassis L6. 1AA 14PT-1432/43, 14PT-1352/00/01/05/07/11/39, 14.20PT-1542/01/43, 14PT-1552/00/01/05/11, 20PT-1342/43 , 21PT-1532/58, 37TA-1232/03, 37TA-1432/03, 37TA-1462/18, 37TA-1473/18, 52TB-2452/19, M-2052/00/01, M-2152/00 /07/15, M-2182/00, M-M192/05
Method 1 is to close pins S1 and S2 on the processor (pin 14 of the IC7600 chip).
Method 2 - on the service remote control of the RC7150 model, press the DEFAULT or ALIGN button. Output POWER OFF
chassis L6.2 20PT1353
Proc. SAA5290ZP/039/040/055
Method 1 is to close pins S1 and S2 on the processor (pin 14 of the IC7600 chip).
Method 2 - on the service remote control of the RC7150 model, press the DEFAULT or ALIGN button. output STAND-BY
chassis L6.2 25PT4423
percent TDA9351
The standard remote control is turned off. into standby mode, then turn off the power, when the LED goes off, turn on the power button while simultaneously holding the text button on the remote control
chassis L6.2AA 25PT4103/60
percent SAA5290ZP/040
Close control points “0053” and “0054” near the processor. output (STANBY)
chassis L7,1A/AA 14PT18A/50B/67R/94R, 14PT132A/50B/50R/75R, 14PT133A/162R, 14PT-137A/162R,
14PT-138A/54R/58T/67R/71R/74R/75R/93S, 20PT-188A/50B/67R/73R, 20PT-120A/78R, 20PT-132A/75R, 20PT-137A/62R, 20PT-38A/ 50D/58R/58H/67R/71R/73R/74R/75R/94R/97R
Connect pins M24 and M25 on the printed circuit board (PCB). STAND-BY output
chassis L7.2A 21PT2622/69R
Briefly close service points M28 and M29 (ground) STAND-BY output
chassis L9.1E, L9.2A 14PT2665/00 21PT1354/58C 21PT1654/58 21PT3882/59R 25PT5307
Proc. SAA5542
Entering the service menu (SDM mode): (0) (6) (2) (5) (9) (6) (MENU);
then to enter geometry (SAM mode)
simultaneously press “VOL –“ and “PR –“ on the TV panel. Attention! do not enable the AS OFF function in SDM,
otherwise (possibly) your TV will stop working.
output (STANBY)
chassis MD1.1 E 25pt4301, 25PT4501/60
Processor TMP87CM36N-3270
1. Close control points S42 S43, the TV will enter SDM mode and the message -SER- 0 will appear
2. press MENU + P on the local keyboard simultaneously - the TV will enter SAM mode,
if there are no errors or malfunctions, there will be zeros in the top row. Changes are remembered automatically.
output - POWER OFF on the remote control.
chassis MD1.2 E 21PT440B, 21PT441B/02, 21PT442B, PT4403, 21PT4422, 24PW6302, 24PW6322, 25PT5403, 25PT45, 25PT4523, 25PT5302, 25PT5322, 25PT5403 , 52TA4311
To enter the service menu, close S42 S43 at SPP.
Service mode for adjustment.
Login: On the RC7150 service remote control, press the ALIGN button together with the MENU i (-) button.
Output POWER OFF
chassis MD2.11/12/13
The menu is entered via a special remote control RC7150.
chassis MD2.22 E 25PT8303
Simultaneously press (?) and (SLEEP) under the cover. Output POWER OFF
Chassis MG3.1E 28PW9525 28PW8806 28PT7306/58
Dial a combination of numbers from the remote control. Next, press (MENU) or (i+). Several code combination options are presented.
(0) + (6) + (2) + (5) + (9) + (6)
(0) + (3) + (6) + (2) + (5) + (9) + (6)
(0) + (4) + (6) + (2) + (5) + (9) + (6)
(0) + (7) + (6) + (2) + (5) + (9) + (6)
(0) + (8) + (6) + (2) + (5) + (9) + (6)
(0) + (3) + (6) + (5) + (9) + (6)
Chassis TE1.1E 14PT1347/01, 14PT1547/01, 20PT1547/01, 37TA1437/03, 37PTB1347/19.
To enter the service on the remote control, press sequentially the number buttons 062595 and the i + button
To navigate in the service menu, use the UP/DOWN cursor buttons.
To adjust parameters, use the LEFT/RIGHT cursor buttons.
In some cases, to switch functions in the service menu, use the Vol +/- and P +/- buttons.
Using the MENU or i+ buttons you can close the current menu (go to the previous level).
New settings are saved automatically.
To exit the service mode, switch the TV to standby mode with the remote control using the STBY button or turn it off with the network button.
21PV288/58С EPSILON
To enter the service mode, you must hold down the PLAY button on (TV) and press the (STOP) button on the remote control for about 5 seconds.
Exit - pressed on Standy (Remote control)
14PV100/01 14PV505/58
percent SAA5541PS/M5/0194 CZ7183 SW1PPV0*9
The service mode is entered from the standby mode.
You need to simultaneously press the (PLAY) key on the TV and the (STOP) key on the remote control for about 10 seconds.
28PT4456/00
percent SAA5564PS/M3/0/81
To enter the service, you need to close the contacts: (GND) and (SMD - service mode) and turn on the TV to the network after 5-15 seconds and open the contacts.
25PT4104/58
two service modes, the first SDM is connected to the chassis control points GND and SDM the second mode is SAM. dial on the remote control, without pauses,
062596 [+] - OSD power button