Coffee capsules Nescafe Dolce Gusto Cappuccino, 8 servings (16 capsules)
435 ₽ More details
Coffee capsule Nescafe Dolce Gusto Cafe O Le Coffee with milk, 3 packs of 16 capsules each
1305 ₽ More details
USB flash drives
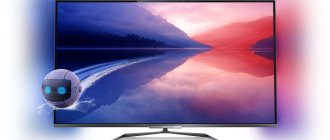
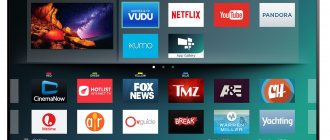
Modern television equipment undergoes incredible changes from year to year. It has become a reality to connect TVs to computers, cam modules, tuners, game consoles, wired and wireless Internet networks. The Philips company is not the least among the leaders in the production of electrical equipment and produces devices and many other useful and necessary equipment with a wide range of functionality. You can figure out the settings of your Philips TV on your own; the main thing is to follow the recommendations for adjusting this equipment.
Philips TV instructions. Download
It is very easy to download or download the manual to your computer. On our website you will very quickly find your TV model, and downloading will happen in one click. Instructions for use of the Philips TV are downloaded without registering or entering passwords; you can easily and quickly use the required manual on your PC.
We will tell you in more detail how to download the Philips TV instructions: enter a search query with your TV model, then on the page find a document in PDF format as “Philips TV instructions”. Click on this file, it will open in a new window, then save it to your computer, for example, as “Philips TV operating instructions” or “Philips TV operating manual”.
If you don’t know how to set up channels correctly, find the manual “Philips TV user manual on how to set up channels” or “Philips TV setup instructions” on the website. We have a large collection of manuals for this technology, use it wisely - and your TV will work properly for many years.
welcome Register your product and get support at RU Guide…
Philips TVs
- Image
- Text
- Content
www.philips.com/welcome
Register your product and get support at
RU
Management
32PFL8404H 37PFL8404H 42PFL8404H 47PFL8404H
- 1 Getting started 1.1 Important information 1.1.1 Watching HD programs
- 1.1.2 Security
- 1.1.3 TV placement
- 1.1.4 Viewing distance
- 1.1.5 Security lock slot
- 1.1.6 Screen care
- 1.1.7 Disposal
- 1.2.1 Switching on
- 1.3.1 VESA information
- 1.4.1 Full HD LCD display
- 1.5.1 Screen
- 2.1 Remote control 2.1.1 Overview
- 2.2.1 Channel overview
- 2.3.1 Switching channels
- 2.4.1 Enable Ambilight function
- 3.1 Teletext 3.1.1 Selecting a page
- 3.3.1 Power on
- 3.4.1 Sleep timer
- 3.5.1 Subtitles
- 3.6.1 USB overview
- 3.7.1 For people with hearing loss
- 4.1 Picture, sound, Ambilight 4.1.1 Presets
- 4.2.1 Changing display order and renaming
- 4.3.1 Benefits
- 4.4.1 From the Internet
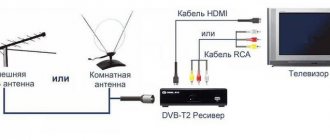
- 5.1 Initial connections 5.1.1 Power cable
- 5.2.1 Cable quality
- 5.3.1 DVD player
- 5.4.1 Gaming devices
- 5.5.1 EasyLink function
- 5.7.1 Wired connection
- 6.1 Contact information
- 7.1 Food and intake
How to set up a Philips TV for cable TV
To set up cable TV programs on Philips television equipment, you must proceed in the following sequence:
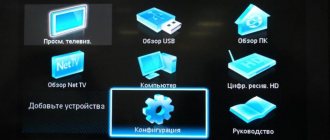
- On the remote control, press the Home key and go to the Menu.
- Find the Configuration section.
- Select Settings and then Channel Setup.
- Set Automatic mode.
- Launch Press.
- Carry out Reinstallation indicating the name of the country. Usually this is Finland or Norway. This choice is necessary to activate cable television (in the Russian Federation such activation is officially impossible).
- Then you should specify Cable, Settings and set the transmission speed to manual mode and the indicator 7000.
- Perform a Quick or Full Scan. Analog channels must be turned on, otherwise the setup will only be for digital channels.
- When the search is complete, click Finish.
Now you can watch TV shows on cable TV.
To digital broadcasting
This type of signal transmission has huge advantages over the analog method. Firstly, the image quality increases significantly. Secondly, it is now possible to broadcast a picture of the highest resolution and thirdly, there is no interference. The network is able to withstand wet weather, strong gusts of wind, snow accumulation and icing. All these advantages can only be experienced if you have a modern TV, such as the Philips LCD. How to set up a Philips TV to receive digital television channels?
In order to set up broadcasting, you need to press the Home button to enter the TV Menu. Next, perform the following steps:
- In the Configuration section you find Installation and Configuration of channels. Once in this service, you can configure digital and analog channels.
- Depending on the user's wishes, the following actions are performed:
- reinstallation - consists of completely deleting already installed channels and scanning again, with digital and then analogue channels in the first row;
- update - channels are configured on top of the old ones, but without deleting, but with the addition of new ones. The found channels will be placed at the end of the line.
- A country is selected from the list with the presence of official cable TV, the Cable item is set, and the search parameters are specified.
- The search starts.
Tricolor
Philips TVs do not have the ability to tune Tricolor TV automatically. Fine tuning can only be done manually.
Advice. Before you start searching for channels, it is best to start scanning the Tricolor satellite. If it is detected by the antenna, the channel should not be saved.
- Before starting the auto search, you need to set the language and location.
- In the window that appears, indicate Installing a satellite channel.
- In models that have two built-in tuners, you need to select one tuner in the Menu and enable search.
- Next we move on to manual settings. As a result, a scale of the incoming signal should appear on the screen.
- Click Install.
- Russia NTV+ channel is selected
- Start a quick search.
- When finished, click Stop.
Not every model has automatic search
Automatic search does not work on all Philips TV models, which significantly increases scanning time. Manual setup of Tricolor TV looks like this:
- Using the remote control, the Settings window opens.
- Specify Satellite Installation and select the Manual option.
- It is necessary to mark the satellite Eutelsat W4 36E, set the circular left polarization and automatic speed.
- A search for a satellite is started in each individual frequency.
- The found channels are saved.
Automatic setup
The easiest way to debug channels.
- On the remote control you need to find the Home button. By clicking on it, go to the Configurations section and select Channel Search.
- Check Reinstallation and write the country in the window that appears. It is necessary to indicate the name of the country in which cable TV officially operates (Finland, Germany, France). According to the official version, there is no cable television in the CIS countries.
- Switch to DVB-C Cable TV.
- The next step is to start scanning. To do this, click the Settings tab on the screen.
- You will be prompted to select the search type (auto or manual). Automatic is selected.
- In order for scanning to detect not only digital, but also analogue channels, you should check On in the Analog menu.
- After confirming all settings, press ready and after 10 minutes everything will be finished.
How to set up your Philips TV
If you take models of two different generations, they may differ in interface, but the principle of adjustment will remain the same. A special feature of the setup is the appearance of pop-up requests on the screen asking you to enter a specific password for further actions. These are standard requirements and the combination of numbers in this case consists of 0000, 1111, 1234.
Follow the steps in the instructions to set up Philips TVs
To set up modern Philips TV equipment, you need to perform a quick or full scan. In the first case, the frequency difference is set, the analog signal is turned off (if previously configured) and Search is activated. In the case of a full scan, the Manual mode is set, the frequency is indicated at 298 and QAM at 256, the analog signal is turned on or off, if already configured, the Search begins. If configured correctly, free channels broadcast in the region should appear on the screen.
Models released before 2011 have their own nuances related not only to appearance, but also to the presence of an interface. The algorithm for tuning satellite channels on a TV is as follows:
- start automatic mode;
- After completing the procedure, you should confirm the search result.
That's all - nothing complicated!
In this video you will learn more about setting up channels:
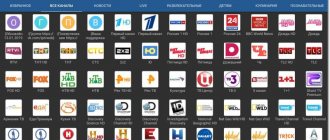
Channels
How to set up channels is described in detail in the user manual included in the package. If the TV was purchased for some reason without it, then the setup manual can be found on the Internet on the official website of the equipment manufacturer. A Philips remote control is required for an effective search.
- Through the Menu on the remote control, enter the list and select Configuration.
- You must select the Installation item.
- Enable Search in Automatic Installation.
- Next, you need to proceed with Reinstalling channels indicating the country with digital broadcasting.
- In the Cable section you can set the transmission speed, as well as the type of scanning (fast or full).
- Turn on analogue channels for searching and Start starts.
- When finished, you need to exit the settings by clicking on Finish.
Language
Select Menu on the TV remote control. If the TV equipment is completely new and has not been turned on (it does not have stored channel data), a Menu similar to Installation will be displayed on the TV screen. You should be prompted to enter your language automatically. Select the desired language from the list and confirm with the OK button on the remote control.
Next, you need to indicate the country in which the equipment is located. From the proposed list, by moving the cursor, select the name of the country.
Sound
To debug the sound quality on a Philips TV, you should follow several steps:
- In the Menu you need to find the house icon and the inscription Sound or Sound. We navigate through the Settings window using the remote control, moving the cursor up and down, right and left.
- If the sound is not entirely clear, you can manually adjust the bass and treble.
- If there is no sound from the TV speakers, pay attention to the EasyLink tab in the Speakers section. It needs to be activated.
- You can change the sound parameters by adjusting the volume level and stereo sound balance. There is also a surround sound feature.
Setting up the sound on a TV like this is not difficult.