Lumax has been operating in our market for more than 15 years. During this time, the company actively began producing various kinds of digital set-top boxes and even became an official supplier to RTRS. According to our modest statistics, Lumax receivers are among the TOP 3 most popular among users.
Instructions for all Lumax consoles
Considering that more than 10 million set-top boxes have already been sold in our country in 2021, there are no fewer questions. Particularly pressing are the topics of correctly connecting one or another model of DVB receiver to a TV and the subsequent search for all possible digital channels. Today we will study this issue using a personal example and try to give instructions that apply to all models of Lumax set-top boxes.
Characteristics of all Lumax digital set-top boxes
All devices of Lumax set-top boxes are equipped almost identically. Their peculiarity is that even the very first models are equipped with the ability to access the Internet via a WiFi signal. This is especially convenient, for example, during the process of flashing equipment and installing new software.
| Model | DVB-T and DVB-T2 support | Connectors | WiFi | Display | AVI, MPEG, MKV, DivX, MP4, JPEG, MP3, WAV |
| DV1108HD | + | HDMI and RSA | + | + | + |
| DV1110HD | + | HDMI | + | — | + |
| DV1111HD | +DVB-C | HDMI | + | — | + |
| DV2104HD | +DVB-C | HDMI and RSA | + | + | + |
| DV2105HD | +DVB-C | HDMI and RSA | + | + | + |
| DV2108HD | +DVB-C | HDMI and RSA | + | + | + |
| DV2114HD | +DVB-C | HDMI and RSA | + | + | + |
| DV2115HD | +DVB-C | HDMI and RSA | + | + | + |
| DV2118HD | +DVB-C | HD OUT and RSA | + | — | + |
| DV2120HD | +DVB-C | HDMI and RSA | + | + | + |
| DV3201HD | +DVB-C | HDMI and RSA | + | + | + |
| DV3205HD | +DVB-C | HDMI and RSA | + | + | + |
| DV3206HD | +DVB-C | HDMI and RSA | + | + | + |
| DV3208HD | +DVB-C | HDMI and RSA | + | + | + |
| DV3211HD | +DVB-C | HDMI and RSA | + | + | + |
| DV3215HD | +DVB-C | HDMI and RSA | + | + | + |
| DV4201HD | +DVB-C | HDMI and RSA | + | + | + |
| DV4205HD | +DVB-C | HDMI and RSA | + | + | + |
| DV1103HD | +DVB-C | HDMI and RSA | + | + | + |
| DV1105HD | +DVB-C | HDMI and RSA | + | + | + |
*In the table, “+ DVB-C” indicates the device’s ability to work with DVB-T, DVB-T2 and DVB-C.
Connecting a digital set-top box Lumax
The procedure and nature of connecting the set-top box depends on the TV itself. Depending on the conditions, up to 3 connection methods can be selected. We will tell you about them.
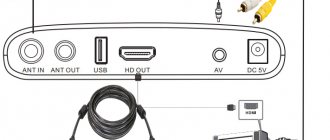
Front panel of the Lumax set-top box with display
For example, let's take the 2 most popular models of Lumax digital set-top boxes - DV1108HD and DV2105HD . If you have a different tuner model, don't worry. The connection procedure is the same for everyone.
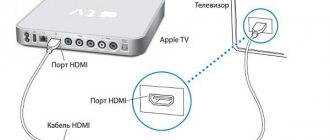
First, let's look at the back panel of the presented console.
The back panel of the Lumax console
- Instructions for connecting and setting up DVB-T receivers Orbit
There are several options here:
- Ant IN. Output for connecting an antenna to the receiver.
- Loop Out. Needed to connect two receivers and receive a digital signal from one antenna.
- HDTV. One of the HDMI output connectors, through which you can additionally connect not only a TV, but also a computer monitor.
- CVBS, R and L. Corresponding RSA outputs. Yellow is responsible for displaying the picture (Video), and the other two are for the right (R) and left (L) speakers of the TV.
Important! In the absence of grounding on external antennas, Lumax does not guarantee the safety of using the set-top box during a thunderstorm. Therefore, upon the onset of such weather conditions, it is better to unplug the antenna cable
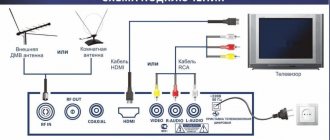
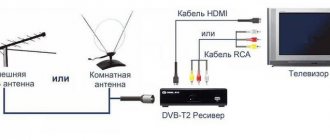
HDMI connection
The most beneficial, in terms of quality characteristics, will be to connect the TV to a digital set-top box via an HDMI connector. Its presence must be checked first. The corresponding cable is usually not included with the device. Its cost is around 500 rubles.
Examples of inputs on a TV
It's better not to skimp when buying. In various stores you can find prices starting from 100 rubles, but the better quality the cable, the longer it will last you
When connecting, HDMI is first installed, then you can insert the antenna and turn on the set-top box to the network.
Connection using RSA or SCART-RSA
Often RSA cables are included in digital set-top boxes. They are also usually called “Tulips”. They are made in different colors and are connected via appropriate connectors.
- How to connect a set-top box to a monoblock
On some older TVs you can still find a SCART input. In this case, the only option to connect the set-top box is to use a special adapter that converts the signal from RSA to SCART. You can find one of these in any hardware store. It's inexpensive.
Video" instructions for double biquadrat
Instructions for making a “double” Bi-Quad (double eight) W-LAN antenna - 2.4 Ghz antennas for wi-fi.
“Double Eight” is a continuation of Bi-Quad, the gain of which is 2 dB higher, i.e. is approximately 12 dB
During construction, pay attention to the fact that the copper wires do not touch at the intersection points. After construction, it is advisable to varnish the “double eight” to avoid oxidation/corrosion
The two photographs below demonstrate how important it is to maintain a distance of 15 mm between the reflector and the copper wire:
The stand is in place, the distance is maintained.
The racks were removed, the distance between the elements (reflector - wire) was reduced.
Side view. It can be seen that the wires do not touch where they cross.
In general, it looks noble. Holes in the reflector for mounting.
In order to avoid questions (there were in the first post), let's consider building an antenna with a circular diagram, in this case something around 270°.
First, from a copper plate (or other sheet metal/material), you need to bend a pipe with a diameter of 70 mm and a height of approx. 100 mm. Then bend a straight 6-element Quad from copper wire and, using, for example, a bottle, give it the appropriate, curved shape
I repeat for those who are not reading very carefully: the distance from the copper wire to the reflector in a circle should be 15 mm! It is important that the crossing wires do not touch each other!
Of course, this is not the only correct option for building such an antenna. The antenna with a pie chart can be made larger,
for example, specifically calculate it for the device to which it will be connected. The number of squares for this case is calculated separately.
In this case, signal loss in the antenna cable will be minimized.
General view without cover.
And of course, about the main thing, about the size of the frame: those who have a printer can download a document that needs to be printed and the frame can be bent exactly according to the printed one: https://raffi.uddu.de/wlan/6erquad/6erQuad.doc Ideally it should look a little different, something like this:
but this is not so important, the main thing is that you can repeat the dimensions using printing. For those bending the “double eight” - the outer squares are not used
Those who do not have a printer can use the following drawing to make a frame: the dimensions are for a wire with a diameter of 2.5 mm
Setting up and searching for channels on the Lumax digital set-top box
Regardless of which connection method was chosen. The test of operation will be the first launch of the console. In order to do it correctly, you need to select the appropriate mode for displaying the device on the TV.
From the list, select the mode in which you connected the set-top box
In this case, we will choose from 3 options:
- If the connection was made using an HDMI cable, then in the settings you should switch to HDTV or HDMI mode (whichever it will be), depending on the TV model.
- If using RSA, then you should find the AV (Audio Video) icon.
- When using SCART, the corresponding message will be shown.
You should look for this setting in the TV menu. Usually it is in the image parameters.
In some cases, you can see 2 or 3 connectors of the same format. For example, HDMI 1 and 2. In this case, choose the one that carries the signal from the cable. You can view it on the back cover of the device
- Once the required display channel is selected. You should turn on the Lumax set-top box from the remote control.
- When you log in for the first time, the main menu window will open. It is necessary to specify the language settings. If your digital antenna has a signal amplifier, then in the “Power” column you need to set it to ON.
- After that, click search channels.
The device will independently select a convenient signal frequency at which the strongest digital reception strength is observed. Upon completion, the list will be saved and you will be able to watch your favorite shows.
Advantages
- Nice design.
- By changing the firmware adapted specifically for IPTV, you can get many additional channels.
- You can download playlists from Lumax Cinema. Especially relevant for those who love Soviet cinema.
- Easy to manage.
- Stable signal reception - at least 18 TV channels and 3 radios.
- In the menu you can change the settings to your taste.
- You can watch the program guide on the screen.
- The sound quality is better than the sound from just a TV not connected to a tuner.
- Convenient remote control.
- Doesn't get very hot.
- The price-quality ratio is normal. As a regular TV set-top box it works acceptably.
- High sensitivity of the device to signals from the remote control.
- Good sensitivity from the antenna.
Search by frequency in manual mode
If the automatic search finds too few broadcast TV channels or their quality of display does not suit you, you can try to independently select the required reception frequency from the TV tower and find the corresponding channels on it.
- How to connect digital television without a set-top box: 4 options
To control menu items, you need to use Vol +/- on the remote control of the set-top box and the OK button to select the parameter
The sequence of searching channels in manual mode is as follows:
- First you need to find out the frequency of digital signal transmission from your nearest television tower. This can be done using the CETV interactive map.
- Then you need to press “Menu” on the remote control. In it, select the channel search section.
- We proceed to a manual search and set the channel number that was taken earlier for your area, according to the previously specified map. We wait a few seconds and look at the signal level, it should change. Click OK.
The device will search for the reception frequency you set and find all available programs on it. This must be done for DVB-T and DVB-T2 parameters.
Connecting the Lumax set-top box to WiFi
All modern Lumax models are equipped with Internet access. First of all, this is necessary for timely updating of company devices and installation of fresh firmware with a new software version. However, Lumax also has additional options that movie buffs will enjoy. We'll talk about them a little later.
In order for the set-top box to freely access the Internet, it must have an appropriate wifi receiver antenna. These transmitters are not included with the device and must be purchased additionally. In stores they cost between 500-700 rubles. And outwardly they look like ordinary flash drives connected via USB.
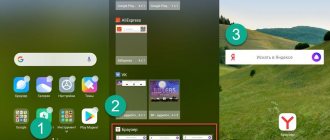
Method 1 - Using the WiFi button on the laptop body
Most often, the wireless network hardware module is turned on using a key combination, but on some models there may be a special toggle switch, slider or key on the case designed for this purpose. They can be located in front of the laptop or at the end. Before you turn on Wi-Fi on a laptop with Windows 7, inspect your model for the presence of these special buttons.
They can also be located near the Esc key in the left corner, or in the right corner above the keyboard.
For example, when such a toggle switch is activated on Asus laptops, a light begins to glow.
Lunax cinemas
It is no coincidence that the company’s devices have become so popular. For all owners of equipment, Lumax gives the opportunity to additionally download some Russian and foreign films and cartoons completely free of charge. The list includes more than 500 options that you can download to your receiver and watch on your TV, with the ability to rewind and stop the broadcast.
To receive a particular film, you must:
- Buy the corresponding branded WiFi adapter for the set-top box – LUMAX DV0002HD. It costs 550 rubles.
- Go to the menu and select “Network and Applications”. Click OK and select “FTP download”
- After that, press the blue button on the remote control.
- The update will begin downloading; its duration depends on the Internet speed. When finished, click OK and confirm the installation.
- Subsequently, in the menu itself, you can go to the “network and applications” section and select the movie you need from the general catalog.
Thus, in addition to 20 free channels, with the purchase of a set-top box you can also watch some premieres for free.
Troubleshooting
Instructions for the remote control from Lumax
When operating the equipment, various situations may arise that will partially or completely limit the full operation of Lumax devices. In this case, we will provide the most effective solutions, based on popular errors:
The set-top box is not visible on the TV/the image disappears
- If the image periodically disappears, then in most cases this indicates a malfunction of some cable.
- If there is a complete absence of a picture, you must also make sure that the device display mode is selected correctly. We wrote about this earlier.
Finds few channels/does not find them at all
- Check the antenna. To do this, it is best to connect another set-top box to it and see the signal reception level.
- Make sure to select the correct frequency when manually searching.
Long download of updates
The download speed of the set-top box updates depends on the Internet speed in your home. The higher it is, the faster the module will be able to order the necessary files via Wi Fi.
The device randomly turns off and reboots
You need to reset it to factory settings and search for channels again. The reason may also be an outdated software version.
Reviews about Lumax set-top box
Currently, the company's products are popular among users. Firstly, everyone appreciates the ease of installation of these devices and their overall reliability. On average, one such set-top box can work for more than 5 years, while some devices from other companies burn out after six months of use.
In addition, when purchasing, you have the option of an additional cinema hall, which contains only the most popular films. There are also about 100 Soviet cartoons, which your children will appreciate with a bang.
If we talk about the average rating on the Internet, then the company’s products can be safely given 4.5 on a 5-point scale.
The question arises: how to connect and configure the Lumax set-top box to the TV? Every user has encountered the problem of connecting a digital tuner to a TV. The Lumex company is a well-known representative of set-top boxes for digital television. Thanks to modern technologies, the device supports Wi-FI. This allows you to freely access the Internet and watch any movie or TV series on the big screen. The receiver plays a lot of popular channels. It connects to any TV model. In addition, it has powerful functionality. The price of the set-top box is affordable for everyone. Having problems with your tuner settings? Use the tips below.
Media players
Media players... Or whatever they are called - just a media set-top box, an Android set-top box, a media center, a media server, etc. Its essence is a device, now usually based on Android, which displays an image on the screen and allows you to do everything that Android can do - connect to the Internet, play games, watch photos and videos, even those formats that the TV does not support .
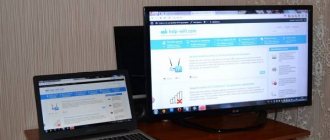
Those. By purchasing such an inexpensive media player, we could expand the functionality of even the most antediluvian tube TV to a modern level. For example, this is how to use a TV as a monitor for a computer, i.e. leave the functions of image output exclusively on it, and transfer all the brains to a digital set-top box. And now the developers have found another segment...
Lumax Electronics: how to connect to a TV and set up channels
Lumax Electronics is a supplier of digital television for Russian users. The company offers several package options. They are divided into two categories. The first is entertaining in nature, and the second is informational. The sections include several dozen top TV channels. Main receiver models:
- dv1120hd;
- dv4205hd;
- dv2108hd;
- dv2120hd;
- dv3206hd;
- 41103hd;
- dv1110hd;
- dv2107hd;
- dv1108hd;
- dv2115hd;
- dv2118hd;
- dv1120hd;
- dv3210hd.
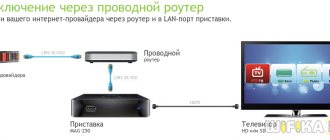
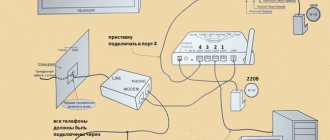
Connecting to a TV is quite simple. To do this, follow these steps:
- connect the TV to the receiver using a cable;
- use the wires that come in the kit or buy a separate one;
- Now plug in the plug and activate the modem.
Now let's move on to setting up channels. Use short instructions for quick activation:
- take the remote control and press the “Menu” button;
- in the window that opens, find the item “Search and edit channels” and move on;
- start the search by clicking on the appropriate button;
- manually enter the required parameters, search type and mode - automatic and network;
- wait for the “Search complete” message to appear, which indicates the end of the operation;
- exit menus and settings completely;
- channels are synchronized.
Why does the LG TV not find terrestrial digital channels: reasons, what to do?
Connecting the device
How to connect Lumax Electronics? First, let's look at the main connectors on the playing equipment. It is recommended to activate the receiver via the HDMI input. So, get high-quality access to digital TV. However, not every old TV has this option. In such a case, use the HR port. Typically, the required wires are provided in the receiver kit. In case of breakdown, it is easy to buy a new cable at any hardware store. The devices work together, so make the connection. After connecting, proceed to further settings.
Initial settings
Now set the desired parameters. What should be done? To get started, use the global search system. If there is a failure, auto-enable settings may not work. Then you will have to find TV channels manually. Use the adapter remote control and click on the “Menu” button. Set the frequency of the desired channel and wait for it to start. If the operation is successful, the system will resume the search.
Basic Operations
The remote control will help you reproduce any actions on the TV. Remember some combinations to quickly activate any option. For example, the “Menu” button will allow you to go to the settings settings. The “Right”, “Left”, “Up”, “Down” keys allow you to select the desired parameters. Scroll through channels in different directions or change the volume. The user can record the screen, set the viewing to “Stop”, show channel information and turn on subtitles. Please read the instructions carefully before using the device.
Program Manager
The “Program Manager” section will open to the user such folders as “Editing”, “Electronic Program Guide”, and “Sorting”. These options help you arrange TV channels in different variations, rename them or delete them, and create favorite lists. Follow the sequence of button presses to get the desired result.
Image Settings
To adjust the aspect ratio, set screen resolutions, the correct format, video output and the actual picture, use this option. Use default modes. You can also set certain parameters.
How to call a volunteer to set up digital television - free
Search channels
Any tuner model is capable of finding a specific TV channel from the list of channels available for the package. To do this, the user selects the desired method:
- find the inclusion using the “Autosearch” system;
- try to find it manually;
- via antenna;
- by selecting the country.
The company's clients will be able to create a personal list with their favorite programs.
Setting the time
Using this option, you can set the correct time, select the time zone and region of the country. In addition, there is a sleep timer. If you don’t want to turn off the TV before going to bed, use the function that automatically turns off the device after 15, 20, 30, 40 minutes. Next, the equipment goes into sleep mode.
Setting options
The Lumax console can be configured through the options menu. Here are the characteristics:
If you have any questions or complaints, please let us know
- language of presentation;
- subtitle language;
- TV sound;
- special sound to support HDMI mode;
- transparency of windows.
These options are available on any router and are activated by pressing a button. Among the available languages, Russian, English, French, and German are most often used.
System Settings
System settings include parental controls, remembering login passwords, various factory settings, system updates, and network settings. It's quite easy to understand here. Open the menu item and find the desired line. Next, choose the steps you need.
Possible problems and their solutions
The main malfunction is due to a malfunction of the adapter or connecting wires. We recommend checking the condition of the device yourself. Perhaps the plug has come off a little or is broken. Can't solve the problem? Contact the service center. You can also take advantage of the warranty and return the adapter to the store. Don't forget to take the Documents and purchase receipt with you.
Wi-Fi module for TV LUMAX DV0002HD is an ultra-modern device of compact size. It is designed to receive/send Internet traffic and allows you to connect electronic devices to the Internet and to each other without using a cable.
Content
Specifications
The receiver has good characteristics, which makes it popular among users:
- maximum throughput – 150 Mbit/second;
- supported wireless protocols – 802.11b/g/n;
- range of action – up to 180 meters;
- security methods – WEP/TKIP/AES/WPA/WPA2;
- operating frequency – 2.4 GHz;
- Dimensions – 8.5 x 16 x 26.1 mm.
Wi-Fi USB adapter Lumax DV0002HD is supported by various operating systems. Thus, the manufacturer has provided drivers for it for the Windows/Linux and Mas OS operating systems. With a power consumption of 5 V, the device consumes minimal electricity.
A related model, the Lumax DV0001HD USB Wi-Fi module, is equipped with a dongle indicator that displays the status of the connected network.
Asus
On Asus laptops, to activate WiFi, you need to press the key combination Fn + F2 or Fn + F3 (relevant for some models) to turn on the integrated wireless network adapter.
HP
The integrated wireless network module on laptops of this brand is activated by pressing the Fn + F12 button combination. When you turn on the adapter, a bluish light should light up on the F12 key, indicating its activation. If the key is highlighted in red, this indicates that the WiFi adapter is disabled.
Acer
On Acer laptops, the built-in wireless network adapter is turned on in the same way as on Asus laptops - by pressing the Fn + F3 button combination.
Sony
On Sony laptops there is no key combination responsible for hardware activation of the Wi-Fi module. To enable it, use a special VAIO Smart Network utility, downloaded from the official web page. The program is compatible with Windows 7.
Lenovo
To enable the WiFi adapter in hardware on a laptop from this manufacturer, you need to press the key combination Fn + F3 or Fn + F5.
How to enable WiFi on a Samsung laptop?
Why is the module needed?
In addition to the ability to connect the receiver to a PC, the Lumax Wi-Fi adapter can be connected to a DVB-T2 television receiver from this manufacturer and various web services. This will allow you to connect the TV to the Internet “over the air”, and will make it possible to launch the “Megogo Cinema” or “Lumax Cinema” applications on the TV, which are a library of films (more than 20,000 in the first and 500 new products in the second). Moreover, you can watch them completely without advertising.
Also, with the receiver you can use the YouTube video streaming service or launch services from Google (Maps, Weather and others).
The device is recommended for working with Lumax DV2118HD tuners via USB connector or other models from this line. In this case, there is no need to install drivers, and the connection speed will be maximum.
For an overview of the console, watch the following video:
Principle of operation
In order not to go into technical details that will be of interest to few people, you need to consider the general principles of the device’s operation. The adapter works using two technologies:
- Digital Living Network Alliance (DLNA) technologies are a set of standards and protocols that allow configured and compatible devices to wirelessly transmit and receive various media information on a home local network. Moreover, the standard supports the transmission of streaming, that is, a stream of media data in real time;
- AirPlay technology is the same wireless data transfer technology from Apple, which includes the same protocols and standards and allows for streaming audio and video content between compatible devices. Designed to work with Apple products – iPhones and iPads.
Review and configuration of the D-Link Dir-320 modem
Wi fi adapter for dvb t2 set-top boxes is equipped with the simplest Wi-Fi adapter and signal decoder. The device receives wireless signals and transmits them as content via an HDMI connection to the TV.
Important! With the growth of technology capabilities, the capacity of such channels and the speed of data transfer are increasing. Even movies in FullHD quality can be played without lags or stutters
User guide
Download the complete instruction manual HERE.
The Lumax DV0002HD Wi-Fi module connects to TVs, as well as computers and laptops. There will be 2 instructions.
TV connection
Here's the step-by-step procedure:
- Insert the adapter into a free USB port on the Lumax receiver;
- The OS will automatically detect the new device;
- Open the “System” menu, go to the “Network Settings” section;
- Find your network in the list of available ones, connect to it (if necessary, enter its password);
- Go to the “USB” section, then to “Internet”. Here you can configure your TV so that it will only connect to your home router.
Now you can use all available applications, including the unique Lumax cinema. The Cinema Hall interface is simple: you just need to connect to the Internet, go to the application and follow the prompts.
PC connection
Instructions for laptops and desktop PCs running Windows XP/2000/Vista/7:
- Connect the device to the USB port;
- Download drivers for Lumax DV0002HD from the adapter support site;
- From the downloaded files, select Setup.exe and run it;
- The Installation Wizard will open, where you need to accept the terms of the user agreement;
- Click NEXT, then Install;
- After installation is complete, click “Finish”;
- The “Configuration and Monitor” icon will appear in the system tray. If not, restart your PC;
- Now find your network in the list of available ones and connect to it.
If even after rebooting the computer does not see the device, remove the downloaded software and install it again.