Mobile TeleSystems have loudly declared themselves in the satellite television market, offering high-quality services and modern technologies for everyday use. Setting up an MTS satellite dish is an important aspect for a potential client to study, since this process must be completed independently. The company's service does not provide home-visit services for a specialist, and calling a specialist will be accompanied by additional financial costs.
By following the established instructions, installing the antenna, mounts, wiring cables and setting up technical equipment will not cause difficulties even for an inexperienced user. In this material we will look at:
- pre-preparation process;
- step by step guide;
- satellite coverage map and direction;
- subsequent equipment setup;
- recommendations, possible difficulties and mistakes.
Preliminary preparation
If you are interested in the basic terms of service from a telecommunications operator, you need to make sure that services are available in your region. The use of modern technologies has made it possible to achieve more than 80% coverage of the Russian territory, but there are exceptions. This information is presented on the official website or can be obtained from a qualified technical support specialist.
You can contact him:
- by calling the operator's toll-free number;
- by contacting the nearest service office;
- leaving a written request in your personal account.
On the official website you can find detailed instructions for setting up MTS satellite TV, as well as information about possible errors. We will cover this issue in the appropriate section.
Also, preview the contents of the TV packages. At any time, you can activate additional services that will add thematic channels to your account.
Features of the MTS TV application
The application offers the following features:
- over 150 television channels;
- more than 150,000 films, cartoons, TV series;
- TV program and access to programs for the past week;
- connect up to 5 devices to 1 account and watch video content on phones, tablets, TVs, PCs and set-top boxes;
- access to the application from any mobile operator;
- There is no charge for traffic on the MTS network.
The application has a simple and intuitive interface, so working with it will be comfortable.
APK file
From Play Market
From the App Store
Coverage map and setup wizard
The operator’s official website provides a detailed coverage map showing the coverage area of satellite and digital TV services. Go to the appropriate section and indicate your residential address, after which the screen will display the possibility of using MTS services in this region.
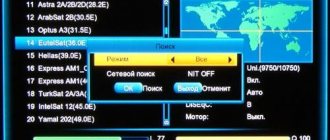
The modern version of the firmware or CAM module contains the “Setup Wizard” function, which will help the client with basic work with the device. Specify the required data, and also select the type of channel tuning: automatic or manual. The automatic mode does not require your intervention, and after searching, you can independently divide the channels into specific categories.
In the case of a manual search, you will have to specify the parameters of each added channel here. Although this labor-intensive process will take a lot of time, this way you can achieve maximum broadcast quality.
Where to send?
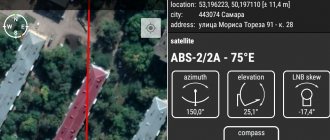
An important point is where to point the MTS dish for maximum signal quality. The SatFinder program, mentioned above, will help you solve the problem.
To begin, select the ABS 2-75 E satellite.
The program shows the direction to the satellite on the Google map, and also calculates the required angles and direction.
In addition, the software helps to adjust the MTS dish at the correct angle. In addition to the mentioned application, you can use the Multifeed and Satellite Director programs. The MTS setup wizard on the company’s website, the geonames.ru resource, or the special satfinder dvs-sf 500 device are also suitable.
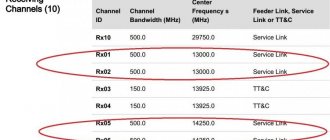
When choosing the last option, enter the following information into the device:
- LO Freq. 10600;
- Polarity V;
- Down Freq. 9750 or 11920;
- DiSEqC1.0: OFF;
- Symbol Rate 45000;
- 22K: OFF.
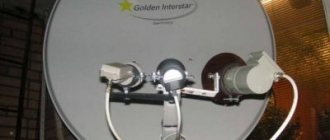
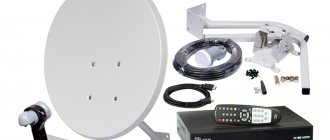
Installation of MTS satellite dish
Having concluded an agreement for the provision of satellite TV services, the client is given a kit with:
- antenna with a diameter of 60 cm;
- attachment or CAM module, depending on the selected type;
- a bracket and additional fasteners, which allows you to securely fix the structure;
- coaxial cable;
- converter;
- several additional F-type connectors;
- keys and other items for installation;
- paper documentation.
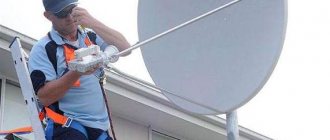
Installing an MTS satellite dish with your own hands requires:
- the presence of an open area without obstacles. Balcony windows, trees, nearby houses and other physical objects may adversely affect the image transmission;
- a specific direction for installing the antenna;
- securely fastened using a bracket and cable holders. Make sure that strong winds will not disconnect the cable.
How to install a plate
After assembling the structure, you can begin installing it on the wall. Fastening is carried out at a pre-selected location (how to do this is discussed above). Now find a flat surface to fix the bracket and follow these steps:
- Using a drill or hammer drill, make holes in the wall where the device will be mounted.
- Fix the bracket support where the antenna will be placed. If there are strong winds in the region, pay attention to the fastening. This is necessary to securely fix the antenna and protect it from falling. In addition, with high-quality fixation, you will be able to configure the MTS TV dish once and return to this issue less often.
- Assemble the bracket, rod and mirror following the instructions (the assembly process is discussed above).
- Attach the assembled mechanism to the support, rotate and tilt the mirror at the angle shown on the MTS website or the SatFinder application.
- Install the converter. It must be adjusted so that its front part “looks” into the mirror of the plate. At the same time, rotate it at the angle defined above.
- Strip the antenna cable and attach the F connector to it so that it is held tightly on the braid.
- Place the cable on the antenna into the connector of the converter and insulate the entry point with electrical tape or sealant. To prevent the cable from dangling, it can be secured with several pieces of electrical tape to the converter rod.
- Pull the cable indoors and connect it to the set-top box (must be disconnected from the power supply).
- Install the MTS smart card into the set-top box. For Interactive TV, install the SIM card into the slot.
At the final stage, all that remains is to connect the set-top box to the TV, activate satellite TV and configure the channels. The process of choosing the right position will be discussed below.
How to set up an MTS TV satellite dish yourself
When considering how to set up an MTS TV dish for a satellite yourself, you can highlight the availability of modern software for mobile devices running on Android and iOS. This way you can quickly find the best location for fixing the plate without a device.
Pre-assemble the antenna. To do this, you simply need to connect the elements of the housing, fasteners and bracket using nuts. After this, you can proceed to the next stage. Installing SatFinder software on a modern smartphone will help you here. For downloading and further installation, it is recommended to use branded application stores.
Now:
- Launch the program and separate the use of the camera, the Internet and GPS data;
- Select ABSS 22 – 75 E from the list of satellites;
- The program will automatically detect the current location and display it on the mobile phone screen along with the corresponding points;
- Using tips and auxiliary elements, adjust the antenna, taking into account the desired angles.
If you do not have the opportunity to use such a program, you will need to purchase the appropriate technical device. After fixing the satellite dish, run the cable to the set-top box, first securing it securely.
How to assemble a plate?
Equipment buyers often ask how to assemble an MTS satellite dish. First, check the equipment you have on hand. Before installing and configuring the system, you will need the following elements:
- KAM module with smart card or set-top box.
- Antenna and mounting device.
- A converter with the required number of pins that correspond to the required number of connected TVs.
- Coaxial cable.
- 2 0F connectors.
- Screwdrivers and wrenches for installation work.
- The plug required to connect the cable to the TV.
For convenience, it is recommended to buy a complete set of equipment at once, so as not to assemble it in parts later. To save money, you can assemble the devices into separate elements - buy a converter, antenna, connectors and cable in different places. But keep in mind that in this case it is more difficult to configure the equipment and errors are possible, which we will discuss below.
Along with the antenna there are instructions for assembling the MTS dish. It describes the configuration of the equipment and the algorithm of user actions. The product is fixed using a special bracket. There is no need to tighten the adjusting nuts. They help to adjust the azimuth of the MTS dish after installation and achieve maximum signal quality. The bracket consists of two elements and is fixed directly to the antenna. The converter can be connected immediately, and cable fixation can be left for later.
The general algorithm for assembling the MTS plate is as follows:
- Fix the envelope holder arc on the support using M6*30 screws.
- Place the support cheeks between the cheeks of the bracket and secure them with a clamp. At the same stage, insert the spacer bushings between the cheeks of the support and place the washers and nuts on the “eight” (M8) on the outside.
- Screw the support together with the bracket and the arc to the reflector. To do this, use four M6*16 screws. After this, tighten the M6 mounting nuts.
- Place the LNB clamp with the converter on the special arch of the holder of this mechanism. To do this, install the protrusion on the left side of the envelope holder into the recess on the right side, grasp the converter and fix the assembled structure on the holder arc using M6*30 screws. Next, install an additional M6*35 bolt, but do not pull it all the way through.
- Hang the reflector with the support on the mount. To do this, it is necessary to attract an assistant, because it is difficult to cope alone. One should hold the reflector, and the second should fix it to the mounting pipe on the wall using two clamps and clamps. Secure the M8 nuts, but do not overtighten them. Turn the reflector towards the satellite and tighten the nuts to "eight" on the clamps.
- To mount the MTS dish at an angle, loosen the M8 nuts on the clamp and manually turn the product so that the required angle is formed between the vertical and the reflector. If the angle is correctly determined, it is easier to align the device with the satellite. To calculate, you need to subtract 26.5 degrees from the satellite angle of your area. The position at which the reflector position relative to the vertical is 0 degrees corresponds to the tilt of the other (focal) axis of the dish by 26.5 degrees relative to the horizon. If you managed to set this moment correctly, tighten the bolts.
- Adjust the product for focus by moving the converter along the axis with the LNB clamp screws slightly unscrewed. In the process of changing polarization, the converter smoothly rotates around its axis. Pull the M6*30 and M6*35 bolts.
A more precise algorithm of actions is given in the instructions for the MTS plate. If the process seems difficult, you can call a specialist. It will help you install and configure an MTS TV dish, but the price depends on the region and a number of other factors. This point needs to be discussed individually.
How to set up MTS satellite TV
The next stage is the most important to ensure high quality image transmission. To do this, connect the receiver to the TV and turn it on. Using the remote control, go to the “Settings” section, and then select “Antenna setup”. Now the screen will display the signal level and recommendations for changing the location of the dish. Follow them to achieve the best results. Once the system is fully configured, you can securely mount the antenna and begin further work with the software.
As you have already seen, installing the equipment yourself is quite simple and at home.
How to disable a subscription to MTS mobile TV
This procedure is carried out in an account on the official MTS TV platform:
- Sign in to your account.
- Next, go to the “More” section.
- Finds a tariff that was connected earlier.
- Click on the button to refuse the provision of these services.
- An SMS message with a code will be sent to the previously specified mobile phone number, which must be entered in the appropriate window.
The online television program from MTS is a convenient platform that provides the opportunity to view federal stations for free and purchase additional packages. The tariff can be activated by a user of any operator.
Settings Features
MTS stands out for the variety of devices offered for mass use. There may be:
- classic receiver with SMART card;
- CAM module for modern TVs, where you need to install an activated SIM card;
- version of the set-top box with interactive functionality.
Setting up MTS satellite TV with your own hands will depend on the above parameter. SMART SIM cards are required for the system to identify a specific subscriber. Without the correct installation of this chip, television operation will be unavailable. Follow the direction indicated on the instructions.
The further process will not cause difficulties, as it is performed using the “Settings Wizard”. Here you can find channels in automatic mode. Information about manual search can be found in a separate article.
Connectivity in your region
Coverage area
Before you buy a satellite dish and install it, you need to consider that it will only work where there is a coverage area. The MTS company provides satellite broadcasting over a large part of Russia, but there are installation sites where this is not yet available. Before setting up the MTS satellite dish, you need to clarify this fact.
MTS satellite television coverage area
Before purchasing expensive equipment, you need to find out exactly how to set up the MTS satellite antenna and whether reception will be provided at the selected point if you assemble the equipment. To do this, just visit the official MTS website and familiarize yourself with the corresponding map.
To search, just enter the name of your locality in the search bar. As a result, the map will show in detail the coverage in the place where you plan to install the connected antenna. If the signal is present in the desired location, it is necessary to select the exact location for installing the antenna in such a way as to ensure maximum reception quality.
How to set up an MTS TV dish to a satellite yourself without a device
As we indicated earlier, installing modern software on mobile devices will help you in this matter. Among the list of programs offered are: SatFinder, Dishpointer Pro, Satellite Director and other analogues. Be careful, it is recommended to use branded websites and markets of your operating system for installation. The high popularity of such software has caused a wave of malicious software being launched by malicious users, which can be used to steal confidential information and personal data. Additional instructions are also available on the operator’s website.
How to download on Android
Users can download MTS TV for Android smartphones and tablets in the Play Market store or as an APK file.
From Google Play
Instructions:
- Open Google Play.
- Use the search bar to find “MTS TV” and go to the application page.
- Click “Install”.
- Wait for the download to complete and click “Open”.
After scrolling or viewing information about the application's capabilities, the user will be taken to the main screen.
To create an account, you need:
- Click on the “More” button and select “Login”.
- Enter your phone number.
- Enter the code from the message.
After logging into the application, the user needs to purchase one of several types of subscriptions. Under one account, he will be able to log into the application on five different devices and watch content from the connected package.
For MTS subscribers, traffic in the application is free. For clients of other mobile operators, it is paid according to the tariff plan.
Via APK
Installation via APK is used if it is impossible to download the application via Google Play for some reason. In addition, the Play Market only offers the latest version of the program, so if the user needs one of the older versions of MTS TV, he can also download it as an APK and install it on his phone.
Instructions:
- Download the APK of the application from the link above.
- Move the installation file to the phone memory.
- In your smartphone settings, open the “Security” tab.
- Allow installation from unknown sources.
- Click on the APK to start the installation.
All you have to do is wait until the installation is complete, open the application and create an account.
Frequently asked questions when connecting
Installing MTS satellite TV is a labor-intensive process that can cause a number of difficulties and questions among subscribers. Let's look at the most common calls to technical support.
No signal
No signal may be caused by incorrect connection of cables or other components. This factor may also be influenced by bad weather conditions, due to which the antenna cannot transmit a signal to the satellite. Also pay attention to the newsletter from MTS, which may contain information about the work being carried out.
No channels
The lack of channels may be due to:
- incorrect installation of a SMART or SIM card, due to which the system cannot identify the subscriber;
- the end of a subscription to a certain package of services or the occurrence of debt on the personal account balance;
- the device is unable to communicate with the satellite. The reasons are described in the previous paragraph.
Quality problems
Poor picture quality depends solely on the signal level, and the most common cause of interference is incorrect installation of the dish or external physical obstacles (trees, leaves, houses).
What problems can you encounter and how to solve them
Now you know how to connect an MTS dish yourself and not involve specialists for help. The downside is that it is not always possible to configure the equipment on your own.
During the setup process, the following difficulties may arise:
- The message No signal appears. Reasons: incorrect or poor-quality cable connections, technical work at the MTS operator, bad weather conditions. In the last two cases, you will have to wait until the work is completed or the weather improves. In the first situation, you need to check the quality of the connection of the connectors and try to configure the MTS dish again.
- No channels. If such an error appears, check that the smart card is installed correctly and check whether your subscription to the service has expired.
- Scattering of video and sound. In this case, reset the settings to factory settings.
- Error with code E. A list of decryptions can be found on the MTS website or checked through the call center. If a different letter appears, problems with the TV may occur.
- The TV did not find all channels. In this case, update the list and check again.
From the article it is clear that anyone can set up an MTS dish. All you need is to have instructions at hand and a little free time. If difficulties arise during the installation process, it is worth hiring a specialist to help.
If our article helped you, please like it!
How to use the application?
If downloading the MTS TV application for free is very simple, then using it is even easier:
- After logging in, you will see the user's profile.
- Here you can subscribe to additional online channels and check your connected devices.
- A list of online channels is available on the main screen.
- In the menu on the right you can filter them by topic.
- Select a channel, program and tap it. A video will appear at the top and can be expanded to full screen.
- In the menu on the left, ranking is done by type of program: films, TV series, educational, etc.
- Select the one you need and you will see a list of programs available for viewing online by group.
- Tap the selected section to jump to a specific list.
Online service
MTS TV is an online service from an operator that allows you to connect television to any mobile device, computer, and even TV. 130 channels, the ability to choose films, programs, cartoons - all this will allow you to keep yourself or your children busy on the road, in line and in any other situation.
Features and tariffs
The company's most popular service, mobile television MTS TV, is provided on a paid basis. If you decide to connect TV from MTS to your phone, the cost of the option will be 15 rubles. per day or you can choose monthly packages:
- Light. 44 channels, 150 rub. per month, 1 device.
- Base. 130 channels, 300 rub. per month, 5 devices.
- For residents of Belarus, such television is also available on the website mts.tv.by
, the price is only 0.35 kopecks. in a day. Now there is a promotion - the first month is free.
By the way, for the “Tablet” tariff this option is provided free of charge. You can find a complete description of the packages in the “Service Catalog”. You can find it in the “Tariffs and Services” block on the main page of the company’s official website.
- Go to the entertainment section.
- Find the service you need.
Technical requirements
In order to use the service, your device must be online (connected to a 3G/4G network from MTS or via Wi-Fi from any provider). Mobile devices require Android OS version 2.2, iOS 7.0, Windows XP and higher. But if you have older versions, that's okay. Access to online broadcasting will be available through the official website. To view, simply click the button below.
Watching MTS TV
There are similar requirements for computers: one of the following browsers must be installed on the PC (Chrome, Mozilla, Opera, Safari or Explorer at least 9 series).
Important! If you have a static IP, then the traffic will be paid. With a dynamic IP, your internet will not be wasted.
Additional terms
- All limits and speed restrictions do not apply to the online service.
- The option is designed for use on the territory of the Russian Federation.
- When using the service, it is best to use either a wireless connection via a modem or mobile Internet at 3G/4G speeds.
- Additionally, a lower limit for the Internet speed at which this service will operate has been set - 150 Kbps. And the ideal connection option is 550 Kbps.
- When you connect to the mobile version of MTS TV, the subscription fee will be charged to you, even if you have never used the application during the day.
How to activate the service?
If the conditions suit you, then you can proceed to connecting the service. For this:
- Go to the company’s official website and select the “Tariffs and Services” section. In it you will see the “Service Catalog” block. Click on it.
In the left menu block, select the “Entertainment” section. To save time, check the box next to the word “Watch”.
Among the services presented, you will find the option you are looking for. Please read the terms and conditions carefully again! If you are happy with everything, click “Connect”.
The system will prompt you to choose a connection method that is convenient for you: USSD code or going to the subscriber’s personal account. Let's look at them one by one.
The easiest way is to dial a special command on your phone. The combinations of numbers for dialing depend on the conditions under which you want to connect to the service:
- dial USSD command *111*9999# (15 r/day);
- You can also connect using the following combinations *999# (for 15 rubles/day) or *997# (300 rubles/month), *995# (150 rubles/month).
If with these methods everything is simple and clear, then we will dwell on the option with a personal account in a little more detail. First of all, log in to your personal subscriber profile of the company:
- Go to your account and enter your phone number and password. If you have not installed yours, click “Receive by SMS”. An SMS with numbers will be sent to your phone number, and you need to enter them into the form.
- In the “Service Management” menu, select the item responsible for the connection.
- Find “TV” in the list and check the box. Click Next.
- Confirm your connection by clicking “Add services”.
- A notification will appear on the screen confirming the connection of services.
- You can connect packages on the detailed description page of the option.
Which satellite does MTS use?
The satellite that the company uses for its work is located on a fairly well-known Bermudian operator that provides cellular communications. This ensures the highest quality connection without any problems.
In addition, MTS switched to the ABS-2A satellite in October 2021. This satellite is very famous due to the fact that it has better characteristics compared to its competitors. Moreover, thanks to this satellite, MTS also provides access to television to countries in Asia and Africa, in addition to Russia. The satellite has approximately 48 transporters that provide the clearest and most accurate television broadcast possible.
Name and coordinates
In order for the user to clearly grasp the required signal, he must try to fully explore the satellite, and he also needs to know the exact information for connection. It is presented in the table below.
| Satellite parameters | Required data for connection |
| The name of the device is ABS 2A MTS TV. | — |
| Location: 75 degrees east longitude. | — |
| Popularization – linear vertical. | Linear vertical. |
| Speed – approximately 45,000 msiv/sec. | Approximately 10,600 Msiv/sec. |
Before installation
Before purchasing an antenna, you need to make sure that there is a good satellite signal in your area. We look at the map: if the satellite coverage area in your place of residence is light red, you will need a larger antenna. There are cases with a weak signal if the antenna is located outside the Russian Federation.
For those lucky ones who live within the satellite's visibility range, there is a special application “SatFinder”. With its help, the desired direction of the antenna is determined. Information about the exact direction of the antenna towards the satellite allows you to detect obstacles to the signal in the form of high-rise buildings or trees. The application can be downloaded from the AppStore or Google Play.
Good advice: it is best to install the antenna on the roof of the house. This arrangement allows the antenna to be rotated in any direction, which cannot be said for installation on a wall.
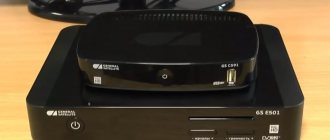
About setting up TV equipment from MTS
To connect the set-top box, we connect the antenna cable to it; to connect the device to the TV, we use an HDMI cable. We place the CAM module in the TV connector. It should fit tightly. Afterwards we insert the access card into the module.
Details about setting up an interactive MTS TV set-top box:
- Before turning on the set-top box, insert the SIM card into the slot.
- The initial launch of the set-top box is accompanied by loading of the 3G signal.
- Let's authorize the device. During authorization, several methods will be offered. A demo version will be used first. As soon as the operator receives your signed documents, the working version will be activated.
- Create a user profile and save it. To set a password to prevent unwanted use of the set-top box by third parties, you need to go to the access settings.
- Let's move on to searching for channels. As soon as scanning is completed, a list of available channels will appear on the screen. This is the final stage of setting up the console.
Antenna installation
The antenna comes with instructions that describe the entire installation process. Initially, we tighten the nuts (moderately) so as not to damage the body, but also to prevent the fasteners from dangling from the bracket. There is no need to fasten the wall bracket, and you also do not need to tighten the nuts responsible for turning the antenna angle.
The two-piece bracket must be assembled separately and does not need to be attached to the antenna. At the initial stage, a converter is connected to the dish; cable connections are made later.
To securely fasten the bracket, a perfectly flat surface is required. Place the bracket on the surface and mark the points at the mounting location with chalk or a marker. We drill holes in the surface and attach the bracket using dowels. Then we put the antenna on the installed bracket, select the required angle and carefully tighten the nuts. By “required angle” we mean the vertical limit angle of the mirror.
We install F-connectors on the converter, strip the cable and also connect it to the convector.