is a popular provider in Russia. In order to connect the offered channels from this provider, you need to install a satellite dish with a receiver. The article provides information on ways to tune channels from Tricolor TV using a special device, without it, and from a smartphone.
Quick installation and configuration of a satellite dish with your own hands.
Today we will learn how to quickly set up a satellite dish. We will tune it to the EUTELSAT 36A/B 36°E satellite. NTV Plus, Tricolor TV, Lebed are located there. But we are more interested in NTV Plus and Tricolor TV.
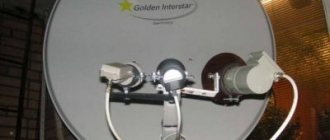
For this we need the antenna itself
with fasteners
And tools:
- Several anchors 6 mm in diameter and 6 cm long, or you can take 8 * 8;
- Keys;
- Stationery knife;
- Wire cutters or pliers.
- We will also need a hammer drill to drill holes in the wall.
At home or somewhere convenient, you first need to assemble the antenna, i.e. Immediately fasten the rod that holds the converter, fasten the converter itself, all the fastenings and assemble the stand. We will mount it on the wall.
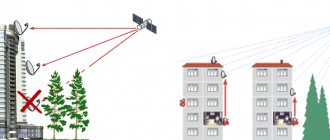
Before installing the mount on the wall, you need to decide on the place where we will actually mount it. The place should be free, there should be no trees or any additional wires around.
The fastening pipe must be attached to the wall so that it is as vertical as possible; you can measure it by level.
We place the pipe where we need it, use something like a screwdriver or a marker to make marks on the wall in the holes.
Then we remove the pipe and drill holes in the wall.
We install our mount on the wall, putting it on the 3 anchors already inserted in advance.
We carefully secure it all with anchor nuts.
Then we take the antenna in our hands, slightly loosening the mount on it, and put it on the pipe, securing it so that the structure holds well, but can move a little to the right/left.
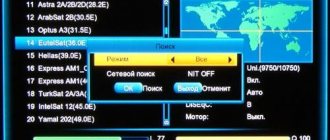
To configure any satellite, arbitrary, there are a bunch of programs on Android and other platforms, as well as for computers.
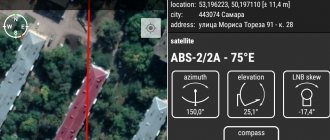
For example, you can install the SatFinder program on an Android phone
The program determines our coordinates and shows the satellite settings.
We are interested in the azimuth and elevation lines (elevation is the geographic direction in which the antenna should be turned).
LNB tilt - angle of rotation of the converter, i.e. the angle at which the converter should be rotated as much as possible for better signal reception.
In addition to this, we are interested in another program on Android - Clinomet.
This is a program that allows you to find out the tilt angle of your phone.
There are many more similar programs, not on Android, that allow you to measure the angle of inclination; you can use any available one.
When installing the antenna, you should first look around, perhaps there are clues around - other already installed NTV Plus or Tricolor TV antennas that will help us determine which direction it should be turned.
If there are any, you can approach another antenna that is already installed and configured.
They all have the same design.
The bar that holds the converter should be at the same angle for everyone.
In order to measure what the angle of inclination of this bar should be, we lean the phone against it, having turned on the necessary program in advance, and we see the angle of inclination of 64 degrees.
The next steps are to get your bearings and figure out where the antenna is geographically directed. To do this, you need to approach the antenna from behind, strictly in the center, and look in front of you. It is necessary to find some landmark in the distance, to which we will direct our antenna during installation.
After which we return to our antenna and repeat the procedure, i.e. measure the angle of inclination of the bar. It, as we determined, should be 64 degrees. Then we stand behind our antenna strictly in the center, find our landmark in the distance and point the antenna exactly at it. And here he is:
Then we screw the antenna cable to the converter.
Do not forget that you can only tighten the cable when it is not connected to the receiver or the receiver is turned off. Otherwise, there is a chance that the receiver will burn out.
How to set up the Tricolor TV antenna - instructions and video
When connecting to a package of services from the largest domestic satellite television operator, the client will need to install and further configure special equipment. “How to set up the Tricolor satellite dish yourself?” - a pressing question among subscribers who, for certain reasons, cannot use the services of third-party specialists. This process directly affects the further functioning of the entire satellite television system and requires strict adherence to these instructions.
The development of the technological process has contributed to the development of special devices, with the help of which you can not only determine the optimal direction for a satellite dish, but also improve the quality of the final image. In this material we will look at detailed instructions and reveal all the features of the process of self-tuning, testing and identifying antenna faults.
Skins
FastSatfinder has a skin changing function, so you can change the appearance of the program according to your mood. If you wish, you can draw your entire program interface or change only individual graphic elements.
FastSatfinder is the result of long and effective work. During this time, many unique technologies have been developed and we are not going to stop at the results achieved. We strive to achieve maximum functionality, convenience and ease of use of FastSatfinder.
Dishpointer Pro
The application has similar functionality as SatFinder, with some exceptions.
Advantages of Dishpointer Pro:
- High accuracy of satellite identification;
- It is possible to determine location using data from mobile operators, which makes it possible for the application to work in places with a poor GPS signal (when using data from a mobile network, the accuracy of the determination may be greatly affected);
- Availability of the ability to take a screenshot of the application;
- Satellites are clearly visible at any time of the day on any phone.
- The application is paid and has a fairly high price.
Android applications for setting up satellite dishes
It is known that you can set up a satellite dish without having a special device using a smartphone or tablet. To do this, you just need to install a special application from the Play Market. This applies to Android mobile devices. There are similar apps for iOS, even with similar names. Since Android remains the most popular mobile system, we will analyze applications for setting up a satellite dish specifically for Android.
The operating principle of such applications is to determine the direction to satellites using GPS. Of the variety of similar applications that can be downloaded from the Play Market, I will highlight the most worthy ones. The main criterion for selection will be the accuracy in determining the direction to orbital positions.
SatFinder
This application for mobile devices, like other programs in this article, is designed to search for a satellite to further rotate the satellite dish in the desired direction; for these actions, a GPS receiver and a camera of a mobile phone or tablet are used. SatFinder is the most popular application for finding satellites, which has spawned many clones with the exact same name, but much inferior in quality and functionality.
What is this application?
Satfinder is a universal application for devices running on Android. The program shows the location of the satellite and indicates its direction. With its help, you can rotate the antenna in the desired direction and improve signal reception.
| Developer | Maciej Grzegorczyk |
| OS version | Android 4.0 and above |
| Russian language | Absent |
| License | Free |
Features of SatFinder for Android:
- there is a list of satellites;
- there is a list of channels;
- the result is displayed as numerical data or on a Google map;
- displays azimuth;
- shows the height and slope of the converter using GPS;
- has a built-in compass.
We invite you to watch a video about the functions of the SatFinder application for Android:
How to set up a Tricolor TV dish to a satellite yourself without a device
You can also install all the necessary components of a satellite television system yourself without a device. The process will take more time and requires following instructions. We have already looked at the method of obtaining the coordinates and direction of the dish for communication with the satellite.
Let's start installation:
- Prepare holes for installing a plate bracket and an additional holder;
- Install the converter. Its head should be installed in a downward direction, so you can protect the device from external factors;
- Further connection of the F-connector requires exposing the cable by 10 mm, after which it is necessary to seal it;
- The cable must be securely fastened with ties, which guarantees protection from gusts of wind;
- Fixing the antenna should not make it difficult to further adjust it by rotating it.
Further work with the system consists of setting up the receiver and searching for channels.
Quick installation and configuration of a satellite dish with your own hands.
Today we will learn how to quickly set up a satellite dish. We will tune it to the EUTELSAT 36A/B 36°E satellite. NTV Plus, Tricolor TV, Lebed are located there. But we are more interested in NTV Plus and Tricolor TV.
For this we need the antenna itself
with fasteners
And tools:
- Several anchors 6 mm in diameter and 6 cm long, or you can take 8 * 8;
- Keys;
- Stationery knife;
- Wire cutters or pliers.
- We will also need a hammer drill to drill holes in the wall.
At home or somewhere convenient, you first need to assemble the antenna, i.e. Immediately fasten the rod that holds the converter, fasten the converter itself, all the fastenings and assemble the stand. We will mount it on the wall.
Before installing the mount on the wall, you need to decide on the place where we will actually mount it. The place should be free, there should be no trees or any additional wires around.
The fastening pipe must be attached to the wall so that it is as vertical as possible; you can measure it by level.
We place the pipe where we need it, use something like a screwdriver or a marker to make marks on the wall in the holes.
Then we remove the pipe and drill holes in the wall.
We install our mount on the wall, putting it on the 3 anchors already inserted in advance.
We carefully secure it all with anchor nuts.
Then we take the antenna in our hands, slightly loosening the mount on it, and put it on the pipe, securing it so that the structure holds well, but can move a little to the right/left.
To configure any satellite, arbitrary, there are a bunch of programs on Android and other platforms, as well as for computers.
For example, you can install the SatFinder program on an Android phone
The program determines our coordinates and shows the satellite settings.
We are interested in the azimuth and elevation lines (elevation is the geographic direction in which the antenna should be turned).
LNB tilt - angle of rotation of the converter, i.e. the angle at which the converter should be rotated as much as possible for better signal reception.
In addition to this, we are interested in another program on Android - Clinomet.
This is a program that allows you to find out the tilt angle of your phone.
There are many more similar programs, not on Android, that allow you to measure the angle of inclination; you can use any available one.
When installing the antenna, you should first look around, perhaps there are clues around - other already installed NTV Plus or Tricolor TV antennas that will help us determine which direction it should be turned.
If there are any, you can approach another antenna that is already installed and configured.
They all have the same design.
The bar that holds the converter should be at the same angle for everyone.
In order to measure what the angle of inclination of this bar should be, we lean the phone against it, having turned on the necessary program in advance, and we see the angle of inclination of 64 degrees.
The next steps are to get your bearings and figure out where the antenna is geographically directed.
To do this, you need to approach the antenna from behind, strictly in the center, and look in front of you.
It is necessary to find some landmark in the distance, to which we will direct our antenna during installation.
After which we return to our antenna and repeat the procedure, i.e. measure the angle of inclination of the bar.
It, as we determined, should be 64 degrees.
Then we stand behind our antenna strictly in the center, find our landmark in the distance and point the antenna exactly at it. And here he is:
Then we screw the antenna cable to the converter.
Do not forget that you can only tighten the cable when it is not connected to the receiver or the receiver is turned off.
Otherwise, there is a chance that the receiver will burn out.
Next, you can configure the receiver itself, just like we configure regular analog channels, i.e. We scan, look at the indicators of signal strength and quality.
The most important thing is that we installed and configured the antenna itself, copying the settings from neighboring working antennas.
To prove that the antenna is configured correctly, there is a special device called Satellite Finder, with which we will check whether there is a signal from the satellite.
After we have screwed the antenna cable to the converter, the arrow on this device deviates, i.e. we conclude that the signal sensor shows us the presence of a signal from the satellite.
Using this device, you can adjust the antenna to achieve the highest possible signal level.
We fix it on our antenna, namely on the pipe that holds the converter, and carefully turn the antenna together with this device to the right/left.
By doing this, we look at what position of the antenna, the device’s performance will reach its maximum value.
After we have found a position for the antenna that is more favorable for us, it can be fixed.
At the beginning, we left the nuts on the rear mount uncompressed so that we could adjust the position of the antenna by turning it left/right.
After we have decided on the optimal position of the antenna, the nuts need to be secured.
As a result, we installed and adjusted the antenna both horizontally and vertically, and achieved the antenna position in which the signal value is maximum.
All that remains is to secure the antenna cable, using tape or clamps, and the antenna is ready for use.
Video review can be viewed at the link below
Source
Multifeed
An application for setting up satellite dishes, which is very different from analogues in its operating principle. For configuration, only a GPS receiver is used, so the configuration acquires many intricacies and features.
Android application SatFinder is a compact and convenient application for devices on the Android platform. This program will help you find a satellite and set up an antenna for it, take screenshots, and also has very wide capabilities, while not demanding on the resources of your device.
Features of the SatFinder Android application
- shows azimuth
- altitude and slope converter for your location (based on GPS coordinates)
- has a list of satellites
- has a list of channels
- the result is shown both as numerical data and as visual graphics on Google maps
- Built-in compass will help you find the correct satellite azimuth.
The list of satellites is quite comprehensive, so the applications should work all over the world.
Starting from version 1.07, the application has added a list of channels downloaded from the Internet.
To use this program, your phone must have an active GPS receiver to determine location coordinates. The data received from the GPS receiver is sufficiently accurate, since the error in determining the coordinates is not significant for determining the position of the satellites.
Note: In order to get the most accurate azimuth readings, you should calibrate your phone's compass by rotating the phone several times around all three axes after starting the program.
How to use the SatFinder Android app
For the application to work properly, the phone must be in a vertical position. This is the position in which the display of satellite positions through the camera lens will be most accurate.
The search for a satellite can be carried out in two ways:
1. display of an arc with satellites located on it (the Clark belt) on the sky 2. precise determination of the specific position of the selected satellite using a sight.
Displaying the arc on which all satellites are located (the Clark Belt) allows you to realistically assess the ability to tune into the desired satellite in your chosen location, determine the presence of interfering obstacles, such as tree branches, roofs and walls of houses, etc. Moreover: you can take a screenshot (copy of the image) of the screen, so that later, in a convenient environment, you can make a detailed analysis of the location chosen for setup. To do this, simply touch your finger anywhere on the communicator screen and a copy of the screen image will be recorded in the phone’s memory.
Pinpointing the satellite's position using the scope is used to locate or "lock" the desired satellite. In this mode, the screen displays the name of the selected satellite, its azimuth and elevation angle. In the middle of the screen, yellow arrows indicate which direction you should turn your phone to tune to the satellite.
Once your device is accurately pointed at the satellite, the arrows will turn green and a sound will sound.
SatFinder for Android
SatFinder Plus is a highly specialized application that is designed to configure satellite dishes and antennas. The program displays where the satellite is located. With it you don’t have to think about whether the antenna will see it. The display occurs in exact coordinates with a sight or along the presented arc.
There are arrows indicating in which direction the equipment needs to be moved. It also has its own database of transponders, which allows you to quickly and freely find all the necessary parameters for any satellite dishes. The program can take into account all the obstacles that come along the way and create interference.
You can also take automatic screenshots with the received settings. When you need to find out the location of satellites, you must download SatFinder for Android. This is the only one hundred percent working option that provides accurate information.
Android applications for setting up satellite dishes
It is known that you can set up a satellite dish without having a special device using a smartphone or tablet. To do this, you just need to install a special application from the Play Market. This applies to Android mobile devices. There are similar apps for iOS, even with similar names. Since Android remains the most popular mobile system, we will analyze applications for setting up a satellite dish specifically for Android.
The operating principle of such applications is to determine the direction to satellites using GPS. Of the variety of similar applications that can be downloaded from the Play Market, I will highlight the most worthy ones. The main criterion for selection will be the accuracy in determining the direction to orbital positions.
SatFinder
This application for mobile devices, like other programs in this article, is designed to search for a satellite to further rotate the satellite dish in the desired direction; for these actions, a GPS receiver and a camera of a mobile phone or tablet are used. SatFinder is the most popular application for finding satellites, which has spawned many clones with the exact same name, but much inferior in quality and functionality.
- The application is distributed free of charge;
- High accuracy of satellite identification;
- The ability to take a screenshot directly from the application (not relevant for devices that have this feature in the firmware);
- Easy to learn and use;
- Two operating modes. The first is a standard search mode for all similar applications using the camera, showing all available satellites; the second is more accurate, for pointing at the selected satellite;
- Good speed even on the oldest devices.
- On smartphones with a poor camera or screen, satellites will be difficult to see when searching during the daytime (in particularly unfortunate cases, they will not be visible at all, since the inscriptions will blend into the sky);
- Due to the large number of not very high-quality clones, it will be difficult to find SatFinder on the Play Market. There is also a small chance of encountering malware masquerading as SatFinder. When downloading an application from the Play Market, you need to be careful and focus on reviews.
Satellite Director
An application for setting up satellite dishes, similar to SatFinder and Dishpointer Pro, but slightly inferior to them. In terms of popularity and number of installations, Satellite Director can compete with SatFinder.
- The application is absolutely free;
- The widest list of devices is supported;
- Satellite Director is very easy to use;
- Fast work even on the oldest and slowest phones;
- Decent satellite identification accuracy.
- There is no function for more precise settings (turning off the display of unnecessary satellites);
- You cannot take screenshots from the application (with the exception of devices with built-in screenshot capabilities).
Dishpointer Pro
The application has similar functionality as SatFinder, with some exceptions.
Advantages of Dishpointer Pro:
- High accuracy of satellite identification;
- It is possible to determine location using data from mobile operators, which makes it possible for the application to work in places with a poor GPS signal (when using data from a mobile network, the accuracy of the determination may be greatly affected);
- Availability of the ability to take a screenshot of the application;
- Satellites are clearly visible at any time of the day on any phone.
- The application is paid and has a fairly high price.
Multifeed
An application for setting up satellite dishes, which is very different from analogues in its operating principle. For configuration, only a GPS receiver is used, so the configuration acquires many intricacies and features.
- Satellite antennas of non-standard sizes and shapes (which are extremely rare) are supported;
- Possibility of tuning one antenna to several satellites simultaneously using a multi-feed;
- The application does not require a camera to operate (you only need a GPS receiver), so the application will work on some older tablets;
- The program is quite difficult to use, aggravating the situation by the lack of familiar settings using the camera of a mobile device;
- The application is paid, although it is significantly cheaper than Dishpointer Pro.
Source
Satellite Director
An application for setting up satellite dishes, similar to SatFinder and Dishpointer Pro, but slightly inferior to them. In terms of popularity and number of installations, Satellite Director can compete with SatFinder.
Advantages:
- The application is absolutely free;
- The widest list of devices is supported;
- Satellite Director is very easy to use;
- Fast work even on the oldest and slowest phones;
- Decent satellite identification accuracy.
Flaws:
- There is no function for more precise settings (turning off the display of unnecessary satellites);
- You cannot take screenshots from the application (with the exception of devices with built-in screenshot capabilities).
How to set up the Tricolor TV antenna - instructions and video
When connecting to a package of services from the largest domestic satellite television operator, the client will need to install and further configure special equipment. “How to set up the Tricolor satellite dish yourself?” - a pressing question among subscribers who, for certain reasons, cannot use the services of third-party specialists. This process directly affects the further functioning of the entire satellite television system and requires strict adherence to these instructions.
The development of the technological process has contributed to the development of special devices, with the help of which you can not only determine the optimal direction for a satellite dish, but also improve the quality of the final image. In this material we will look at detailed instructions and reveal all the features of the process of self-tuning, testing and identifying antenna faults.
How to set up a satellite dish from Tricolor TV
The provider provides 3 satellites for watching TV channels at once. The setup must be carried out exactly on the satellite that broadcasts in a given region.
- Eutelsat 36B and Express AMU1 36.0E satellites for the European part of the Russian Federation, the Urals;
- Express AT1 56.0E satellite for the Siberian and Far Eastern districts;
- Residents of the border parts of the Ural District can tune in to any of the 3 satellites.
Healthy:
- How to manually install and configure satellite TV
- How to choose a satellite dish for your home and garden
Having chosen a satellite, according to the region of residence, you need to correctly configure the signal frequency. Frequency setting is carried out only after assembling and installing the satellite dish and connecting the tuner (receiver).
Setting up with the device
Special devices will help you configure the Tricolor TV antenna yourself. There are several types of special devices to determine the quality of the received signal. The device is necessary to determine the quality of the signal received from the satellite to the antenna. The easiest to use is the Sat-Finder device. This device is electromechanical and digital. Setting up using a mechanical device is carried out as follows:
- Prepare a piece of cable 20-30cm long, attaching connecting plugs to both ends.
- Connect one end of the cable to the antenna converter (head).
- Connect the second end of the cable to the LNB terminal on the device.
- Connect the end of the cable coming from your home receiver to the REC output on the device.
- Connect your home receiver to the network and enter satellite information into it.
- Place the instrument needle just below the center of the scale.
Next, you need to adjust the signal quality by rotating the antenna. As a guide for tuning, you can select adjacent antennas. The vertical position is determined by the horizon. The degree of inclination is from 30 to 60. After receiving a signal, its quality is increased by smoothly rotating the antenna body. The best signal is the center of the scale on the device.
Antenna tuning using a digital Sat-Finder device. It connects in the same way, but does not require adjustment. There are 3 scales built into the front panel of the device. The signal quality is adjusted until all scales turn green.
After receiving a high-quality signal from the devices, they must be disconnected. Next, connect the cable from the receiver to the convector. At the final stage, the receiver switches on to automatically search and save channels.
Setting up without a device
Setting up a satellite dish without a device is a little more difficult. To do this you will need an assistant or a portable TV. The setup is carried out as follows:
- Turn on the receiver to show the signal quality for the selected satellite.
- Achieve a vertical position of the satellite dish.
- Slowly turn the antenna 1 cm to the side, searching for a signal.
- Achieve more than 70% signal quality by rotating the antenna.
It is important to remember that after each shift of 1 cm, the receiver saves the received data. The next rotation of the antenna must be done every 30 seconds. The final stage of setup will be automatic search and saving of the found channels.
Setting up from a smartphone
You can configure the Tricolor TV antenna using your smartphone. There are a large number of programs, most of them are free. The general functionality of these programs is to determine the location of the smartphone owner and the satellites available for configuration. The most popular programs include Satellite Antenna Alignment and SatFinder . You also need to download a program to determine the angle of the smartphone itself. The setup is carried out as follows:
- You need to turn on the program on your smartphone to determine your location using GPS.
- Having determined the location of the smartphone, the program will highlight all available satellites for configuration.
- a satellite to set up Tricolor TV .
- The program will provide data on azimuth and elevation. Azimuth is the north-satellite inclination angle, and elevation is the satellite's relationship to the earth.
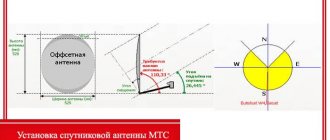
- According to the data received, adjust the antenna position. To do this, turn on the program on your smartphone for determining the angle of the gadget’s position. Place the gadget on the stand that regulates the vertical position of the antenna and set the required tilt angle. Next, attach the gadget to the antenna bowl itself and rotate it to the required angle in the horizontal plane.
During the process of adjusting the position, you need to monitor the signal level on the portable TV. When the signal reaches 70 percent or more, the antenna must be fixed in this position.
When setting up an antenna, there are some important factors to consider.
- The antenna is installed in a place where there are no nearby high-rise buildings, structures, or trees.
- The antenna must be well secured.
- When disconnecting the antenna cable from the receiver or converter, the receiver must be de-energized.
- Make adjustments only if you know the satellite coordinates, its exact location and name.
- If you have any difficulties when setting it up yourself, call a specialist.
How to set up a Tricolor TV dish to satellite yourself
Having subscribed to a profitable package of services, new clients of the company receive a set of equipment that needs to be connected to the satellite. As stated earlier, these actions require compliance with clear instructions. Technical features make it necessary to install at a specific elevation and azimuth. These parameters are provided by the operator in the corresponding technical section of the official website and can be obtained by directly contacting customer service.
An alternative option is the use of additional software, the most popular of which in 2021 is Satellite Antenna Alignment. It is recommended to check the relevance of the version installed on your computer to ensure that the data provided is correct.
Which satellite does MTS use?
MTS TV is a popular company that serves many houses and apartments. The company was initially based only on providing cellular communications, but recently decided to try its hand at television.
Like all popular and well-known companies, MTS keeps its face and always does its job to the highest standards.
The satellite on which the company operates is located on a well-known Bermudian cellular operator. This guarantees a high-quality connection without hitches.
A long time ago, namely from October 18, 2021, MTS switched to an ABS-2A type satellite. This satellite is popular because it is a geostationary type and has much better parameters than many competitors.
On this satellite, MTS provides television not only to Russia, but also to the countries of Asia and Africa, and other regions.
The satellite has about 48 transporters that are responsible for accurate broadcasting. Many even modern models have only 40.
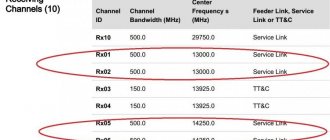
Name and coordinates
In order to clearly catch the signal, you need to know everything possible about the satellite and have accurate connection data:
| Satellite parameters | Connection information |
| Satellite name - ABS 2A MTS TV | — |
| Position 75◦ B.D. | — |
| Popularization - vertical linear | Vertical linear |
| Symbol rate - about 43000-45000 Msiv/second | About 10600 Msiv/second |
Configure the Tricolor antenna yourself - detailed instructions
When considering how to set up the Tricolor antenna, you need to prepare an initial list of tools, without which installation and further setup will be impossible:
- a plate with a diameter of at least 60 centimeters;
- hammer drill or ready-made holes for installing the bracket;
- basic and additional fasteners;
- electrical tape, wrenches, working level;
- If desired, you can use a special device that allows you to automatically check the signal level and quality of the resulting image. This issue will be further discussed in the appropriate section.
How to determine the direction of the antenna with a special device
Technicians who professionally set up satellite TV often use a special device to help them install the equipment clearly and correctly. This device emits audible signals when the antenna is pointed at the correct angle away from the satellite. In order to determine the direction, just turn on the device and set the necessary parameters for the MTS satellite.
The main advantage of the device is accurate location determination. Since the direction of the branches plays a significant role in showing television, you can ask your friends for this device. The most popular is Sat Finder. It is widespread among craftsmen and enjoys great fame.
Device for tuning satellite dishes Tricolor
The corresponding technical device with the same name “device for tuning satellite dishes” will help you verify the correct installation. The compact device operates according to the following principle:
- The device is directly connected to the antenna using a cable;
- After synchronization is completed, the system will display an image or corresponding sound signals indicating further actions to achieve the best signal;
- Once the optimal position has been found, fix the satellite and connect the appropriate cable. We will pay more attention to this process.
An analogue is a mobile application for Android and iOS operating systems. Through the use of geolocation and additional sensors, you can also determine an effective location. You can find such software in the official markets of the above platforms.
How to watch Tricolor on a regular tablet or smartphone
The first option is quite complicated, but it has a significant advantage: you don’t need the Internet to connect your phone to Tricolor.
Before you start setting up your set-top box and TV, it’s worth mentioning that this method only works with phones and tablets with the Android operating system pre-installed.
First you need to connect your smart TV using a cable to your router. Here you need to be extremely careful and connect the cable to the input connector on the router. It is usually painted yellow.
Next, you need to configure the TV to distribute the signal via the Wi-Fi network. Open “menu” – “applications” – “settings”. Open the “Network” section and see the available Ethernet connection. If the connection does not appear at this stage, go back and try repeating all the previous steps. After following the steps described earlier, we can even disable the receiver if its operation is not required.
The final step will be to configure the phone to receive a signal from the set-top box. To do this, we need the Multiscreen application, the current version of which can be downloaded without any problems. You can use other applications, but this one seemed to us the easiest and easiest to use.
Next, you need to connect to your router's Wi-Fi network on your phone. We go into the application, open the main menu and select the “view” item. After this, the player opens, but there is no image. Click on the blue button in the upper right corner. A drop-down list appears where we select “independent viewing”. Voila! Now all channels are available for viewing, and the menu for selecting them can be seen by clicking on the button in the upper left corner of the screen.
The second method is much simpler, but many people have various problems. In general, you should adhere to the following algorithm:
- Download the "Tricolor Online TV" application.
- Login to your account. Login data (ID or contract number) can be found on the receiver. You can recover your password on the tricolor.tv website in your personal account or directly in the application.
- After logging in, we immediately have access to all channels available through your subscription, if any. Otherwise you will have to pay for it.
You can watch TV anywhere via the Internet, but you should remember that watching can consume quite a lot of traffic. In addition, there are often channels available through apps that are not included in your service package. It is unknown whether this is a flaw in the creators of the application, or whether it was originally intended, but the fact remains.
If problems arise, you can always contact Tricolor TV online support or call the hotline, where they will help you and give you the right advice. Both methods work both from satellite television and from Tricolor online.
How to set up a Tricolor TV dish to a satellite yourself without a device
You can also install all the necessary components of a satellite television system yourself without a device. The process will take more time and requires following instructions. We have already looked at the method of obtaining the coordinates and direction of the dish for communication with the satellite.
Let's start installation:
- Prepare holes for installing a plate bracket and an additional holder;
- Install the converter. Its head should be installed in a downward direction, so you can protect the device from external factors;
- Further connection of the F-connector requires exposing the cable by 10 mm, after which it is necessary to seal it;
- The cable must be securely fastened with ties, which guarantees protection from gusts of wind;
- Fixing the antenna should not make it difficult to further adjust it by rotating it.
Further work with the system consists of setting up the receiver and searching for channels.
Tips and video instructions
Before demonstrating the visual video, it is worth mentioning additional recommendations:
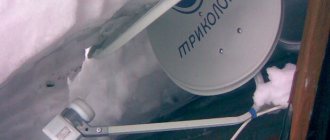
- glazed loggias are not suitable for installing an antenna, as they interfere with stable signal transmission;
- snow and rain can also negatively affect the “picture” displayed on the screen, take care of additional protection;
- installation on roofs without drainage and under places for snow slopes is ineffective for the reasons stated above;
- trees, foliage and other physical objects interfere with the exchange of signals with the satellite. The area should be open;
- insulation of the cable and connections is an important part when setting up. Stock up on electrical tape and sealant for these purposes.
A video with a step-by-step explanation of the steps and a clear example will help you figure out how to set up the Ticolor antenna yourself.
Source