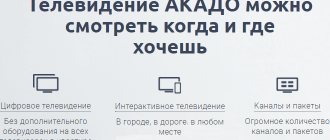
Connection of digital television in Russia is in full swing. Like the transition from black and white TV to color, the transition from analogue to digital broadcasting is another step on the path to progress. Now it is becoming a standard, not a luxury for the elite.
The 20 digital channels, available free of charge today, bring viewers the best picture quality, clearest sound and unparalleled experience. But, first, in order to watch “digital” on their TV, many residents of our country will have to buy additional equipment. Let's delve into the nuances.
General information
In practice, the question “how to connect digital television?” comes down to a one-time purchase and installation of special equipment that will allow you to demonstrate modern HD signal quality.
CETV channels are broadcast in packages - so-called multiplexes. Currently, the process of introducing digital TV in Russia includes the broadcast of two multiplexes, each with 10 channels. All 20 broadcast programs can be viewed for free.
What is digital television
Today there is hardly a family where they have not heard about what digital television is. And certainly many people can’t wait to connect it.
Digital television is another television technology, a new way of transmitting television signals that not only provides higher quality picture and sound, but also offers a greater selection of programs and functions (for example, analog TV does not have the ability to receive HD programs).
The idea of digital television broadcasting is quite simple: image and sound are transmitted over radio waves in the form of a digital audio-video stream, similar to what comes to our computer from the Internet when we watch a video on YouTube.
In addition, thanks to the digital algorithm, it becomes possible to send more than ten times more television and radio programs than with traditional analogue TV. Additional services are also available for digital viewing, such as electronic program navigation on the TV screen, as well as video on demand or interactive TV.
The main advantages of digital television are: high quality sound and image, the ability to watch HD programs. Digital television allows you to select different language versions of the same program, subtitles, and also block selected channels (so-called parental control).
Digital and analogue image
What distinguishes digital from the current standard, known as standard definition TV, is its higher resolution: the image on the TV screen is represented by dots (the so-called pixels) - the more of them, the more detailed and better the screen image. The number of such points is called resolution.
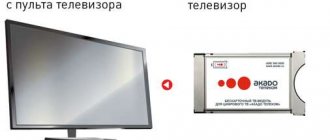
Setting up via cable TV
Free digital channels are available through your local operator's cable network. To do this, the user must have a special receiver and access module.
New TVs are usually equipped with similar receivers; for older models you will have to buy them. The content access module is provided by the provider.
What is needed to connect digital television
In order to connect to digital TV and take full advantage of its benefits, you need to invest in several necessary devices and accessories. If you don’t have a newly purchased TV at home with a built-in digital tuner and you don’t live near a TV tower, then most likely you will have to buy a tuner or a new antenna, or possibly both. For all this to work in one chain, you need various kinds of cables, thanks to which you connect the equipment.
How to approach this issue correctly? If you live in a high-rise building and have a shared antenna, then you should find out: is the house connected to digital television? Ask your neighbors, perhaps they are already receiving digital reception, so your collective antenna is quite suitable for digital reception. All you have to do is buy a receiver and set up your home TV network.
Equipment for digital television
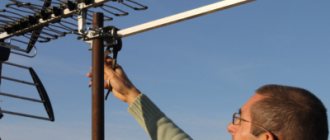
Antenna
If you live not far from the transmitter, then a small indoor decimeter antenna or the antenna that you already have will be enough to receive T2 television. If your locality is located far from the tower, then it is better to change the wave receiver by choosing a simple directional model. In addition, DVB-T2 reception requires proper antenna placement.
You may be interested in: The correct antenna for receiving DVB T2 digital television at the dacha
Amplifier
When choosing an antenna, you will be faced with the question of the need to amplify the signal. If you have a weak analog signal and you use an antenna with an amplifier, then most likely you will need it to receive digital signals. With significant losses in reception quality, a good amplifier is worth its weight in gold, especially if the distance from the transmitter is quite large.
Antennas with powerful broadband amplifiers can enhance the reception of not only the T2 band, but also all radio waves with similar frequencies, which can prevent decoding of the desired signal. Do not use the amplifier unnecessarily. In many cases it can do more harm than good.
Currently, amplifiers with a 12 V power supply are often used. However, according to the new DVB-T2 standard, new models of digital receivers provide a voltage of 5 V for the antenna amplifier. Therefore, in active-type antennas designed for T2, the amplifiers operate from a voltage of 5 V directly from the tuner. This is a convenient and cost-effective solution because it eliminates the need for an additional power source. The amplifier is powered only when the tuner is turned on.
You may be interested in: TV amplifier
Receiver
A digital receiver is a decoding device that allows you to use the digital television service. Receivers or decoders are usually easy to use and designed with user convenience in mind. The receiver is controlled using a remote control, but has basic buttons on the front panel of the case.
The receiver is compatible with most TVs. The TV must be equipped with a Euro or Video IN connector. However, in order to receive digital signal quality, the TV receiver must be adapted to support HD modes and equipped with an HDMI or component connection. Otherwise, programs that are broadcast in high definition will appear in analog quality.
You may be interested in: Digital TV set-top box
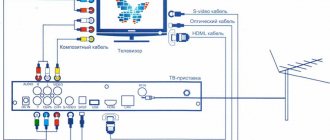
Cables
A digital set-top box can be connected to almost any TV: older TVs have a typical Scart socket for this, and later, flat TVs use an HDMI connector. Accordingly, you will need cables with the necessary connectors.
To get a screen picture in HD quality, the TV must be connected to a digital set-top box via an HDMI cable. When connected via a Euro connector (Scart), the resulting image will have analog quality. The HDMI cable may not be included in the set-top box; the client must purchase it independently.
The antenna is connected to the DVB-T2 receiver with a coaxial (coaxial) cable, which you will find in any radio store, through the RF-In or RF input or RFIN connector. At the end of this antenna cable there should be a well-secured antenna plug.
You may be interested in: Which cable is better: seven practical ways to check quality
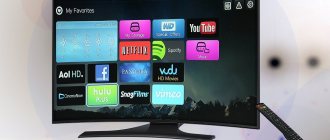
Using Third Party Applications
This method is the most convenient and simplest, because in the applications all channels are grouped and work stably.
Lime TV
Lime TV is one of the most popular applications, which has more than 150 channels in its catalog. These include free ones: First, TNT, STS, etc. The interface allows you to add channels to the “Favorites” folder. The sound can be adjusted by swiping up or down. There is a detailed TV program and a change in the quality of the picture shown.
In the settings of Lime TV, the user may notice a function for people with slow Internet. It allows you to speed up the start of TV shows.
In addition to all the advantages, Lime TV also has disadvantages. These include:
- More than 50 channels are available only by subscription.
- For each category of channels you need to buy an additional subscription.
- Aggressive advertising that pops up after every user action.
Most of the channels in the application are Russian. That is why broadcasting in other countries may be limited.
Light HD TV
The application has more than 250 channels. The application provides the following options: changing the picture quality, adjusting the sound, and rewinding some channels. But for certain categories of channels in Light HD TV, the user does not pay a subscription.
The program contains a large number of advertisements that pop up after each user action. To get rid of it, you need to pay a subscription for 1-6-12 months. Otherwise, the interface and operation of Light HD TV is similar to the application discussed above.
What channels are available for viewing?
As already mentioned, the T2 broadcast includes 20 free channels. Cable providers that provide digital may offer you more as part of the package you choose. But these will be paid digital television channels.
20 digital channels
The question of a third multiplex is up in the air, because... The existing digital broadcasting infrastructure in the Russian Federation is designed for only two multiplexes: there are not enough frequencies, the volume of analogue broadcasting is still large. It is expected that the current year 2021 will be decisive in the situation with the reduction of analogue broadcasting and the integration of the third package of digital channels.
Setting up channels using Smart TV
Digital television can be set up using the Smart TV function, which is found on almost all new TV models. To do this, you need to go to the “Menu”, then select the auto-tuning option and run it. This procedure usually takes less than ten minutes.
After scanning is completed, you should save the found channels in the TV memory.
Antenna selection and installation
Having decided to connect to digital television yourself, you will come close to choosing an antenna. Already at the very beginning, you should understand that there is no single universal model capable of catching a signal in any, even the most difficult conditions. It all depends on your location.
Using an indoor antenna is attractive, but, unfortunately, in many cases its power is not enough. This is due to interference that will inevitably appear in a situation when you walk around your apartment or when cars often pass near your house. Even with a very strong built-in amplifier, “clean” reception of channels will be problematic, because any obstacle dampens the waves. A room wave receiver is only “shown” at a short distance from the transmitter or in an ideal location (for example, windows pointing directly at the repeater).
An external signal receiver is a better option than an indoor one, because UHF waves do not penetrate walls without loss of quality. An external antenna provides sufficient signal strength. But is it active or passive?
The answer to this question is the distance between the TV and the DVB-T2 wave receiver. In most cases, a passive model that does not have additional amplification is sufficient, since the cable length is often short. In this case, the amplifier is an extra expense. The amplifier is already built into the active antenna at the factory.
You may be interested in: How to install an antenna
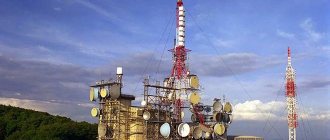
How to locate a TV tower
You can find the TV tower closest to your locality using the digital TV coverage map in Russia. By placing the name of your locality in the search bar, you can estimate the distance and direction to the nearest transmitter, and the main parameters of its broadcasting.
Reliable reception area
Reliable reception from a transmitter is when the quality of its broadcast remains at a high level, regardless of:
- depending on weather conditions
- from sun activity
- time of year and day
- air temperature and humidity, etc.
The reliable reception area is the coverage within the line of sight distance from the broadcasting antenna to the place where the receiving antenna is installed. The interactive digital TV connection map reflects the broadcast area of each television tower, under construction or in operation, for each of the two multiplexes.
Area remote from the TV tower
The problem with long-range reception of a digital television signal is its low level due to the significant distance between the transmitter and receiver due to the fact that outside the zone of reliable reception, radio waves fall into the shadow of the earth's surface, the so-called penumbra zone. Officially, permissible distances between towers have been adopted to solve this problem. However, digital reception at the edge of the transmitter's coverage area will be subject to interference due to weather conditions, which may appear as image fading on the screen.
Long-distance reception of digital channels is characterized by antennas that are large in size and have a complicated design. The task of remote subscribers (which is often solved only experimentally): to select an antenna design with a high gain and, at the same time, with the minimum possible dimensions. Directional models are usually the solution.
Equipment installation
It is extremely important to install the antenna correctly. The signal reception sector of these devices is small, so it must be accurately directed. If we are talking about an indoor device, then it needs to be placed on the windowsill and directed towards the nearest tower. It is advisable that there are no other emitting devices, such as a router, nearby.
It is much more difficult to install an outdoor antenna. It is better to secure it at the highest possible point: on the roof or on any high structure. In this case, there is less chance that the signal will be blocked by some obstacle. The antenna should be pointed at the nearest TV tower.
The antenna, receiver and TV are connected using coaxial cables. After connecting them, you can turn on the TV and start searching for channels.
Antenna and TV setup
To start watching DVB-T2, you need to connect all the necessary cables, and only after that should you connect the equipment to the power supply. The antenna should be installed towards the nearest TV tower.
You may be interested in: How to connect a digital set-top box to your TV
Connection process
Installing the decoder is as simple as its operation, taking about half an hour and following the instructions that come with the device or are displayed on the screen. When you turn on the device for the first time, the initial installation assistant window appears - “Autoinstall”, in which you can easily navigate to the most important settings. Labeled keys on the remote control will guide you through installation instructions step by step.
Settings
After you install the antenna in the desired position and make sure that all cables are connected correctly, you can connect the TV and set-top box to the network and begin setting up. Using the special button on the receiver's remote control, call up “Menu” and select “Settings”.
Auto search
Select the Auto Search option and wait until the scan finishes. If you were unable to tune channels using automatic search, this means that the set-top box is not receiving a signal from the antenna. Reposition the antenna and run Auto Scan again. Check different antenna positions and search the channel until the TV shows the channels of the desired multiplex.
Manual mode
In some cases, it becomes necessary to manually search for channels. In the set-top box menu, select “manual search” (this option may also be called “manual scanning”). A list will appear on the screen where you need to manually enter the broadcast data of the nearest transmitter and confirm the search. The correct result is 20 free Russian channels in HD quality.
TV on Android without Internet
As we determined earlier, to watch over-the-air television channels on smartphones and tablets, you need a TV tuner. The device connects to the gadget via a micro USB connector and allows you to watch TV channels received by the television antenna. The offer of such devices on our market is very extensive; any online store or specialized store selling radio electronics will offer you dozens of options.
Recently, a TV tuner for Android and iOS appeared on sale, which does not require a detachable connection to the gadget. The device allows you to distribute a television signal simultaneously to several mobile devices via WI-FI connection, and provides reliable reception of digital terrestrial channels in the DVB-T and DVB-T2 standards.
The tuner also supports the MPEG-4 format and has the function of recording TV broadcasts into the memory of your gadget. It is equipped with a telescopic antenna and can be placed within a radius of 30 meters from receiving devices, that is, the tuner can be installed in any place convenient for reception. The name of this TV tuner is Lunas. TV-1.
The device is powered by a lithium battery (1000 mAh), and the micro USB connector allows you to connect the receiver to a charger or other power source. The time of continuous operation of the tuner without connecting to the mains is 4 hours or more. If you use the tuner in a car, it is possible to power it through the cigarette lighter.
To work with the device, you need to download the “Lunas TV” application from the Play Market. After the application is installed, enable the Wi-Fi connection function on your gadget and select the Lunas network. TV-1. Then we turn on the autoscan mode and wait until the found channels appear in the list. This is practically the entire installation. After its completion, you can enjoy watching TV broadcasts in any place convenient for you.
Checking the signal quality
After installing and connecting the equipment and setting up the channels, you should check the signal strength level. This can be done using a receiver.
To do this, press the INFO button on the device three times. After this, information about the signal frequency, its encoding and reception quality should appear on the screen. If it exceeds 60%, then everything is done correctly and the equipment is working normally.
If the level is less than the specified value or constantly “dances,” then it is necessary to look for and fix the problem, because otherwise the picture will be unsatisfactory.
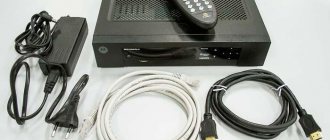
Connecting a digital TV to an old TV
Digital channels are successfully installed on old TVs. To do this, you need to buy a receiver and connect the antenna to the TV through it. In 2021, you could purchase this device for 1 thousand rubles.
Connection diagram for a digital set-top box to an old TV
When people talk about old TVs, they usually mean models released from the early 2000s until about 2012. However, it is possible to connect digital broadcasting to old Soviet technology, although this is not easy to do. To do this you need:
- remove the insulation from the antenna cable in an area of 1.5-2 cm;
- remove the shielding braid;
- remove the insulation of the central vein in an area of 1-1.5 cm;
- Connect the resulting wire to the tuner and TV.
To successfully perform these manipulations, you need to have some experience working with electronic devices. You should also understand that even a digital signal on devices like “Record” or “Rubin” will not provide decent quality. The picture tubes of Soviet televisions are simply not capable of displaying images in high resolution.
Main problems and ways to solve them
Problems can arise both at the setup stage and after it. Most often, users complain about the following problems:
- The message “No signal” appears on the screen, there is no picture. There may be several reasons for this problem: damage to the antenna or incorrect connection of one of the connectors. You need to check all possible options and fix the problem. You may have to look for a new place to receive the signal or raise the antenna higher.
- The image quality is poor or there is a delay. In this case, the problem is most likely with the antenna. It may be oriented incorrectly or simply not have enough power to receive the signal properly. If the reception quality deteriorates significantly, it is recommended to go to the RTRS website and once again check the direction to the nearest relay towers. It is possible that the signal is blocked by a barrier between its source and the antenna.
- Only one multiplex works - 10 out of 20 channels. In this case, you need to check the operation of the second repeater. It may have stopped broadcasting in the region or the antenna is too weak to pick up its signal. In this case, you can try connecting to another tower. The receiver could simply not add non-working channels to memory. In this case, they need to be configured again and saved.
- One or more channels have failed. This problem rarely occurs. The reason may be the operation of the TV, the antenna, or a problem at the transmitting station. The channels should be reconfigured; if failures occur regularly, check the serviceability of the antenna or TV.
Installing channels without a receiver
People often ask how to set up 20 free digital channels without a receiver? Alas, there is no magic way here. You can not use a receiver or decoder only if it is already built into the TV.
Finding out whether your TV has such a device is very simple - just carefully review the technical documentation. If there is a plus in the column with DVB-T2, then the TV has a built-in decoder.
To receive the signal, you can use cable TV, satellite dish or Smart TV.