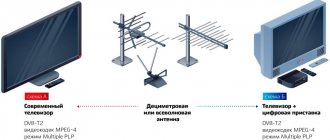
In 2021, the transition to digital television was carried out in the Russian Federation. This allowed us to watch channels in better quality without interference. Despite the fact that the transition has been completed, not everyone has yet connected to DTV. Therefore, the topic of connecting and setting up digital channels on a TV remains relevant. And it will be in demand for a long time.
Terrestrial television (from a regular antenna) has one undeniable advantage - the absence of fees for viewing channels. An initial investment will be required as you need the right antenna and digital receiver. But then you don’t need to pay for channels, television is completely free. It is possible to connect anywhere, an apartment building in the center or outskirts of the city, or in a country house. The manufacturer of television equipment is also not important.
What are the advantages of digital TV
Analog TV transmitted a list of channels on separate frequencies. That is, a separate frequency value was allocated for each television channel. The situation with digital broadcasting is different. The encoded signal of a package of channels is transmitted at once on one frequency. That is, several channels are broadcast at once in one meaning, or rather, some television and a number of radio channels. If we talk about TV channels, then each package, called multiplexes, contains 10 TV channels.
There are two multiplexes available almost everywhere in the country. This means that the viewer will be able to use two dozen DTV channels. And in Moscow, parts of the Moscow Region (where the signal from the Ostankino Tower reaches) and Crimea, you can set up as many as three multiplexes, i.e. 30 channels.
Transmitting data in packets rather than individually provides both advantages and disadvantages. The advantage is that the signal is resistant to interference, which was very annoying when using analogue broadcasting. But if there are problems on the repeater and any multiplex is turned off for maintenance or repair, then a significant part of the channels disappears. But the picture on the TV screen is clearer.
Why doesn’t the equipment pick up channels and where to go?
The management company to which the house is assigned, or the chairman of the apartment building, is responsible for servicing the common building antenna. If something happens to the device, for example, it stops working or does not receive a signal, then you can turn to the above structures. If you contact the management company, you must write a statement that describes the essence of the problem.
Currently, all regions are rapidly switching to digital broadcasting. It provides subscribers with a good image, high-quality sound and no interference. Many people use a collective antenna, which allows them to view digital data. The main thing is to find out whether the device receives a digital signal and configure the channels correctly.
What kind of digital television can I connect to?
- Terrestrial DTV. The connection requires only an antenna and a cable to connect the over-the-air receiver to your TV or digital set-top box. Television is free, so it is used by most residents. In addition, in some cases you can do without spending at all. The cable remains from the previous system, and you can make an antenna for DVB-T2 television yourself. It is about broadcast television that we talk about in the article.
- Satellite television. The signal is also received by an antenna, but a parabolic one, that is, a satellite dish. Additionally an external tuner is required. The cost of equipment is much higher than for broadcasting. But the user will be able to view an increased number of channels. It is unlikely that you will be able to install the antenna yourself; you will need the help of specialists.
- Cable TV. An excellent alternative to ethereal. A cable is installed into the house from a cable TV provider, and an agreement is concluded. Afterwards, the technician connects your apartment to television. The channels are available for a month, after which a subscription fee is required.
- Internet television. You won't be able to watch without a Smart TV. There is a logical explanation for this: you need an Internet connection to view it. This means that the apartment or house must have Internet. There are different ways to connect. For example, you can watch channels for free through public playlists by downloading from the Internet. Or use the services of Internet television providers. The latter method is preferable, since a large list of channels is available. In addition to federal programs, there are channels of different categories (movies, TV series, premium, entertainment, etc.). In addition, you will be able to watch some channels in HD quality. It is paid, like cable. You need to pay for the service monthly depending on the selected tariff, which determines the number of television channels.
Before switching to digital television, you need to decide on the capabilities of the TV. If the equipment is very outdated, you will have to purchase additional equipment.
Description, pros and cons of a collective device for receiving TV
A collective antenna is a device where the signal is distributed to a large number of subscribers. A collective antenna is installed in every residential building.
The main task is to provide the residents of the house with television channels. You must pay monthly for such an antenna. Different regions have their own prices.
This antenna consists of the following parts:
- Receiver _ A device that helps receive digital numbers.
- Amplifier . It allows you to amplify the system signal.
- Distribution system . This is a device with which television is tuned.
There are some advantages of this device:
- Free service feature. The housing company is responsible for repairs and installation of the antenna.
- Good quality. Antenna installation is carried out by specialists, not by residents of the house. They calculate the location of the area and select the optimal point for installation.
- You can set up TV broadcasting immediately after moving into your home. No additional equipment is required.
- Customers can simultaneously set up analogue and digital television broadcasting.
As for the negative aspects, there is only one - a monthly subscription fee for use. It has already been included in utility bills.
What kind of TV do you need?
Any modern TV receiver released after 2013 is suitable for displaying DTV.
Earlier models can also support DTV, but only the first generation, that is, the DVB-T standard. Now “digital” is broadcast on modernized equipment; the signal is broadcast using second-generation technology (DVB-T2). It is the number “2” that defines a generation. You need to rely on it to find out if the TV is suitable.
Find out the TV model code in the documentation or on the back cover of the case. Go to the search engine via the Internet on your computer or phone. Register the model and go to the sites. Look at the section (usually a table) with technical specifications. Opposite the item “Broadcast standard” or similar, “DVB-T2” should be indicated among those listed.
If you know that the TV was purchased recently, there is no point in checking. It can definitely receive and process the signal from a digital antenna.
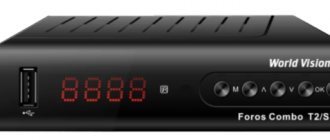
If the check shows that the television receiver does not support T2 television, an external set-top box must be connected. Outwardly it resembles a router with several inputs and outputs for connecting cables. Additionally, there may be buttons, a digital display, connectors for connecting flash drives and adapters. But there is no point in buying expensive consoles. The cheapest device will be able to show 20 federal channels.
If you are no longer satisfied with the quality or size of the TV, you can purchase a new one. Then you don’t need to connect the set-top box to the TV.
Receiver selection
When selecting a digital TV receiver, first of all you will need to decide on the planned types of viewing digital television. They are divided:
- Broadcasting - for this it is enough to purchase the simplest set-top box. If your TV has a digital signal reception function, you can do without a set-top box.
- Cable TV - in this case, you will need to determine how the signal is transmitted in a particular region. In most cases, operators use DVB-C and IPTV standards. Accordingly, receivers should be purchased in accordance with the specified standards.
- Satellite TV - here you need a receiver that reads the reception signal from the corresponding satellite.
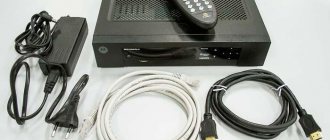
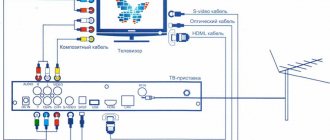
What you need to connect digital TV
The entire system consists of several main and auxiliary elements:
- decimeter antenna for DVB-T2 reception;
- TV with built-in digital tuner or external T2 receiver;
- antenna coaxial cable with a characteristic impedance of 75 Ohms;
- F-type connector to connect the cable to a TV or receiver;
- if the antenna is active, then you need an external power supply (if there is no set-top box). With a receiver there is no need for a block, since power can be supplied through the device settings;
- To connect several TVs to one antenna, a splitter (signal divider, splitter, crab) is required.
What kind of antenna is needed for the transition?
- The simplest option is indoor antenna.
Almost always it is placed on the windowsill or mounted on top of the window. There is a way to catch only a strong signal from a nearby television digital repeater. Moreover, the signal should not be interrupted by high dense buildings or trees near the window. Suitable if you live in the city center or not too far away, and there is no density of buildings, that is, the area is quite spacious. - Outdoor individual antenna.
It can be installed independently outside an apartment or house. Provides better reception and is therefore more popular than a home antenna. You need to choose if the tower is located far away (from 15 km or more). Selected for country houses and where the indoor terrestrial receiver does not work properly. It is better to immediately take an antenna with a built-in amplifier. - Community antenna.
It is located on the roof of the house and ensures the transmission of a T2 signal to the televisions of all residents of the building at once. The best option, since the highest possible installation location always gives the best results. But you won’t be able to fix even the slightest problems on your own. Only the service company carries out preventive maintenance and repairs. The same goes for connectivity. Selected if there are many tall buildings nearby that block the signal. In this case, it is unlikely that it will be possible to install an individual design normally. And the collective antenna is on the roof, which ensures a good signal level.
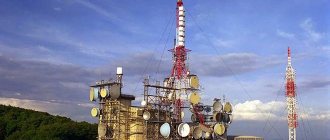
Additionally, when choosing an antenna, take into account the distance from the digital broadcast tower. The further away it is, the more powerful the antenna is required.
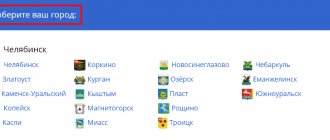
You can find out the distance to the tower on the CETV coverage map. Enter your address in the “Address or object” line, click “Find”. Click on the location indicated on the map and select the nearest repeater in the table. This is the distance you should use when purchasing an antenna.
- If the distance is no more than 15 km, an indoor unit will suffice. But it is important that there are empty zones so that the signal reaches the receiving device.
- From 15 to 30 km a stronger antenna will be required. But in some cases, an indoor antenna can provide high signal quality. It’s better not to experiment and immediately buy a powerful outdoor structure.
- If a digital broadcast station is located at a distance of 30 to 50 km, a highly directional antenna with an amplifier is needed.
- More than 50 km. The signal is subject to significant losses. Therefore, there is a risk that no antenna will be able to receive a sufficient level of DVB-T2 signal. The use of a satellite dish is recommended.
Antenna Installation Recommendations
Remember, the higher the setting is made, the more likely it is that the signal will reach the antenna. Any opaque buildings and even the foliage of trees absorb the signal. Therefore, problems may arise with adjusting the location of the antenna on the first and even second floor of the house.
The best place to mount the antenna is the roof or the end of the house.
Cable selection
The cable transmits a signal in the form of a current, which is excited at the antenna by the received waves. Next, the received signal is converted into a form that can be displayed on the screen. This is how the picture appears on the TV screen.
The better the cable design, the less signal loss will occur in the conductor. The magnitude of the signal that reaches the TV receiver depends on this. When the TV signal level is low, periodic signal loss may occur. This entails the picture stopping, squares appearing, and sound disappearing. Therefore, if there is no cable left from the old antenna or there is no cable at all, then it is immediately recommended to buy a good version of the cable.
The following brands of wires are recommended for transmitting a TV signal:
- RG-6;
- SAT-50;
- SAT-703;
- DG-113.
An acceptable replacement would be the domestic version of the RK-75.
If none of the brands listed is available, then in the store choose a cable with the following parameters:
- thickness of the central core – 1 mm;
- core material – copper.
The longer the wire, the greater the attenuation of the TV signal. With every meter the signal decreases. This means that if the length is excessive, the signal can drop to almost zero. Keep this in mind when choosing a place to install the TV and attach the antenna. The maximum length is 100 m. With this value, the radio signal becomes practically zero.
Connectors, adapters
The second end of the cable that comes from the antenna must be connected to the antenna socket of the set-top box or TV. There is a special plug under the socket, which consists of two parts:
- F-connector – fits onto the cable;
- adapter - screws into the connector. Depending on the task at hand, adapters are different. In our case, an F-plug (male) is required, which is designed to be inserted into the F-socket of the TV.
There is no need to buy both parts separately. The plug is sold assembled, containing both a connector and an adapter for a set-top box or TV set. The information is written for general education.
There is a straight and angled (V-shaped) adapter for the connector. Direct is used if there is enough space behind the TV. A corner one is needed for a TV that is hung on the wall. In this case, there is practically no space at the back of the case. And with a straight plug, the wire can bend strongly and rest against the wall.
How to connect and configure digital
Actions begin with the antenna. But before attaching it, you need to connect the antenna cable to the output of the structure. That is, to the antenna itself or the amplifier on it.
You need to strip the cable and secure the exposed section in the amplifier clamp. Do not allow a short circuit between the cable shield and the core core, as well as to other contacts on the amplifier board.
It’s easier with an indoor antenna, since it already has a connector for connecting a wire. Or the cable immediately comes out of the antenna.
Antenna Installations
Digital television broadcasting is direction sensitive. Therefore, you need to point the antenna as accurately as possible to the signal source, that is, to the transmitting station.
You can also try to tune in “by eye”. But manual configuration can take a very long time. And the accuracy of the location remains in question. It’s better to immediately use the values that the RTRS-1 mapping service gives people.
- Open the DTV coverage map, write the address in the line and search with the “Find” button.
- On the map, click on the house you are looking for and decide on the tower you will be heading to. You need to look at the “Distance” line. Selecting a nearby station ensures that the signal arrives with minimal or no loss. But this is not always possible. It often happens that the tower is on the other side of the house. And if you point the antenna in accordance with the direction provided on the map, the antenna will look at the wall of the house. In this case, you will have to place the antenna on another tower.
- I operate with the value in the “Direction” line and the arrow icon, using a compass, direct the antenna. Fix it well after installation so that the correct position will not change in the future due to strong gusts of wind.
Carrying out the described actions is enough for the antenna to catch the channels and the signal strength to be at the level.
Using the same instructions, you can orient your home antenna. This will be even more useful for an indoor version than for an outdoor one.
Plug installation
The free end of the feeder (cable) needs to be crimped, or rather, the plug must be attached to it. A regular metal connector is used.
This must be done if a set-top box for digital television is used. If you only use a TV and an active antenna, then there is no need to install a conventional connector. The fact is that power is required for the antenna (amplifier). This means that a plug from the power supply is connected to the end of the wire (we’ll look at it below), and not a television connector with an adapter.
- First, the cable is cut for the F-connector. Using a regular or utility knife, remove 10 mm of the top insulating material of the cable.
- Bend the shielding layer completely in the opposite direction so that it is located on the remaining upper shell.
- Carefully cut the inner insulation and remove part. Leave about a couple of millimeters of layer.
- Unscrew the adapter from the antenna connector if it was originally screwed in.
- Using your hands or a pair of pliers, screw the connector completely onto the braided cable. You need to screw it in until the braid is completely under the metal part of the connector, and the core sticks out a few millimeters.
- If the vein protrudes strongly, shorten it with wire cutters or regular scissors. But you still need to leave a small protrusion of about 2 mm.
- Screw the adapter into the connector thread.
Afterwards, you can insert the cable with a plug at the end into the antenna connector (ANTENNA, ANT IN, RF IN) of the set-top box or TV equipment.
Connecting the amplifier power supply
The connection is made through a separator. This is the device that is located at the end of the cord extending from the unit. Simply put, this is a small box, inside of which there is a plug and a board along with fasteners for the cable.
You need to unwind the separator, strip the cable, insert it into the clamp and press it tightly with the bolts. Refer to the image below when connecting. It is important to prevent the core from short-circuiting with the screen.
Connection to TV or T2 tuner
The last step is to connect all devices. Insert the plug firmly into the TV antenna socket. Or connect to the connector of the set-top box.
If you have a power supply, plug it into a power outlet. Then turn on the TV and automatically scan for channels.
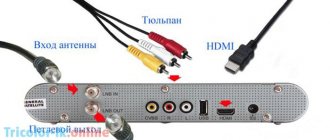
The set-top box must be additionally connected to the television equipment. A multimedia cord must be included with the device. Could be a tulip cord or a high quality HDMI cable.
If possible, use an HDMI cable, as it transmits audio and video in the highest quality digital format. In the case of a tulip, you need to insert a plug into each socket, observing the colors of the inputs and outputs. When the TV is an old model, the body often has only white and yellow tulip inputs. Then the red wire is not needed. Without it, sound and images will also work.
To power the amplifier from the set-top box, open the menu and in the “Search” section, enable the “Antenna power” option.
How to find channels
The algorithm for setting up a TV to receive digital TV is different for each brand. But the steps are very similar. Using the instructions below, you can easily find the necessary sections and menu items to search for programs.
- On the remote control, press the “Settings” button to open the device settings section.
- If there is no settings button, click “Home” (the house icon or the inscription of the same name). Then find and select "Settings", "Preferences", "Options" or similar.
- Find the channel menu. The names can be very different, for example, “Channels”, “Broadcast”, “Broadcast”, “Live”, “Live TV” and so on.
- In the next steps, select the search source (in our case it is antenna, terrestrial) and the search mode (digital channels, digital and analogue). For digital search there are no differences in both points. Both modes will scan DVB-T2 frequencies.
- Start the search by clicking “OK”, “Scan” and other similar buttons.
- Wait until scanning of TV channels is completed. If the connection is correct, then already during the search process you will begin to notice how channels will be added in groups of 10. It is possible that analogue TV channels will be added, in addition to digital ones.
- After completing the search, click “OK” or “Finish.” The TV should go into viewing mode and display the first channel. If this does not happen, open the channel list through the TV menu or using the button on the remote control (LIST, CH LIST, CHANNEL LIST and others).
Everything is the same with the console. But first you need to switch the TV to another signal source so that the picture is output from the set-top box.
The source menu opens with the “SOURCE”, “INPUT” button. Less often, but it happens that the button is indicated only by an icon of a piece of wire. On older TV receivers, the sources section does not open. There is an "AV" button that simply switches the source each time you press it.
- If the receiver is connected with tulips, then the source needs “AV” (audio-video).
- When connecting with an HDMI cable, select the same source.
Afterwards, when the set-top box is turned on, the tuner menu will be displayed on the TV screen.
- If you turn it on for the first time, you can immediately set the initial parameters (language, region, resolution and screen aspect ratio). There will also be a button to start the search. Click and the scan will start. Once you've finished adding TV channels, save your changes.
- If this is not the first time it was turned on, and the setup was done previously, then it is possible that the channels are already configured on the set-top box. Try looking at the list and switching channels. If all transmissions are working, there is no need to perform a search. If the channels are not shown, go to the menu, open the “Search” tab, select the “DVB-T2” standard, click “Auto search”. Finally, save or confirm the completion of the operation with the “OK” button.
Manual search
Manual setup is rarely needed, but sometimes it helps to set up television if automatic scanning does not produce results.
You need to enter the manual scanning menu in the same way as in the instructions above. Only instead of the “Auto search” item, “Manual search” is selected.
Then you need to set the channel number (frequency) on which each program package is broadcast.
You can find out the numbers and frequencies on the digital television map. Find your home on the map by entering the exact address in the search field. Afterwards, click on the house and take the “TVK” data in the lines “Package of TV channels RTRS-1” and “...RTRS-2” for the TV tower that the antenna is facing.
Enter (or select) the first channel number in the TV menu. Click "Add Channel", "Create". The TV will detect the channels and save them to a list. Do the same for the second channel.
By the way, when you enter a channel, the signal scale should work. It shows the level of the radio signal that has now reached the decoder. The scale displays data in real time. The higher the value, the more stable the television reception.
If the scale on one channel (or both) shows a zero value, this becomes the reason why auto search does not find channels. This means there is a problem somewhere. It is possible that the antenna is bad, broken, or installed incorrectly. Or somewhere the signal is interrupted, possibly due to cable damage.
Setting up TV channels: general guide
On each device, the settings are slightly different: different menu items, different order. But the general setup principles are suitable for all devices:
- Connect the antenna or cable.
- Connect the TV to power and turn it on.
- Open the menu using your remote control.
- Go to “Options”, “Settings”, “Settings” or similar. Samsung calls it “Channel”.
- If the settings require selecting a country, then indicate “Russia”; if you need to select a signal type, then o. These items are not available on all menus.
- Select the source of the received signal. This could be a cable, antenna or satellite signal.
- Start searching for channels. The item can be called differently: scanning, auto search, quick search, and so on.
- The channels work without a set-top box, and you can enjoy watching them.