What is a receiver and what is it for?
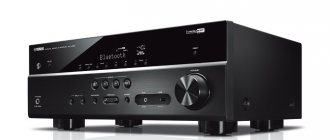
A receiver or tuner is a device that is capable of decoding a digital television signal in order to subsequently transmit it to the screen in the form of sound and image. We have already said above that all modern TVs have a built-in tuner, which initially has the ability to read digital signals, but older TVs do not have this capability. And this is exactly what the receiver is designed for.
We have already said that digital television is better than analogue. But we haven't mentioned signal types. The fact is that analog television is capable of transmitting a signal in only one way - cable, while digital broadcasting can be carried out via satellites and broadcasts. That is, when in our reviews you see different types of signals, this is nothing more than the ability of the TV to read this or that type of digital broadcasting. For example:
- DVB-S and DVB-S2 are satellite broadcasting options.
- DVB-C is a variation of cable broadcasting.
- The rest are variations of broadcasting.
And if modern televisions are capable of performing this work automatically, then outdated televisions, designed exclusively for analogue perception, cannot do this. In this they are helped by receivers that receive a digital signal, process it, decode it and convert it to analog. As a result, your TV receives the signal it was designed for, but at the same time it picks up digital signals.
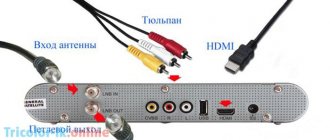
Among other things, some receiver models have additional functions. For example, they have additional slots and functions. For example, they have USB slots so you can use flash drives and external hard drives to display content on the screen. In addition, you can record content from a TV program through the receiver. However, do not forget that the main function of the tuner is its ability to transform a signal from digital to analog in good quality, so first of all pay attention to this. Well, you can connect the device to your TV using cables and interfaces: SCART, RCA, HDMI or tulips. But we will return to this later.
Does TV support digital?
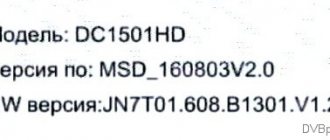
In order to set up digital television, make sure that your TV supports the DVB-T2 format. This format is supported by all new models, but to make sure of the TV’s capabilities, check the instructions or product data sheet. Also, any Hyundai TV can be checked on the website, see the RF figure. Where do you choose the brand and model of your TV receiver?
To set up your Hyundai TV, you can use two different setup options. Manual search – suitable for quickly searching for channels. To do this, you need to know the name of the multiplex frequency. Automatic search - you need to choose when you need to update or find all available channels on the network.
How to find out if your TV needs a receiver
Everything is quite simple. Focus on TVs 2021 and older. Almost all models starting from 2021 have a built-in T2 tuner. However, some models do not have such capabilities, so carefully read the device passport or its characteristics on Internet resources. For example, in our reviews we always indicate these device capabilities.
Standard equipment for digital set-top box
Let's look at what is included in the standard set of the receiver; this information may be useful when connecting it to a television receiver.
Standard equipment for digital set-top box
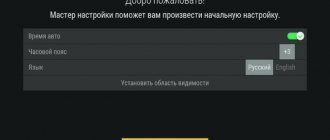
Let's list what is shown in the figure:
- A – user manual, we recommend that you carefully read this manual to get a complete understanding of all the functionality of the device and its connection to the TV and antenna.
- B – “Tulip” cable (RCA) with characteristic connectors allows you to connect the set-top box to almost all modern models of television receivers.
- C – a device for decrypting and converting a digital signal into an analogue one (receiver).
- D – packing box.
- E – remote control for the device.
- F – batteries for the remote control.
- G – network adapter for connecting the device to a household power supply.
- H – warranty service coupon.
The basic configuration may differ slightly from what is shown in the photo (for example, the “Tulip” is replaced by an HDMI cable).
How to choose a receiver for your TV
Surely you have already realized that receivers are different. And not only in terms of the principle of operation, but also in terms of the type of operation and power. In order not to bother you with abstruse terms and numerical characteristics, we will give you a simple classification that will help you make the right choice.
Discount of the day!
Cable receivers
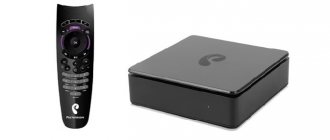
Cable receivers are the most budget-friendly and most in demand. They are perfect for apartment buildings, to which the appropriate cable is connected. That is, it works the same as wired Internet. You connect the digital TV cable to the receiver, and the device itself to the TV and a power outlet.
Satellite receivers
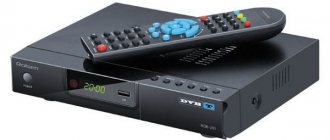
This is an excellent option for private houses, especially country houses. Such receivers receive signals using satellite dishes and antennas. As a rule, the receivers themselves do not cost much more, but they often require a signal amplifier, because in country houses, even in big cities, the signal is poor.
On-air receiver
These are devices that were massively distributed free of charge during the transition from analogue to digital TV. Essentially, such devices allow you to access a small number of free channels.
As for the characteristics that you should pay attention to when purchasing, pay special attention to the following:
- Signal strength.
- TV connection type.
- Additional features and capabilities.
- Digital standards.
Standard equipment for digital set-top box
Let's look at what is included in the standard set of the receiver; this information may be useful when connecting it to a television receiver.
Standard equipment for digital set-top box
Let's list what is shown in the figure:
- A – user manual, we recommend that you carefully read this manual to get a complete understanding of all the functionality of the device and its connection to the TV and antenna.
- B – “Tulip” cable (RCA) with characteristic connectors allows you to connect the set-top box to almost all modern models of television receivers.
- C – a device for decrypting and converting a digital signal into an analogue one (receiver).
- D – packing box.
- E – remote control for the device.
- F – batteries for the remote control.
- G – network adapter for connecting the device to a household power supply.
- H – warranty service coupon.
The basic configuration may differ slightly from what is shown in the photo (for example, the “Tulip” is replaced by an HDMI cable).
How to connect the receiver to the TV
As we said earlier, you can connect the receiver to the TV through one of the following connectors: SCART, RCA, HDMI or “tulips”. It is noteworthy that initially it is best to choose a receiver that you can connect to the TV without problems. Well, if your model is too old, then this is also not a problem, because now you can find many different adapters. Well, as for the connection, below we have given you step-by-step instructions on how to do this:
- Decide on connectors. If necessary, purchase the appropriate adapter. Connection interfaces are located either on the side of the TV or on the back.
- Unplug your TV. The receiver must also be turned off.
- While the devices are turned off, connect them using cables and adapters. It is best to connect via HDMI, DVI/D-SUB or Scart, because... in this case you will receive a higher quality broadcast. Tulips are not so good in this regard.
- Connect a signal source (antenna or satellite) to the receiver.
- Connect the receiver and TV to the network.
- In the settings, start searching for channels (if it did not happen automatically).
In addition, 1 receiver can be used on 2 or more TVs at once, if they are in different rooms. To do this, you need to buy a device capable of such achievements. True, such a receiver will cost more, but it is better than buying 2-3 separate devices.
And with this we say goodbye to you, good luck to everyone and see you again.
Connection options
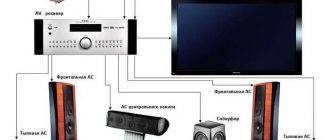
The electrical engineering market is growing. Companies set their own standards for video signals. For this reason, several types of connections have appeared, and the TV receiver has a variety of connectors. There are six options in total.
There are several options for connecting the receiver
RCA (tulip)
The Radio Corporation of America was the very first organization to develop and equip televisions with communications. Old monitors and receivers are equipped with this type of connection. RCA consists of three plugs and connectors in white, yellow and red. Yellow receives and transmits the picture to the TV, and red (right) and white (left) are responsible for sound quality. For the screen to work, you need to connect the cables according to the colors. The disadvantage of this technology is the low image quality for large monitors (more than 30 inches).
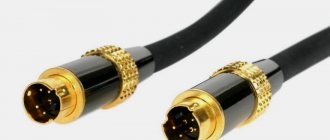
S-Video connector
This type of connection differs from the previous one in having a higher frequency and, therefore, better image quality. The socket is available on all game consoles and DVD players. A significant drawback is the lack of a plug for audio output. Therefore, to receive sound from the TV you need to buy separate wires. Typically RCA plugs are purchased and used.
In this video you will learn how to connect the receiver:
SCART connector
Syndicat des Constructeurs d`Appareils Radiorecepteurs et Televiseurs is universal and is sold with most televisions. “Comb” (as it is called in everyday life) has much more advanced capabilities, unlike the previous two. It conveys excellent picture and sound quality, although it is considered outdated due to its size. SCART also supports stereo sound, S-Video and RGB format. This communication method is not used on set-top boxes.
Important! This type of connection is sold in different modifications, so you should be more careful with your choice.
RF connector
Radio Frequency allows you to connect to TV broadcasts either via a satellite dish or via cable. The downside is the low resolution of the picture (the same as that of a tulip). Therefore, this connector is usually used for small TVs. Plus - the ability to connect two TVs to one receiver, but for this the receiver must have the necessary RF output and an appropriate modulator. But not all receivers have such technical characteristics.
YPbPr and YCbCr interface
These plugs are designed based on RCA. Despite this, the interface allows you to watch TV in HD quality. This is achieved through five “petals”: white, red (aluminum) and green, red, blue (plastics). YCbCr and YPbPr differ in their binary coding system.
In the first case, a digital channel is received and reproduced, and in the second, an analog channel. You need to connect like this:
- Green, red and blue are inserted into the receiver into a platform called “Video” according to the colors of the connectors.
- Red and white are connected to the panel marked “Audio” into the corresponding connectors.
The blue plug controls the brightness and blue level on the screen. Red is exactly the same, but for its own color. Green is necessary for synchronizing the picture and adjusting brightness.
HDMI
High Definition Multimedia Interface is the most modern and advanced type of connecting a receiver to a monitor. If the TV receiver and the screen itself have special connectors for HDMI, then HD image quality, high definition and excellent sound are guaranteed. The interface is suitable for screens of any diagonal. HDMI consists of only one wire, with plugs at the ends. The wire is capable of simultaneously processing audio and video signals.
The receiver can be connected via HDMI