What is a receiver
Digital television operates in a modern digital format. New technologies have improved sound and picture quality. In addition to 20 basic TV channels, digital catches more than 300 different TV programs and is constantly expanding its range.
Most older TVs, including LCD or plasma, are configured to work with an analog DTV (Digital Television) signal. It is transmitted in the AM band at FM radio frequencies. The transmission quality is low due to the large amount of interference. And the further the reception point is from the radio tower, the worse it is.
In order for the quality of television broadcasting to move from 525 lines, 60 fields and 30 frames to Full HD standards, you must connect the receiver to a TV.
Features of digital TV broadcasting
Analogue television operates using the standard DVB-C protocol. Digital broadcasting transmits signals in three ways:
- Satellite TV or DVB-S, S2;
- Cable – DVB-C;
- Broadcasting – DVB-
The equipment for decoding the signal is selected depending on its type. TVs with a built-in T2 receiver do not require auxiliary devices.
How tuners work
Based on the types of digital television transmission signals, there are three types of receivers: cable, terrestrial, satellite.
Regardless of the type, all tuners work on the same principle:
- Reception and amplification of a digital signal.
- Decoding and conversion to analog signal via RCA, SCART, HDMI, tulip connectors.
- Playing multimedia from USB media and drives (optional).
- Recording, stopping and delayed viewing (optional).
You need to connect the receiver to the TV specifically to “convert” a digital signal into an analog signal without losing the quality of sound and image.
Which TV doesn't need a set-top box
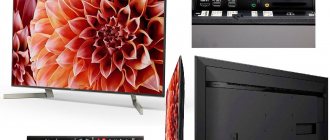
Modern TV models are equipped with a built-in or external T2 tuner. For such options, no additional attachment is required. You can check the availability of such equipment in your TV on the manufacturer’s official website, for example, go to the Samsung website and type in the TV model in the appropriate section.
You can carefully study the passport for the TV. It must indicate the complete set and type of incoming television broadcast signals.
Smart TV, which operates over an Internet connection, does not require receivers. The quality of broadcasting in this case depends on the speed of data transmission over the network and the reliability of the connection to it.
Receiver selection
Set-top boxes are selected by signal type:
- If a cable with a digital signal is installed in a multi-storey building, a cable receiver will be required. It connects simultaneously to the wire stretched from the entrance, to the electrical network via an adapter, and to the TV.
- Private houses are equipped with antennas that receive satellite TV. In this option, you buy a satellite tuner. Additionally, a signal amplifier may be required.
- Terrestrial set-top boxes are suitable for the basic channel package. They were purchased or received free of charge during the transition from analogue to digital television in Russia.
In addition to the main criterion - the type of incoming signal, there are additional criteria for selecting equipment:
- Signal reception power;
- Type of connection to TV - what connector and adapter is needed;
- Availability of additional options: broadcast recording, turning on or off by time, reading information from USB drives.
It is better to choose the method of connecting the receiver to the TV before purchasing the equipment. An auxiliary adapter (cable with different connectors) is often required, which is purchased along with the equipment set.
Ways to connect the receiver to the TV
The set-top box comes with a cable with an adapter for connecting to the mains and an adapter for connecting to a TV (not always). Before purchasing equipment, look at what connectors are on the TV itself. In most Samsung and LG models they are displayed on the back or side panel.
In total, there are 7 options for connecting the receiver to the TV: RCA, Scart, HDMI, DVI/D-SUB, LAN, CAM module, antenna input.
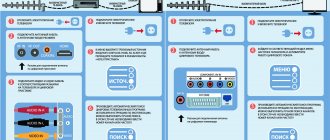
General connection diagram
A separate device (set-top box) is connected directly to the signal source, power supply, or TV. The general diagram for connecting the receiver to the TV is as follows:
- Before connecting all devices into one circuit, disconnect them from the network.
- Connect the set-top box and TV through the selected connector.
- Connect the antenna or cable (signal source) to the set-top box. A separate entrance is provided for this.
- Turn on all equipment. Start automatic channel setup.
If the receiver is correctly connected to the TV, the channels will be tuned in quickly and 20 free TV shows will be immediately available. If you have paid a paid connection to the Internet and TV from an operator offering services in your home, for example, Tricolor, specialists are required to connect and start the equipment themselves.
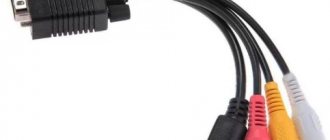
Via RCA connector
The classic connection of old TVs is through tulips or an RCA connector. DVD set-top boxes and other equipment were previously connected in the same way. There are three connectors on each end of the cable: red, white and yellow. Yellow is not required to connect the receiver to the TV via tulips. The red and white wires are audio signals.
On the TV and set-top box, the tulip connectors are painted in the same colors. Additionally, they all have their own markings. The maximum quality that can be obtained with this option for transmitting digital channels is up to 1080p.
Important! Tulips - power cables. connect the RCA only when the power supply to the TV and set-top box is turned off.
Via Scart
The wide flat connector on the TV is suitable for receiving a digital signal. The Scart version is equipped with a wide connector on one end and tulips on the other, where the attachment is. This is a more compact and faster way to connect a tuner to a TV.
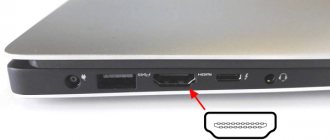
Connection via HDMI
A modern option for organizing digital television is to use an HDMI cable. This is high capacity coaxial wire. Connecting the receiver to a TV via HDMI allows you to watch TV channels with Full HD resolution.
Connecting equipment via DVI/D-SUB
Powerful, high-quality receivers, also used for Smart TV, have a video adapter. It provides high signal transmission speed, sound and image quality. As an adapter, you can use a cord to connect a classic monitor and the system unit of a personal desktop computer.
Important! To use this method of connecting the receiver to the TV, you need to check that the TV equipment has a D-SUB socket. In another case, you will need an auxiliary adapter, which slightly degrades the quality of television broadcasting.
LAN connection diagram
Universal Smart set-top boxes are equipped with a connector for connecting to the Internet - LAN. Data transmission is carried out using IPTV technology. It does not provide signal encoding and decoding. It is transmitted directly, which affects the high quality of image and sound.
Most often, IPTV is offered by cellular operators that provide Internet and digital TV in multi-storey buildings. In this case, a direct connection of the TV to the network is not required. For this purpose, a separate cable is used, routed into the apartment.
How to connect a CAM module
Satellite receivers are equipped with CAM modules. They allow you to watch not only 20 basic channels, but also connect to package offers from the selected operator. Essentially, the CAM module is a card installed in the receiver. It does not require any additional connection.
Connection via antenna input
Antennas and satellite dishes can be connected via the RF IN connector. It is universal and suitable for analog and digital television. This round input is present on all tuners, regardless of their year of manufacture and configuration.
S-Video connector
Many models of DVD players and game consoles are equipped with this interface. However, using S-Video, the receiver can only be connected to an old TV. New models are mostly not equipped with this connector.
Connecting the receiver to your TV via S-Video yourself is slightly different from connecting a set-top box via RCA. The interface in question is designed to transmit a video signal. Therefore, to configure the audio channel you will have to use an additional cable. This complicates the task a little, because the wire is not included in the basic package of the TV and tuner.
The main advantage of S-Video over RCA is its high image quality. The clarity of the signal is noticeable to the naked eye. A rich, bright and realistic picture is broadcast on the screen.
Is it possible to connect 2 TVs to one receiver at once?
Most modern apartments are equipped with two or three televisions at once. Users want to save money and get by with one set-top box. The ability to connect a tuner to two TVs at once is limited by the functionality of the receivers themselves. For example, Smart equipment has the option of dividing the signal into 2 broadcast options without loss of quality. The correct connection can be found in the instructions for the devices.
If there is no separation option, you can try connecting an antenna or cable TV to two equipment at once. To do this, you need to separate the cable using special adapters, run them to the TVs and tune the channels at different frequencies. If TV programs operate at the same frequencies, signal overlap will occur and the quality of audio and video transmission will deteriorate.
Only the antenna cable can be separated. It comes from a satellite dish or general wiring along the entrance. If digital signal decoding is required, a second set-top box will be required.
Now you know all the ways to connect the receiver to a TV to watch digital channels. Choose the appropriate option, buy adapters if necessary and enjoy watching.
Found a mistake? Select it and press ctrl+enter
YPbPr and YCbCb interface
You can also connect and configure digital television by connecting the tuner to the TV via the YPbPr and YCbCb interface. High-quality video signal transmission is carried out through three cables. They are called "component". With their help, you can set up a high-quality picture with good detail without any interference.
The main difference between YPbPr and YCbCb is the system of use. The first one provides the transmission of an analog signal, and the second one provides digital signals. The cables have different colors: red, blue and green:
- green is used to transmit pulses and image brightness parameters;
- red provides the difference between red hue and brightness;
- blue is needed to indicate the difference between brightness and the blue color palette.
Connect all three cables to the corresponding ports to set up transmission to the TV video channel. With an audio signal it is a little more complicated. You will need an additional cable - RCA. The white plug is the left channel, and the red plug is the right channel.
Now you know how to properly connect a tuner to a TV, as well as what interfaces are intended for this.
Share material
How to set up digital channels on a Samsung TV How to insert a smart card into a tricolor receiver Subscribe When new materials are added, you will receive a notification by E-mail. Subscribe Already subscribed: 1—> 12.09.2018 Vadim Evseev Category: Reviews
How to connect the receiver to the TV? This question is asked by every inexperienced owner of such a device who has decided to join the benefits of a home theater relying solely on their own strength. The reason for this question is clear - a lot of connectors and all kinds of cables can put even the calmest person into a short-term stupor.
How to find out if your TV needs a receiver
Everything is quite simple. Focus on TVs 2021 and older. Almost all models starting from 2021 have a built-in T2 tuner. However, some models do not have such capabilities, so carefully read the device passport or its characteristics on Internet resources. For example, in our reviews we always indicate these device capabilities.
Connecting the TV to the receiver via HDMI
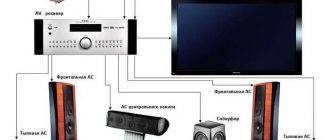
First of all, you need to understand the essence of such a device as an AV receiver. This is a complex and rather expensive device, the purpose of which is to receive, convert and transmit digital and video signals, video, audio and radio signals from various sources to the appropriate display systems.
And although the AV receiver on the back side still has many connectors with which you can connect it to a TV, from all their many it is worth using the HDMI interface. Receivers equipped with it fit perfectly next to TVs of any diagonal. The digital signal transmitted using an appropriate cable is converted into high-quality video and sound, which distinguishes this interface from others (“tulip” RCA, S-Video, Scart, RF, YPbPr and YCbCr). Thus, having only one HDMI cable, you significantly simplify the solution to the pressing problem of connecting a TV as an output device for digital signals and an AV receiver as a device that converts them.
The HDMI interface is present today in all such AV products, regardless of their price category. Therefore, if you just bought a TV and receiver, the corresponding connectors should be present on them by default.
Pioneer VSX receivers: basic audio calibration characteristics
Receivers in the VSX line are equipped with special audio calibration features. MCACC AUTO ROOM TUNING is a proprietary technological discovery of the Pioneer trading and manufacturing brand, which is a multi-channel acoustic calibration. The technology allows, ideally, to configure the optimal performance indicators for the room where audio is listened to (positive reviews judge the performance as a predominant feature of the product). To date, the company offers three levels of MCACC technology, depending on the selected function:
- MCACC – works to measure the level and size of loudspeakers, the distance to the listening area, and produces a kind of autonomous sound adjustment. The system automatically makes settings in accordance with the information received in order to achieve the best quality sound effects. The Phase Control function allows you to adjust the delays of sounds broadcast by the subwoofer, aligning them in accordance with the phase of other channels.
- Advaced MCACC with 3D calibration and more accurate measurements achieved via the time axis. Auto Phase Control Plus is an additional feature offered to automatically compensate and analyze the phases between the main feed signals in real time in Blu-ray Disc and LFE content, multi-channel file and DVD. Standing Wave Control can help reduce unwanted sound resonance. The amplifier's equalizer is used to adjust the channel's low frequency effects (LFE).
- MCACC Pro goes beyond the specified functions by including an analyzer and phase correction, grouping indicators of the delay characteristics that appear due to the speakers' equipped filtering systems. The typical equalization process also applies between different channels, ensuring a smooth flow of sounds. Other functions include settings for dual amplifiers, and adjustment of the speaker position (in 1 mm steps). MCACC Pro for all channels works by adjusting the phase difference between the original audio recording and the audio coming from the speakers.
HDMI ARC connection: what is it?
If you want to get not only high-quality images, but also impeccable sound from your TV, which will be output to all speakers, pay attention to the HDMI ARC interface. Few home theater owners who assemble entertainment systems on their own know about its existence. And in vain, because this is one of the most luxurious features in modern TVs.
ARC (Audio Return Channel) is a reverse audio channel, a fairly new HDMI protocol that provides a two-way communication channel between the TV and other equipment.
What are the undoubted advantages that the ARC HDMI connection has over other options? There are two of them:
- Simplify control of your home theater system. In particular, if the TV and receiver are equipped with ARC and are synchronized with each other using the appropriate cable, you can control the system’s activation, sound volume and some other functions of the entire complex by controlling it from the television remote control. Thus, there is no need to use extra remote controls that duplicate each other’s functions;
- Increasing audio transmission speed. The eARC protocol, as an improved version of the audio reverse channel, allows the transmission of audio signals at speeds of up to 38 Mbit/s. This is very important for surround sound in home theaters, as it allows you to broadcast data from eight channels at 192 kHz / 24 bits simultaneously. The eARC protocol in HDMI 2.1 will appear in 2021, but for now we have to make do with the existing ARC with a signal transmission rate that depends on the version of the HDMI interface (that is, from 1 Mbit/s and higher).
So, if you want to take full advantage of DTS and the full potential of all Dolby surround sound formats from Blue-Ray, DVD or game content, connecting HDMI ARC or eARC will achieve what you want. And this difference will be audible on any system with a configuration from 5.1 and higher, even to the system owner who is far from technical nuances.
Attention!!! It doesn’t matter which connection method you use, before connecting the cable, all equipment must be turned off and de-energized.
Output sound from the TV to the home theater/receiver using an HDMI cable.
One of the most modern ways to transmit high-quality sound (not only audio, but also video) is the HDMI interface. As for transmitting sound from the TV to the receiver, this interface is also suitable, but with a few reservations - your TV and home theater must support Audio Return Channel (ARC) technology.
ARC (Audio Return Channel) is a technology that allows you to transmit surround sound from a TV to a home theater/receiver using an HDMI v 1.4 cable.
But in order to use this technology, your TV must have an HDMI (ARC) connector.
An HDMI connector with ARC support should also be on your home theater receiver; you can find this information in the technical documentation for the audio system.
If your TV and audio system support ARC, all you have to do is connect them to each other using an HDMI cable version 1.4, preferably 1.4b. Please note that the cable must be of high quality, because if the cable is of poor quality, problems may occur when playing audio on a home theater, in particular, the sound may disappear for several seconds.
After you have connected your TV and home theater/receiver with a high-quality HDMI v 1.4 cable, make sure that ARC is enabled on both the TV and the audio system. All that remains is to select in the TV settings to play sound from the audio system (instead of the built-in speakers) and enjoy high-quality sound.
This method allows you to achieve excellent sound quality without the use of unnecessary wires and, in my opinion, is the most preferable.
Play audio from your TV on your audio system using an optical cable.
Another way to transfer sound from a TV to an audio system is using an optical cable. To do this, make sure that your TV and home theater receiver have an optical cable connector. The TV must have an OPTICAL OUT connector, and the home theater receiver must have an OPTICAL IN connector.
If such connectors are available, all that remains is to purchase an optical cable of the required length and connect the TV and home theater.
What is the advantage of this method - the optical cable is not “afraid” of electromagnetic radiation, so there will be no interference when using it, plus it is capable of transmitting excellent sound quality.
Output audio from your TV to your home theater receiver using a coaxial cable.
If the first two methods do not suit you, then connecting using a coaxial cable (RCA-RCA) is your salvation.
First of all, see if such a connector is present on your TV and audio system.
After this, use a cable to connect the COAXIAL OUT (S/PDIF - OUT COAXIAL) jack on the TV and the COAXIAL IN jack on the theater receiver. After that, you can enjoy multi-channel sound on your home theater.
Set up audio playback from the TV to the receiver using an analog connection.
If all the methods described above do not work for you, you can use the simplest methods, namely, use an analog connection, for example, connecting using RCA (in common parlance - a tulip).
Use it to connect the AUDIO IN port on the receiver and the AUDIO OUT (LINEOUT) port on the TV. In addition to the “tulip”, you can use various adapters, for example mini Jack - 2RCA, SCART - 2RCA (if 3RCA, then the yellow one (transmits video) does not need to be connected), etc. The main thing is to choose an audio connector on the TV with an OUT prefix and on a home theater receiver with an IN prefix.
I would like to add that connecting via analog connectors reduces the sound quality, and if possible, it is better to use any of the first three methods.
Bottom line.
As you can see, there are quite a few ways to set up audio playback from a TV on a home theater. It's up to you to decide which one to use.
Video of sound settings from TV to home theater.
I really hope my article helped you! Please share the link with your friends:
Let's move on to connection
Having familiarized ourselves with the possible connectors and interfaces, let’s move directly to the process of connecting the equipment itself. It is, in fact, quite simple and involves a simple algorithm of actions:
- Select the required cable. It may be included with one of the purchased devices or may require a separate purchase. Remember that the longer the cable, the greater the signal distortion that occurs;
- The connection must be made when the equipment being connected is de-energized (remove the plug from the network).
We are sure that this information will be useful to you. And the connected equipment during operation will fully meet your expectations as its owner. If not, the catalog and showroom of the Hi-Fi Design store, together with the help of our specialists, will help realize them in the best possible way.
We also have a review on the website that you can read: Seamless coverage of Wi-Fi networks based on Pakedge products
- home
- Articles Reviews News
- Adviсe
- By receivers
- How to connect AV re…
18739Comments30 June 2015
Line of AV receivers: benefits received when purchasing a device
By purchasing an AV receiver from the Pioneer brand, each buyer is guaranteed to receive the following list of advantageous technical characteristics, combining several devices:
- digital system with a variety of software surround sound settings for higher quality and perfection when watching movies, listening to music or for a full perception of the space of video games;
- multi-channel powerful sound amplifier with decoder that supports digital audio formats of enveloping sound;
- high-quality radio receiver with digital display located on the receiver screen;
- high-quality characteristic in simultaneous switching of various video audio systems with subsequent accessible selection of video audio source using remote control (it is possible to discuss this option in more detail in the forum on the ixbt website).
Using the receiver as the only device, setting up the implementation of enveloping sound will not work. To create ambient sound, it is worth purchasing an additional speaker system.
How to connect an AV receiver to a TV (using the Onkyo AV receiver as an example)
Have you finally become the owner of such a wonderful device as an Onkyo AV receiver? Well, then the first thing you will do after unpacking the product is installing it, choosing a location and connecting the AV receiver to your TV, personal computer and/or other devices. And this is quite logical, since it is the receiver that will become the heart that ensures the smooth operation of the entire “organism” of the speaker system. Considering the importance of this device for the uninterrupted functioning of your audio complex, the issue of connecting it to all components of the system (including the TV) should be treated with due attention. In this article we will talk about the general principles of connecting this product.
Have you finally become the owner of such a wonderful device as an Onkyo AV receiver? Well, then the first thing you will do after unpacking the product is installing it, choosing a location and connecting the AV receiver to your TV, personal computer and/or other devices. And this is quite logical, since it is the receiver that will become the heart that ensures the smooth operation of the entire “organism” of the speaker system. Considering the importance of this device for the uninterrupted functioning of your audio complex, the issue of connecting it to all components of the system (including the TV) should be treated with due attention. In this article we will talk about the general principles of connecting this product.
SCART connector
Users often call this interface a “comb”. It differs from previous connectors in maximum versatility. To connect a digital receiver to a TV, you need to use a special cable.
The image quality is much higher than when connected via a tulip. Very often, the Tricolor operator connects tuners to the TV using SCART. The interface supports stereo sound, RGB.