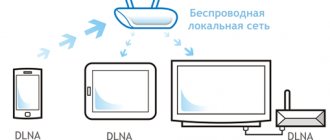
If you have an ASUS or TP-LINK router with a USB port, then most likely? it has the ability to launch a media server and provide access to video, photos and music for a TV that supports DLNA. You can run a DLNA server not only on routers from TP-LINK and ASUS, but in this article I will show examples of devices from these particular manufacturers.
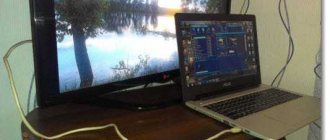
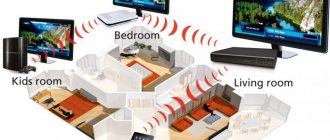
Let's first figure out how it works. We have a router with a USB port, the ability to run a media server (if there is USB, then most likely there is support for DLNA Media Server). We have a TV connected to this router, in my case it is a Philips TV on Android TV. Again, the TV can be anything: Samsung, LG, SONY, etc.
We connect a storage device (flash drive or external hard drive) to the router, which contains movies, music, and photos. Then, in the router settings, launch the media server. And on the TV we can watch those files that are on the storage device connected to the router. Moreover, if the TV is connected via Wi-Fi, then all this is done wirelessly, over the air. And we can still access this drive from a computer that is also connected to the router, and we can copy new movies to it, or download them from the Internet directly to the drive.
And if you want to run a DLNA server on your computer and watch files on your TV, then you need these instructions:
- How to watch movies from a computer on an LG TV (via wi-fi or network)? Setting up DLNA via Smart Share
- Setting up a DLNA server for a Philips TV. Watching movies from your computer on your TV
A convenient scheme, you will agree. Now we will take a detailed look at the setup process on both routers. First, I’ll show you how to launch a media server on the router, then we’ll access it from the TV, and we’ll also get access to the drive from the computer to add new files, and not always disconnect the flash drive from the router.
Installing MiniDLNA
The simplest installation method is to install the package from your distribution's repository:
sudo apt-get update sudo apt-get install minidlna
Installing Sudo
If your system does not have the sudo command, it is advisable to install it. We will need Sudo during the setup process to test access rights to folders with media files.
Install sudo:
apt-get install sudo
Add the user to the sudo group:
usermod -aG sudo user
Log out and log in again for the group change to take effect.
Which devices support DLNA
All certified devices that support DLNA are divided into three main classes:
- Networked devices for household use are televisions, media and music centers, DVD players, network storage devices, home theaters and others.
- Mobile devices – this group includes smartphones and tablet PCs, portable players, video cameras and others.
- Multifunctional household appliances - this niche includes devices that support a variety of communication standards and are able to convert different file formats among themselves. They are required to ensure compatibility between the first and second class.
Despite the large number of different types of equipment, the main thing that immediately comes to mind when mentioning DLNA technology is modern LCD TVs. Moreover, it was precisely with the promotion and total distribution of televisions with the Smart TV function that there was an increase in the demand for the standard. The fact is that, in essence, a “smart” TV is a multimedia entertainment center in modern “Smart Home” systems. For this reason, DLNA is most often used to transfer video content from PCs to TVs.
All electronics that support the presented technology are marked with a “DLNA Certified” sticker on their housing. And although it uses open standards, devices must undergo a pre-certification process to qualify for such labeling. To date, more than 20 thousand different electrical appliances have already received DLNA certification. Regarding the volume of their sales, the figures have long exceeded a hundred million.
To use DLNA, you need an established home network. It can be created either wired, via Ethernet, or wirelessly, using a Wi-Fi network. To use the second method, a sufficient level of bandwidth is required. Comfortable work is only possible with a protocol not lower than the Wi-Fi 802.11n standard.
Setting up MiniDLNA
Editing the configuration file:
sudo nano /etc/minidlna.conf
At a minimum, you will need to set the path to the folder with media files, parameter: “media_dir”. You can also set the server name displayed by the client, parameter: “friendly_name”.
If our DLNA server is also an Internet gateway, it is also necessary to set the internal network interface, parameter: “network_interface”.
The parameters in the configuration file comments contain default values.
# Server port port=8200 # Network interface # You can specify several interfaces # in the format network_interface=eth0,eth1
#network_interface=eth0 # Username or UID under which the service will run # Added in version 1.1.0 # In Debian it is set in the parameters init script #user=jmaggard # Path to the folder with media files # To scan multiple folders, specify several media_dir parameters # To scan files of a specific type, specify the appropriate prefix: # A - audio: media_dir=A,/home/jmaggard/ Music # V - video: media_dir=V,/home/jmaggard/Videos # P - images: media_dir=P,/home/jmaggard/Pictures # Starting from version 1.1.0, you can set several types: # PV - images and videos : media_dir=AV,/var/lib/minidlna/digital_camera # # If you change the parameter, you will need to rescan the files. # You must run the command “service minidlna force-reload” as root [more]. # Starting from version 1.1.0, when changing a parameter, scanning is performed automatically. media_dir=/var/lib/minidlna # Merge root folders # This parameter was added in version 1.1.3 # Enabled to get rid of the unnecessary level of nesting # Location of video files if the value is “no”: Video/Folders/Video, if the value is “yes” : Video/Folders # If you change the parameter, you will need to rescan the files. merge_media_dirs=yes # DLNA server name displayed by the client # Default: "$HOSTNAME:$USER" #friendly_name= # Path to the folder for storing the database and album art cache db_dir=/var/lib/minidlna # Path to the folder with log files log_dir=/var/log # Log detail level # In the format log_level=source1, source2=value1, source3, source4=value2 ... # Available sources: “general”, “artwork”, “database”, “inotify”, "scanner", "metadata", "http", "ssdp", "tivo" # Possible values: "off", "fatal", "error", "warn", "info" or "debug" #log_level=general ,artwork,database,inotify,scanner,metadata,info,ssdp,tivo=warn # List of album cover file names, separator: “/” album_art_names=Cover.jpg/cover.jpg/AlbumArtSmall.jpg/albumartsmall.jpg/AlbumArt .jpg/albumart.jpg/Album.jpg/album.jpg/Folder.jpg/folder.jpg/Thumb.jpg/thumb.jpg # Auto-detect new files # Enabled by default #inotify=yes # TiVo device support #enable_tivo=no # Strictly follow the DLNA standard # Use server scaling for very large JPEG images # Which may reduce their processing speed.
#strict_dlna=no # Device web page address # Default IP address and specified server port #presentation_url=https://www.mylan/index.php # Interval for sending SSDP notifications, in seconds #notify_interval=895 # Serial number and the DLNA server model number reported to the client serial=12345678 model_number=1 # Path to the MiniSSDPd socket, if installed # Required to support multiple DLNA/UPnP services on one server #minissdpdsocket=/run/minissdpd.sock # Container used in as the root folder for clients # * "." - standard container # * "B" - "Browse Folder" # * "M" - "Music" # * "V" - "Video" # * "P" - "Pictures" # If "B" is specified and the client introduces itself as audio player, the folder “Music/Folders” #root_container= will be used as the root. # Always use the given sorting criterion instead of the value requested by the client #force_sort_criteria=+upnp:class,+upnp:originalTrackNumber,+dc:title # Maximum number of simultaneous connections # Please note: many clients open several connections at the same time #max_connections=50 Check the init parameters -script /etc/default/minidlna:
sudo nano /etc/default/minidlna
Usually no adjustment is required. If the file is missing, during the initial installation from sources, copy the listing:
# Start the daemon if “yes” is set START_DAEMON=”yes” # Path to the configuration file #CONFIGFILE=”/etc/minidlna.conf” # Path to the log file #LOGFILE=”/var/log/minidlna.log” # Run as a specified user and group # Default: minidlna #USER="minidlna" #GROUP="minidlna" # Additional launch keys DAEMON_OPTS=""
Since the service runs under a user with limited rights, published folders and files must be readable by all users, hence have permissions 644: "rw- r— r— ", for files and 755: "rwx rx rx ", for folders .
We check the availability for each folder specified in minidlna.conf with the command:
sudo -u minidlna ls -l folder
If the folder is inaccessible, set the access rights:
sudo chmod -R 755 folder
Parent folders must also be readable by all users. We check the readability of each folder specified in the path. For parent folders, use chmod without the -R switch, unless you need to reset permissions for all child files and folders.
As an alternative to changing permissions, you can run MiniDLNA as the user or group that owns the files. To do this, you need to set the USER and GROUP parameters in /etc/default/minidlna, and change the owner of the /var/lib/minidlna folder with the command:
sudo chown -R user:group /var/lib/minidlna
Launch MiniDLNA
Restart the service:
sudo systemctl restart minidlna
We check whether the service is running and also look at the startup parameters:
systemctl status minidlna
Check if the port is listening:
sudo ss -4lnp | grep minidlna
Checking the log:
cat /var/log/minidlna.log
If the start is successful, the log should be something like this:
[2014/04/07 22:00:48] minidlna.c:1000: warn: Starting MiniDLNA version 1.1.2. [2014/04/07 22:00:48] minidlna.c:354: warn: Creating new database at /var/lib/minidlna/files.db [2014/04/07 22:00:48] minidlna.c: 1039: warn: HTTP listening on port 8200 [2014/04/07 22:00:48] scanner.c:702: warn: Scanning /var/lib/minidlna [2014/04/07 22:00:55] scanner. c:789: warn: Scanning /var/lib/minidlna finished (25 files)! [2014/04/07 22:00:55] playlist.c:125: warn: Parsing playlists... [2014/04/07 22:00:55] playlist.c:256: warn: Finished parsing playlists. [2014/04/07 22:00:55] inotify.c:198: warn: WARNING: Inotify max_user_watches [8192] is low or close to the number of used watches [14] and I do not have permission to increase this limit . Please do so manually by writing a higher value into /proc/sys/fs/inotify/max_user_watches.
If we see: “WARNING: Inotify max_user_watches [8192] is low.”, you need to increase the number of inotify tracking descriptors to 100,000. To do this, add the following lines to the /etc/sysctl.conf file:
#MiniDLNA warning fix fs.inotify.max_user_watches = 100000
Manually by editor:
sudo nano /etc/sysctl.conf
Or copy-paste the command:
sudo sh -c 'printf "\n\n#MiniDLNA warning fix\nfs.inotify.max_user_watches = 100000\n" >> /etc/sysctl.conf && cat /etc/sysctl.conf'
The parameter change will take effect after the system is rebooted.
We open https://server.address:8200 in the browser, we see the number of files in the library, starting from version 1.1.2, and a list of connected clients is also displayed.
The DLNA/UPnP-AV server setup is complete.
If question marks are displayed instead of messages and MiniDLNA container folders, disable localization.
If the package was installed:
sudo mv /usr/share/locale/ru/LC_MESSAGES/minidlna.mo minidlna.mo.del
When installing from sources:
sudo mv /usr/local/share/locale/ru/LC_MESSAGES/minidlna.mo minidlna.mo.del
Restart MiniDLNA and rescan the library.
Port 23 TCP or UDP?
Known ports
| Port | TCP | Description |
| 21 | Yes | File Transfer Protocol (FTP) control (command) |
| 22 | Yes | Secure Shell (SSH), secure login, file transfer (scp, sftp) and port forwarding |
| 23 | Yes | Telnet protocol - unencrypted text messages |
| 25 | Yes | Simple Mail Transfer Protocol (SMTP), used to route email between mail servers. |
Scan your MiniDLNA media library
If errors appear in the directory, you need to rescan the files.
To do this, delete the Minidlna database and restart the service:
sudo rm /var/lib/minidlna/files.db sudo systemctl restart minidlna
To scan the media library every time the system starts, you can set the startup key: “-R” in the DAEMON_OPTS parameter in the /etc/default/minidlna. Scanning a large media library places significant disk load, which can slow down the system boot time.
The complete creation of the catalog may take several minutes. Folders are scanned in the order they are declared in the config. Files from the small folders declared in the config above will appear in the directory at the very beginning of the scanning process. It makes sense to place large folders with rarely played content last in the config.
Advantages and disadvantages of technology
DLNA is constantly evolving technologically. It is supported and promoted by the world's leading corporations and computer software developers engaged in the creation and implementation of mass digital devices with extensive capabilities. Today, dozens of global companies, such as Google, Apple and Microsoft, have implemented DLNA support in their products. The total number of corporations that are members of the union of manufacturers of gadgets supporting this technology has exceeded 250 members.
The DLNA Home Media Server brings simplicity and convenience to the world of content sharing. Thanks to this standard, various devices were able to interact with each other within a home network. With all this, the process of setting them up is extremely simplified.
But the DLNA standard, like any modern technology, has both its advantages and some disadvantages. Here are the main ones.
| Advantages | Flaws |
| Ability to fine-tune the server | The local network connection function has not been finalized |
| The database is stored in the cloud | Software updates are no longer published on the official website |
| Both wired and wireless networks supported | |
| TVs can be connected via a Wi-Fi router |
Disable request for file display method: All Files, Folders
We configure the display of the contents of the Music, Pictures, Video folders without an intermediate request for how to display them.
The issue can be partially resolved by setting the parameter: “root_container=B” in minidlna.conf. In this case, the request itself is not disabled, but the contents of the folders are displayed directly in the root container.
If the device, as the root container, displays its own start screen, adjusting the configuration file will not work. To completely disable the request for how files should be displayed, you will have to make changes to the program code.
Disabling virtual folders in MiniDLNA version 1.1.4 and higher
For version 1.1.4 we apply a patch and add the disable_extended_directories=yes parameter to minidlna.conf. This patch will be included in the next version of MiniDLNA; for later versions, just set the parameter in the configuration file.
We obtain and install the source package, as described in the section: “Installing or updating MiniDLNA from sources.”
Go to the source folder:
cd ~/src/minidlna/minidlna-1.1.4
Download and apply the patch:
wget https://sourceforge.net/p/minidlna/feature-requests/101/attachment/diff.dif patch < diff.diff
We compile and install the corrected version:
sudo make install
Editing the configuration file:
sudo nano /etc/minidlna.conf
Add a parameter:
# Disable virtual directories disable_extended_directories=yes
Restart the service and rescan the media library:
sudo service minidlna force-reload
On systemd-based systems, rescanning will require manually deleting the database:
sudo rm /var/lib/minidlna/files.db sudo systemctl restart minidlna Check the result. Folders should open without asking for a display method.
Disabling virtual folders in MiniDLNA version 1.1.3 and below
We obtain and install the source package, as described in the section: “Installing or updating MiniDLNA from sources.”
Go to the source folder:
cd ~/src/minidlna/minidlna-1.1.3
The necessary folder identifier constants are declared in scanner.h
#define MUSIC_ID "1" #define MUSIC_ALL_ID "1$4" #define MUSIC_GENRE_ID "1$5" #define MUSIC_ARTIST_ID "1$6" #define MUSIC_ALBUM_ID "1$7" #define MUSIC_PLIST_ID "1$F" #define MUSIC_DIR_ID "1$14" # define MUSIC_CONTRIB_ARTIST_ID "1$100" #define MUSIC_ALBUM_ARTIST_ID "1$107" #define MUSIC_COMPOSER_ID "1$108" #define MUSIC_RATING_ID "1$101" #define VIDEO_ID "2" #define VIDEO_ALL_ID "2$8" #define VIDEO_GENRE_ID "2$9" » #define VIDEO_ACTOR_ID "2$A" #define VIDEO_SERIES_ID "2$E" #define VIDEO_PLIST_ID "2$10" #define VIDEO_DIR_ID "2$15" #define VIDEO_RATING_ID "2$200" #define IMAGE_ID "3" #define IMAGE_ALL_ID "3$B" #define IMAGE_DATE_ID "3$C" #define IMAGE_ALBUM_ID "3$D" #define IMAGE_CAMERA_ID "3$D2" // PlaysForSure == Keyword #define IMAGE_PLIST_ID "3$11" #define IMAGE_DIR_ID "3$16" #define IMAGE_RATING_ID "3$300"
When requesting the MUSIC_ID, VIDEO_ID and IMAGE_ID folders, we need to redirect the client to MUSIC_DIR_ID, VIDEO_DIR_ID and IMAGE_DIR_ID respectively.
Processing client requests is implemented in the upnpsoap.c file.
Save a backup copy of the file:
cp upnpsoap.c upnpsoap.c.old
Launch the editor:
nanoupnpsoap.c
Activate the search (F6), look for the procedure: “BrowseContentDirectory”.
static void BrowseContentDirectory(struct upnphttp * h, const char * action) {
At the beginning of the procedure, the SOAP/XML request is parsed, then processed and the result is returned.
Parsing the request ends with the generation of a debug message:
DPRINTF(E_DEBUG, L_HTTP, "Browsing ContentDirectory:\n" » * ObjectID: %s\n" » * Count: %d\n" » * StartingIndex: %d\n" » * BrowseFlag: %s\n" » * Filter: %s\n" » * SortCriteria: %s\n", ObjectID, RequestedCount, StartingIndex, BrowseFlag, Filter, SortCriteria);
The following is the selection of the root container depending on the root_container configuration parameter:
// If the root container is requested if( strcmp(ObjectID, "0") == 0 ) { // Set the root container flag args.flags |= FLAG_ROOT_CONTAINER; // If the root container is specified in the config if( runtime_vars.root_container ) { // If the client is an audio player and folder browsing is specified in the config // Send it to the music folder if( (args.flags & FLAG_AUDIO_ONLY) && (strcmp(runtime_vars .root_container, BROWSEDIR_ID) == 0) ) ObjectID = MUSIC_DIR_ID; else // Otherwise, set the container specified in the config ObjectID = runtime_vars.root_container; } else // If the container is not specified in the config { // If the client is an audio player // Send it to the music folder if( args.flags & FLAG_AUDIO_ONLY ) ObjectID = MUSIC_ID; } }
Immediately after this block and before the block with queries to the database, add the code for redirecting folders for videos, music and images:
//Redirect video to folder if( strcmp(ObjectID, VIDEO_ID) == 0 ) { ObjectID = VIDEO_DIR_ID; } //Redirect music to folder if( strcmp(ObjectID, MUSIC_ID) == 0 ) { ObjectID = MUSIC_DIR_ID; } //Redirect images to folder if( strcmp(ObjectID, IMAGE_ID) == 0 ) { ObjectID = IMAGE_DIR_ID; }
As a result, the corrected fragment should look like this:
if( strcmp(ObjectID, "0") == 0 ) { args.flags |= FLAG_ROOT_CONTAINER;
if( runtime_vars.root_container ) { if( (args.flags & FLAG_AUDIO_ONLY) && (strcmp(runtime_vars.root_containe$ ObjectID = MUSIC_DIR_ID; else ObjectID = runtime_vars.root_container; } else { if( args.flags & FLAG_AUDIO_ONLY ) ObjectID = MUSIC_ID; } } //Redirect video to folder if( strcmp(ObjectID, VIDEO_ID) == 0 ) { ObjectID = VIDEO_DIR_ID; } //Redirect music to folder if( strcmp(ObjectID, MUSIC_ID) == 0 ) { ObjectID = MUSIC_DIR_ID; } //Redirect images to folder if( strcmp(ObjectID, IMAGE_ID) == 0 ) { ObjectID = IMAGE_DIR_ID; } if( strcmp(BrowseFlag+6, "Metadata") == 0 ) { args.requested = 1; sql = sqlite3_mprintf ("SELECT %s, " COLUMNS "from OBJECTS o left join DETAILS d on (d.ID = o.DETAIL_ID$ " where OBJECT_ID = '%q';", (args.flags & FLAG_ROOT_CONTAINER) ? "0, -1 " : "o.OBJECT_I$ ObjectID); ret = sqlite3_exec(db, sql, callback, (void *) &args, &zErrMsg); totalMatches = args.returned; }
Build and install the corrected version:
sudo make install
Restart the service:
sudo service minidlna restart
Let's check the result. Folders should open without asking for a display method.