The popular Digital Living Network Alliance technology will allow you to comfortably transfer any media content to devices of various groups and brands. Read on in the review to learn how DLNA works, which devices it supports and how it is configured.
Dlna client and server on the same wireless LAN
What is DLNA
DLNA is a joint development of Intel, Microsoft and Sony. It is a set of standards that will allow compatible devices to transmit and receive any media files (photos, audio, video) over a wired or wireless Internet network, as well as play them online.
In other words, it is a technology for connecting televisions, computers, digital cameras, printers, smartphones and other consumer electronics into a single network.
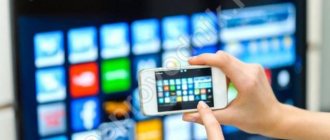
Using DLNA, we can send photos and videos taken on a mobile phone to the TV screen without unnecessary wires. We send photos from a digital camera directly to the printer. Thanks to the same option, we can listen to our favorite music from our tablet, etc. through our computer speakers.
Note! Using Digital Living Network Alliance technology, all media content is streamed, and there is no need to wait for files to fully download to play them.
DLNA – technology for connecting various devices into a single network
Home Media Server Features
DLNA is intended for transferring media format content between devices using a wired Ethernet connection or using a Wi-Fi wireless network. A significant feature is the ability to automatically configure devices for transmitting information - users do not have to spend a long time understanding manuals and re-reading advice on various forums. It turns out that the technology is prepared for those users who do not want to delve headlong into the essence of network settings and want the whole process to be extremely simple, fast and convenient.
For example, thanks to the capabilities of DLNA, you can “make friends” between a smartphone, a computer and a TV. Connected to your home network, these devices will be able to communicate with each other without any obstacles. For example, the user has the opportunity to transfer content directly from the PC hard drive to a smart TV, and at the same time there is no need to use external storage devices, such as USB flash drives. Each file, by the way, is transmitted in streaming mode, that is, users do not need to wait until the full download is completed.
Another example would be the ability to transfer photographs from a camera directly to an MFP or printer without using a computer. Naturally, for such a procedure, both gadgets must have DLNA certification.
The main features of a home media server are:
- Watching digital TV.
- Plays various file formats.
- Ability to run from removable media.
- High degree of home server protection.
- Availability of viewing video content in Full HD format.
- Interaction with external and internal subtitles.
- Compatible with numerous Smart TV models.
- The dimensions of the main application window can be adjusted.
- A set of integrated transcoding profiles.
- Streaming data has a ton of customizable options.
- The ability to broadcast content to mobile gadgets running Android and iOS.
Therefore, DLNA is not only convenient, but also the speed of content transfer.
At the moment, the technology is supported by a huge number of both household and professional equipment: smart TVs, media players, smartphones, laptops, digital photo/video cameras, tablet PCs and others.
There is a good chance that each of us already has such devices at home. Literally every modern PC or laptop running Windows, starting with version XP, is compatible with DLNA technology. For computers running Mac OS, you will need to install special software distributed by hundreds of web resources.
Devices and DLNA support
All devices that comply with DLNA standards are divided into 3 groups:
- The first group includes all household network devices . These include TVs, video players, audio systems, stereos, printers, network storage, etc. Based on their functionality, devices are divided into media players (DMP), media servers (DMS), media players (DMP), media controllers (DMC) and media renderers (DMR).
- The second group is mobile devices : phones, portable players, cameras and video cameras, pocket computers, etc. Mobile devices are divided into the following classes based on functionality: mobile media players, media servers, downloaders, transmitters and controllers.
- The third group unites all household multifunctional devices . This includes devices that support additional communication standards and convert data formats.
All DLNA Certified devices are marked with the appropriate "DLNA Certified" logo. Today this is about 4.5 billion devices from more than 250 manufacturers.
Modern personal computers and laptops, regardless of their operating system, are also DLNA compatible. But when working with them to exchange data via the protocol, you first need to install profile software that is downloaded from the network.
Devices that support DLNA technology can be divided into three large groups
Important! To successfully exchange media files, both devices must support the DLNA protocol.
How DLNA technology works
Content exchange via the DLNA protocol involves two compatible devices: a server and a client or DLNA player. A server is a device that stores and transmits any media content to a second device. To automatically transfer data to DLNA devices, the server sets up shared access to media files for home group devices. A client or player is a device that receives and plays received files. Most often, televisions, audio and video players act as clients.
Some devices are combined into a single network automatically. To work with others, you will need a simple initial setup, which we will discuss later.
A prerequisite for the DLNA protocol is that all devices are connected to the Internet. Files will be exchanged using it.
Important! To transfer data, all devices must be connected to a single home network. Otherwise, you will not be able to use the DLNA option.
Client and server on the same network
DLNA function on TV
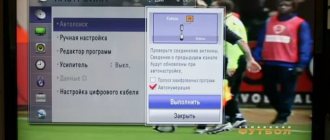
The DLNA function is built into most modern TVs. To find out if it is supported on your device, check the user manual, or find the information you need on the official DLNA website.
To transfer data via DLNA, we must connect the TV to the router:
- via Wi-Fi network;
- or using an internet cable.
Note! When transferring heavy files to the TV, it is recommended to install a wired (Ethernet) connection. This will avoid loss of streaming data and system failures.
To connect the TV wired to the router, you will need an Internet cable. One end of the wire is connected to the LAN TV socket, the other to a similar socket on the router.
A wireless TV connection can be achieved by installing a built-in or external Wi-Fi adapter. The latter is purchased additionally and is inserted into the USB connector. The router to which the devices are connected must support the DLNA protocol.
Once the DLNA connection is established, folders with files available for playback will be displayed on the TV screen.
Note! For the convenience of displaying and playing media files on TV, it is recommended to first sort all data into folders (for example, by categories or artists). You can also use the LCN (Logical Channel Number) function on your TV, which sorts channels in a convenient order.
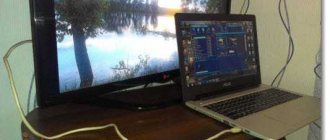
Installing and configuring DLNA media server:
Connection via HDMI cable
Turn off both devices to protect the ports from being damaged. Connect a cable with the same connectors.
After connecting the TV and computer, turn on both devices. Set it to AVI mode. The mode will allow you to receive a computer signal and temporarily disable the antenna.
After connecting, in the desktop properties (Screen resolution in new versions of Windows), select screen settings. The TV screen should be found automatically.
Then how to connect it to a computer via wifi as a monitor? Assign the maximum resolution to the additional screen for excellent picture transmission and make it your default monitor.
Restart your computer if necessary.
If the connected TV does not produce sound, make sure that the default audio output device is set to external device, i.e. TV speakers.
Setting up a connection via DVI and VGA is no different. You need to replace the cable with one that matches the ports. Enjoy your viewing!
Setting up the DLNA function on LG TVs
Additional settings for the DLNA option on TVs from different manufacturers are somewhat different; let’s consider this process on a SMART TV from LG:
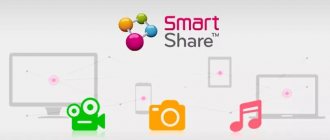
- On the media server from the official website, download and launch the “Smart Share” software, which was developed specifically for LG on the WebOS platform.
- Install the program according to the suggested instructions.
- To complete the launch, click on the “Finish” button and on any of the icons that appear.
- Go to “Options” in the “Service” tab and enable sharing of allowed files.
- Go down to “My shared files” and mark the folders for access on TV.
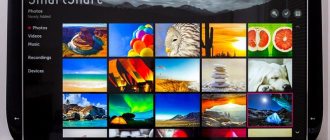
- Next, media content will open and is available for playback.
To further play files on LG, you will need to open the TV menu, go to the “Smart Share” folder, and select the desired files from the list.
Branded DLNA media server from LG: installation and configuration –
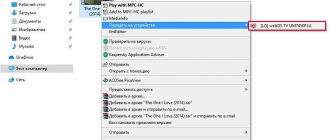
Paragraph 1
First, find the folder you want to open access to and right-click on it. Next, click on the “Properties”
and go to the
“Access”
.
In the “Advanced sharing settings”
Click on the
“Advanced setup”
.
Movie folder properties
In the window that opens, check the box next to “Share this folder.”
Sharing settings (advanced)
Thus, we have opened access to this folder, and you can move on to the second point.
Setting up DLNA on SAMSUNG TV
Many SAMSUNG smart TVs are equipped not only with the DLNA option, but also with the Plug and Play standard. UPnP also allows devices to be shared on a single network, but has less flexibility in choosing content providers. In most cases, UPnP and DLNA devices are compatible.
AllShare and PC Share Manager programs have been developed for Samsung based on Tizen.
PC Share Manager proprietary software connects a TV and a computer or laptop into a single network, and also makes it possible to play multimedia data from a media server on TV. The program is compatible with all generations of Samsung TVs that support DLNA.
We configure the operation of PC Share Manager according to the following algorithm:
- Download and run the software on your computer from the official Samsung website.
- In the explorer located on the left, we find the necessary folders with media files.
- Let's celebrate them.
- Click on the folder with the check mark located above.
- Open shared access to folders: drag them into the right field; or right-click on them and select the appropriate item in the context menu.
- Next, go to “set device policy”, and in a new window select the desired device, that is, Samsung TV. Click on “Accept” and “OK”.
- We update the connection state: open “Sharing” and click on “Set state changes”.
- We are waiting for the updates to finish.
Having completed the setup on the computer, we move on to working with the TV:
- Open the settings and go to TV sources.
- Select PC Share Manager and Share Folder.
- After the manipulations have been completed, folders with media files that are located on the PC and are available for playback on the TV will be displayed.
Note! Only those files that belong to the photo, music and movie categories will be displayed on the Samsung TV screen. Media content that belongs to other categories will not be visible.
The setup via AllShare looks like this:
- Download the “AllShare” program to your computer from the official website and launch it.
- Following the Wizard’s prompts, click on the “Next” button.
- In the window that appears, select the device to connect – Samsung TV.
- We complete the process.
- Let's go to the folder settings and indicate the general folder where the files to be played will be located.
- We also set a folder for saving content from other devices.
- The next step is to set up the rights and allow access to TV.
When working with DLNA, it is recommended to watch videos with the DivX codec. With this format, the size of media content is significantly reduced without loss of quality.
The DivX codec in Samsung with the smart option is registered like this:
- In the TV menu we find the “System” section.
- Next, open the “DivX Video on Demand” subsection.
- Go to the official DivX website and register the device. Here you will need to enter the code that is located in the “DivX VOD” folder.
- Next, we move on to working on a PC, and download and launch DivX Player from the official DivX website.
- Here we register the device and complete the process.
Windows Media Player
To connect your TV to your PC and view any content on a big screen using DLNA technology, you don’t have to download third-party software - you can use the Windows tool. This is a standard audio and video player for Windows OS.
Here are the instructions using the “seven” as an example:
- We connect the TV and a computer or laptop to the same network - via cable or over the air. You can connect directly, without using a router - in this case, you need to set both devices to an IP address (as in the previous instructions).
- Launch the player and select the “Stream” tab. In the drop-down menu, we allow all actions: “Allow Internet access to the home multimedia library...”, “Allow remote control of the player...”, “Enable media streaming in the home group...”.
- Click the “Arrange” tab and select “Apply media information changes.”
- On a SAMSUNG TV, go to the “AllShare” section. If everything is in order, we will see the files available for viewing on the screen.
That's all. As you can see, taking advantage of DLNA technology is easy. The main thing is to choose a method that is convenient for you.
Setting up DLNA data transfer on Philips
One of the components of the Smart TV platform in Philips models is the SimplyShare option (https://apkfab.com/philips-simplyshare/com.philips.simplyshare). It connects the TV with other DLNA devices. And allows you to play audio files from iPhone and iPod. Philips TVs from the 6000 series and above can play other content. These models are equipped with SongBird technology and codecs for format recognition.
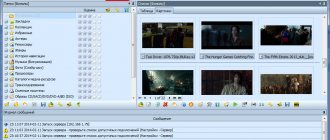
Another way to set up DLNA is to use the universal Home Media Server program:
- We download and launch the above-mentioned software from the official website onto the server device.
- Next, we move on to setting up access to content on the PC. Expand the “Media Resources” tab and check the boxes next to the required drives: local, network or removable. Using the “Add” button, you can provide access not to the entire disk, but only to its individual elements. Click “OK” to complete the process.
- Using the corresponding button, we start transferring data to the TV.
- In the “Playback Devices” tab, select Philips. In this case, the TV must already be turned on and connected to the Internet.
- Go to the TV, and on the remote control click on the “Sources” button.
- In the “Sources” window, select the media network.
- We find a PC, expand the folder with files available for playback, and play the content.
Setting up DLNA on Sony branded TVs
You can configure DLNA technology on branded Sony Bravia TVs in different ways. Let's consider the most convenient option using the built-in Windows Media Player. This method is suitable for PCs running Windows 8.1 and higher:
- Expand the “Start” menu, then in the general list of all programs we find and select the desired player.
- Let's go to the "Library", which consists of 3 sections - audio, pictures and films.
- Depending on the type of material that needs to be played on the TV screen, go to the “Manage music library”, “Manage gallery” or “Manage video library” sections, respectively.
- Here we select a folder for broadcast from the existing list. If it is not here, add it manually using the “Add” button.
- Next, go to the “Stream” section and click on the streaming connection in the home group.
- In the window that opens, select Sony Bravia TV from the proposed list of available devices and click “Next”.
- At the next stage, we set up access to various files and folders.
- After clicking the “Next” button, the computer will generate a password, which may be required to connect other devices to the DLNA network.
Let's move on to working with the TV:
- Expand the main menu.
- Find “Multimedia Server” here and expand it.
- Select a server device from the list provided. In this case PC.
- Next, all available media files will be displayed on the screen - select the one you need.
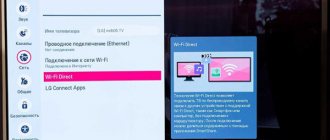
To transfer data from a smartphone, perform the following steps:
- We turn on both devices.
- On the TV, through the advanced settings, activate Wi-Fi Direct.
- In the “Show Network (SSID/Password)” section, find and remember the password.
- Afterwards we activate the Wi-Fi Direct function on the phone.
- From the proposed list of available devices, select the desired TV and enter the previously specified password.9
- Next, we transfer data using the Throw command.
If you connect an Apple phone, you will need an Apple TV set-top box.
How to set up DLNA on Xiaomi TVs
To work with Xiaomi as a DLNA client, the same universal Windows Media Player is suitable. The “BubbleUPNP” application (https://play.google.com/store/apps/details?id=com.bubblesoft.android.bubbleupnp&hl=ru&gl=US) with a PC server, or the “VLC for Android” program may also be useful » to send files from a smartphone or Android tablet. Both utilities are downloaded from the network.
Set up miniDLNA server
This DLNA server is configured with one configuration file that we will have to edit, so it makes it much easier to configure and run because we will not have to edit several, but only one. To edit it we will use any text editor, usually vim or nano is used, in our case we will use nano.
sudo nano /etc/minidlna.conf
In the configuration file itself we will have all the necessary documentation to run the DLNA server, but in this article we will explain in detail how to configure it, since it comes in English. The important detail is that we have a help page (manual) for miniDLNA media server, so we can get more information about the operation.
man minidlna
The first thing we need to know is to load media content sources, depending on whether we have video, audio or photos, the syntax will be as follows:
media_dir=A,/home/bron/multimedia/audio
media_dir = P, /home/bron/multimedia/photos
media_dir = V, /home/armor/media/video
As you can see, if we want to load "A" is audio, P is photos, and V is video, so it will look perfectly classified on TV. If we want videos and photos to appear, we could do that too, which is ideal for cameras that also record video:
media_dir=PV,/home/bron/multimedia/camara_fotos
Another suggestion we have to configure is where to store the DLNA database, in this case this is done by uncommenting the following line:
db_dir=/var/cache/minidlna
The same thing happens with the logs or registers directory, in case of any error:
log_dir=/var/log/minidlna
The remaining configuration parameters can be left as follows:
port 8200
friendly_name = DLNA server
inotify = yes
notify_interval = 30
We have all the statements already written in the config file, but they are commented, so we have to uncomment them for them to fire. Once we have configured it, we save the configuration file and proceed to reboot the DLNA server so that it applies the changes correctly.
sudo service minidlna restart
Once we have done all this, we can access our TV or smartphone and test the DLNA media server.
Setting up on MAC OS
To work with MAC OS using DLNA technology, you will have to install third-party software. Best utilities:
- Elmedia Player Pro (https://www.appstorrent.ru/114-elmedia-video-player.html);
- Serviio Pro (https://macx.ws/mac-os-unix/9624-serviio.html) ;
- FireStream (https://apps.apple.com/us/app/firestream/id1005325119?mt=12).
Each program has its own characteristic features. Therefore, the approach to choosing the most suitable utility is individual and depends on the purpose of the connection.
Connection errors and solutions
Some users encounter a number of problems and errors when connecting devices using DLNA technology.
The most common problem is that devices do not see each other or do not start. In this case, most likely the answer lies in the Internet connection. You need to make sure again that all devices are on the same local network. When working with a smartphone, it is recommended to turn off any possible connection to the mobile Internet in advance.
The error may be due to an insufficient quality Internet connection.
Poor quality playback or program crashes may be a consequence of the low speed of the switch ports. You can try to solve the problem through the appropriate settings.
As you can see, DLNA technology is universal and quite convenient. To connect, all that remains is to choose the most suitable connection method, according to your goals and technical characteristics of the devices.
Installation and commissioning of MiniDLNA
The miniDLNA program is so well known that we have it available in the official repositories of the major GNU/Linux distributions, so we will have it via the package manager. In this tutorial we used Debian 10, but you can use any version like Ubuntu, Linux Mint or any other distribution because they all work the same.
The first thing to do is install miniDLNA with all its dependencies:
sudo apt install minidlna
After installation, start the miniDLNA service:
sudo service minidlna start
Automatically this service starts with the operating system, we don't need to do absolutely anything else, as you can see when we add:
sudo service minidlna status