I have already published more than one article on the topic of setting up DLNA. We ran the DLNA server in different ways, on different devices, and for different TVs. In this instruction, I will show you how to enable a DLNA server in Windows 10. Let it be a computer or a laptop, it doesn’t matter. The main thing is that Windows 10 is installed on it. There are many different programs that you can use to run a media server on your computer. But in this instruction we will not use any third-party programs. We will use only standard Windows 10 tools. However, this option is available in both Windows 8 and Windows 7. There are few differences there.
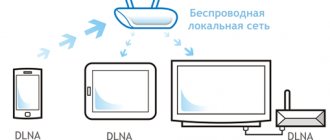
And so, first, let’s figure out what DLNA is, why run this server on a computer, laptop, and what to do with it. Everything is very simple. Using DLNA technology, you can transfer media content (video, photos, music) between devices on a local network. Most often, this technology is used to view videos or photos that are on a computer on a Smart TV. I wrote in more detail about this technology in the article: DLNA technology. Using DLNA on Smart TVs and other devices. If interested, you can read it.
How it all works: the Smart TV must be connected to our router. Via Wi-Fi network or cable. It doesn't matter. The computer on which we want to run the media server and from which we want to play video, photos, or music on the TV must be connected to the same router. The main thing is that the devices are on the same local network (connected through the same router). This does not mean that there should be only one computer and one TV, there can be several of them. Moreover, there may be other devices on the network that support DLNA. For example: game consoles, TV set-top boxes, satellite receivers, etc.
Before proceeding with setup, make sure that your computer and TV are connected to your Wi-Fi network, or using a network cable to your router. Check if the Internet works on the TV. If you don't know whether your TV supports DLNA, you can check the specifications for this information. I will say this, if the TV has a Smart TV, then everything will work.
And in the Microsoft Edge browser in Windows 10, it is possible to display videos, photos and music on TV directly from the browser. I wrote how to do this in this article.
I think we have figured out all the nuances, now we can start setting up.
What do you need to stream?
Advice!
To play media content on another device (tablet, smartphone or smart TV), it is not necessary to set up a DLNA server, homegroup or share a folder. Use the Miracast feature. To operate a home media server in Windows 10, it is not necessary to set up a home group and share the folder for public access on the network. It may be on a public network (that is, network discovery is hidden), but streaming will still work.
To set up a DLNA server on Windows 10, you need to:
- The two devices must be on the same home local network (for example, connected to the same router). How these devices will be connected (via LAN or Wi-Fi) does not matter.
- Make sure your Smart TV (or other device) is turned on and supports DLNA technology. On LG TVs it is called Smart Share, on Samsung - AllShare, on Philips - Simple Share.
How a home media server works
What is a home media server? This is a system within which various devices connected to a network - computers, televisions (if they support the corresponding functions), mobile gadgets and other modern devices - can interact and exchange multimedia content. Another notable technology that can be used through a home media server is IPTV. That is, having built the appropriate one, the user will be able to organize something like a mini-TV studio at home.
Quickly output video from your computer to your TV
To send a video stream from a Windows 10 device to a TV screen, you don’t have to bother with servers. You just need to make a few mouse clicks. Select one of the movies in the folder and right-click on its icon. In the context menu that appears, find the item “Transfer to device” , next to which, when you hover the cursor, a list of available displays is displayed. If your TV is connected to the same local network as your computer, it should definitely be on this list. Sometimes you need to wait a little while the system finds all devices.
So, click on the item with the TV model, and the player window will immediately appear. It will take some time to establish communication between devices.
After this, the TV will start playing the video, be it a movie or a music video. You can control the process either through the player on your computer or using the TV remote control. Closing the window will stop the video stream.
As we can see, this method is simple and requires a minimum of actions. However, it is not reliable, since often the connection is not established for some reason, and a message appears on the TV screen that the device is not ready. Sometimes playback is interrupted and cannot be resumed immediately. This is why using a DLNA server still seems preferable.
Video slows down and other problems
Sometimes annoying interference and malfunctions interfere with watching your favorite movies and prevent you from appreciating all the benefits provided by using the DLNA network. See the table provided for possible problems and methods for solving them.
Table: errors that occur when playing media content and methods for eliminating them
| № | Errors and malfunctions. | Causes of errors and malfunctions. | Possible Solution. |
| 1 | Devices cannot discover the network. | The wi-fi router may have malfunctioned. | Try rebooting your wi-fi router. |
| 2 | Low data transfer speed on a wired connection. | The cable is damaged or poorly secured in the LAN connectors. | Check the integrity of the cable and the tightness of its fastening in the connectors. |
| 3 | The media server is unavailable. | Errors in the operation of the media server. | Reboot the media server. |
| 4 | Media device is not available. | Errors in the operation of the media device. | Reboot your media device. |
| 5 | The video is slow. | The data transfer speed is insufficient to watch the movie. | Temporarily stop watching the movie to download enough data to watch it. |
| 6 | The system stops watching movies and indicates the reason - insufficient disk space. | There is not enough space to store temporary files. | Choose lower quality videos with a smaller frame size. |
| 7 | A message appears - the movie format is not supported by the media device. | The media device does not support this movie format. | Find a movie in a supported format. |
Often the reason why the TV slows down when watching movies is easily eliminated small details. The main reason lies in the unstable operation of the media server. For normal operation, periodically optimize and clean the system. Don't overload your computer with unnecessary programs.
Anyone can set up DLNA-enabled devices at home. It's not difficult at all. A TV connected to your home network gets a second wind. After spending half an hour connecting to the DLNA network, you can view any content from your devices on the big screen. Movies, photos, videos shot on your phone, now you can watch all this just by pressing a couple of buttons.
How to Set Up Media Streaming on Windows 10
The essence of this method is that individual folders and files on the computer are shared, after which you can open and view them on the TV. Data exchange between ordinary PCs on a local network is approximately the same.
The media server is launched through “Media Streaming Options” . To access these settings, open the Control Panel, go to the “Network and Sharing Center” section and click on the appropriate link on the left.
This tool can be easily found through the Windows 10 search bar.
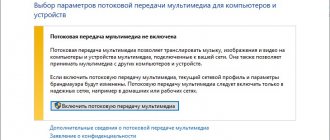
In the Options window, click the “Enable media streaming” .
Next, set the server name, and then set permissions for all detected playback devices.
The Configure link next to a specific device opens an additional settings window. If you are satisfied with the configuration, click OK to start the server.
Now let's move on to the TV. The mechanism for accessing shared files is implemented differently on different models. We will look at everything using the example of an LG TV. In older versions, launch the “SmartShare” , and then go to the “Devices” tab.
Find our server here and open the location. There will be folders “Video”, “Images” and “Music”, displaying the contents of the Windows 10 system directories of the same name. If movies are loaded into the “Video” directory, you can view them.
, “Home Control Panel” allows you to go to the media server folders .
Launch it and immediately see the required tile in the “Inputs” block.
Click on it, and then select “Photos and Videos.” The folders with media content already listed above will appear.
Everything seems to be clear, but there is one nuance. You probably have a separate directory with movies, and constantly copying files from it to the system folder is not very convenient. How to open access to any of the directories on a computer with Windows 10? Simple enough.
Displaying video from Windows 10 to TV: a quick and easy way
A video, film, almost any video can be displayed from a computer to a TV in a few clicks of the mouse. Turn on the TV. Make sure it is connected to the Internet (to your router).
On the computer, open the folder with the video, and right-click on the file that we want to play on the TV (Smart TV). Next, move the cursor to the “Transfer to device” item. Our TV should appear there. If it says “Searching for devices...”, then you need to wait a little. Leave the menu open, or try again in a couple of seconds. As you can see in the screenshot below, Windows 10 found two TVs on me: LG and Philips.
Choose a TV. The player control window will immediately appear. In it, you can control video playback on the TV, add other files to the playlist, see information on the TV, etc.
The TV will immediately start playing the currently running movie.
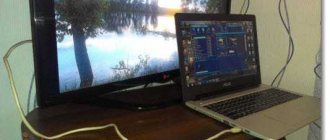
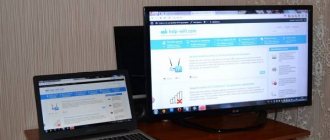
We have just started watching video from a computer to a TV using DLNA technology. As you can see, everything works. And all this wirelessly, over the air. It's over if you have both devices connected via Wi-Fi.
Starting a DLNA server on Windows 10 using standard means
Above we looked at a method where you can send files to a TV from a computer. But, there is still an excellent opportunity when we can view all the files (to which access is open) that are stored on our computer from the TV. I think this is exactly what you need.
To run a DLNA server, you can use third-party programs, for example, “Home Media Server (UPnP, DLNA, HTTP)”. I wrote about setting up using this program in the article setting up a DLNA server for a Philips TV. We watch movies from the computer on the TV. This program is suitable for all TVs. But each manufacturer, as a rule, has its own program. LG, for example, has Smart Share. I wrote about the setup here.
Well, on the other hand, why do we need third-party programs if everything in Windows 10 can be configured using built-in tools.
1 First of all, we need to open the “Media Streaming Options”. This item is located in the control panel. You can simply start typing its name in the search and launch it.
2 In the new window, click on the “Enable media streaming” button. Thus, we enable the DLNA server in Windows 10.
3 Next, enter the name of your DLNA server. Then, in the device list, you can allow or deny access to the media server for a specific device on your network. If you are connected to your home network, you can leave all devices.
If your TV is not on the list, then wait a little. Or close and reopen your media streaming settings.
Next to each device there will be a “Configure…” button. If necessary, you can set individual settings for each device.
4 You can now access the running server on your TV. It looks different on different TVs. On Philips TVs (with Android TV), for example, you need to launch the Media application. Or select this source from the available signal sources.
As you can see in the screenshot above, access will immediately be open to three standard folders: “Video”, “Images”, “Music”. You can view all the files that are in these folders on your TV.
These three folders are located on the system drive. Agree, it’s not very convenient to copy the necessary films and other files there all the time in order to watch them from the TV. Therefore, you can simply share other folders.
How to add a folder for a DLNA server
Launch Windows Media Player.
If you want to add a folder with videos, for example, then click on the corresponding item on the left and select “Manage video library.”
In the new window, click on the “Add” button. Select the folder to which you want to open access via DLNA, and click on the “Add folder” button.
That's it, the required folder will appear in the list and will be displayed on the TV. For example, I opened access to the “Video” folder in which I store films.
In this way you can add any folders or remove them from the list.
Stream video without setup
In Windows 10, you can use DLNA features to play content without setting up a DLNA server. The only requirement is that both the computer (laptop) and the device on which playback is planned are on the same local network (connected to the same router or via Wi-Fi Direct).
In this case, “Public network” can be enabled in the network settings on the computer (accordingly, network discovery is disabled) and file sharing disabled, playback will still work.
All you need to do is right-click on, for example, a video file (or a folder with several media files) and select “Transfer to device...” (“Bring to device...”), then select the desired one from the list (at the same time In order for it to be displayed in the list, it must be enabled and online; also, if you see two items with the same name, select the one that has the icon like in the screenshot below).
This will start streaming the selected file or files in the Windows Media Player "Cast to Device" window.
Creating a DLNA server using built-in Windows 10 tools
In order for Windows 10 to act as a DLNA server for devices that support the technology, just follow these simple steps:
- Open Streaming Media Options (using search in the taskbar or control panel).
- Click "Turn on media streaming" (the same action can be performed from Windows Media Player under the "Stream" menu item).
- Give a name to your DLNA server and, if necessary, exclude some devices from the allowed ones (by default, all devices on the local network will be able to receive content).
- You can also select what types of media you want to share by selecting your device and clicking Configure.
Those. You don't have to create or join a HomeGroup (and homegroups are gone in Windows 10 1803). Immediately after the settings have been made, from your TV or other devices (including other computers on the network), you will be able to access content from the “Video”, “Music”, “Pictures” folders on your computer or laptop and play them (the instructions below also include information about adding other folders).
Note: with these steps, the network type (if it was set to “Public”) changes to “Private Network” (Home) and network discovery is enabled (in my test, for some reason, network discovery remains disabled in “Advanced sharing settings”, but is enabled in additional connection parameters in the new Windows 10 settings interface).
Managing DLNA Server Folders
Adding folders to the list available for viewing on the TV is done through the settings of the standard Windows Media Player. Launch it from the Start menu or using the search bar.
Next on the left, in the “Library” section, right-click on “Video” and select “Manage video library” .
In the window that opens, you will see a list of already shared folders, although for now there is only one system directory here. Click "Add" on the right and find your movie folder. Click “Add Folder” and then “OK”.
Movies from the new directory will appear in the video library, which means they can be viewed on a TV via DLNA.
If you need to change the media server settings, here in Windows Media, open the “Stream” menu item and select “Advanced streaming options...”
We looked in detail at one of the working mechanisms for streaming data between two devices on the same local network. DLNA technology allows you to watch movies from your computer on your TV without using additional removable media. However, this type of connection is subject to various types of failures, especially if the connection is made wirelessly via a Wi-Fi network. Problems may also arise when transmitting high-definition video, which requires a channel of appropriate bandwidth.
If you have set up a DLNA server, but cannot achieve stable operation, you will have to use other methods of connecting devices. A proven option is regular flash drives and portable hard drives
How to connect to a DLNA server on Windows 10
When everything is set up and ready, all that remains is to connect the end device on which you will play the content. This depends on what operating system or application you are using to connect.
If you want to connect to the DLNA server from another computer, make sure both devices are on the same network. Then open File Explorer and click on the Network in the left pane. A list of available media devices will open. Select your server in it, after which Windows Media Player will open with access to your media library. From it you can play videos, music or view photos. Everything is done as simply and conveniently as possible, so even the most distant users should not have problems connecting.
Connecting TV to PC
For this technology to function, you need to connect your TV and computer into one local network. This can be done either via an Ethernet network (connection via cable) or via a wireless Wi-Fi network. In the first case, insert the cable from the router into the LAN port of your TV, the connection will happen automatically. In the second, go to the TV settings, select “Network” -> “Wireless”, select the desired network from the list and enter the password for it.
You can also connect your TV to your PC directly. You need to connect the LAN ports of your computer and TV with a cable, and then set the network settings:
- On TV, for example: IP 192.168.1.2, subnet mask 255.255.255.0, gateway: 192.168.1.1
- On the computer like this: IP 192.168.1.1, subnet mask 255.255.255.0, gateway: 192.168.1.1
To create the necessary server on Windows 7 and 8, you need to install a special program (for example, Twonky, Plex, TVersity), or use the standard Windows Media Player.
How to disable DLNA on Windows 10
- If you decide to disable media streaming, open Network and Sharing Center , and click on the link Change advanced sharing settings .
- In the new window, expand All Networks , and then click Select your media streaming options .
- On the new window, Deny all .
After this, connected devices will not be able to access your media library.
Setting up Windows 10 to run a media server
Home media server for Windows 10 and its configuration: Right mouse button (hereinafter RMB) to “Start” → “Control Panel”;
In the viewing options, select “Small icons” → find “Network and Sharing Center” in the list;
On the right side of the window, click on “Change advanced sharing settings”;
Expand the “All networks” list;
We find “Select media streaming options...”;
Similar to Windows 7 “Enable media streaming”;
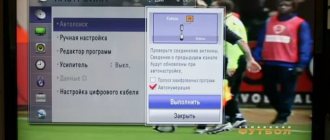
Now let’s specify the streaming parameters according to the order indicated in the screenshot:
Method 1
One of the options for transferring a file to a home media server is configured directly from the Windows Media Player application, for this: launch the above application; in the “Stream” menu, from the drop-down list you must select “Allow remote control of the player ...”;
Windows security will display the message “Allow remote control of the player?” → click “Allow...”.
RMB on any image/video/music and click on “Play to” → select your TV.
Method 2
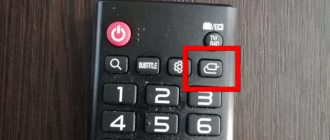
Now let's start the home media server from the TV, first turn it on. on the TV remote control, press the button with the image of a house to launch smart services;
scroll to the right to select “SmartShare”;
when the service starts, in the “External Memory” section the name of your computer will be displayed with the caption “Multimedia Server” → press to select using the OK button on the remote control.
Next, let’s go through the contents of the configured home media server: “Music” directory - note that the folder tree is completely saved (as on a PC / laptop) → playback will start at the top of the screen; “Video” directory, also open the desired file and play it;
“Images” directory - find the required file and open it, pay attention to the ability to launch automatic viewing, the technical implementation is identical to viewing on a computer.
Having completed all the above settings and manipulations, we launched a home media server on a computer running Windows 7 and 10.
To enable DLNA Server on Windows 10, follow these steps.
- Open the classic Control Panel. To do this, simply open the Start menu and start typing the word Panel , from the results displayed, select Control Panel .
- Go to Control Panel Network and Internet Network and Sharing Center .
- On the left, click the Change advanced sharing settings .
- In the window that opens, expand the “All Networks” .
- Click the link - Select Media Streaming Options... under Streaming Media .
- On the next page, click the Turn on media streaming .
- Give your online media library a name and select the devices that can access it.
All. Once you're done, your personal folders such as Music, Pictures, Photos and Videos will automatically become visible to any UPnP-enabled streaming device.
For example, I can view and play files using my TV with DLNA Android software.
The built-in DLNA server can be disabled at any time. Here's how.
Sharing access to media content in HMS
Among the main advantages of the HMS program, as we noted above, is versatility. With its help, virtually any device can be combined into an infrastructure, the central part of which is a home media server. For Philips, Samsung, LG and other brands, it does not matter what type of software is installed on the main network module.
To solve the problem associated with organizing shared access to media files - videos, photos, music - we launch the program, then select from the list of devices displayed in the main window the one with which we are supposed to launch files on the media server. For example, it could be a TV-enabled TV.
After this, you should specify the media resources that are to be distributed among the devices connected to the network. You need to go to the HMS settings, select the “Directory List” item, then “Media Resources”, and then, by clicking the “Add” button, you should specify the address of the corresponding files. As soon as these actions are completed, you need to click the “Scan” button, and then activate its automatic implementation so that the corresponding content is promptly displayed on the TV.
How to use a media server using TV? Very simple. Using the TV remote control, you need to load an interface that will indicate the source of the TV picture - this could be the antenna itself, an Internet channel, a flash drive, or, as in our case, a media server created using the DLNA standard. The corresponding item should appear in the TV menu, and those files that we have marked in HSM as being shared will be available for launch. Modern TVs, as a rule, recognize the home media server without problems. For LG, Samsung, Philips and other brands, providing support for standards like DLNA is the norm.
Setting up a DLNA server using third-party programs
In the previous guide on the same topic: Creating a DLNA server in Windows 7 and 8, several examples of third-party programs for creating a media server on a Windows computer were considered (in addition to the method of creating a “Home Group”, which is also applicable in 10). In fact, the utilities specified then are still relevant today. Here I would like to add just one more program that I discovered recently, and which left the most positive impression - Serviio.
The program, already in its free version (there is also a paid Pro version), provides the user with the widest possibilities for creating a DLNA server in Windows 10, and among the additional functions the following can be noted:
- Use of online broadcast sources (some of them require plugins).
- Support for transcoding (transcoding into a supported format) of almost all modern TVs, consoles, players and mobile devices.
- Support for broadcasting subtitles, working with playlists and all common audio, video and photo formats (including RAW formats).
- Automatic sorting of content by type, author, date of addition (i.e. on the end device when viewing, you get convenient navigation taking into account various categories of media content).
You can download the Serviio media server for free from the official website https://serviio.org
After installation, launch Serviio Console from the list of installed programs, switch the interface to Russian (top right), add the necessary folders with videos and other content in the “Media Library” settings item and, in fact, everything is ready - your server is running and accessible.
Within the framework of this article, I will not delve into the Serviio settings in detail, except to note that at any time you can disable the DLNA server in the “Status” settings item.
Which Android TVs and set-top boxes support DLNA?
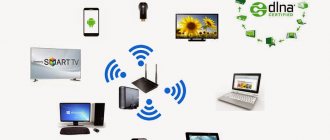
DLNA-compatible devices include TVs, mobile phones, PCs and laptops, music players, game consoles such as Sony PlayStation 3, home media players, personal computers, Android phones, Blu-Ray players, tablets, wireless printers, camcorders, TVs flat screen, routers and HiFi systems. First of all, make sure that your device has this support. All DLNA Certified devices have a logo or sticker indicating that the product has been tested to meet DLNA requirements and is capable of connecting to other certified devices. Next, the device must have a description of the type of digital content supported (for example, audio, video, photos), as well as the type of purpose (for example, server, printer, player, etc.). A more detailed description of the accepted notation is at the end of the article.
Currently, The Digital Living Network Alliance's membership list includes most of the major players in the market, such as Intel, HP, Motorola, HTC, Microsoft, Samsung, LG and Panasonic. These companies create products that work well with each other. Only Apple remained on the sidelines and developed its own standard - AirPlay. So if you have a device from the Apple family, you won’t be able to include it in your media network consisting of devices from other manufacturers.
Stream media to another computer
You can use Windows Media Player to stream or play media on another computer or set-top box on your network.
For example, if you have a digital media player connected to your home network, Windows will automatically detect it and let you play music on it using Windows Player.
To play media on another computer or device, follow these steps:
- Open Windows Player.
- If the player is already open and in playback mode, click the Switch to Library button in the top right corner of the player.
- If the list pane is closed or the Recording or Sync tabs are displayed, select the Play tab.
- Find the items you want to play in the Player Library and drag them from the details pane to the list pane.
- Click the Play With button at the top of the list area and select the device on your network that will receive the media.
- In the Play With dialog box, use the playback controls to control playback on your device or computer and stream media.
Note: When streaming music to a digital media player, you may not be able to change tracks using the controls on the devices or the remote control that came with the device.
general information
What is DLNA? This is a set of standards, a technology thanks to which compatible devices transmit and receive images, video, and music over a local network. Also, with the help of DLNA, media content can be displayed online. At the same time, connecting compatible devices to your home network is possible both wired and wireless.
3 groups of devices that support the technology:
- Designed for use on a home network - network storage, network media players, TVs, printers, etc.
- Mobile devices – smartphones, audio and media players, digital cameras that support file transfer via Wi-Fi, etc.
- Mobile devices for connecting mobile networks to home networks - for example, a modem.
How do you know if your TV supports DLNA? Everything is simple - in the instructions or on the sticker on the receiver itself there will be the inscription: DLNA CERTIFIED. However, it must be taken into account that some large manufacturers have given a proprietary name to the technology. SAMSUNG SMART TV, which will be discussed below, has DLNA called AllShare.
Starting a home media server
Individual settings according to preferences and needs have been completed, and now let's get to the fun part - demonstrating the capabilities of your media server. The program window is divided into 3 parts:
The top right is a tree of folders with content. Upper left – list of files located in the selected directory from the right side. Bottom part – your devices to which the stream is directed are displayed here.
Launch the home media server:
On the main panel, click “Launch”;
if the firewall is enabled, the security system will display a message to which we respond “Allow access”;
your TV will automatically appear at the bottom of the program window;
on the right side of the screen you can select which files to exclude from broadcasting;
in an already well-known way, we launch the “SmartShare” function on the TV using the remote control → in the “External Memory” category the number of available devices and their type is indicated;
When you start navigating through the directories, you will notice a complete match in structure on your computer, but pay attention to the additional filtering options
Let's look at the images/photos: select the desired folder and press the “OK” button on the remote control to open the file in full screen;
Built-in ability to view images with a selection of other images at the bottom of the screen, within a few seconds the image opens to full screen and the navigation bar disappears.
Folder navigation is identical, select the desired file and start viewing, below is a screenshot. Tz_mediasrv/screenshot_058 Tz_mediasrv/V002.mp4 Upon completion of work with the home media server, you need to stop the stream transmission: in the main menu, select “Stop”;
click on the cross - close the main window → the system will display a dialog box with the question “Unload the program?” → “Yes.”
Enjoy watching!
A few more tips
1 If you need to open your media streaming settings, you can do so from Windows Media Player. Just click on the “Stream” menu item and select “More streaming options...”.
2 If during playback of files via DLNA the computer goes into sleep mode and playback is interrupted, simply turn on the “High Performance” power plan.
Sources
- https://geekon.media/dlna-server-windows-10/
- https://viarum.ru/kak-nastroit-dlna-server-win-10/
- https://help-wifi.com/raznye-sovety-dlya-windows/dlna-server-v-windows-10-nastrojka-vyvod-na-televizor/
- https://remontka.pro/dlna-server-windows-10/
- https://wp-seven.ru/instruktsii/tips/windows-10-tips/dlna-server-v-windows-10.html
- https://besprovodnik.ru/domashnij-media-server-kak-nastroit/
- https://g-ek.com/vklyuchit-dlna-server-v-windows10
- https://lumpics.ru/data-streaming-is-not-turned-on-in-windows-10/
- https://WiFiGid.ru/raznye-sovety-dlya-windows/dlna-na-win-10
- https://windows-school.ru/publ/winfaq/ptdz/potokovaja_peredacha_multimedia_na_ustrojstva/10-1-0-237