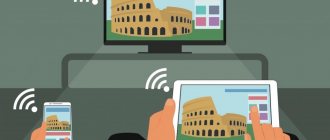
The idea of connecting a computer or laptop to a TV may be quite reasonable if, for example, you often watch movies stored on your hard drive, play games, want to use the TV as a second monitor, and in many other cases. By and large, connecting a TV as a second computer or laptop monitor (or as the main one) is not a problem for most modern TV models.
In this article I will talk in detail about how to connect a computer to a TV via HDMI, VGA or DVI, the different types of inputs and outputs that are most often used when connecting a TV, what cables or adapters may be required, as well as settings Windows 10, 8.1 and Windows 7, with which you can configure various picture modes from your computer to your TV. Below are the options for a wired connection; if you need it without wires, then the instructions are here: How to connect a TV to a computer via Wi-Fi. You may also find it useful: How to connect a laptop to a TV, How to watch TV online, How to connect two monitors to a computer in Windows 10, 8 and Windows 7.
Step-by-step instructions for connecting a TV to a PC or laptop
Let's start directly with connecting the TV and computer. To begin with, it is advisable to find out which connection method will be optimal, least expensive and provide the best image quality.
Connectors such as Display Port or USB-C/Thunderbolt are not listed below because such inputs are not currently available on most TVs (but I do not rule out that they will appear in the future).
Step 1. Determine which video and audio output ports are available on your computer or laptop
Step 2. Determine the types of video inputs present on the TV
Look at what inputs your TV supports - on most modern ones you can find HDMI and VGA inputs, on older ones - S-video or composite input (tulips).
Connect via Wi-Fi
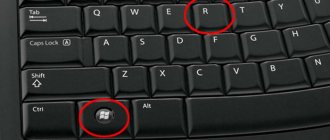
Instructions for Windows 10
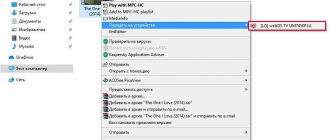
Select the desired file, right-click. In the window that appears, select “Transfer to device.” Then select the name of the TV.
Instructions for Windows 7
Right-click on the file and select "Play to". Click on the TV. After this, a player will appear where you can manage the selected files and change the order in which they are displayed. To expand the list, transfer files through the player. This way you can remotely control the display, updating it with new files. You can also combine photos, music and other movies.
It happens that before the image is transferred, the “Media Streaming Options” window appears. Click "Enable Media Streaming."
Adjusting the image on TV from a PC in Windows 10
For your computer, the connected TV is simply a second monitor, and accordingly, all settings are made in the monitor settings. In Windows 10, you can make the necessary settings as follows:
- Go to Settings (Start - gear icon or Win+I key).
- Select the settings item “System” - “Display”. Here you will see two connected monitors. To find out the number of each of the connected screens (they may not correspond to how you arranged them and in what order you connected them), click the “Detect” button (as a result, the corresponding numbers will appear on the monitor and TV).
- If the layout doesn't match the actual layout, you can drag one of the monitors to the right or left in the options (i.e. change their order to match the actual layout). This is only relevant if you use the “Expand Screens” mode, which is discussed below.
- An important parameter item is located just below and is entitled “Multiple displays”. Here you can set exactly how two screens work in pairs: Duplicate these screens (the same images with an important limitation: both can only be set to the same resolution), Extend the desktop (the two screens will have a different image, one will be a continuation of the other, pointer the mouse will move from the edge of one screen to the second, if positioned correctly), Display only on one screen.
In general, the setup can be considered complete at this point, except that you should make sure that the correct resolution is set for the TV (i.e. the physical resolution of the TV screen), the resolution is adjusted after selecting a specific screen in the Windows 10 display options. two displays, the instruction may help: What to do if Windows 10 does not see the second monitor.
DLNA
DLNA is a technology for connecting computers, laptops, tablets, smartphones and other devices into one home network (server). I'll tell you about setting up DLNA for LG TVs using a special program. This will allow you to watch videos from your computer.
- Download and install the “Smart Share” software on your PC.
- After opening the program, its icon will appear in the computer tray. Right-click on it and select “Set up Smart Share program”. Set the switch to “ON” and click “OK”. With this action we give access to files on the PC.
- In the “My Shared Files” tab, you can add or remove folders that will be available for viewing on TV. Then click “Ok” and “Apply”.
- In the “My Device Settings” section you can change the name of the server.
- In the “Allow/Block other devices” section, you need to find your TV and click “Apply”.
This is the end of the settings. Now let's move on to how to watch movies or other content:
- On your TV, go to “Smart TV” and look for “Smart Share”.
- Open “Connected devices” and select the server that we created earlier.
- In the “All Folders” section you will find the files that you have accessed. We open them and watch them on TV.
If you do not find your server in the list, disable your antivirus program, restart your computer and try again.
A video with instructions for setting up Smart Share is also available for viewing:
We wrote in this article how to output video from a computer to TV using DLNA in the standard way.
How to adjust the image on a TV from a computer and laptop in Windows 7 and Windows 8 (8.1)
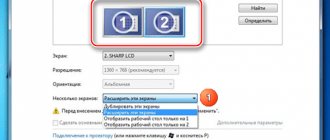
In order to configure the display mode on two screens (or on one if you are going to use only the TV as a monitor), right-click on an empty space on the desktop and select “Screen Resolution”. The following window will open.
If you have both a computer monitor and a connected TV working at the same time, but you don’t know which one corresponds to which number (1 or 2), you can click the “Detect” button to find out. You will also need to clarify the physical resolution of your TV, as a rule, on modern models it is Full HD - 1920 by 1080 pixels. The information should be in the operating instructions.
Settings
- Select the thumbnail corresponding to the TV with a mouse click and set the “Resolution” field to the one that corresponds to its real resolution. Otherwise, the picture may not be clear.
- If you use multiple screens (monitor and TV), in the “Multiple displays” field, select the operating mode (more details below).
You can select the following operating modes, some of which may require additional configuration:
- Show desktop only on 1 (2)
- the second screen is disabled, the image will be displayed only on the selected one. - Duplicate these screens
- The same image is displayed on both screens. If the resolution of these screens is different, distortion may appear on one of them. - Extend these screens (Extend desktop by 1 or 2)
- in this case, the computer desktop “occupies” both screens at once. When you go off screen, you move to the next screen. In order to organize your work correctly and conveniently, you can drag and drop display thumbnails in the settings window. For example, in the picture below, screen 2 is a TV. When I move the mouse to its right border, I will be taken to the monitor (screen 1). If I want to change their position (because they are in a different order on the table), then in the settings I can drag screen 2 to the right side so that the first screen is on the left.
Apply the settings and enjoy. The best option, in my opinion, is to expand the screens. At first, if you have never worked with multiple monitors, this may not seem entirely familiar, but then you will most likely see the benefits of this use case.
I hope everything worked out and is working properly. If not and there are any problems with connecting to the TV, ask questions in the comments, I will try to help. Also, if the task is not to transfer an image to a TV, but to simply play a video stored on a computer on your Smart TV, then perhaps a more optimal way would be to set up a DLNA server on the computer.
- 312 543
- Author: admin
- Date: 07/20/2013
- How to connect a TV to a computer via HDMI, but so that the image is duplicated on the computer monitor, in other words, the image needs to be on both the monitor and the TV? I have a large collection of films and cartoons on my computer, including digital high-definition Blu-ray and HD formats. I really want to watch all these films on my new TV. The TV is in another room. How to do this and how long should the HDMI cable be? I seem to be connecting everything correctly, the computer is connected to the TV using an HDMI cable, and to the monitor via a DVI cable. There is an image on the monitor, but not on the TV, only the inscription on the black screen “Cable not connected” “Check cable connections and source parameter.” Your articles How to connect a laptop to a TV via HDMI and How to connect an Acer laptop to a Philips TV, How to connect a SONY laptop to a TV via HDMI, How to connect a laptop to a Toshiba TV I read, I do everything as written in them. In the TV settings, I select HDMI from the list of all available video sources, but there is still no image from the computer. Dmitriy.
- Hello Admin, in short, this is the case: I bought a new TV with a screen resolution of 1920x1080, connected the TV (as a second monitor) to the computer via HDMI, everything is basically fine, there is a picture on the TV, but I can’t set the resolution correctly on the monitor. The computer monitor does not support the maximum TV resolution of 1920x1080. The maximum that can be set on my monitor is 1280x1024. Therefore, on the TV the resolution is normal 1920x1080, but on the computer monitor everything is a little flattened. In principle, the resolution on the monitor is not important to me, the most important thing is that everything is fine on a large TV, but still, maybe there is some solution to the problem?
- Maybe you can help me, I have a simple system unit with a video card with an HDMI output and a TV with an HDMI input. I sometimes want to use the TV instead of a monitor, but many people do this, for example, to watch movies, of which I have a lot. I really want to watch all these films on my TV, but I can’t, or rather it works, but not quite. When I connect the TV to my computer via HDMI
, there is no sound, but the picture is very good. The operating system is Windows 7, I tried several HDMI cables, maybe it’s not them, but the operating system settings?
If the PC does not see the TV
Outputting video to a TV is simple, but can cause complications or problems. Each device and technique may vary. First, check whether everything is connected correctly and which devices are participating in the broadcast.
What should I do if my TV does not appear in the list of new devices on my computer? Just wait a little without closing the list, and the TV will appear. First of all, make sure that the output device has the “Smart TV” function and is connected to the same router as the computer. Check the connection and functionality of the output device.
Other possible problems:
- The file cannot be played and a “Format not supported” notification appears on the screen. A common occurrence, the reason is the lack of support for the file format. Or the problem is related to the computer: on the Windows 10 operating system the file runs without problems, but on Windows 7 an error is displayed.
- Music/movie playback slows down. If the file is of high quality or weighs a lot, it will slow down during playback. If the Internet speed drops, the picture will begin to slow down. For example, Full HD video is played without delay. If it is 4K, then it is better to purchase a router with a 5 GHz band.
- There is no sound. Go to sound settings. It is located next to the clock, then in “Playback devices”, “Use default speakers”.
To improve performance, create a media server. Use one of the following applications:
- Home Media Server - many possibilities and customizable programs.
- Twonky Server is a simple, convenient communication program that does not require any special knowledge to install.
- Plex Media Server is a Russified version with support for mobile gadgets, which expands the list of capabilities.
How to connect a TV to a computer via HDMI
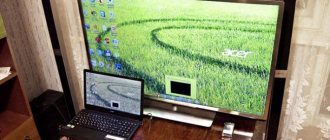
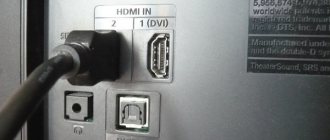
For example, let’s take a Samsung TV, a not entirely new 4 series (LED type), purchased several years ago, but it already has two connectors for connecting HDMI devices.
The computer that we will use to connect to the TV was also purchased about three years ago, it has an Nv video card installed >
As I already said, our TV has two HDMI connectors. With the TV turned off, connect the HDMI cable to the HDMI 2 connector,
We connect the reverse end of the cable to the HDMI connector of the video card of the desktop computer. The computer, in turn, is already connected to the monitor (also Samsung SyncMaster 971P) with a DVI cable.
We turn on the computer and TV. There may not be an image on the TV right away, instead we see the following message: “Cable not connected” “Check cable connections and source parameter” or “Weak signal or no signal”
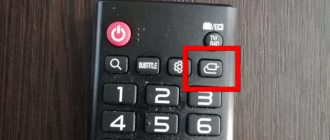
On Samsung TVs, to display a list of all available video sources, you need to press the Source button on the remote control.
A menu appears on the TV, in this menu, using the remote control, select the HDMI 2 connector,
Next, press the Confirm selection button on the remote control.
Now, on our TV, an exact copy of our computer’s desktop should appear. But again there is nothing, the same error appears on a black screen. So we go to the “Screen Resolution” settings. Right-click on the desktop and select “Screen Resolution”.
As we can see in the window that appears, our main screen is set to the second (2) Samsung SyncMaster 971P monitor, and in the “Multiple Screens” parameter we have set “Display desktop only on 2 monitor”, which is why the image is only present on the computer monitor screen, but it's not on the TV
We bring everything in this window to this state. Select the Multiple screens option: “Duplicate these screens” The “Screen” option is automatically set to “Multiple monitors”, click Apply and OK.
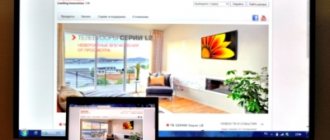
The desktop of our computer appears on the TV.
The resolution of our small Samsung TV is 1366 x 768. If your computer monitor supports this resolution, then it will automatically be set to the same resolution of 1366 x 768. If not, then either the TV or monitor will have the wrong resolution. For example, my Samsung SyncMaster 971P monitor has a maximum resolution of 1280x1024. When using a TV and a computer monitor at the same time, the main thing for me is to set the resolution on the TV correctly, otherwise why would I connect it then. I set the resolution to 1366 x 768 on my Samsung TV, the image is perfect.
And on a computer monitor such a resolution of 1366 x 768 looks like this.
And nothing can be done here. If you want the perfect image on your TV and computer monitor, then they must support the same screen resolution, that is, have the same characteristics.
Hardware and Sound->Sound
If you don’t have anything in this field, right-click on an empty space and in the menu that appears about. “Show connected devices” Now we look at the name of our TV, in my case it is Samsung, it needs to be turned on and the rest turned off. Right-click on Realtek and select Disable.
There are two options for connecting a computer to a TV:
1.
Image duplication - the same thing will be displayed on the TV as on the monitor. The easiest way.
2.
Viewing photos and videos - only photos and videos stored on the computer will be played on the TV. This is a rather complicated method that requires knowledge in the field of setting up networks and sharing files.
Via USB cable
When a person wants to connect a phone to a TV, he most often turns to a USB cable. This small cord comes with any smartphone, regardless of its price category. Its primary function is to charge the gadget, but the cable is also often used to interface with a computer. Is it possible to use a cord to connect to the TV?
Of course you can. But in this case, the user will face some restrictions. For example, it will not be possible to display an online stream on the screen. That is, watching videos via the Internet on your TV will not be available. Broadcasting is only possible with files that are loaded into the device’s memory.
If your TV has a USB-A connector, you can safely proceed to pairing:
- Insert one end of the cable into your smartphone.
- Connect the other end to the TV.
- On your smartphone screen, click on the pop-up window that notifies you about pairing via USB.
- Select “Connect as media device” as the pairing type.
- Open the TV menu, and then the “Signal source” section.
- Click on the USB icon.
After these steps are completed, you can open the folders available on your mobile device. Next, you need to go to the subsection where the video you need to watch is located. It could also be a photo or music file.
Not all TVs support codecs that work on a smartphone. Therefore, some videos may not play on the TV receiver.
Simultaneously with connection to the TV, the smartphone will begin to charge. Thus, this method of pairing two devices will not affect the battery charge. The smartphone can be placed next to the TV, and further navigation can be carried out via the remote control.
Duplicating the image from the monitor
This article describes only the most common connection methods. If they do not suit you or you have difficulty connecting, it is better to contact a specialist. For advice on Samsung technology, you can contact the support service.
The simplest and most modern way, high quality video and sound are transmitted.
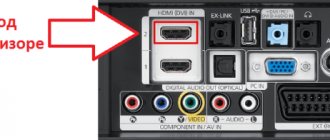
Your computer and TV must have HDMI connectors.
An HDMI cable is required for connection.
The cable is inserted into the connectors of the TV and computer.
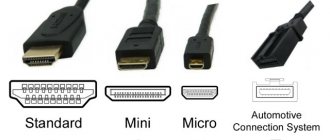
Some laptops and computers use a Micro HDMI connector.
To connect such a computer or laptop to a TV, you need either an adapter from Micro HDMI to HDMI
Or Micro HDMI to HDMI cable
After connecting the cable on the TV, you need to select the HDMI source (on Samsung TV, use the “Source” button on the remote control).
By default the screen will be duplicated. If you want the image to be different on the monitor and TV, configure this setting in the operating system.
A method for older equipment that does not have an HDMI connector. Only average or low quality video is transmitted to the TV. If you connect this way, you may have to disconnect the monitor (if your computer only has one VGA connector).
Your computer and TV must have VGA connectors. The connector is usually blue, but can also be black.
A VGA cable is required for connection.
The cable is inserted into the connectors of the TV and computer.
Some TVs do not have a VGA connector. In this case, you need a VGA - RCA adapter (tulips). Such adapters come in different configurations and qualities, their cost is 500 - 1500 rubles. Be sure to check the functionality of the adapter before purchasing.
One end of the VGA cable is connected to the computer, the other - into the adapter. The TV is connected to the adapter using tulips, a male connector. If the adapter has female connectors, then you will also need male-male tulips.
After connecting, you need to select the AV source on the TV (on Samsung TV, use the Source button).
We broadcast videos using special set-top boxes
If the TV does not support the SmartTV function, but a person wants to equip his device with all the functions of a modern TV receiver, he will need a special set-top box. Such gadgets are sold in every hardware store, as well as on marketplaces like AliExpress or JD. Depending on the store and model, the cost will be from 1000 to 5000 rubles.
To control the set-top box you will need a second remote control. Therefore, this method of displaying images on the screen is not very popular.
The smart set-top box must be connected to a power source and TV using the included HDMI cable. Next, go to the TV receiver menu and select HDMI as the pairing method. Then the image from the set-top box will appear on the screen. Typically this is an operating system that allows you to watch videos online and offline, provided that the video is downloaded to the internal storage.
Rate this article
Using third party programs
For Miracast and Intel Wireless Display, your TV must support these technologies!
- Codecs are an important part of any system, thanks to them film and other media files are decoded. K-Lite Codec Pack is a proven program that has been used for several decades. After setting up the application, the function of transferring files to the TV screen will be available.
As you can see, there are many options to display video from your computer on a large TV screen. Choose the one that seems simpler and more accessible to you, and enjoy watching. Good luck!
You can only enjoy watching 4K movies on a big screen TV. Although modern TV devices have Internet access, it is much easier to find and play the desired video using a laptop. Next we will tell you how to watch TV through a laptop and set up mirroring the computer screen.
TV set-top box
Such a set-top box almost completely copies the functionality of the new Smart TV, but the list of features is larger and it is easier to manage. For example, consider Apple TV:
- Connect it to your TV.
- Start watching videos, audio, photos and other content.
Once connected, you will have access to movies and photos stored in your iCloud and iTunes account. You can also play small toys by connecting several gamepads to the console.
Of course, Apple TV is designed for users of Apple products only with licensed files. Therefore, many choose consoles with the Android system, where there are more options and freedom of action. You can watch movies and other videos through the browser, download the application through the Play Market. In fact, these are the same smartphones on the Android platform. In addition, you can connect a keyboard and mouse for quick text entry.
Setting up Samsung AllShare.
For communication, you need to use a router (I wrote how to set up a Wi-Fi router here) and a directly crimped network cable (LAN) or use a wireless connection if the connected devices have built-in Wi-Fi modules (adapters). Let me remind you that if you do not know how to crimp a network cable, then the link to explanatory material is located above.
It should be said that if you have done everything according to the instructions, but the media server does not see the TV, then check whether the firewall is filtering the application. For example, we created a rule in ESET for “Samsung AllShare”. So, download the program from the official website or via a direct link and install it on your computer.
It is difficult to find this program on the official website because the link to it is constantly changing. To make the search and download process easier, I am giving you a direct link to Samsung AllShare.
After you have installed and launched the application, the program will offer steps to set up a connection with another device.
Step #1: Check the status of the shared server for the My Computer folder.
Step No. 2. Turn on the device to connect to the “My Computer” folder.
Step No. 3. Setting up a network to connect the device. To create a connection, the device (computer, TV, mobile phone...) must use the same common network.
Step No. 4. Select the device to connect to. If the device is not detected as shown in the image above, first of all check whether the program is blocked by a firewall. To check whether it blocks the application or not, disable it completely for a while.
If the firewall blocked the application, then in the settings you need to create rules that determine how the firewall works with network connections.
If you did everything correctly, you will see devices detected by the program that are located on the public network. In my case, the TV detected was the one shown in the image below.
Click the connect button.
Step No. 5. The connection setup for the selected device is completed.
All that remains is to check and customize the application for yourself. It is necessary to create and specify a shared folder in which the required content will be stored and specify a folder in which files will be automatically saved when copied.
Check the folder sharing rights settings and set permissions to use it for each connected device. In my case, one TV is connected to the general network.
All that remains is to upload the file to the folder you created, in my case it is the Shared folder AllShare folder that I created. Select a video file in the folder, select the device on which you want to play it and enjoy watching it.
Broadcasting a movie from a computer to a TV via the AllShare server has begun. As you can see, there is nothing complicated in setting up the application. By the way, if there is no connection, be sure to check in the “Network” menu of the TV in the “AllShare Settings” item it should be “Allow” to exchange multimedia data with the connected device (computer, PDA, smartphone...). That is, you must allow the connected device to share content with the Samsung Smart TV.
According to the developers, the AllShare program (now Samsung Link) does not work with all hosts and it looks like they are not going to fix this glitch. Therefore, you can use the program described below (Samsung PC Share Manager) or install a DLNA home media server on your computer.
Thanks to HDMI
This is one of the most popular methods. The image is transmitted in decent quality, and the sound transmission is excellent. And almost everywhere in modern computers there is a treasured HDMI connector. As a rule, the connectors have the same dimensions on both the TV and the computer, but sometimes one or the other also has a mini HDMI cable, which is a little smaller. This means that you will need to purchase a cable with a regular and mini connector. And then it’s a matter of technology – connecting it to a TV and PC. Data transfer has started. A very simple way to connect.