The BBK company is known to domestic buyers for high-quality video equipment. Today, the brand creates decent set-top boxes for digital TV, which are distributed everywhere free of charge. What are the benefits of BBK digital set-top boxes, as well as an overview of the best models and recommendations for setting them up are presented below.
Features of BBK consoles
Despite the fact that digital TV is significantly inferior to satellite TV in terms of the number of channels, receivers for both types of television may not be inferior to each other in functionality.
This also applies to BBK set-top boxes for digital TV. Their features include:
- high-quality image;
- playback of content from USB media in FHD resolution;
- recording of broadcast programs;
- the ability to pause or rewind the broadcast if necessary;
- the presence of a TV guide function;
- fast channel switching due to modern processors;
- clear interface.
Important! BBK digital television set-top boxes are distinguished by their low price and high-quality build, which is often mentioned by customers in reviews.
Best models
Like any other company, BBK offers a fairly wide selection of digital receiver models. Among those available on the market, the ones presented below have received positive ratings from users and are recommended for purchase more often than others.
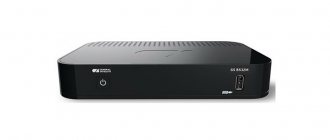
BBK SMP240HDT2
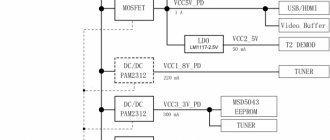
The BBK SMP240HDT2 digital receiver is a model made in a metal case with a display, control buttons and a USB output on the front panel. It has a built-in DVB-T/T2 tuner, supports MPEG-2/4 and plays video from small-capacity external drives in MKV format.
Important! The device has an EPG function - an interactive program guide that allows you to find out what will be broadcast on what channel.
The BBK digital receiver is based on the ALI 3821 chipset, which, according to reviews, behaves quite decently and responds quickly to requests. On the rear panel there are antenna input and output, composite video output and HDMI. Audio codec – Dolby Digital. Maximum video resolution is FHD. The delivery set includes the device, power supply, RCA cable, instructions and remote control with batteries. Cost – from 1,100 rubles.
BBK SMP015HDT2
The BBK SMP015HDT2 receiver has a plastic case without a display. The device runs on the MSTAR 7T01 chipset, which is installed in many Russian TV set-top boxes. There is support for DVB-T/T2, MPEG-2/4, Dolby Digital, electronic program guide, teletext and TimeShift function.
On the front panel there is a USB 2.0 connector without support for powering large-capacity drives (hard drives larger than 500 GB cannot be read, formatted - FAT32). On the rear panel there is an antenna input, RCA, audio output, composite video output, HDMI. Maximum video resolution is FHD. Includes RCA cable, power supply, set-top box, remote control with batteries and instructions. Cost – from 800 rubles.
BBK SMP001HDT2
Model BBK SMP001HDT2 is made in a plastic case without a display. All connectors are located on the rear panel - USB 2.0, antenna input, AV output, composite video output, HDMI. A distinctive feature of this model is its support for the PVR - recording broadcasts to external media .
In this case, the USB connector cannot become a power source, which implies the use of small drives up to 500 GB formatted in FAT32, or hard drives with their own power. The model has a built-in DVB-T/T2 tuner and MPEG-2/4 support. Functions include teletext, electronic guide, Timeshift. Maximum video resolution is FHD. Cost – from 800 rubles.
Despite a number of advantages of the internal power supply, if it fails after the end of the warranty period, it cannot be replaced as easily as a faulty external one . And repairing it in a workshop is often not economically feasible. And then it’s more rational to buy a new console.
This is especially true in rural areas and dachas, where the mains voltage constantly fluctuates or after thunderstorms, so for these places it is better to initially choose set-top boxes with an external power supply.
This article discusses the simplest repair option - replacement with an external power supply .
Moreover, even for professionals, understanding and repairing a faulty switching power supply is irrational - neither in time nor in cost.
For example, in: - from 75 rubles, - from 86 rubles.
We open the console, inspect the insides and carefully their appearance. First of all, you need to pay attention to the output capacitor (usually its capacity is 1000 μF x 10V or 16V).
Usually located somewhere nearby after the yellow transformer and rectifier diode:
If the capacitor is swollen from above or stuck out from below: then simply replace it with a new one - the same capacity and preferably with a voltage of 16V or even 25V.
(by the way, the capacitor shown here is swollen not in the internal power supply, but in the external adapter)
As a rule, signs of a swollen output capacitor are reduced brightness of the indicator or blinking, the set-top box does not start well or does not start at all.
If the replacement did not help or it looked fine, you can change the small capacitor (left):
(ignore the brown glue in the power supplies)
But if you immediately see that the large input mains capacitor (on the right) is swollen (and sometimes explodes), the fuse is blown, then the power supply circuit itself is damaged
Broken diodes of the diode bridge show a short circuit when measured with a multimeter.
It happens that the PWM chip is not only broken, but exploded and its brand cannot be read:
In such cases, the indicators do not light up at all, because there is no power - silence.
The easiest way to connect an external +5V adapter is in parallel with the output capacitor (+5V) - we cut off the plug and solder + + of the capacitor, and - to the - of the capacitor.
But if you want to do all this beautifully and more universally - for the following adapters, then it is better to buy a DC socket for a standard 5.5 mm plug (10 rubles) and file it a little with a knife on the sides: you can insert the resulting grooves into the recess for the power cord:
The result is a prefix for an external power supply:
And now, after a power surge, you can simply replace the adapter with a similar one.
Some OEMs produce universal chassis:
And depending on the Customer’s requirements, they install a connector for an external power supply or complete with all the parts for an internal one.
If you suddenly have additional questions about repairing set-top boxes, there is always the most detailed: INSTRUCTIONS! How to repair a receiver. Read for everyone who has problems with the DVB-T2 receiver!
5/5 — (4 votes)
You can ask questions about digital television on the DVBpro forum
Author: Alexander Vorobyov, 08 Nov 2021 | Permanent link to the page:
Connecting and setting up the set-top box
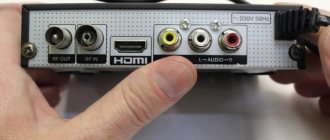
The BBK set-top box is connected to the TV through the available connectors in both devices. First, the antenna cable is connected to the set-top box into the RF IN connector. Next, select a suitable cable for the TV - tulips or HDMI.
Advice! If the latter is available, it is recommended to choose it due to the higher quality of the transmitted content.
After connecting, you need to configure the BBK digital set-top box. To do this, you should perform the following sequence of actions.
- The set-top box is connected to an outlet and turned on by the power button on the remote control or case.
- On the TV, the broadcast switches to the socket selected for connection.
- When you turn it on for the first time, you must enter the requested data (region, time, date, language, etc.).
- After completing the initial setup, you should start an automatic channel search. The system itself will ask you to perform this action, just click on “OK”.
- After searching for channels, they are automatically saved.
- If you need to reconfigure the BBK set-top box, you should first go into its settings and select reset to factory settings, and then repeat step 4.
Additional materials
How to determine polarity without a device / multimeter
For those who have a multimeter, determining the polarity of the power supply will not be difficult, but what about those who do not have this device?
There are several simple ways:
- You can determine the polarity by the color of the wires. There is a rule - the red wire is a plus, respectively, the other wire is a minus. This is almost always the case! Almost! Sometimes there are exceptions, either the wires are not clear what color, or the rule was broken.