HDMI
The main method is how to connect sound to a TV from a computer. When transmitting sound through this cable, difficulties very rarely arise, and the quality of the audio signal is very high. The most optimal option for new TV models. An HDMI cable is often included with various television and audio equipment; it can also be purchased separately.
Connection diagram:
- Disconnect the computer and TV from the power supply.
- Connect the cord to both devices.
This option does not require any additional settings; just select the HDVI output on the TV as the sound source.
But, if there is no sound, then it is recommended to set the TV on your personal computer as the main sound source.
Actions:
- Right-click the sound icon, then select the “Playback equipment” tab and select your equipment from the list of devices that appears.
- Use your computer mouse to click on the selected option and check the box next to the “Default” tab.
The procedure is performed with the equipment connected to each other. If the HDMI cable is connected to the devices, but the PC does not see it, then you should reboot.
Adjusting the TV picture
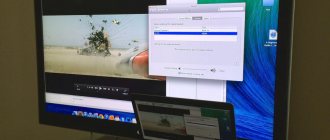
Let's consider a situation where a video card provides output to several video devices simultaneously.
Step 1: Right-click on the desktop and select the Screen Resolution option from the menu.
Right-click on the desktop and select the “Screen Resolution” option from the menu
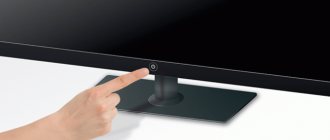
Step 2: If the connected monitor is not yet detected, click Find.
If the connected monitor has not yet been detected, click “Find”
Step 3. Activate the “Duplicate these screens” function to display the same image on your PC and TV monitor. Click "OK".
Activate the “Duplicate these screens” function, click “OK”
Note! This function is often used to watch high-definition videos on TV.
Step 4: Activate the “Extend these screens” feature to use your PC and TV screens independently. Click "OK".
Activate the “Extend these screens” function and click “OK”
Note! This feature is often used to simultaneously watch video and work on a PC or display a game on multiple TV screens.
The "Extend these screens" feature is effective on PCs that are powerful enough to handle the tasks assigned to them in this case.
WiFi
This method is only possible if the TV has DLNA support, and a multimedia file player is also required. All modern panels support DLNA, so this method can be considered an alternative to transmitting audio via HDMI. Thanks to this option, the connected screen works directly with PC files. Scheme:
- Make sure that the plasma panel has a module for distribution via WI-FI connection.
- Turn on devices.
- Installing and configuring the DLNA server.
- In the TV menu settings, select the “WIRELESS CONNECTION” tab.
- To transfer sound to TV, you need to download a special computer application called a media server.
- To transmit audio sound, the user must open this program and select “Ethernet”.
You should be aware that the connected server is subject to a large load, which leads to a decrease in speed.
Possible problems
Sometimes it happens that the PC does not transmit sound to the TV, but everything is connected correctly. If the connection was made wirelessly, then you should try to install it again, check the volume on the TV and PC, and also make sure that the content is played correctly. For example, a player without the required codec can play video but without audio.
If there is no sound on the TV when you connect the HDMI cable, then the problem may be in the cable . There are different types with and without audio support, different signal quality, and even two-way and one-way signal transmission. For this reason, you should not buy HDMI cords with a minimum price tag; the words that these are “no-name from China” in this case can guarantee problems, and not justify the low price.
If everything is in order with the cable, then you should make sure that the video card supports audio signal transmission via HDMI. To do this, in the Device Manager and the “Sound, gaming and video devices” section, look for a video card. If it is not there, then this is not a reason to be upset.
Of course, the video card may be very simple or old, but in most cases, even the most budget options can transmit audio. Therefore, the simplest answer to why sound does not work on TV is out-of-date drivers. It is best to update them on all equipment at once. This can be done through the official website of the equipment or through software update utilities.
RCA
The best option is to transmit the audio signal to older TV models. This cord is often called “TULIP”, it has three branches, the red socket is responsible for the sound on the right, the yellow socket is responsible for the left sound, and the white socket is responsible for the video signal. Scheme:
- Disconnect all devices from power supply.
- In the PC settings, you should expand the computer monitor settings to match the size of the television screen.
- Switch the TV to “VIDEO” mode.
Of all the listed sound transmission methods, HDMI and Fi-Wi are considered the best. Since they provide high sound quality and reliable operation of the equipment.
Recommendations for choosing a cable
Unfortunately, you can no longer output audio through your TV wirelessly. Previously, there was special software with which it was enough to connect the TV to Wi-Fi. Now it’s better not to waste time on useless attempts at wireless audio output. You will have to purchase a special cable. The best of its kind is the HDMI cable, which provides digital signal transmission. In a digital connection, you can transmit both video and an audio track, but with an analog connection, only video.
How to choose a good HDMI cable:
- Don't skimp on quality. A cord from China, of course, costs much less, but its quality can be extremely low. Sometimes the distortion is so significant that it is simply impossible to enjoy clear sound with a picture.
- Buy a long cable. It is better to have a reserve than to face a lack of length. A regular plastic tie will remove the excess cable and hide it behind the TV. If the cable is not long enough, you have to buy an extension cord (it spoils the signal quality) or change the environment. Both are undesirable.
- Make sure the cord is in good condition. It is important to pay attention to the integrity of the sheath, the absence of mechanical damage, marks on the wire and the condition of the connector.
Laptop and TV
Instructions on how to output sound from a laptop to a TV. The user needs to purchase an HDMI-to-HDMI cable or a JACK-2RCA cable.
JACK–2RCA
- Turn on the laptop and LCD panel.
- After loading the laptop OP, open the sound setup program.
- Select the system type "FRONT SPEAKERS".
- In the TV menu, select the “SOUND SOURCE” tab.
- Open the player and play any music composition.
- Set up the equalizer.
HDMI-HDMI
- Connect the laptop and plasma using an HDMI cable.
- In the panel settings, specify HDMI as the main signal transmission source.
- On your laptop, open the control menu and go to the “HARDWARE AND SOUND” section.
- Select the “Manage sound devices” link; in the “Playback” section, the “SPEAKER” item should be activated.
- Click on the HDMI Output icon, select “Properties”, activate the “Use this device” tab.
- In the previous menu, activate “DEFAULT”.
- Play any musical composition to check the sound operation.
- The setup is complete.
Sound settings
Sometimes when you connect an external audio device, the sound does not come out or continues to come from the existing speakers on the laptop or connected to the system unit. This is not critical and can be easily fixed - you just need to switch the sound from the computer to the TV.
Setting up sound on Windows 7 and Windows 10 is no different, but the paths to the menu in which they are performed are slightly different.
In the Windows 7 operating system, it’s easy to configure the sound - right-click on the speaker icon in the tray and select “Playback devices”. In Windows 10, in the tray on the speaker icon, select “open sound settings” - “sound”.
Once in the menu, look for the “playback devices” item. You need to turn on the TV connected by any of the above methods. Typically, in Windows OS, the signal automatically begins to flow to external devices, but due to a failure this may not happen, so switching is done manually.
Advice! If this type of audio signal transmission is constant, then it is better to click on “use as default” so that after each switching on/off of the PC you do not have to switch it again.
The local network
The connection is made either via cable or Wi-Fi. Make the decision yourself, whichever is more convenient for you. In the first case, it’s a little more complicated - you’ll have to dig a little into the TV settings to connect to the central router, but usually all people already have their TVs connected. In the second case, everything is much simpler - you need to connect the router and the TV via a wire (RJ-45 connector):
The next task is to set up a media server on the computer, and on the TV to receive a signal from it. This is a convenient way to stream movies and music to your TV. I won’t describe the detailed setup here, but you can read this article (especially the point about the DLNA server).
Connection options
There are many connection options. Each has its own pros and cons. To choose the best option for yourself, check out the detailed list below.
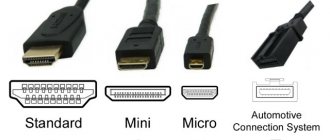
Via HDMI cable
This is the easiest way to connect. But an HDMI cable does not come as standard, so you will have to purchase one. It is universal and suitable for all TVs, computers and laptops.
It can also transmit picture resolution in Full HD (1920x1080). Therefore, the majority of users choose it.
HDMI cable
After connecting the HDMI cable to your laptop/computer, you need to find a similar connector on the TV. If it is missing, you will need to buy an adapter or use another connection method.
On a computer, the HDMI cable connects to the video card, not to the motherboard.
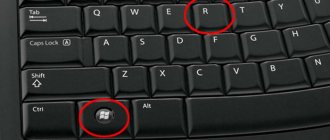
When two devices are connected, you need to configure the image transmission format using the Win+P (or fn+F4) key combination. A menu will open with a choice of image output:
- Only the computer screen.
The image is displayed only on the computer monitor. - Repetitive.
The picture is duplicated on the TV. - Expand.
Increases desktop space. You can use the second monitor in the same way as the main one: work on it, play games, watch movies, etc. - Only the second screen.
The image is displayed only on the TV.
The TV itself is easier to set up. To do this, open the menu and select the desired signal source.
Watch video instructions for connecting a laptop to a TV via HDMI:
Possible problems and their solutions:
- The laptop does not see the TV (shows that there is no signal). Solution: turn on the TV first, and then the laptop. Not the other way around!
- The picture on the TV is out of frame. Solution: you need to change the screen resolution on the laptop (reduce it).
- Connection problems, no picture. Solution: Try a different HDMI connector on your TV if you have more than one. Or you need to select PC mode on the TV.
- The picture disappears and appears again a second later. Solution: Change the HDMI cable to a new one. This one may be interrupted.
DVI cable
An older model, but TVs with this connector continue to be produced. It is capable of transmitting images in Full HD quality, but for this you will have to connect sound separately.
DVI cable
The problem may also arise for laptop users - not all models have a DVI connector, just like TVs. But this situation can be avoided if you use an adapter.
The adapter may degrade the quality of the transmitted image, especially when using older generation cables such as DVI.
The connection and synchronization itself is similar to the HDMI cable.
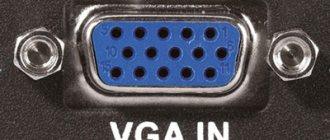
Via VGA
It is found on most laptops, but it is already difficult to find on TVs or computers with a new generation video card. The cable only transmits the image, so the sound will have to be connected separately via a wire.
VGA cable
The video signal is transmitted in Full HD quality. For games, this connection format is economical, since sound can be output from the computer directly to headphones, and the VGA cable itself is low cost.
To connect two devices to each other, you need to insert the VGA cable into the corresponding connectors on your PC and TV. Next, on the TV remote control, click on the “sources” button and select “PC” in the menu that appears.
How to connect a laptop to a TV via VGA and make screen settings, see the following video:
Miracast (WiDi)
The technology does not require connecting additional wires, but only an adapter. Also, the computer or laptop must be equipped with at least a fourth generation Intel processor. Many new laptops and TVs have already implemented this technology, so purchasing a Miracast adapter is not always necessary.
Connection instructions:
1. Computer/laptop and TV must support WiDi function. If everything is ready, go to the next step, if not, insert a Wi-Fi adapter that supports Miracast.
2. In the application menu on your TV, select Screen Share and launch it.
3. Use the Win+P combination. In the menu that appears, click on “Connect to a wireless display”, after a few seconds the TV will appear - connect to it.
4. Once connected, go to “Display Settings” by right-clicking on the desktop, where it will appear in the menu that opens. Select the appropriate quality.
Video instructions for connecting devices using Miracast:
RCA and S-Video
A very outdated type of image transmission. Suitable only for displaying images on outdated TV models from a computer. Laptops with this technology have not been produced for a long time - you will have to use an adapter.
RCA and S-video
The only advantage of such a cable is the ability to broadcast images on old TVs, but the picture quality will be poor. So you can't count on good resolution.
Wi-Fi (or Ethernet) connection
Another one of the most convenient methods, where the big advantage is the complete absence of wires and the ability to connect anywhere in the house where the Wi-Fi signal reaches. To do this, you will need to configure access to certain folders on your laptop or computer.
This technology also allows you to conveniently listen to music on Hi-Fi speakers.
Both devices are paired through a router. Just connect them to the same Wi-Fi network and on your TV you will be able to view videos, photos and listen to music from your laptop or computer.
In most modern TVs, manufacturers are actively introducing functions that allow you to conveniently connect it to a remote device, making it possible to also connect phones and tablets.
If your TV does not have a Wi-Fi module, you will need to purchase an adapter. But for each TV it is necessary to select it individually; not each of them can fit a certain model.
Next, we’ll tell you how to connect two devices to each other via Wi-Fi so that you can watch media content from your laptop on your TV.
In order to share the contents of laptop folders, you first need to install a media server on it. How to do this is described here:
Next you need to do the following:
- On the TV, go to the menu and select “Network”. If there is no such line, make sure that your TV model supports Wi-Fi connection.
- Go to network settings and select "Wireless Connection".
- When the TV finishes searching, select your router from the list of found ones, and enter the password for the router. The TV is now connected to the Internet.
- Press the “sources” button on the remote control and select our home media server as the source. Ready.
Launch the desired file and enjoy watching content on your TV.
Using a wireless monitor
When connecting a wireless monitor, the same technology is used as on TVs - Miracast, the connection of which is described in detail above.
The disadvantages include a strong delay and the use of the monitor only with an active Wi-Fi connection. This technology is not suitable for video game lovers, but it is just right for work, watching videos and surfing the Internet.
When pairing devices, the picture is compressed, which affects the quality for the worse.
Miracast technology only works on the latest generation processors. Please make sure it supports this feature before purchasing.
Scart
Outdated technology for displaying images on older generations of TVs. Due to lack of demand, no one uses it now, but despite this, the quality of image transmission still remains good. When connecting a computer or laptop, you will need an adapter.
Another significant disadvantage is the influence of the length of the wire on the quality of the output picture. The longer the wire, the more intermittent and unclear the signal becomes.
SCART cable
DVI cable
The second most popular way to connect audio from a computer to a TV is the option with a DVI cable. It is used in cases where it is not possible to connect via the HDMI interface. There are 3 types of connectors of this type: combined, analog and digital. Not everything is so simple with the transmission of audio information through this connector. It all depends on what kind of video card is in the computer. Not all video cards support audio playback through the DVI output.
If you are interested not only in how to transfer computer sound to a TV, but also a video signal, then use a DVI-HDMI cable. A DVI-D to HDMI adapter and then an HDMI-HDMI cable are also suitable for connecting devices. Such a complex connection system is used due to the fact that a DVI cable cannot always transmit a video signal.
The disadvantages of this feature include the complex setup process, if compared with the previous version. First, in the television menu you need to select a DVI connector as a signal source. The PC and TV must be connected.