There are many known ways to connect a computer to a TV . The easiest way to connect these devices is to use an HDMI, VGA or RCA cable. You can also connect using wireless interfaces: Wi-Fi or Miracast.
Each method of connecting a computer to a TV has advantages and disadvantages. Therefore, before reading the instructions for connecting a computer to a TV, let’s consider the features of the methods.
Below there will be instructions for each method, thanks to which you will learn how to connect a computer to a TV .
Why might you need to connect your computer to your TV?
When connected to a computer, the TV acts as a monitor. This is very convenient for realizing the multimedia capabilities of a PC. The user has the opportunity to view photos, videos, films on the big screen.
Often the screen characteristics significantly exceed those of the monitor. Therefore, anyone who prefers to watch something on a big screen can connect to the TV and then return the monitor to its original place.
A similar operation is relevant when conducting business meetings, training events, when it is necessary to demonstrate presentations. To avoid spending money on a projector and auxiliary equipment, it is recommended to connect your computer to a TV and display the necessary information on a wide screen.
Fans of computer games do this too. There are a number of ways to display game images on a TV via a computer. Obviously, acting on screen is much more interesting and enjoyable, and the overall atmosphere of the process is deeper.
Computer settings
So, we have completed the connection, all that remains is to configure the computer a little, because there may be no image, or it will be broadcast on two monitors at once.
Screen control
- Right-click on an empty space on the desktop. A context menu will pop up in front of you, in which you need to select the “Screen resolution” item.
- A window will open, as in the picture above, from where we can manage the broadcast parameters.
- There are three main points here: screen, resolution, orientation.
- By clicking on the triangle next to “Screen”, you will see a menu in which you can select which monitor you currently want to display the image on. Find your TV there, click on it, click “Apply” and “OK”. That's it, the image will appear on the TV screen.
- It happens that the computer incorrectly sets the screen resolution - here you can set the value manually, according to the matrix resolution of your TV - usually it is either 1920x1080 or 1366x768. Modern TVs have a high resolution of 3840x2160.
Functional buttons may vary between laptops
Advice! To switch between monitors on laptops, there is usually a separate function button; read the instructions and you will be able to control the system with greater convenience.
Let's summarize. Now you know how to properly connect a television cable to a computer. We talked about many variations, so you will probably find a method that suits you and do it all yourself.
Methods for connecting a computer to a TV
There are quite a few ways to connect a computer to a TV, but not all are able to provide a stable connection and high speed data exchange between devices. To determine the best options, consider the pros and cons of each option.
HDMI cable
This option is considered the best, due to numerous advantages over other methods. HDMI technology provides a stable and high-quality signal between devices and can transmit both image and sound.
It is also important that HDMI connectors are available both on the PC and on the TV body, which eliminates the need to use additional adapters. The newest specification is HDMI 2.1 with a bandwidth of up to 48 Gbps, allowing you to broadcast images in 4K and 8K resolution without any delays.
A way to connect a computer to a TV via VGA
This connector is present on almost any computer and laptop. But on modern TVs, VGA is gradually disappearing, which is explained by the advent of more advanced technologies. If your TV does not have this connector, you can use an adapter cable that transmits the signal from VGA to the PC and is converted to HDMI.
A key feature to consider is that VGA is designed to carry video signals only. To play audio from your computer through the speakers, you will need to connect via a different channel, which in turn necessitates an auxiliary cable.
DVI-D cable for connecting a computer to a TV
There are several types of DVI cable, but it is recommended to use DVI-D to connect a PC and TV. This cable allows direct transmission of digital data without conversion to an analog signal.
The picture quality when connected is very high and the connection is stable. Another advantage worth highlighting is that connecting devices using such a cable is very simple. The only significant drawback is that it practically does not occur on laptops.
S-Video signal
This technology is now considered obsolete. S-Video is a four-pin connector through which video signals are transmitted. The data transfer speed is higher than using conventional composite cables. However, compared to HDMI and DVI-D, the connection quality is significantly lower.
It should be taken into account that on new TV models such connectors are practically absent. This is explained by the fact that they use SCART, a wired interface that uses similar digital-to-analog conversion technology.
A way to connect a computer to a TV via USB
You cannot directly connect the TV to a computer via USB, as this will not lead to any result. To pair using this cable, you will need an auxiliary USB video card. The task of this device is to convert the PC’s digital signal to analog.
Connecting a TV to a computer via RCA
This is a so-called composite cable used to interface different types of multimedia equipment. This cord is also often called a tulip due to the specific design of the plugs.
It is not recommended to use such a cable to connect a computer and a TV. This is due to the fact that the quality of the outgoing and incoming signals is very different. As a result, a low-quality image will be transmitted to the screen. The same problem is relevant for the sound signal.
Connecting a computer to a TV via Wi-Fi
Among wireless connection methods, this is considered the most convenient and effective. However, it only works for modern TV models that have a Wi-Fi module. If there is one, users can quickly transfer the image from the computer to the TV screen using the built-in functions of Windows 10.
The presented method also has a number of disadvantages. The quality of pairing will directly depend on the speed of the Internet and the operating characteristics of the router. Due to natural factors, the signal between devices may be interrupted.
Miracast technology for broadcasting media to TV
Another way to connect your TV to your computer as a monitor. Using this function, you can quickly duplicate the image from your PC to your TV screen. The disadvantage of this method is that Miracast is supported only by the latest TV models, and not all of them.
Typically, this function is implemented in models of the middle and premium price segment. It is basically impossible to find Miracast on older TVs. In addition, this technology is not supported by all computers and laptops.
Types of connection via wires
Popular connection types
Connecting the TV to your personal computer, laptop or compact tablet can be done in different ways, the choice of which depends on the capabilities of the equipment.
- In modern devices there are usually no problems, but with older devices there may be some technical problems.
- We will build the connection rating in order of rationality and optimality, starting with the most common options and ending with the more rare ones.
- In the second part of the article, we will look at alternative methods that will allow you to make a connection when it is difficult to use classic cables.
So here are all the cables we can install:
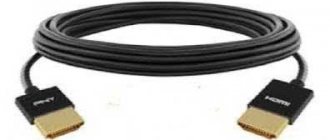
Cable for connecting TV and computer HDMI
- HDMI is a cable that transmits picture and sound in digital quality. It is not only the highest priority in terms of image, but also the most convenient, since only one connector is required to connect.
VGA cable
- VGA – this wire transmits an analog image. Modern video cards often no longer have this connector, but a couple of years ago all devices were equipped with it. This video output can be found on most laptop models. The downside of the connection is that it cannot transmit sound, so a separate 3.5 mm mini-Jack cable is used with it. The picture quality remains at the same level.
DVI cable
- DVI – this connector is considered completely computer, so it is not installed on TVs. However, you can use it by using adapters for the options indicated above. The signal produced by the cable is digital, sometimes analog.
Interesting to know! This connector cannot transmit sound, so when using an HDMI adapter, do not expect it to appear.
S-video cable
- S-video - the presented cable has long been outdated and is not even used for transmitting a TV signal, but sometimes its installation is what is required, because old video cards had them, but the TV may not have other connectors.
Now let's find out in more detail how the listed connections are made.
How to connect a TV to a computer via HDMI
Cable for connecting TV and laptop
HDMI (High Definition Multimedia Interface) is a single modern multimedia standard capable of transmitting high-resolution images and equally high-quality sound. It allows you to connect not only TV, but also speaker systems that need to transmit sound separately through channels.
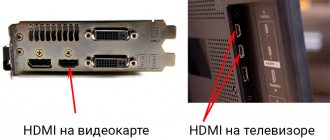
Any modern TV, even the most inexpensive one, has at least one or two such inputs - this is what they look like in the photo.
This connector will be on your TV and computer.
The shape of the plug is made in such a way that it cannot be inserted incorrectly - there is a narrowing with bends in the lower part. However, not all connectors look exactly like this, because there is an option for compact devices (tablets, ultrabooks, smartphones).
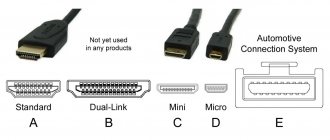
In general, cables are usually divided into classes, among which there are the following options:
- Type “A” is a standard digital cable capable of transmitting a signal in a resolution of up to 1920*1080. This is what is used for connections, more often than other options. Its price is the lowest.
- Type “B” is a more advanced cable that can transmit a picture in 4K resolution and a high-quality signal in 3D without loss of quality.
Compact HDMI connector
- Types “C”, “D” - these are the mentioned connectors for small devices. They are connected to standard cables through adapters, or the wire on the second edge has a plug of a standard shape and size.
The rest of the information on cables can be easily found on our website or third-party specialized resources. We are of little interest to it now, so let’s go straight to the connection.
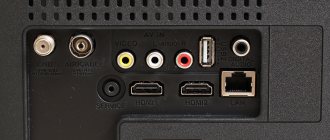
So, all video outputs on the computer are located on the back of the system unit, on the video card or motherboard. Here's what it usually looks like in practice.
- In the photos shown you saw output options on PCs and laptops. From the external differences, you can notice that the VGA on the laptop does not have a thread for mounting screws - the cable is simply inserted.
- The first thing you should do is take a close look at all the exits. If among them there is the HDMI we need, then we simply plug one end of the cable into it and install the block in place.
- We look for a similar connector on the back or side panel of the TV, remember its number and make the connection. Manipulations with the cable end here, then we move on to setting up the equipment.
List of available signal sources
- Depending on the TV brand, their menus will differ, but the general layout (with the possible exception of Phillips) will be very similar.
- Press the output selection button on the remote control. It can be called and designated differently: In, TV In, Source, TV AV, a circle with an arrow pointing inward, etc. It is usually located in the top row, but this is not a fact.
Advice! If you haven’t found the button you need, the instructions for the TV will help.
- After pressing the button, you will see a drop-down list with available inputs on the screen. Select HDMI with the desired number from them and click “OK”.
- The TV will begin to accept video and audio from the specified input, ignoring the rest.
- Next, the computer is configured, but we will talk about this at the end of the article, in the corresponding chapter.
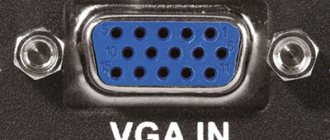
VGA connector is still popular
There is a VGA input on the back of this TV.
Technically, connecting a VGA connector is almost no different from the procedure already described, except that the shape of the connector is different and, as we have already said, a separate cable is required for audio transmission.
- Look carefully at the photo. The VGA input is called PC IN (the name RGB may also be present) - this is important, as it will help us find the desired input for sound.
- Usually it is located nearby, but exceptions are possible. In this particular case, we see an input on the right labeled as PC/DVI Audio IN. You need to plug a 3.5 mm mini-Jack cable into it, like on headphones.
- If the audio jack is not visible, it means that the TV does not support simultaneous broadcasting of audio from this input. You can get out of this situation by connecting an external speaker system to your computer, the power of which will be enough for comfortable viewing of movies and other things.
Advice! At the back of the TV, in addition to the audio input, there may also be an output that will look exactly the same. They can be distinguished by the “poke” method, or by markings. The output can be labeled as AUDIO OUT, there can be headphones drawn there, or a circle with an arrow coming out of it.
S-video connector
S-video cable with transition to classic “tulips”
This type of cable is also analog and is not intended for transmitting an audio signal. On sale you can find adapters from this connector to other television connectors, so you can connect any TV to a PC through this output.
On the TV, next to the cable, you can also see separate sockets for sound, but more often it is combined with the same tulips (AV). That is, they will have common sound inputs, and the image will be transmitted from the connected cable.
Connector options and combinations
It often happens that just the right connector may not be on your TV or computer. In this case, all kinds of adapters will help out.
Let's look at the most common of them:
DVI to VGA adapter
- The most common adapter is designed to move from a DVI connector to a VGA connector. It usually comes bundled with many video cards that do not have a separate VGA output. If such a device is not included in the kit, then do not rush to run to the store to get it. This connector may not support analog signal transmission.
- To avoid confusion, you need to accurately determine the type of DVI connector, of which there are 4. Open the specification of your video card, which can be found on the Internet and look at the exact markings.
Types of DVI and other connectors
- DVI-I Single link - this type supports simultaneous transmission of digital and analog signals, which means it is suitable for connecting the adapter we reviewed. The annotation “Single link” means that the digital signal is transmitted in single-channel mode.
- DVI-I Dual link is almost the same connector, but has a double digital channel.
Interesting to know! Both options transmit the image in a resolution of 1920x1080.
- DVI-D Single link - this output does not transmit an analog signal, and there is no point in buying an adapter for it - nothing will work. This standard is used, for example, on all nVidia 10-series video cards - we remind you that VGA is beginning to be abandoned.
- DVI-D Dual link – this connector, due to its higher bandwidth, can transmit an image with a resolution of 2560x1600 pixels. Just like the previous option, it is not used for transmitting an analog signal.
- DVI-A is a rather rare option, which is designed to transmit only an analog signal. Wait, we wrote that there are 4 connectors, and this is the 5th in a row! That's right - this is how the plug in the adapter for connecting analog devices is designated.
In general, pay attention to the letter assigned to the name of the connector - I allows you to use an adapter, D does not.
DVI-RCA
- The following adapter can be used if the TV does not have a VGA input, but has a component RCA input.
Switch to tulip and S-video
- This option is similar in purpose to the previous one, but you can connect a “tulip” or s-video to it. You may ask why there is only one pin on the tulip. We will answer, because the other two transmit sound and are not needed here.
This adapter is for digital only
- We have already mentioned the next adapter in the text. It is intended for digital data transmission, so the type of connector does not matter.
Advice! With this connection, no sound signal will be sent to the TV, and it will not be possible to connect it to the TV separately, since HDMI does not have additional audio inputs. For this reason, the sound will have to be supplied to separate playback devices.
- You can also find adapters on sale from VGA to almost any analog inputs, be it RCA, tulips or even SCART.
VGA-SCART adapter
- We wrote that HDMI transmits only a digital signal, but this does not mean that the same VGA cannot be connected to it. To implement this scheme, not just adapters are used, but entire converters.
Switching from digital to analog
- Converters can have separate power, or they can receive it from the computer. There is no big difference in functionality, so you can give preference to more compact devices.
- HDMI can also switch to DVI if the circuit requires it, but this case clearly does not apply to TVs.
Instructions for connecting a TV to a computer via HDMI
First of all, it is worth taking into account the fact that there is no universal connection method. This is due to the fact that each TV model has its own characteristics. To figure out how to connect a computer to a TV via cable, you should first read the user manual and find out where the necessary connector is located on the case.
Experts recommend turning off both devices before connecting. This is believed to make synchronization more efficient. After this, you need to connect the computer to the TV via HDMI by inserting the cable plugs into the corresponding connectors on the PC and TV. After this, you need to turn on both devices and perform further configuration.
The procedure is as follows:
- Specify the signal source on TV. This is done differently on different TV models. Usually this is done by pressing the Source button on the remote control. On some TVs, the Input key performs a similar function. You need to select HDMI input as the source.
- On your computer, you need to go to the desktop, right-click and click “Screen Resolution”. Windows will redirect the user to the appropriate settings section. In the “Display” field, you need to select the name of the TV device, and in the “Multiple displays” field, select “Display the desktop on only 2”. As a result, the image transmitted by the computer should appear on the TV screen.
To quickly change the display mode, you can use the Win+P key combination. With its help, you can quickly switch between the image on the monitor and the TV, and, if necessary, change the resolution in the parameters.
How to use your TV as a Smart TV
Using a TV as a web browser, online television receiver, Smart TV is a reality. This problem can be solved by purchasing a Chinese set-top box, with the help of which any TV equipped with an HDMI socket can become a full-fledged mini-computer. Surfing the Internet, watching videos on YouTube and other benefits will be given to you by the Androin Smart TV set-top box. Just connect it to a free HDMI port, do a simple Wifi setup and use it. The TV turns out to be a kind of analogue of a giant tablet computer without a sensor. All control is carried out from the remote control, which comes complete with the set-top box. Also, some set-top boxes support connecting a wireless mouse and keyboard.
How to connect a computer to a TV via Wi-Fi? Instructions
The wireless module is built into many TV models. They are usually used to browse Internet services. Windows 10 computers have the ability to project images onto an external display using Wi-Fi Direct. If this option is supported on the TV, then there will be no problems with synchronization.
How to connect a computer to a TV via WiFi:
- First of all, you need to turn on both devices and make sure that Wi-Fi on the TV is activated. By default, the TV can connect to your home router, this does not matter in this process.
- On a computer or laptop running Windows 10, you need to open the Start menu, go to Settings and find the Display section. At the bottom of the window there is a field that says “Connect to a wireless display.” After clicking on this command, the computer will begin searching for devices. Select the detected TV in the window on the left and connect.
- When you try to connect to TV, as a rule, a corresponding request appears. It must be confirmed, since otherwise the connection between the devices will not appear. You should take into account the fact that on the first attempt you may not be able to establish contact between the devices: during the first connection, the computer transfers encryption keys to the TV. But in the future it will be possible to quickly connect a PC via Wi-Fi.
- By connecting your PC to your TV, you can perform additional settings. To do this, in the window where the search and pairing was performed, you need to click “Advanced display options.” From here you can view the properties of the connected screen and, if necessary, change the properties of the video adapter.
When considering how to connect a computer to a TV wirelessly, it should be noted that the data transfer speed via Wi-Fi is lower than via HDMI. There may be short delays when playing videos or launching games, especially if the signal quality between devices is poor.
In addition to Wi-Fi, the Bluetooth wireless interface can also be used to pair devices. Many TVs support this data exchange technology. By activating Bluetooth on your TV, you can search for the device on your computer and connect. The data transfer speed over a Bluetooth connection is slightly lower than over Wi-Fi, but it is quite sufficient for viewing low-quality photos or videos.
Transferring images from laptop to TV via Wi-Fi
In this case, we consider direct broadcasting of the image from the laptop screen to the TV. In practice, in this case, the computer receives another display.
Important! In this case, there is no need to use a router for a wireless connection. You can send data between devices using Wi-Fi Direct.
WiDi technology
To transmit this way, you need a computer that uses an Intel processor. It must correspond to the third generation or older. You must have a built-in wireless adapter from this company. You will need to install the Intel Wireless Display program from the official Intel website.
To connect, you need to do the following:
- Enable WiDi support.
- You need to run the Intel Wireless Display application on your laptop. All devices that were on the network will be displayed. You need to find a wireless monitor. A security key may be required during the connection process.
After completing these steps, the image from the computer display can be duplicated on the screen.
Miracast technology
Previously, there was a need to separately purchase a Miracast wireless adapter. Now most TVs are equipped with this communication protocol initially or receive it when updating the firmware. This solves the problem of how to display an image from a computer to a TV via Wi-Fi.
The computer must be equipped with a wireless adapter that supports Miracast.
The connection procedure is as follows:
- You need to enable Miracast support in your TV settings. On Samsung TVs this feature is called Screen Mirroring. If it is not possible to set the necessary settings, then in this case you need to make sure that Wi-Fi is turned on.
- On your laptop you need to open the Charms panel. In Windows 8.1 it is located on the right side of the screen. Next, go to “Devices”, then to “Projector (Transfer to Screen)”. After this, you need to click on the “Transfer to wireless display” item.
Note! If you cannot find the last item, it means that your computer does not support this communication method. In some cases it will be possible if you upgrade the wireless adapter driver to a new version.
Miracast support is built-in in Windows 7 and higher versions. For example, in this operating room, in order to use the TV as a monitor via Wi-Fi, you need to do the following:
- Press the key combination Win+P. Do not press it for too long, as this may cause the screen to go dark.
- After this, the menu related to the design will be shown on the screen. In it you need to click on the line “Connection”.
- The operating system will provide a list of devices connected to the wireless network.
After this, the broadcast process will begin.
How to cast video from your computer to your TV using Google's Chromecast
This device is a minicomputer running on the Android operating system. It is connected to the HDMI input of the TV. It can receive one of the Chrome browser tabs from a laptop and duplicate it on the screen. In addition, it can work directly with the youtube.com service. In this case, the laptop can be turned off, and the device will broadcast video directly from this site or transmit television programs.
How to connect a regular TV to a laptop via Wi-Fi
To do this, the TV must have a built-in wireless adapter. To watch TV this way, you first need to set it up correctly. In this case, you need to do the following:
- Open settings.
- Go to the section related to network connections.
- Select a connection to a wireless network.
- Open settings options. A list of available connections will be shown. You need to select the one you need and connect.
To configure, you can use the free program “Home Media Server” (you can download it from the link. When you start it, you will be prompted to add it.
How to transfer images to your TV via Wi-Fi depends on the brand. Usually you need to go to settings and select a DLNA server from the available connections.
After this, you can play video files located on the laptop on the screen.
How to connect a Windows 10 computer to a TV via Miracast?
If your TV supports Miracast, you can use this wireless technology to transmit a signal from a computer or laptop. This interface is based on Wi-Fi Direct technology. Therefore, if the TV does not support this interface, then you will not be able to use Miracast.
How to connect:
- You need to enable Miracast on your TV. If the menu does not have a separate block with an activation function, it is enough to make sure that the Wi-Fi signal reception is turned on on the TV.
- On your computer, you need to open the Start menu and go to Settings. Here you need to select the “Devices” section.
- Next, you need to open the “Connected devices” section. A list of all devices that are paired with the PC via different connection types will be displayed here.
- To find a TV, you need to click the “Add device” command. When prompted to add, you must select the “Miracast” receiver. When the computer finds the TV, it will be in the “Other devices” list. You must click on the name to make a wireless connection.
Having determined whether it is possible to connect a computer to a TV via Miracast, you should keep in mind that this will not be possible in all cases. Some Wi-Fi routers do not support this mode of operation.
You may also need auxiliary drivers for connection. Due to physical obstacles or other negative factors, the signal between the PC and TV may be too slow, in which case the video cannot be streamed.
Smart TV
The development of digital electronics is moving toward the point where all gadgets are becoming multifunctional and capable of replacing other devices. The most striking example of such a transformation is smartphones, which from ordinary “dialers” have turned into portable laptop computers, not much inferior in functionality to full-fledged devices (the same PCs, cameras, voice recorders, etc.).
Smart TV from Samsung is one of the best today
- The development of television technology followed a similar path. A modern TV is not only a means for watching TV programs, but also partly a computer that can be connected to the Internet.
- What does connecting to a computer have to do with it, you ask? It's simple - a PC configured in a certain way can distribute the Internet even via Wi-Fi.
- As for the TV itself with the Smart function, it is not a full-fledged analogue of a computer. Basically we are talking about the use of certain resources - branded and publicly available, for example, YouTube.
- Yes, some models have a built-in browser, but it is almost impossible to use it, due to the fact that the devices do not know how to clear the cache.
Wi-Fi signal receiver for TV
- You can connect the TV in this way using a LAN wire or wirelessly. Not all models have a built-in signal receiver, so you may need to buy an adapter like the one in the photo above. The price for such a device is quite high.
How to connect a computer to a TV via a VGA or DVI cable?
The proposed methods are suitable if you need to connect an old TV model to your computer, which does not have HDMI and does not support wireless interfaces. There are no fundamental differences in the procedure for connecting VGA and DVI. The main thing is that the cords are of high quality, since otherwise the connection will not work.
How to connect a computer to a TV via cable:
- Select a VGA or DVI cable, make sure that the necessary connectors are present on the computer and in the TV case. Before connecting VGA, it is recommended to turn off both devices to eliminate the risk of damaging the video card.
- Connect the computer and TV via cable. On the remote control, press the Input or Source button to select the input source. Select the appropriate option: VGA or DVI.
- Adjust screen resolution in Windows To do this, right-click on a free area of the desktop and select “Screen Resolution” in the context menu. We select the appropriate value taking into account the characteristics of the TV. When you select the “Display desktop 2” mode, Windows 10, as a rule, adjusts the image resolution automatically.
Having figured out how to connect a computer to a TV, it is worth considering that VGA and DVI are not capable of providing high data transfer speeds. These cables are used to exchange an analog signal, while the same HDMI transmits data in digital form.
Converters
As I said earlier, old TVs do not know how to understand a digital signal, since at that time it simply did not exist. More precisely, it was, but more often it was the analog signal that was used. But the computer still more often uses a digital signal (we look at the ports). So, in order to convert a digital signal to analog, there are special converters. They should also be chosen based on the inputs and outputs that your computer and TV have.
How to connect a computer to a TV via S-Video and RCA?
These methods are also used in cases where you need to connect an outdated TV to a PC or laptop. A standard RCA cable consists of three cords, each of which is responsible for transmitting a specific type of signal.
The main difficulty that a PC user may encounter is that new computers do not have special outputs for connecting this cable. In this case, it is recommended to use a VGA-RCA or HDMI-RCA adapter.
How to output an image from a PC to a TV screen via RCA:
- Both devices must be turned off first. This is necessary to protect the video card.
- Connect the cord to the appropriate connector on your TV and computer. The yellow wire is connected to the Video Input, the white and red wires are connected to the left and right audio inputs, respectively.
- After connecting the cord, you need to turn on the TV and then the computer. On the remote control, you must press the Input or Source key and select the desired signal source. On some TVs, to display the picture received from the PC, just press the AV button.
Connecting via an S-Video cable is carried out in the same way. However, it is worth considering that most computers do not have a connector for this cord. It is best to use another connection option or, as a last resort, purchase a special adapter.
As already noted, RCA and S-Video technologies are considered obsolete. They are inferior to HDMI in all respects and cannot provide stable communication between devices. The maximum image resolution when connected in this way does not reach the Full HD standard.
What to do if the TV does not see the computer
There are unpleasant situations when the Samsung TV is connected to the PC correctly, but there is no pairing.
To troubleshoot the problem, you must do the following:
- Check the condition of the cable. If the wire has not been used for a long time and has been in a twisted state or has been handled carelessly (heavy objects have been placed on it, stepped on), it may be damaged. Only replacing it with a new sample will help.
- Make sure that the correct input source is selected on your Samsung TV. To do this, you need to go to the signal source menu and check each available option.
- Make sure your computer is paired with only one external monitor. If the PC is connected only to the TV, then it should be detected automatically. But to make sure of this, you need to right-click on the desktop and go to the item with screen resolution or graphic characteristics (depending on the installed OS version). Next, select the item with screen duplication.
- Install the latest drivers for the video card on your computer.
- Check to see if your computer system is infected with a virus or other malware. This often prevents proper pairing.
- Inspect the ports through which the TV and computer were connected for defects.
The information provided is enough for the user to understand how to watch files from a PC on TV and what to do if the connection fails.
If you don’t know how to connect Samsung Smart TV to a computer to watch multimedia content from the computer on the TV, then this article is written for you. We live in the age of information technology and today we have the opportunity to create a multimedia home network and give the TV access to other devices (computer, phone, tablet) and to the films, photos and music recordings stored on them.
You will probably agree with me that having a home network is very convenient, since you no longer need to transfer the video file stored there from your device to a flash drive or DVD in order to watch it on your TV. There are several ways to connect a Smart TV and a computer to your home network, but in this article I will talk about two of them. Today, thanks to Samsung developers, setting up and connecting your home into a common Smart TV network with a computer is easy and convenient, and you will see this if you read the article to the end.
How to connect a computer to a TV via a USB cable?
As already noted, it is not possible to connect devices directly using a USB cable. This is explained by the fact that the USB connector in both devices is designed primarily not for transmitting, but for receiving signals. This interface is used to connect external devices, such as monitors, keyboards, mice, and capacitive storage devices.
Since you cannot directly connect your TV to your Windows 10 computer, you will need an alternative solution, and it exists!
To connect, you can use a special adapter that makes the digital signal available to the TV. This function can only be implemented if the TV has an HDMI connector.
The general procedure for connecting is as follows:
- Insert the USB cable into the appropriate port on the system unit or laptop.
- Connect the second end of the cord to an external video card, which acts as an adapter.
- Connect the HDMI cable to the connector on the converter, and insert its other end into the connector on the TV.
In principle, if the TV has an HDMI input, then using USB is inappropriate. The connection speed via USB is slower and the signal is less stable. When watching videos in high quality, delays will occur, since the content will not have time to be transferred from the PC, processed by the TV and displayed on the screen.
The method is only justified if the HDMI port on the computer is faulty. Also, image output via USB is relevant for laptops that do not have such a connector.
When considering how to connect a TV to a computer via USB, it should be noted that it is not necessary to use a USB-HDMI converter for this. The signal from the computer can also be converted to VGA if you use the appropriate adapter for this.
How to record video from TV to computer
To record television programs, sports broadcasts, movies, it is not necessary to buy a TV tuner for your PC. You just need to buy a simple USB video capture card, “tulip” wires, as well as a Scart to AV adapter, equipped with a switch with 2 positions “IN” and “OUT”. From the circuit diagram of any modern TV equipped with a Scart socket, it is clear that this socket can be used for both AV input and output.
The AV input, of course, is used to connect all kinds of DVD players and set-top boxes such as Dendy, Sega and others. The scart output was used to record television programs onto a VHS video recorder. It is this feature of the Scart connector that we will use to record the signal from the TV to the computer. We recommend using the Easy cap attachment as a video capture device. This set-top box easily connects to a computer USB port, and after installing software and drivers, it becomes a full-fledged video capture card.
All that remains is to connect the Scatv to AV adapter to the TV, set the output and output switch correctly, and connect the Easy cap set-top box. Using the built-in software, you can easily get high-quality picture and sound from your TV to your computer, which can be recorded onto your hard drive.
conclusions
By connecting your computer to your TV, you can view photos and videos on the big screen. The TV can also be used as an external monitor, which is especially important for gamers who use gaming laptops and strive to get new gaming experiences.
Question about how to connect a computer to a Samsung TV. LG or another manufacturer is very relevant. You can use both wired and wireless methods for pairing.
The best option is a connection via an HDMI cable, which provides high data transfer speeds and does not negatively affect the quality of the content.
You can also broadcast images from your PC to your TV screen via Wi-Fi or Miracast. RCA, S-Video, DVI technologies are considered obsolete and are not recommended for connecting a computer to a TV.
Setting up Samsung AllShare.
For communication, you need to use a router (I wrote how to set up a Wi-Fi router here) and a directly crimped network cable (LAN) or use a wireless connection if the connected devices have built-in Wi-Fi modules (adapters). Let me remind you that if you do not know how to crimp a network cable, then the link to explanatory material is located above.
It should be said that if you have done everything according to the instructions, but the media server does not see the TV, then check whether the firewall is filtering the application. For example, we created a rule in ESET for “Samsung AllShare”. So, download the program from the official website or via a direct link and install it on your computer.
It is difficult to find this program on the official website because the link to it is constantly changing. To make the search and download process easier, I am giving you a direct link to Samsung AllShare.
After you have installed and launched the application, the program will offer steps to set up a connection with another device.
Step #1: Check the status of the shared server for the My Computer folder.
Step No. 2. Turn on the device to connect to the “My Computer” folder.
Step No. 3. Setting up a network to connect the device. To create a connection, the device (computer, TV, mobile phone...) must use the same common network.
Step No. 4. Select the device to connect to. If the device is not detected as shown in the image above, first of all check whether the program is blocked by a firewall. To check whether it blocks the application or not, disable it completely for a while.
If the firewall blocked the application, then in the settings you need to create rules that determine how the firewall works with network connections.
If you did everything correctly, you will see devices detected by the program that are located on the public network. In my case, the TV detected was the one shown in the image below.
Click the connect button.
Step No. 5. The connection setup for the selected device is completed.
All that remains is to check and customize the application for yourself. It is necessary to create and specify a shared folder in which the required content will be stored and specify a folder in which files will be automatically saved when copied.
Check the folder sharing rights settings and set permissions to use it for each connected device. In my case, one TV is connected to the general network.
All that remains is to upload the file to the folder you created, in my case it is the Shared folder AllShare folder that I created. Select a video file in the folder, select the device on which you want to play it and enjoy watching it.
Broadcasting a movie from a computer to a TV via the AllShare server has begun. As you can see, there is nothing complicated in setting up the application. By the way, if there is no connection, be sure to check in the “Network” menu of the TV in the “AllShare Settings” item it should be “Allow” to exchange multimedia data with the connected device (computer, PDA, smartphone...). That is, you must allow the connected device to share content with the Samsung Smart TV.
According to the developers, the AllShare program (now Samsung Link) does not work with all hosts and it looks like they are not going to fix this glitch. Therefore, you can use the program described below (Samsung PC Share Manager) or install a DLNA home media server on your computer.
Setting up Samsung PC Share Manager.
Usually, a direct network is created through this program, that is, they connect Smart TV and PC via an Ethernet port (without the participation of a router). For communication, you must use a cross-pressed network cable (LAN). You can also create a connection via Wi-Fi if the connected devices have built-in Wi-Fi adapters. If you connect via a router and one of the devices is connected by a network cable, then you need to crimp the RJ-45 (connector) directly. So, download the application via a direct link and install it on your computer.
Unfortunately, downloading the application from the official website is problematic, I don’t know why this is connected, but in order to save your time and nerves, I am giving you a direct link to Samsung PC Share Manager.
Then turn on the TV and computer and connect them to each other using a network cable using a crimped cross method. Let me remind you that if you do not know how to crimp a network cable, then a link to detailed instructions is at the beginning of the article.
The next thing you need to do is assign IP addresses to the devices. To do this, on your computer you need to go to “Network Connections”, click on the “Local Area Connections” icon and select “Properties” from the context menu. Next, select the “Use the following IP address” switch and enter 192.168.1.1, and set the TV to the IP address 192.168.1.2. The subnet mask for both devices must be the same 255.255.255.0.
Now launch the Samsung PC Share Manager program and select the folder to which you want to give access to the TV to view multimedia content.
1. Specify (select) or create a folder to which you want to give access to the TV.
2. Click on the button with the image of a folder with a green check mark (Share folder).
3. In the drop-down menu, click on “Sharing” > “Set device policy”.
4. Next you need to set the device status to “Accepted”.
Now all that remains is to click the “Set changed state” button and enjoy watching your favorite movie streamed from your computer to your TV.
Let me remind you that if there is no connection, then first of all check whether the firewall is blocking the program and that the network cable is crimped correctly. To check whether it blocks the application or not, disable it completely for a while. If the firewall blocked the application, then in the settings you need to create rules that determine how the firewall works with network connections. As you understand, there are a lot of firewalls and it is not possible to describe the configuration of each.
As you can see, there is nothing overly complicated about connecting Smart TV to a computer. By analogy, these instructions can be used to configure other devices.
If you find an error, please select a piece of text and press Ctrl+Enter.
There are two options for connecting a computer to a TV:
1.
Image duplication - the same thing will be displayed on the TV as on the monitor. The easiest way.
2.
Viewing photos and videos - only photos and videos stored on the computer will be played on the TV. This is a rather complicated method that requires knowledge in the field of setting up networks and sharing files.