A TV synchronized with a PC increases its functionality significantly. That's why many people are interested in how to connect a computer to a TV via HDMI. Even old TV panels have this interface, and a suitable cable can be found in any digital equipment store. The connection process itself is simple and can be done in several ways.
It all depends on the goals: broadcasting from a PC to a large screen, using the TV as a large monitor, or whether they need to work simultaneously. In this case, HDMI outputs the image along with sound. The methods are effective for both plasmas and new LED panels. Such synchronization of equipment is quite convenient: on a large screen it is easier to work with documents, it is more comfortable to watch movies, and playing games is a pleasure.
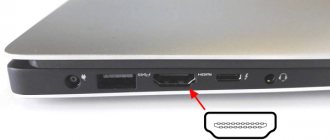
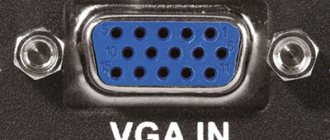
HDMI input location on PC
In view of all the above advantages, a large number of people strive to connect a TV or monitor via HDMI to a computer. This is where the first problem arises: not everyone knows where this interface is located on a PC. The answer is quite simple: on the back panel of the system unit . It is located on the video card, next to one of several additional interfaces for a similar purpose:
For clarity, you can turn your attention to the photo.
How to make an HDMI output on a computer if it is missing
There are situations when there is no HDMI interface on the rear panel of the system unit. This is primarily due to the age of the video card. On earlier models this connector was completely absent.
If you have an outdated video card, but you really need this input , there are two outputs on how to make HDMI on a computer:
- Change the video card to a more modern one . This will require financial investments, and significant ones at that, since a brand new video card (especially gaming analogues) cost quite a lot.
- Choose an adapter from your interface to HDMI . This can be done either in a computer parts store or via the Internet. In this case, the investment amount will be significantly lower.
Choose the option that suits you best.
Technical part
The easiest option is to purchase the necessary cable.
But this is only if the TV has a standard HDMI connector.
Find the required connector on the back of the TV, such as shown in the figure.
HDMI connector on the back of the TV
On some models it may be located on the side panel.
Location of the connector on the side of the TV
Then find the same socket on the back panel of the system unit of your computer or laptop. It has the same appearance.
HDMI connector on the rear panel of the system unit
It is located directly on the panel of the installed video card along with other connectors (DVI and VGA).
If the TV is mounted on the wall, conventional cable connection is almost impossible.
This is due to the short distance from the television socket to the wall.
In this case, a special adapter made in the form of a right angle can come to the rescue.
HDMI adapter angled type
If you have such an adapter, it will not be difficult to connect to both the rear and side panels (depending on where the socket is located).
If you want to connect several devices to your TV at once, but there is only one HDMI connector, you can use a “switcher”.
Correct HDMI setup with your own hands
We have looked at where it is located and how to make HDMI on a PC, now we should move on to configuration and connection. Without this, you will not be able to enjoy the operation of this interface. This stage will be discussed using the Windows 7 operating system as an example.
After this, you can proceed to the next steps - connecting the TV/monitor to the computer. To do this, you will need to insert the cable itself into their HDMI inputs/outputs. It should fit tightly, all the way.
On your computer, you need to right-click on an empty space on the desktop and select the “Screen Resolution” menu. In the tab that appears, the Windows 7 interface will notify you of the presence of multiple monitors.
Standard OS tools implement 2 ways of working with monitors:
- Screen duplication. The two monitors will represent one unit and broadcast the same video signal. Good to use when setting up displays with the same resolution. Otherwise, one of them will show a black frame on the sides and the image will not fill the entire screen. Separately, here, you cannot adjust the resolution for each display.
- Expansion of screens. Supports separate setting for each monitor. It is good to use when devices with different resolutions are connected, for example a TV and monitor. It is possible to configure each of them separately and the ability to select the default device. The default screen will broadcast the operation of the OS, and an additional one (with a higher resolution) can be used to watch movies in high quality.
Setting up screen duplication
For this method, just select the resolution you are interested in (it is recommended to set it to the maximum). In the “Multiple screens” , select “Duplicate these screens” . Click "Apply" after "OK" and you're done. On both displays you see the same picture.
Setting up screen extensions
Here the situation is a little more complicated, but 1fleshka.ru will tell you how to do everything quickly. We will need to determine which monitor will be the main one and which one will be the secondary one . Usually the monitor is left as the main thing, and the TV as a secondary one.
Select this in the “Screen” and check the box “Set as the main monitor” . Setting up HDMI on a personal computer is almost complete. All we have to do is set the resolution we are interested in. Here you can set the resolution for each monitor separately. It is advisable to set it to the maximum (the picture will be clearer).
It will not be superfluous to make additional settings . Click the “Advanced options” and select the “Monitor” . Set the screen refresh rate to the maximum. We always use 32 Bit .
screen expansion mode, additional settings must be made for the TV and monitor separately.
Sound settings
We have more or less figured out the image, now it’s time to move on to setting up the sound. This is quite easy to do. You need to right-click on the speaker icon in the lower right corner and select “Playback Devices” from the menu. See photo.
the Playback tab will display the available devices for playing audio through an HDMI connection. From this list you will need to select a device (carefully evaluate the list provided and select the appropriate option), right-click on it and select “Enable” . The photo below will help you do everything right.
As an example, let's consider a situation where you need to connect a TV and select it as the audio source. Go to Sound/Playback and turn on AMD HDMI Output. The remaining devices will need to be disabled in a similar way.
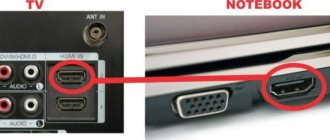
How to connect a TV to a computer via HDMI
For example, let’s take a Samsung TV, a not entirely new 4 series (LED type), purchased several years ago, but it already has two connectors for connecting HDMI devices.
The computer that we will use to connect to the TV was also purchased about three years ago, it has an Nv video card installed >
As I already said, our TV has two HDMI connectors. With the TV turned off, connect the HDMI cable to the HDMI 2 connector,
We connect the reverse end of the cable to the HDMI connector of the video card of the desktop computer. The computer, in turn, is already connected to the monitor (also Samsung SyncMaster 971P) with a DVI cable.
We turn on the computer and TV. There may not be an image on the TV right away, instead we see the following message: “Cable not connected” “Check cable connections and source parameter” or “Weak signal or no signal”
On Samsung TVs, to display a list of all available video sources, you need to press the Source button on the remote control.
A menu appears on the TV, in this menu, using the remote control, select the HDMI 2 connector,
Next, press the Confirm selection button on the remote control.
Now, on our TV, an exact copy of our computer’s desktop should appear. But again there is nothing, the same error appears on a black screen. So we go to the “Screen Resolution” settings. Right-click on the desktop and select “Screen Resolution”.
As we can see in the window that appears, our main screen is set to the second (2) Samsung SyncMaster 971P monitor, and in the “Multiple Screens” parameter we have set “Display desktop only on 2 monitor”, which is why the image is only present on the computer monitor screen, but it's not on the TV
We bring everything in this window to this state. Select the Multiple screens option: “Duplicate these screens” The “Screen” option is automatically set to “Multiple monitors”, click Apply and OK.
The desktop of our computer appears on the TV.
The resolution of our small Samsung TV is 1366 x 768. If your computer monitor supports this resolution, then it will automatically be set to the same resolution of 1366 x 768. If not, then either the TV or monitor will have the wrong resolution. For example, my Samsung SyncMaster 971P monitor has a maximum resolution of 1280x1024. When using a TV and a computer monitor at the same time, the main thing for me is to set the resolution on the TV correctly, otherwise why would I connect it then. I set the resolution to 1366 x 768 on my Samsung TV, the image is perfect.
And on a computer monitor such a resolution of 1366 x 768 looks like this.
And nothing can be done here. If you want the perfect image on your TV and computer monitor, then they must support the same screen resolution, that is, have the same characteristics.
Hardware and Sound->Sound
If you don’t have anything in this field, right-click on an empty space and in the menu that appears about. “Show connected devices” Now we look at the name of our TV, in my case it is Samsung, it needs to be turned on and the rest turned off. Right-click on Realtek and select Disable.
Installing Multiple Displays
If you want to have an image on both the computer and the TV at the same time, set the option to display multiple monitors.
To do this, select the desired item from the “Monitor type” .
From this list you can select screen cloning or desktop extension.
Display Settings Window
In the first case, the desktop will be displayed identically on both devices at the same time.
In order to feel comfortable, it is advisable that both the monitor and the TV be of the same format (regular or widescreen), otherwise one of the devices will distort the image.
When using the desktop extension, each of the connected devices will be assigned a serial number.
For example, monitor 1 and monitor 2. If you don’t know who is who, use the “Determine” .
In this case, the number assigned to it will be displayed on the screen of each device.
In the settings window, you can use the mouse to swap screens. In this case, their numbering will change.
To confirm the settings, click the Apply button.
To make sure the extended desktop is functioning correctly, move the mouse cursor to the edge of the screen.
Having reached its border, the cursor will appear on the second display.
Using the capabilities of the video card when connecting via HDMI, you can adjust the refresh rate and resolution for each device separately.
Cards from manufacturers such as NVidia and AMD have their own settings for connected devices.
To enter them, right-click on an empty space on the desktop.
With a GeForce video card installed, select Nvidia Control Panel .
In the window that opens, specify the displays that will be used.
Preparation: check the HDMI ports on the TV and computer, select a cable
First we need to check if our devices have the necessary ports. We also need an HDMI cable to connect. Let's look at everything in more detail. If you have everything, then you can proceed directly to connection and configuration.
- The HDMI input on a TV is usually located on the side, or on the back panel (sometimes, both). They must be signed and numbered. They look like this (Philips on the left, LG on the right):
If your TV has at least one such port, then everything will work out. - Next, take a look at the back panel of your computer (I mean the system unit). There we need to find an HDMI output. HDMI can be on the motherboard (integrated graphics on new boards) or on the video card. But, even if you have this port on the motherboard (as I have in the photo below), and there is a separate discrete video card with an HDMI output, then the TV must be connected to the video card.
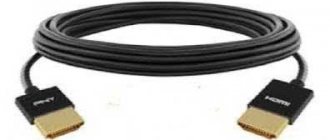
I took a photo of the system unit in a horizontal position. In my case, the TV can be connected to the HDMI output on the video card. If your computer does not have an HDMI output, but has DVI, then you can buy a DVI-HDMI adapter. And if you only have the old VGA, then you can also use a VGA-HDMI adapter, but then the sound will not be output to the TV, since VGA is not a digital output. If you want to connect a TV and monitor to your computer at the same time, you will need either two HDMIs, or HDMI and DVI. We will also need the appropriate cables. - The HDMI cable must be the length we need. If I'm not mistaken, they exist up to 20 meters. If you do not have a separate cable, you can use the one with which the monitor is connected. If you have it connected via HDMI. I have this cable:
The most common, inexpensive cable.
If you have ports on both devices and have a cable, then you can connect.
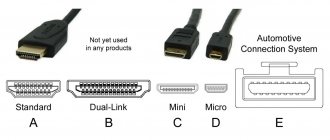
Labeling, Bandwidth and Maximum Resolution
Today there are 5 types of HDMI cables , each of which is used for certain types of devices.
Below, let's take a closer look at the markings and determine the option that suits you.
Standard HDMI cable . It is the most common solution for connecting home devices. Reliably transmits 720p and a maximum resolution of 1080p in HD quality. This resolution is used in cable and satellite television, as well as in digital HD broadcasts and DVD players.
Standard HDMI cable with Ethernet function. It supports the same functions as the previous marking, but has the Ethernet Channe function, which allows devices to access the Internet. An important feature is that both devices must support this function to access the network.
Car HDMI cable. It has increased reliability, as it is designed for installation in cars with on-board HD systems. Works in the most extreme conditions, and also withstands high temperature changes and vibrations from engine operation.
High speed HDMI cable. It has an increased communication channel for high-speed image transmission. It is rational to use this type of wire with video resolutions of 1080p or higher. In addition to everything, this type of connection supports such advanced video technologies as:
So, if you are using a 1080p and the signal translator transmits it in this resolution, then it is better not to save on cable and buy a high-speed option.
High Speed HDMI Cable with Ethernet. Supports the same functions as the previous high-speed wire, but has an Ethernet Channe function, which allows devices to access the Internet. An important feature is that both devices must support this function to access the network.
We hope that this material was useful for you and you learned why you need an HDMI cable with all that it implies. If you have any questions, write in the comments and subscribe to updates so as not to miss anything new.
- 312 270
- Author: admin
- Date: 07/20/2013
- How to connect a TV to a computer via HDMI, but so that the image is duplicated on the computer monitor, in other words, the image needs to be on both the monitor and the TV? I have a large collection of films and cartoons on my computer, including digital high-definition Blu-ray and HD formats. I really want to watch all these films on my new TV. The TV is in another room. How to do this and how long should the HDMI cable be? I seem to be connecting everything correctly, the computer is connected to the TV using an HDMI cable, and to the monitor via a DVI cable. There is an image on the monitor, but not on the TV, only the inscription on the black screen “Cable not connected” “Check cable connections and source parameter.” Your articles How to connect a laptop to a TV via HDMI and How to connect an Acer laptop to a Philips TV, How to connect a SONY laptop to a TV via HDMI, How to connect a laptop to a Toshiba TV I read, I do everything as written in them. In the TV settings, I select HDMI from the list of all available video sources, but there is still no image from the computer. Dmitriy.
- Hello Admin, in short, this is the case: I bought a new TV with a screen resolution of 1920x1080, connected the TV (as a second monitor) to the computer via HDMI, everything is basically fine, there is a picture on the TV, but I can’t set the resolution correctly on the monitor. The computer monitor does not support the maximum TV resolution of 1920x1080. The maximum that can be set on my monitor is 1280x1024. Therefore, on the TV the resolution is normal 1920x1080, but on the computer monitor everything is a little flattened. In principle, the resolution on the monitor is not important to me, the most important thing is that everything is fine on a large TV, but still, maybe there is some solution to the problem?
- Maybe you can help me, I have a simple system unit with a video card with an HDMI output and a TV with an HDMI input. I sometimes want to use the TV instead of a monitor, but many people do this, for example, to watch movies, of which I have a lot. I really want to watch all these films on my TV, but I can’t, or rather it works, but not quite. When I connect the TV to my computer via HDMI
, there is no sound, but the picture is very good. The operating system is Windows 7, I tried several HDMI cables, maybe it’s not them, but the operating system settings?
We connect the TV to the computer using an HDMI cable
You just need to take a cable, connect it to the HDMI output on your computer and the HDMI input on your TV.
If you connect the TV as a monitor, that is, a single screen, then the diagram will look something like this:
Let's also consider another case when a TV and monitor are connected at the same time.
TV as a second monitor for a PC
The monitor can also be connected via HDMI (as I have in the photo below), via DVI, or even via VGA. As a result, two screens will be connected to the PC.
We sorted out the connection. Most likely, in your case there will already be a system unit with a monitor connected to it. And all you need to do is connect a TV to it.
Select HDMI input as signal source in TV settings
Most often, after connecting and turning on the devices, there is no image on the TV. A message like “No signal”, “No signal source selected” or something like that will appear. On the TV you need to select the signal source. The port where we connected the cable.
To do this, your TV remote must have a separate “SOURCES” or “INPUT” button.
After clicking on it, a menu should open in which you can select the signal source. You can see which port on the TV you connected the cable to (each port has its own number). Or simply select an active source. The process itself may vary depending on the TV. I have an old LG.
Appearance
As I already said, wires can differ in appearance and are divided into several types:
- A is the most common standard, found in almost every digital device.
- Mini is a smaller version, more often used to connect portable devices and cameras;
- micro – used to connect phones and tablets;
- B – wider channel for broadcasting video with resolutions above 1080p;
- E – when connected, it has a lock to reduce the likelihood of the wire falling out.
Setting up an HDMI-connected TV in Windows
The screen resolution is adjusted automatically in most cases. So in Windows settings we can only change the multi-display mode. This is only relevant when a monitor and TV are connected to the PC. If there is only one display, then these settings are not needed.
The easiest way to change mode in Windows 10, Windows 8 and Windows 7 is the keyboard shortcut Win + P.
After clicking on them, the “Project” menu will appear. In the top ten it looks like this:
In Windows 7 like this:
Let's look at each mode in more detail.
- Computer screen only (turn off the projector) – in this mode, the image will only be on the monitor.
- Repetitive (duplicate) – there will be the same image on the monitor and TV screen. There is one caveat to this mode. This is the screen resolution. For example, if, as in my case, your monitor resolution is 1920×1080, and your TV’s is 1366×768, then the monitor will be set to 1366×768 and the picture will not be very good. And if the monitor is 1920x1080 and the TV is also 1920x1080, then the picture will be clear on both screens.
- Expand – the desktop will be expanded to a second screen. In our case, this is a TV.
- Second screen only (projector only) – this is when the image from the computer will be displayed only on the TV. The monitor is turned off.
In most cases, these settings are quite sufficient.
Additional screen options
To open them, just right-click on an empty area of the desktop. In Windows 10, you need to select “Display Settings”, and in Windows 7 – “Screen Resolution”.
A settings window will open where you can see how many screens are connected to the computer.
You can also identify them (by clicking on the “Define” button), change the resolution of each screen and the operating mode (which I talked about above).
In Windows 7, the settings of a TV connected via HDMI look like this:
We figured out how to set up the image on the computer.
Mobility Center Features
To open the corresponding settings window, use the key combination Win + X.
Mobility Center Window
In the section labeled: External Display, click the Turn Off Screen .
This is done in order to bring up the external display options window.
It contains the following items:
- computer only;
- duplicate;
- expand;
- only a projector.
Let's take a closer look at each of them.
When using the Computer Only option, the signal will not be output to an external monitor.
Using the duplication function will allow you to display the desktop identically on both devices.
The screen extension mode will combine two monitors into one.
In this case, the cursor will first move along the first screen, and when it reaches its edge, it will move to the second.
If you select “Projector only” , the desktop will be displayed only on the TV screen.
The laptop monitor will not work at this time.
What to do if the sound from the computer does not go to the TV?
This happens very often. The picture appeared on the TV, but there was no sound. It is not there at all, or it sounds from a speaker system connected to the computer. If you want the sound to come through the TV, then first check that the sound on the TV is not muted or distorted.
Next you need to go to “Playback Devices”.
Your TV should be in the list of devices. You need to right-click on it and set “Use as default”.
If the TV is not in the list, then right-click on the empty area and check the boxes next to two items: “Show disconnected devices” and “Show disconnected devices.”
If this does not help, and there is still no sound from the PC on the TV, then try reinstalling the video card driver. Just download it and start the installation. At this moment, let the HDMI cable be connected to the computer.
I showed how to check these settings in Windows 7 in the article Why there is no sound via HDMI on the TV when connecting a laptop (PC). Be sure to watch it and read the comments. There is a lot of useful information there.
I have never encountered a problem with audio output via HDMI. No matter how many times I connected, everything worked immediately after connecting. But there is such a problem.
How to configure the created connection?
Installing an HDMI cable into the connectors of your TV and computer is only part of the story.
Next you need to configure this connection.
Connect both devices while switched off. After that, turn on the TV and start the computer.
After Windows boots up, proceed with the necessary settings.
Right-click on an empty space on the desktop and select “Screen Resolution” .
Screen settings window
In the settings window that opens, set the appropriate resolution.
Remember that the system automatically detects and sets the maximum possible.
However, if the resolution is too high, the font will be very small and difficult to read.
In this case, you can change the resolution as you wish.
However, non-standard resolution may cause the picture to not display correctly on the TV screen.
This is because the matrix will scale according to its settings.
Connecting a 4k TV to a computer. Ultra HD over HDMI
If you have an Ultra HD TV (aka 4k) and a video card supports this resolution, then there is a chance to get a beautiful and clear image. I checked, everything works. I have a 4k TV from Philips. And the computer has a GeForce GTX 750Ti video card, which supports resolutions up to 4096x2160.
There are a lot of nuances there. I'm not a gamer, so I'll try to explain as best I can. The fact is that it is possible to output a 4k image via HDMI, and I succeeded. But most likely we will get a frame refresh rate of 30 Hz. Which is very little. To get 60 Hz, we need a video card with HDMI 2.0 and the same cable. This is why DVI cables are used to connect to 4k monitors. But I haven’t seen anything on DVI TVs.
I connected everything, started the computer, and saw that the image on the TV was somehow strange, the colors were wrong. Perhaps this is only in my case.
Everything is resolved very simply. First, I tried in the TV settings to disable UHD (Ultra HD) for the HDMI port to which the PC is connected. The image became normal, but the resolution turned out to be normal, 1920x1080. Therefore, this method is not very suitable for us.
To get a real 4k image with natural colors, you just need to change the screen resolution to the maximum 3840x2160 in the display properties in Windows 10.
The image immediately became normal. The scale was also automatically set to 300%. Otherwise everything would be very small. It can be changed if necessary. I haven't tried playing at this resolution. But I think that this is not real. Moreover, the video card on my computer is not the newest and not the most powerful.
I look forward to your comments. Ask questions and don’t forget to share tips. Best wishes!
Possible problems
If there is no sound being transmitted to the TV, or the screen does not show or does not show the picture correctly, this may indicate a synchronization failure. Most often, these problems can be solved on their own.
No image
If the laptop does not see the TV, it is quite possible that the operating system is missing the necessary drivers . The solution to this problem is described above. Be that as it may, you should be skeptical about installing drivers yourself, because installing an extra, unnecessary or wrong driver can only make the situation worse.
If you see a black TV screen that says “no signal”, you can’t set up the connection, the screen doesn’t work at all, then this may indicate a damaged connector or a faulty cable. In this case, you should try connecting the wire to a different connector or changing the wire.
If the user is not satisfied with the settings of the image itself, its quality, or the function performed by the TV screen, you can do the following: