Some TVs have the ability to receive digital signals. However, most modern and not so modern TVs are simply incapable of this. What to do in such a situation? A digital set-top box will come to your aid. It connects to the TV, receives a digital signal and transmits it to the TV device. The question arises, how to install it? There are two ways: either entrust it to a master and pay a tidy sum, or try to do it yourself. From this article you will learn how to install and connect a digital set-top box yourself, without the help of strangers.
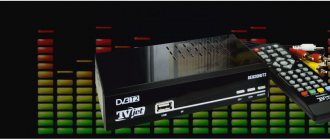
Miniature set-top box with micro-USB OTG
If you are a radio amateur, then on the radio market you can purchase all the components for a homemade digital receiver. Such a homemade product may turn out to be several times cheaper than its certified counterpart. But you'll have to work on it.
Main components
In general, if everything is done correctly, the set-top box will work on mobile gadgets, TV and PC. As an example, you can assemble a DVB-T2 set-top box like a small stick. Main technical characteristics:
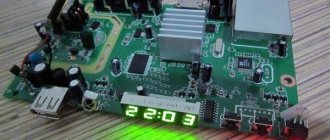
You can create an exact copy of the Geniatech PT360 whistle. The differences will only be visible on the body. Since the manufacturer will not be indicated there. This small gadget can work with a smartphone, tablet, Android TV-box, and even a Windows-based PC.
It is important to understand that soldering all elements of the console requires certain skills, knowledge and equipment. But you can do it easier and purchase a Chinese copy of the original DVB-T2 set-top box on the radio market or AliExpress, modify it to an adequate level and use it everywhere.
Reconfiguration
To create a copy of the Geniatech PT360 set-top box for digital television with your own hands, you need to open it in order to finalize it. It is recommended to modify the whistle if it gets very hot. Otherwise, you don’t have to go into its insides.
To open it, you need to carefully remove one half of the case. It should be taken into account that the body is fastened quite tightly.
Inside the case there is:
Datasheets indicate that the receiver supports terrestrial digital DVB-T/T2, cable digital DVB-C/C2 and analog. As for the heat sink, it is constructed as follows: “heat leaves the microcircuit through a through heat sink on the board (indicated by a red arrow) and along the copper substrate into the antenna braid.” In fact, the role of a radiator is played by a banal copper braid. With this approach, after a long period of operation, the heating reaches such a limit that you can simply burn your finger by touching the antenna output.
To prevent this baby from floating along with the microcircuit elements in a closed case in the summer, you can build a small radiator. Any 2.5 mm aluminum sheet is suitable for riveting it. For example, you can cut a primitive radiator from a profile. Then, using copper foil and hot glue, bring the foil layer out. In this way, heat is transferred to part of the board on the opposite side.
You can glue such a heatsink onto a memory chip using superglue and thermal paste:
Do everything as carefully as possible, since you only try once and it will be impossible to clean the glue that has been dropped in the wrong place.
For greater efficiency, glue the plate and copper foil together and bring it out.
Assembly and testing
After installing the homemade heat sink plate, close the housing cover and connect the antenna to the antenna input. You can also check operation with a whip antenna. And the experimental device will be a smartphone with OTG support and Android version no lower than 4.1. The same conditions apply to other gadgets.
Since the connected receiver will receive power from the device, the energy consumption will be equal to 1000 mAh battery for 3-4 hours of operation.
The gadget works with the PadTV HD application, but can also work with other programs for watching a television channel.
If the signal level is high-quality, then the found channel will remain in memory.
Using a microUSB - USB adapter, the TV tuner works perfectly under Windows. The OS can detect the drivers on its own.
Watch your favorite movies and TV series on any device thanks to More TV for only 299 rubles per month. Don't miss out on your 7 days FREE subscription!
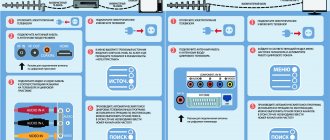
Instructions for connecting a digital set-top box to a TV
Purchase. To have something to install, you first need to buy it! If you already have this device, then skip this point and move on to the next one.
But if you are not the happy owner of such a device, then you should know what you need to pay attention to when purchasing.
- It must have the necessary connectors such as RCA and HDMI. If the set-top box is purchased for an old TV model, then it must also have a SCART connector, which is typical for previous generation TV models.
- Picture resolution. A good, high-quality modern set-top box should be able to transmit a signal to a TV in FULL HD or, at worst, HD. If necessary, you can find a set-top box with 4K resolution. If you see a device with SD resolution, then you should not buy such a model: they are no longer popular and transmit low-quality images.
- Additional functions. If you choose a good model of TV set-top box, it will be able to perform a number of very useful functions. Firstly, it will be able to read and transmit a signal to the TV from an external storage device connected to the USB port. Secondly, it can perform SMART TV functions even on old TVs. If you connect the Internet to it, you can use the capabilities of the World Wide Web. Thirdly, if your Internet provider, be it Rostelecom, K-Telecom or someone else, provides the ability to use IPTV, then you can use a set-top box to watch TV through the service provided. With it you can watch more than fifty digital channels in excellent quality. However, this function has a small disadvantage: if you have problems connecting to the Internet, you will not have Internet.
Advice!
For older TVs, it is worth buying an inexpensive set-top box (up to 1 thousand rubles), which will support FULL HD resolution and have a USB connector. For newer models, you should look at more expensive devices (about 2 thousand rubles) with additional features in the form of: IPTV, FULL HD, Internet access.
Installation. The placement of the device is also an important part of the process, so you need to approach it with the utmost seriousness. First you need to unpack the device and all its components. Then you need to find a suitable location. The device should be located in a place where you have easy access to it, and animals and children will not be able to find or reach it. It is also important to take into account that it is necessary to hide the wires so as not to inadvertently get caught on them and damage the console itself, and not injure yourself. So, having chosen a suitable place, we proceed to the next step.
Connection. To get started, you should take a 3RCA-3RCA cable. It is usually included in the kit. Make sure that similar connectors are present on the TV. On older TV models, there may not be a red tulip, then it is simply not used, both on the screen and on the device. Some fairly old TVs have the same SCART connector. In this case, you will need to purchase it in addition, since most often it is not included in the kit. Now you need to take and connect these wires in the corresponding colors. The side doesn't matter. After this, connect the over-the-air antenna. Don't mix up the connectors! Check that the antenna is securely attached. Now you need to connect the power cable to the appropriate connector and then plug it into the outlet. After this, you need to press the power button, if there is one, and wait about 10-15 seconds for the set-top box to turn on and boot. After this you need to move on to the next step.
Setup. Pick up the TV remote control. Find the button on it that is responsible for selecting the input. It is usually called "SOURCE" or "INPUT", but it can also be called something completely different. For example, “AV”, “TV/AV”, “EXIT” or maybe an arrow pointing in a circle. In general, there are a lot of variations, choose the one you have and click. Now you need to click until the settings window appears. New TVs have 7 similar connectors. After browsing and selecting what you need, start setting up. In the welcome window you usually need to select your language and country. After that, click "Ok". Next, an automatic channel search will begin. It usually lasts about 10-15 minutes. Most often, after this you can start using a digital set-top box. However, problems happen. It happens that not all channels are found or the search does not work. In this case, the problem is often a poorly connected antenna. Try setting it up again and restarting the channel search. If it doesn’t help, then you should contact a specialist in this matter.
Setting up additional functions. As mentioned above, the console provides us with an additional range of functions that will help improve our daily lives. Let's figure out how to configure each of them.
IPTV. To connect IPTV to your TV via a set-top box, you need to perform a number of manipulations. First, the device must be connected to the Internet. This can be done in two ways: wired and wireless. To use the first one, you need to buy an Ethernet cable. Insert one end into the appropriate connector in the router, and the other into the digital set-top box. Check that the cable is securely fastened. Usually you need to wait for a small click, which will indicate that the wire connection was successful. There is also a second method. In which a cable is not used, but a Wi-Fi network is used. To use it you need to have the corresponding module on the set-top box. After you are convinced that it is available, go to the settings of the set-top box. To do this, click on the gear on the remote control.
After that, go to the “Wi-Fi” section and connect to your network there. Next, make sure whether the Internet works on your device in the “Network Information” section. Next step: In the “Servers” section you need to specify pool.ntp.org. in the NTP servers line.
Then we go to the video settings, there we turn off “DVI boost” and turn on automatic frame rate. In video output mode, select the resolution suitable for your TV. The most commonly used option is 720r. If your device is connected via HDMI, then it is better to choose 1080p. Next, reboot the device. After it turns on, you need to find the list of IPTV channels in the settings, then the field for entering the URL and enter the address of the place where the channels come from. It can be recognized in two ways. Either look online first (if your provider provides Internet television services, then you will definitely find this address), or contact your provider’s support service and find out this URL there.
After entering, if you did everything according to the instructions, you should have a list of channels.
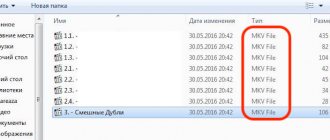
- View files from USB storage devices. This procedure is much easier than the previous one. Here you don’t have to fiddle with the settings, but just work normally with your computer. First, you need to decide what files you want to view on the set-top box: photos, videos, films or something else. Then you need to connect the external drive to your computer, remove all files from the flash drive and format it as NAT32. After that, you need to take the files that you are going to view and transfer them to an external drive. After that, remove the flash drive and insert it into the USB connector of the set-top box. Next, select the appropriate section in the menu and enjoy photos or videos.
- Using a digital set-top box. To begin with, it’s worth knowing that all actions on the console are performed using the console’s remote control, which is included in the kit. To switch channels, press the “forward”, “backward” buttons, dial the channel number, or use the arrows. The sound is adjusted by pressing the left and right buttons to decrease or increase the volume respectively. The “Ok” key is used to select one or another action.
What is a TV tuner and its types
A TV tuner is a type of equipment that is used to work with a digital TV. It has advanced functionality that differs depending on the tuner model.
There are several types of TV tuners. Conventionally, they are divided into three categories:
Broadcasting involves decoding, which is carried out by a TV tuner. This is possible if one of the following standards is available:
The output can have several standards: built-in and external for PCs, as well as external for TV. The only difference between them is the port connection. The latest TV models, as a rule, have a standard USB connector, which replaces any port and does not require synchronization between the computer and television.
The operating system type is specified separately by the manufacturer. Each type corresponds to one of the computer programs: Windows, MacOS and others. Mobile operating systems, such as Android, are also found.
Antenna design features
Most antennas offered on the Internet have an angular design made of copper or aluminum tubes (or thick wires), which works great in open areas with direct visibility of the translator. Another type is based on a circle of antenna cable.
Both designs do not provide very good reception in dense urban areas or in places closed from the line of sight of the translator.
Our version of the antenna (seen on a popular video hosting site) is focused on both the direct signal and the one reflected from buildings in the city. That is why the design consists of two concentric rings made of antenna cable, which greatly simplifies its manufacture.
This might be interesting:
- Which set-top box for digital television is better to buy?
- Which antenna to buy for digital TV? Comparing options
How to make an SDR all-wave receiver and TV tuner in one bottle. My personal experience. I share with everyone.
It has been written and said many times, How to make an SDR all-wave receiver and TV tuner in one bottle? Yes, in fact, you don’t really need to do anything, with the exception of a civilian antenna on the roof for the required range and a foil cable (to eliminate losses and interference). I had a very simple task, to make an Internet connection link to the Internet (such as an echo signal repeater) without buying expensive equipment for radio communication, since there is a dedicated server and IP, and the Internet works on fiber optics. Why not do that!? I started looking for information on the Internet. Some fancy circuits or expensive equipment didn’t suit me at all. Soldering and etching boards takes a long time and is a hassle - RF connector on the cable, please. Looks like a USB flash drive. The antenna there is complete crap, but I use my J-antenna on the roof . I understood only one thing: the digital-analog receiver of the scanner should be based on a microcircuit from the well-known company Realtek RTL2832U / FC0013 and R820! Why is that? You ask. Because the Internet is full of all kinds of software specifically for it. Starting from TV receivers with a digital HD signal, to an SDR all-wave amateur receiver (for all frequencies). Frequency range from 25 to 1700 megahertz! Step 300 hertz. Not bad? Input - took a standard TV-female - easier to solder (adapter from PL-male, to TV-female - pitgale). Built-in MPEG, DUB/SUB, DVB-T decoders. Modulation? All types: AM, FM, CW, USB, LSB, NFM, SSTV, WFM, NMT, AMPS, DAMPS, GSM, and others. You can listen to amateur HF stations, here is an example, of pretty good quality . (Reception frequency 3666.6 kHz, LSB modulation). Not bad really. Listening to your neighbor's radiotelephone is no problem. It’s easy to listen to the ISS astronauts on 145800 mHz FM! Eavesdrop on: Cops, Ministry of Emergency Situations, ambulance, easily (but some have a specially encoded signal). Listening to bugs is easy and simple! And other uses for this toy! While it’s summer and not severe winter, what not to do and make 2 in 1: SDR all-wave receiver and TV tuner.
Kharchenko antenna at 626 MHz
To receive analogue television signals of various wave frequencies, the design of a zigzag broadband antenna, which does not require complex manufacturing, worked well for me before.
I immediately remembered one of their effective varieties - the Kharchenko antenna. I decided to use its design for digital reception. I made the vibrators from a flat copper bar, but it’s quite possible to get by with round wire. This will make it easier to bend and straighten the ends.
How to determine the dimensions of a specific antenna
Online calculator
Let's use the all-knowing Google search. We write on the command line: “Calculation of the Kharchenko antenna” and press Enter.
We choose any site you like and perform online calculations. I went into the first one that opened. This is what he calculated for me.
I presented all his data with a picture indicating the size of the Kharchenko antenna.
Manufacturing of antenna design parts
I took the information provided as a basis, but did not accurately maintain all the dimensions. I know from previous practice that the antenna works well in the broadband wavelength range. Therefore, the dimensions of the parts were simply slightly increased. The half-wave of each harmonic of the sine wave of the electromagnetic TV signal will fit into the arm of each vibrator and will be received by it.
Based on the selected data, I made blanks for the antenna.
Vibrator design features
The connection of the ends of the figure eight busbar is created in the center at the bending stage. I soldered them with a soldering iron.
I created it according to the “Moment” principle, made it with my own hands from old transformers, and has been working for two decades. I even soldered 2.5 square copper wire with it in thirty-degree frost. Works with transistors and microcircuits without burning them out.
In the near future I plan to describe its design in a separate article on the website for those who also want to make it themselves. Follow publications, subscribe to notifications.
Connecting the antenna cable to the vibrator
I simply soldered the copper core and braid to the metal of the figure eight from different sides in its center.
The cable was tied to a copper bar, bent into a loop in the shape of a semi-square vibrator. This method matches the resistance of the cable and antenna.
Screening grid design
In fact, the Kharchenko antenna often works normally without signal shielding, but I decided to show its manufacture. For the base I took a wooden block. I did not paint or varnish: the structure will be used indoors.
In the back side of the block, I used an electric drill to drill holes for attaching the screen wires and inserted them, and then wedged them.
The result was a screen for the Kharchenko antenna. In principle, it can be made of a different design: cut from a piece of frontal armor of a tank or cut from food foil - it will work approximately the same.
On the back side of the bar I secured the vibrator structure with a cable.
The antenna is ready. All that remains is to install it on a window to work in vertical polarization.
How to choose the right tuner for digital TV
Watch your favorite movies and TV series on any device thanks to More TV for only 299 rubles per month. Don't miss out on your 7 days FREE subscription! Subscribe
A TV tuner for a TV must be selected based on several rules:
Useful: Which set-top box to buy for digital television
World Vision or BBK is considered one of the most reliable and at the same time budget brands. Manufacturers of these devices always focus on the latest digital TVs and multimedia updates. They take into account the wishes of customers, creating a better and more convenient device.
The most popular and profitable models of digital set-top boxes
Below you will be presented with different models of digital devices that have been tested by thousands of people and will definitely serve you faithfully for a long time.
| Name | Oriel 421 |
| Price | 1650 rubles |
| Wi-Fi adapter | Eat |
| Remote Control | Eat |
| Main advantages |
|
| Main disadvantages |
|
| Rating | 9.2/10 |
| Name | BBK SMP145HDT2 |
| Price | 1590 rubles |
| Wi-Fi adapter | Eat |
| Remote Control | Eat |
| Main advantages |
|
| Main disadvantages |
|
| Rating | 9.0/10 |
| Name | BBK SMP240HDT2 |
| Price | 964 rubles |
| Wi-Fi adapter | Eat |
| Remote Control | Eat |
| Main advantages |
|
| Main disadvantages |
|
| Rating | 8.5/10 |
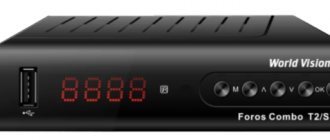
| Name | World Vision Foros Combo T2/S2 |
| Price | 1215 rubles |
| Wi-Fi adapter | Eat |
| Remote Control | Eat |
| Main advantages |
|
| Main disadvantages |
|
| Rating | 9.0/10 |
What is a built-in TV tuner?
After studying the characteristics of the equipment, the following question may arise: what is a built-in TV tuner for a TV. This is a TV tuner for a TV that is factory installed. This model has advantages, since during operation you will not need to connect the TV separately to the Internet. You can also avoid lengthy setup of functionality, which usually happens when using an external tuner. In addition, the built-in TV allows you to select broadcast standards.
Useful: Which TVs do not require a set-top box
Antenna made from tin cans
To make a simple TV antenna for digital channels you will need a cable, a couple of aluminum or tin cans, and a small plastic pipe. A wooden plank can also be used as a base.
Remember that the antenna can only be created from aluminum or tin cans. Plastic or glass will not work. The main requirement is smooth, not ribbed, internal walls. Anyone can install such a device with their own hands in just a few minutes.
- Rinse well and then dry the jars.
- The end of the coaxial cable must be cut.
- Remove the insulation from the center core.
- Twist the braid.
- Once you have 2 wires, attach them to the jars.
- If you have a soldering iron on hand, solder the conductors. They can also be secured with self-tapping screws with flat heads. Twist a loop at the ends of the conductors, and insert a self-tapping screw with a washer into it, then secure it to the can.
- Pre-clean the metal, you need to take fine-grained sandpaper and remove plaque, as well as paint.
- Attach the jars to a plastic pipe or wooden strip.
- The distance is calculated individually.
- Connect the cable to the TV and try tuning the channels.
This is an emergency solution to the problem. Don’t be under any illusions; at best, several channels will be available in good quality. The final result directly depends on how far away the TV tower is, how “clean” the corridor is, and also how well the antenna is made.
Now you know how to make an antenna for tuning digital channels using improvised means.
Alternative programs and drivers
First you need to worry about replacing device drivers. To do this, use the Zadig program, which can be found either together with the downloaded software or on the website www.rtl-sdr.com/tag/zadig/. The above website shows installation instructions in pictures. On my own behalf, I’ll add that to search for a device called RTL2838UHIDIR, in the program settings it would be good to check the boxes next to “List all devices” and “Ignore Hubs or Composite Parents”.
What I liked the most was the SDRSHARP program. airspy.com/download/. I haven't looked into all of its settings, but overall it's quite functional. Changing the frequency is done by clicking on the upper or lower part of the digits of the displayed current frequency. The type of received signal is selected automatically, depending on the range. But almost everything can be selected manually. Using this program I was able to receive a signal in the range from 21 MHz...
... up to 940 MHz. The FM band even displayed RDS station information.
If you need to change the drivers to native ones from Realtek, then I found them here. Choose depending on the chipset. www.ukwtv.de/cms/downloads-aside/281-dab-player-von-andreas-gsinn.html RTL2838U + E4000
Operating principle of an antenna for digital television
Regardless of the signal format, it is transmitted from the tower emitters. Reception of the wave channel is provided by the antenna device. To receive a digital signal, you will need a sinusoidal device with the highest possible frequency, which is measured in MHz.
When an electromagnetic wave passes through the surface of the receiving beams of the antenna, a V-voltage is induced in it. Each wave contributes to the formation of a different potential, marking it with its characteristic sign.
Under the influence of an induced voltage, an electrical current flows in a closed receiving circuit with resistance R. It is gradually growing. Processing is carried out by the TV circuit, the picture is displayed on the monitor, and the sound is broadcast through the speakers.
You won't be able to connect digital broadcasting using a regular indoor antenna. Firstly, you will need an intermediate link that will provide decoding of information - a DVB-T receiver. Secondly, you should use a UHF antenna or Turkin antenna for DVB.
Homemade antennas for DTV reception
On the territory of the Russian Federation, the implementation of the federal digital broadcasting program in 2021 was marked by the commissioning of two multiplexes with a completely free state package of 20 TV channels and 3 radio programs. The channels are not encrypted; they are transmitted in clear text in the UHF wavelength range. That is, for high-quality reception of digital public television, any antenna operating in the UHF range is suitable.
A little theory. The dimensions of the vibrators (the active elements of any antenna) must be equal to the full wavelength, half or a quarter of it. In the decimeter range, a radio wave has a length of less than one meter. This means that the dimensions of the elements must be consistent with this value.
The radio engineering literature describes many receiving designs for the UHF range. Most of them will perfectly receive modern digital television. The popular devices described below, which anyone can make with their own hands, have the following characteristics:
| Design option | Gain, dB | Reception range without amplification, km | Reception range with amplifier, km | Operating range, MHz |
| Cable loop | 0 – 3 | 15 | 15 | 440–800 |
| Antenna made from aluminum cans | 3 – 5 | 15 | 40 | 470 – 622 |
| "Butterfly" | 5 – 11 | 20 | 70 | from 300 MHz |
| "Triple square | 9 | 15 | 60 | 300 MHz and above |
| Antenna Kharchenko | 5 – 6 | 10 | 50 | from 300 MHz |
| Log-periodic antenna | 8 – 12 | 30 | 100 | more than 300 MHz |
Of course, these are not all designs of receiving antennas for digital television that can be made at home. There are a huge number of alternative options, but most of them have certain disadvantages:
A digital TV antenna recommended for DIY production must be effective, easy to replicate, and not contain expensive parts and materials. The designs discussed below fully comply with these parameters.
How to find out the initial data for calculating an antenna
The main parameter influencing the quality of the received digital signal, as can be seen from the explanatory first figure, is the length of the electromagnetic wave of radiation. Under it, symmetrical arms of vibrators of various shapes are created, and the overall dimensions of the antenna are determined.
The wavelength λ in centimeters can be easily calculated using a simplified formula: λ=300/F. It is enough just to find the frequency of the received signal F in megahertz.
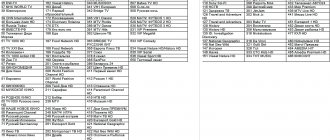
To do this, we will use a Google search and ask it for a list of regional TV communication points for our area.
As an example, a fragment of a data table for the Vitebsk region is shown with the transmitting center in Ushachi highlighted in red.
Its wave frequency is 626 megahertz, and its polarization type is horizontal. This data is quite sufficient.
We carry out the calculation: 300/626=0.48 m. This is the length of the electromagnetic wave for the antenna being created.
We divide it in half and get 24 cm - the desired half-wave length.
The tension reaches its maximum value in the middle of this section - 12 cm. It is also called amplitude. The whip antenna is made to this size. It is usually expressed by the formula λ/4, where λ is the electromagnetic wavelength.
DIY Turkin antenna for DVB-T2
An interesting option that works on the principle of a “wave channel” is a ring antenna developed by N. Turkin. It has an increased range and can be used in areas remote from the repeater. It has good sensitivity, but requires precise direction to the tower.
It is based on six rings of different diameters, mounted on a rod made of dielectric material. The sizes of the rings and the distance between them also depend on the wavelength of the television signal.
The most reliable version of the antenna, which allows you to catch over-the-air digital channels, has the following parameters:
Note that a ferrite ring is used as a matching device, which is placed on the cable directly at the point where the antenna elements are connected. The manufacture of this version of the receiving device requires even greater accuracy while maintaining the dimensions; its range will depend on this.
TV from an old CRT monitor
Cathode ray tube displays fell out of favor with the advent of liquid crystals. However, few people sold or threw out CRT monitors that had gone out of use; prudent owners hid them, as they say, “for later.” Actually, today the moment has come when you can make a TV out of an old screen, breathing a second life into unnecessary equipment.
How to make a TV? We answer the main question, which is undoubtedly of interest to absolutely everyone. The easiest way is to remove the control unit and graphics card. You also need to purchase additional components; they can be found at any TV equipment store.
The main condition is the presence of a VGA connector; without this interface, turning an old CRT monitor into a full-fledged TV device will absolutely not be possible. However, all old screens were equipped with this port for connecting a PC system unit.
If you know absolutely nothing about connection diagrams and basic computer components, then it is unlikely that you will be able to turn an old monitor into a TV; certain skills and knowledge will still be required to achieve the task.
The created product requires the following components and components:
- The most important functional device of television equipment is the module responsible for adjusting the color of the image. The quality of the broadcast image depends on the correct operation of this node.
Color module from AIWA TV-1402KE TV
- Radio channel - this module selects intermediate frequencies among all incoming signals, necessary for television broadcasting.
Radio channel modules 40-32V6GM-NIUI2XG
- The control unit is a part responsible for setting up and controlling the TV in manual and remote modes.
Samsung TV control unit UE32F4500AKXKZ
To make your own TV, connect the missing nodes and insert them into the screen body, after connecting them with cables to other basic modules. It is possible that to enhance image quality you will need resistors; they need to be soldered. A comprehensive audit is then carried out.