Connecting a laptop to a TV is possible via wire or local network; we will consider all connection methods, their advantages, features and disadvantages.
The simplest and fastest is a wired connection, but it requires a suitable cable or adapter. The distance between devices is reduced to a minimum. Wireless connection increases the range of interaction between devices, but requires appropriate hardware. However, not every TV model has wireless communication modules. An alternative solution is pairing via a local network or using intermediaries: special converters, set-top boxes, etc.
Why connect a laptop to a TV?
Connecting a laptop to a TV provides the following options for the user:
- Transferring images from a laptop display to a TV. Televisions, as a rule, have a huge diagonal. Watching videos or playing games in this case is much more convenient.
- Transferring data from the hard drive to the TV memory. Relevant for TVs based on Android, which have their own built-in drive for storing content. The TV can be completely configured as a “node” of the local network. In this case, you can stream content from a laptop even without saving the file in the TV memory (specialized network data transfer protocols, such as DLNA, are used for this).
- TV remote control. Some manufacturers support sending commands via WiFi or Bluetooth. A useful option for those cases when the included remote control is lost or faulty.
- Providing access to the Internet. For example, if you only have a wired router at home, but your TV requires a WiFi connection to access additional features or update software. That is, in this case the laptop is used as a portable access point.
What you need to pay attention to when choosing a USB to HDMI adapter
- The first thing you need to pay attention to is fullHD support. Many devices of this type only support HDRedy, and this often does not affect the price range.
- Second, and it seems to me no less important, is the sound. Study this issue very carefully, because you risk being left without six-channel sound and being content with only stereo noise.
- Third. Please note operating system support. Support often ends with Windows Vista. The lack of drivers for your system may make the device impossible to use.
- An important characteristic will also be the ability to connect the adapter to USB version 3.0.
Tell your friends about this article:
Connection via cable
There are the following options for connecting TV and laptop via cable:
- via HDMI;
- via DVI;
- via Scart;
- via S-Video;
- via RCA;
- via VGA;
- via USB;
- via LAN (RJ-45).
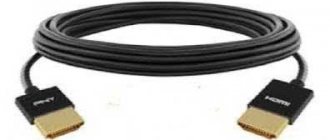
Via HDMI
Using an HDMI cable, you can transfer sound and video to your TV. Also, the TV can be used as an additional monitor to expand the work area, and not just to duplicate the image.
The connection is made as follows:
- Turn off your laptop and TV.
- Connect the laptop (HDMI Out port) and TV (HDMI In port) with an HDMI cable.
- Turn on the laptop and TV. Use Windows Mobility Center to configure the second screen. This can also be done through “Settings” (section “System”).
One of the main advantages of HDMI is its support for transmitting images with resolutions up to 4K. The port is provided in almost all laptops and TVs after 2015 release. And the cable also transmits sound. There is no need to output it separately via a 3.5mm jack.
Connecting HDMI "hot" (while devices are turned on) can lead to failure of their graphics adapters (GPUs). This is one of the most expensive parts on the motherboard!
Connection via DVI
DVI is a standard for wired digital or analog image transmission (there are 4 variations of DVI ports, they are partially compatible with each other). Sound is not transmitted through a DVI cable!
First you need to make sure that your TV has a DVI port. It was common in laptops from 2005 to 2015 along with VGA. And at Fujitsu-Siemens it is still actively used.
To connect devices you will need:
- Connect DVI to laptop.
- Connect the other end of the DVI cable to the TV.
- In Windows settings, configure the use of the connected display.
If the laptop does not recognize the connected TV, this means that the TV only receives a digital (or analog) signal that is not supported by the device. The situation can only be corrected with the help of a special converter.
DVI supports image transmission in resolutions up to Full HD (as well as 2K in some cases). To output sound, you will also need a connection via AUX (3.5mm jack).
Connection via Scart
Scart is a universal standard for transmitting digital, analogue images, and sound. The connector has 21 contacts, but all of them are not used at the same time. Scart is only found in very old laptops . But it is still ubiquitous on television.
There are also special converters that allow you to connect the HDMI port of a laptop to the Scart port of a TV.
It is not necessary to turn off the power to the equipment before connecting. Once connected, the laptop automatically recognizes the TV as an additional monitor or external speaker system. Configuration is carried out through “Settings” or “Control Panel”.
Connection via S-Video
S-Video is an analog data transmission standard. Mostly found on older TVs that do not support digital imaging. The resolution limit is 720 by 576 pixels (4 by 3 aspect ratio). The S-Video port can be found on laptops produced before 2010. Sound is connected separately.
The main disadvantage of S-Video is not only its low resolution, but also the lack of support for vertical synchronization. That is, image output is always performed at 24 or 29 frames per second. If it does not match the FPS on the laptop, then “tearing” of the image will occur (correctly called “tearing”).
Connection via RCA
Via RCA you can transmit video in a resolution of up to 720 by 576 pixels, as well as stereo sound (analog). Common on both old and modern TVs. In laptops - only up to 2010 release. There are also special converters from HDMI, DVI or VGA to RCA.
RCA is often also referred to as “tulips”. The cable has 3 ports: red, white, yellow. If there is no white or red on a TV or laptop, this means that sound output is only possible in mono mode.
Connection via VGA
VGA is one of the most common analogue image transmission standards. Found in many laptops and PCs. On TVs too.
Supports resolutions up to Full HD, storyboards up to 120 FPS (if the matrix is designed for such a refresh rate). One of the connector pins is responsible for transmitting technical information, so the connection should be recognized by the laptop by default. That is, Windows will determine the hardware model, supported resolutions, and update frequency.
The only caveat: both the laptop and the TV can only use one resolution at a time. To connect, it is not necessary to turn off the power to the equipment.
Via USB
You can connect a TV and a laptop via a USB cable only if the TV supports the OTG standard (you must first check the instructions). Most often, this connection option is used for data transfer (the TV is recognized as a removable storage device), as well as for firmware updates.
Connection via LAN cable
This is possible if the TV has an Rj-45 port (aka LAN, aka Ethernet). Allows you to create a local network between your laptop and TV for data exchange, as well as for Internet access. The exact list of functions that will be available on TV depends on the manufacturer.
Using local network
At the moment, there are few wireless technologies that would allow broadcasting images, among them:
- Wi-Fi as the fastest and most universal data exchange protocol;
- WiMax and analogues, but cellular communications are not yet used on TVs.
Bluetooth and IrDA are not suitable due to their low speeds.
It turns out that only Wi-Fi remains. But there are some peculiarities here too, because the technology involves organizing a local network.
Wired analogue – LAN (Ethernet). In this case, a local network is also created, but using a physical wire - twisted pair.
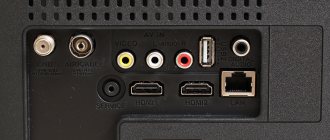
Input for connecting a local network on the RG-45 TV
Data is transmitted in the TCP/IP stack, so to exchange it you need an intermediary device - an access point (router, router). The access point can also be software or organized on the basis of the TV itself.
Now about the possibilities of organizing screen broadcasting.
- Many manufacturers use their own technologies, such as Smart Share or VAIO Media Server.
- Support for universal industry solutions such as Miracast is possible.
- Solutions from third-party developers in which data transfer is carried out not on the local network, but via an Internet channel.
- Hardware solutions that implement the most popular technologies listed above (most often Miracast or analogues).
Miracast Wireless Monitor
Data is transmitted within the local network, which ensures maximum transmission speed.
Both the TV and the laptop must support the technology. For example, with most Android-based smartphones this can be easily done. Just select “Screen Cast” and the TV turns into the screen of your smartphone or tablet. But difficulties may arise with a laptop, since it may not support this technology.
Some manufacturers offer analogues, for example, WiDi from Intel.
How to check and configure a laptop
Make sure your device supports Miracast. The description will be given for Windows 10 OS. The algorithm is as follows:
- Press the key combination Win+P (English “P” or Russian “Z”);
- The menu that appears should have a “Connect to a wireless display” option.
- If it is not there: You need to make sure that the latest versions of drivers for all equipment are installed.
- If the drivers are up to date, your laptop does not work with the technology.
- Click it and an automatic search for available displays starts.
For WiDi you need to install the Wireless Display program, you can download it from the official Intel website. When launched, it will automatically find and offer available wireless monitors for connection.
Video about connecting using Miracast technology
If you have Windows 8, you can use this video tutorial.
Setting up your TV
You can verify Miracast support from the accompanying documentation. If it is not declared, there is an alternative solution - a third-party module that connects to the HDMI connector or set-top box. Almost all models on Android OS work with this technology. The set-top box also connects to any generation of TVs, even if they do not have HDMI connectors. From the available signal sources, you must select the port to which the adapter will be connected.
If you are using a built-in Wi-Fi module, you need to make sure that it is active - enabled in the settings.
Home network (DLNA and similar)
This technology provides the ability to share access on different devices united into one local network. It can be an improved alternative to Miracast, since it does not require support for special technologies and can work over a wired network (LAN).
The requirements include connection to one router or communication via Wi-Fi-Direct.
Only SMART TVs can work with DLNA as full members of the local network.
Settings on a laptop
To get started, you need to open the Streaming Media Options app. You can find it in the Control Panel or through the built-in search in the Start menu.
In the setup wizard that opens, select “Enable media streaming.”
In the settings window, you can enter a new server name or leave the one suggested by the system. In the list of detected devices, you need to find your TV and give it access to the desired types of content.
You can add directories with the necessary media files through the settings of the Windows Media player through the “Manage Media Library” settings item.
There are alternative server implementations from third party developers, such as Serviio.
All files will now be available for viewing on TV. And for this you will not need to broadcast the screen.
With an active connection, you can play a movie on the second screen. To do this, you need to select the file in Explorer, right-click on it, find the “Play on..” item and select your TV from the list of devices.
TV settings
On the TV you only need to go to the media library. All available content from the laptop will be displayed here, as if you had connected a removable storage device to a USB connector.
In some TV models, due to caching technologies, content is not immediately visible. The device needs to be rebooted.
Setting up sound after connection
The sound is configured as follows:
- If you are using an HDMI connection, you must first enable the appropriate sound card (HDMI) in the Windows sound settings. Otherwise, audio is output through the built-in speakers.
- If you are using a DVI, VGA, Scart, RCA, S-Video cable connection, then the sound is connected via a separate 3.5mm cable to the AUX connector of the TV. The audio will automatically play on the TV after this as it is recognized as an external speaker.
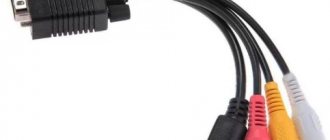
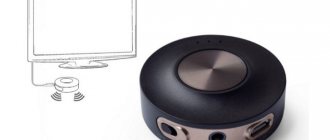
After a little digging on the Internet, we find several solutions for the USB-HDMI connection.
The figure shows several device options for USB to HDMI communication:
In fact, it is not entirely correct to classify such devices as adapters. For the most part, this is a full-fledged external video card, with all the attendant features.
I would like to draw your attention to wireless devices for connecting to a TV via a computer’s USB port. This solution will protect you from unnecessary worries with wires.
Flaws
- Not a very good matrix. Firstly, it is glossy and because of this it glares. Secondly, the viewing angles are not very good (Thankfully, the hinges have not lost their ability to rotate the display to the desired angle).
- Due to the difference in aspect ratio of the displays (the main one is 1920x1080, the second one is 768x1360), there is no effect of a single display. Yes, I made the resolution 768x1024 - much better with solidity, but I was not satisfied with the quality of the picture (the letters floated a little).
- My profile design is not very good because... it has poor resistance to torsion, which arises due to its characteristics and the way loads are applied to it. This problem can be avoided by attaching a second profile to the bottom two VESA mount holes and riveting everything into a rigid structure.
By the way:
I don’t know whose fault this is, but when I connected my display to the VGA output of the Samsung R519 laptop under Xubuntu, the colors on the display were very strange.