Modern computers have many options for displaying images on a TV, one of which is connecting via VGA. The peculiarity of this method is that the VGA interface was a de facto standard in the past and even old PCs of venerable age are equipped with it. Therefore, if you are the owner of such equipment, then connecting your computer to your TV via VGA may be the only way to output images from one device to another.
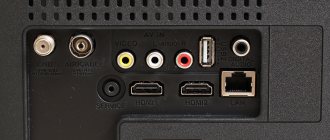
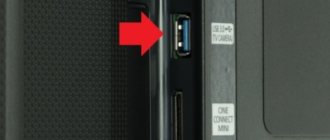
Unlike most modern interfaces, VGA is analog and does not support audio output. However, almost all modern TVs have VGA connectivity. Carefully inspect the connectors of your device and you will probably find one like the one in the picture below. This is a 15-pin D-Sub (VGA).
It is into this that we will connect the cable, connected at its other end to a similar connector on your computer.
Make the connection in the switched off state and with the power cords unplugged from the socket!
When connecting, please note that it is not enough to insert the connector tightly and all the way; you will also need to tighten the “ears” - two screws on the sides. This will eliminate the possibility of accidentally pulling out the cable and guarantees a reliable connection. So, if you managed to connect your PC to your TV via a VGA cable, let's start setting up.
Configuring connection settings
Right-click on a free space on the desktop and select “Screen Resolution”. If you did everything correctly, the display settings should show two devices, and your monitor should be defined as the primary one.
Next, in the “Screen” line, select the second monitor. In our case it is ACER V243HQ. Check whether the resolution of your television device is determined correctly. Please note that it should not be greater than the physical resolution of the matrix specified in the operating instructions.
If the image on the TV is without distortion or change in proportions, then congratulations - you managed to connect everything correctly. If there are black bars on the sides of the screen, then you have set the resolution or aspect ratio incorrectly. Carefully read the characteristics of your TV and, in accordance with them, select the correct value in the “Screen Resolution” menu.
So, we have dealt with image output and are moving on to setting up audio transmission to the TV.
How to use your TV as a Smart TV
Using a TV as a web browser, online television receiver, Smart TV is a reality. This problem can be solved by purchasing a Chinese set-top box, with the help of which any TV equipped with an HDMI socket can become a full-fledged mini-computer. Surfing the Internet, watching videos on YouTube and other benefits will be given to you by the Androin Smart TV set-top box. Just connect it to a free HDMI port, do a simple Wifi setup and use it. The TV turns out to be a kind of analogue of a giant tablet computer without a sensor. All control is carried out from the remote control, which comes complete with the set-top box. Also, some set-top boxes support connecting a wireless mouse and keyboard.
Sound output
As we already mentioned, the VGA interface only supports image transmission. In order to output sound, the easiest way is to use a mini-jack cable, connecting it to the computer output, marked in green, and a similar TV input. The cable has the same connector that is widely used for connecting almost all types of audio devices: mp3 players, stereo systems, headphones, etc. When outputting multi-channel audio, a connecting cable with color-coded connectors is used, so the connection should not cause you any difficulties.
Wi-Fi or RJ45 (network connector)
To implement such a connection, the TV must meet 2 requirements
: 1) be equipped with its own multimedia player (roughly speaking, be able to read video files, music or photos from a flash drive);
2) support DLNA technology and have an RJ45 connector (regular network connector) or a Wi-Fi module. DLNA
(
Digital Living Network Alliance
) is a technology that allows home network devices to share multimedia files in real time.
Thanks to this protocol, the TV will be able to play files located directly on the computer’s hard drive, without the need to transfer them to a flash drive or removable hard drive. You can find out about the TV's support for DLNA from its documentation, ask a consultant in the store, or read on the official website of its manufacturer. The process of connecting a TV to a computer using the DLNA protocol consists of 2 stages
: -
physically connecting the TV to the computer
;
— installation of special software (DLNA server) on your computer
and its configuration (this software is free and available to everyone, see the link below).
Physically connecting the TV to the computer
The physical connection method depends on the technical capabilities of the TV. The TV may be equipped with an RJ45 connector (a regular network connector, see image above), a Wi-Fi module, or both. Connecting via a network cable is considered faster and more reliable, so if possible, preference should be given to this option. I will not consider connecting a TV via Wi-Fi, since it is practically no different from connecting other devices, and every schoolchild today knows how to do this. You can use a network cable to connect your TV directly to your computer. If the computer is connected to the router and its network card is already occupied, then the TV can also be connected to a free connector on the router. In the first case, you will need to “manually” make certain changes to the settings of the network card of the computer and TV (more on them below), in the second, the router will independently make all the settings and automatically ensure interaction between the computer and TV. Keep in mind that to connect the network connector of the TV to the router, you should use a twisted pair cable with straight
crimp connectors.
To connect directly to a computer's network card, a twisted-pair cable with a crossover crimp
(“crossover” cable) is better suited. Any of these cords will be made for you in the first computer store you come across within a few minutes, and it will not cost much (about 0.3 US dollars per 1 m plus the cost of 2 RJ45 plugs). The option with a router is not always acceptable. The fact is that watching video on a TV from a computer puts a serious load on the router, as a result of which malfunctions may occur in its operation, manifested by slowdown or loss of Internet connection. In this case, buying a more expensive and productive router is not advisable. It is better to install an additional network card in the computer specifically for the TV. It will cost approximately 5-7 dollars. USA, a new router is 10 times more expensive. As mentioned above, when connecting the TV directly to the computer’s network card, it is necessary to configure them, namely, specify the parameters for interaction via the IP protocol in the settings. One of the settings options is shown in the table.
| IP address | Subnet mask | Gateway | DNS server | |
| Computer | 192.168.1.1 | 255.255.255.0 | . . . | . . . |
| TV | 192.168.1.2 | 255.255.255.0 | 192.168.1.1 | 192.168.1.1 |
If your computer has 2 network cards installed, these settings need to be made only in the properties of the one to which the TV is connected.
Installing a DLNA server on your computer and setting it up
One of the best free DLNA servers is the Home Media Server
.
• Home media server
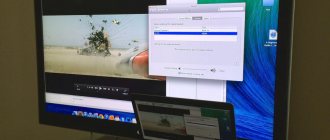
: After installing the “Home Media Server” program, you need to change some of its settings (the TV must already be connected to the computer with a network cable and turned on): - run the program, click the “Settings” button in the menu, select “ Devices”, then click “Search”. After scanning is completed, select the TV among the found devices and confirm its connection to the media server (see figure);
- Go to the settings again, select the “Media Resources” item, click the “Add” button and specify the hard drive partitions that need to be allowed access from the TV. In the same window, in the “My Computer” folder (at the very bottom), you can check the “Local disks” box. In this case, you can view the entire computer hard drive (the entire file system) from the TV. Then you need to click the “OK” button and confirm the scan;
— start the media server by clicking the “Launch” button in the program menu.
The procedure for viewing files from a computer on a TV
To play media files from a computer on a TV, you need to turn on the computer and TV, open the “Home Media Server” program on the computer and start the server by clicking the “Start” button. Then on the TV, select the Ethernet (LAN) connector as the source (the “input” or “source” button on the remote control). An explorer will open in which, using the remote control, you can select and open the required file (as when viewing files from a flash drive).
Possible connection problems
Sometimes it happens that, despite a correctly made connection, the computer does not see the TV via VGA. In this case, there are several ways to solve the problem:
- First of all, make sure that the cable is in good condition - it may need to be replaced.
- Check if you have the latest video card driver. If necessary, update it from the manufacturer's website.
- If the PC still does not see the TV, try disabling PC auto-detection in the TV service menu and manually selecting it as a signal source. More information on how to do this can be found in the instruction manual for your television equipment.
Connecting a PC to a TV via VGA
Whatever actions you describe are taken to connect a PC to a TV, the main device will in any case be the computer.
Step 1: Preparation
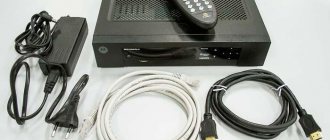
A double-sided VGA cable can be purchased at any computer supply store. However, its length should be selected based on personal convenience.
If there is no VGA connector on one of the connected devices, you can use a special adapter, the type of which is determined by the presence of other interfaces. One such device, VGA-HDMI, is shown below.
Like many other varieties, you can make your own VGA cable. However, such a wire does not have the simplest structure and without the proper knowledge it is better to get a ready-made one.
The only purpose of the VGA interface is to transmit video signals. This type of connection does not allow the transfer of files or sound.
Based on the above, you will need external speakers connected to the PC.
Connection without a router
Wireless synchronization of two devices is possible via Wi-Fi. Almost all modern equipment can be connected in this way: any PC with Windows 8 and higher, any TV with a built-in Wi - Fi module ( Smart TV ).
How to connect if one of the conditions is not met?
- If the OS is Windows 7, then you can only output video through players, for example, KMPlayer or the built-in player Windows - Cinema and TV
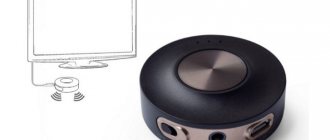
- If the TV does not have Wi-Fi, then the issue can be solved by connecting a smart set-top box with a wireless communication module.
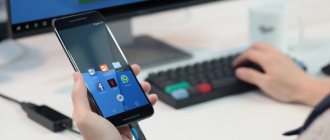
There are several technologies for wireless synchronization - Wi-Fi Direct, WiDi, Miracast. There is absolutely no need to know how they work and how they differ. To connect, you need to do the following.
- If the TV is new, then the option is enabled by default. If the device is old enough, then you should go into the wireless connections settings, find the Wi-Fi Direct, WiDi, Miracast item and turn it on.
- On your PC, open “display settings” - “display” - “connect to a wireless display”. A list of available ones will appear, select the one you need and click on it. The connection has been established.
Advice! This method is very simple, but is controlled via a PC. If the system unit and the TV are located in different rooms, then it is convenient to use a wireless mouse and keyboard - they are connected to the computer.
Connection via cable
The first and most common way is to connect the screen to the TV via an HDMI cable. To do this you will need to follow a few simple steps:
Additionally, it may be necessary to adjust the monitor display resolution to a resolution that the TV supports. If you do not follow this procedure, the image on one of the 2 screens may appear torn.
The monitor is now synchronized with the TV. However, some problems may occur before or after connecting these devices.
Problems and solutions when connecting a monitor to a TV
After synchronizing the monitor with the TV, you may notice that the display displays an unclear picture, and the image does not occupy the entire part of the screen - there are black stripes along the edges. In this case, there may be low levels of clarity and brightness. This problem is equally common in Windows, BIOS and boot. Now we will talk in detail about ways to fix the problem, which must be done sequentially.
After these steps, the image on the screen should stabilize, the clarity and brightness of the picture will return to normal, and the sound will start working.
Making a TV from a Monitor
If desired, the old monitor can be turned into a full-fledged TV on which you can watch channels. To do this, you will need to buy a television set-top box (its price starts from 500 rubles). In addition, these devices are already equipped with all the necessary functions and parameters, so the user does not have to install additional programs and drivers. Simply connect the set-top box to the monitor via the HDMI input, and all the functions of the TV will be available to the device. And if, instead of the usual set-top box, you buy a TV box or media player, the monitor will acquire the capabilities of a Smart TV with Internet access and other useful parameters.