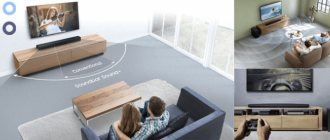
Synchronization with a PC will significantly expand the functionality of the TV. Therefore, it is not surprising that all users want to know how to connect a computer to a TV? Note that there are a huge number of different methods, each of which we will carefully analyze. Much will depend on the TV model. Old equipment is equipped with connectors that are not found on computers. Because of this, certain difficulties may arise.
A PC is connected to an LG TV or equipment from any other manufacturer using special cables. There are also wireless synchronization methods. However, not all TVs are equipped with a built-in Wi-Fi module, which is necessary for a wireless Internet connection.
How to connect a computer to a TV via cable
Find out what signal ports your computer has
To do this, inspect the connectors available on the device. If you cannot determine the types of ports by eye, find their description in the documentation for your computer. Depending on the device model, you may see the following types of connectors:
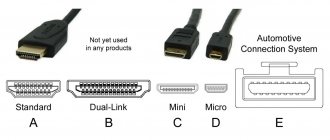
- HDMI is a digital interface that is present on most modern computers. It transmits both audio and video, and therefore is optimal for outputting a multimedia signal to a TV.
- DVI is another digital port that is widely available on the market. It transmits only video, no sound.
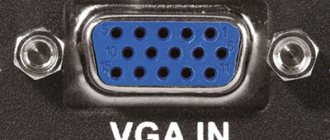
- VGA is a popular analog connector. Like the previous type of port, it outputs only a video signal.
www.amazon.com
- Mini DisplayPort, Thunderbolt 2, USB-C, and Thunderbolt 3 (USB-C) are digital interfaces found on Apple computers. They all transmit video and sound. In addition, the Mac may be equipped with a regular HDMI connector.
There are other types of connectors. But we have listed the most popular ones. Surely your device is equipped with one or more of them.
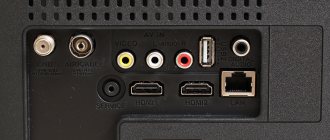
Determine which signal reception connectors are on the TV
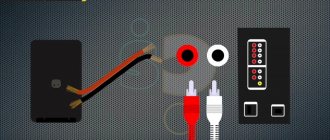
Inspect the TV ports. Most modern models have HDMI and VGA connectors. Older ones are equipped with RCA format ports, the plugs for which are called tulips:
Select cable according to available connectors
If you have an HDMI TV
If both your TV and your computer have an HDMI connector, then everything is simple: you can connect the devices using an HDMI cable. This option will be optimal.
To connect a computer that does not have an HDMI port to an HDMI TV, you will also need a special signal converter along with an HDMI cable. Which one depends on the connector available on the computer. This could be DVI → HDMI, VGA → HDMI or other adapters to HDMI.
In addition to the HDMI cable, such converters can often be connected to an additional audio cable, the other end of which is inserted into the computer. This allows audio to be transmitted bypassing the limitations of DVI and VGA. An audio cable is often sold complete with a converter.
www.amazon.com
To connect to a Mac HDMI TV with Thunderbolt 2 or Mini DisplayPort, you'll need a Mini DisplayPort to HDMI adapter along with an HDMI cable. For it to transmit sound, ask the store for an adapter that supports audio.
However, some older Mac models do not support audio output to HDMI TVs via Mini DisplayPort. In this case, the sound should play from the laptop speakers.
To connect one of Apple's new Thunderbolt 3 (USB-C) computers to your HDMI TV, you'll need an HDMI cable and a USB-C Digital AV Multiport Adapter. But if you have an older model with a regular USB-C port without Thunderbolt 3 support, then a simple USB-C → HDMI adapter will do.
If you have a VGA TV
For a VGA TV, the procedure will be similar. You just need an HDMI → VGA, DVI → VGA or other converter, depending on the computer port. The main thing is that it converts the signal to VGA.
If you have a TV with an RCA connector
If you have a very old model of TV with tulips at your disposal, then converters like HDMI → RCA, VGA → RCA and others that provide an RCA signal at the output are suitable.
In order not to make a mistake when buying a cable or converter, you can tell the seller the types of connectors on your TV and computer: he will select the appropriate option for you or check the compatibility of your choice.
Connect devices via cable
Turn off your computer and TV first for safety reasons. Next, connect the devices using a cable (and, if necessary, a converter). Only then turn on the devices. If the TV does not automatically detect the computer as the signal source, then do it yourself in the TV settings.
Adjust the TV picture using your computer
If the image is blurry, open the system settings on your computer and find the section responsible for the monitor. Here you can set the resolution that matches your TV and change the video display mode if necessary.
Setting up a TV and laptop
Setting up most modern gadgets is not difficult; the interfaces are specially designed to be easy to understand.
IMPORTANT: You may need to update drivers for all connected devices.
TV setup
Setting up TVs is the easiest task. You must carefully read the instructions and act without deviating. Even if there is no description of the device, there is no need to despair. TV menus are clear and designed to be intuitive. You just need to remember which input the cable is connected to. Select the desired connection in the menu and the TV is ready to watch.
How to connect a computer to a TV via Wi-Fi
Modern smart TVs can be connected to computers wirelessly via a local Wi-Fi network. Technologies like DLNA and Wi-Fi Direct allow you to broadcast video, music and other content to your TV screen or completely duplicate the image from your computer on your TV, turning the latter into a wireless monitor. Moreover, in the case of Wi-Fi Direct, you don’t even need a router for this.
For example, LG devices have a Smart Share service for similar functions. And Samsung TVs offer similar capabilities as part of the AllShare service.
Wireless connection settings may vary depending on the manufacturer and model of your TV. Some devices establish a connection in semi-automatic mode. Others require installation of additional software on the connected computer.
Therefore, it is difficult to formulate universal instructions that will suit all users. If you want to connect your TV to a computer via Wi-Fi, you will find the necessary information in the paper manual or on the manufacturer's official website along with the software required for this.
Wireless Connectivity Options
Despite the fact that in most cases the computer is connected to the TV using wires, there is also a wireless connection method.
Bluetooth
Using Bluetooth to pair a laptop and TV equipment is an option that is convenient for owners of outdated models of digital equipment. Some computers require you to purchase a Bluetooth router separately.
The connection diagram is as follows:
- both types of equipment are included;
- in the “Bluetooth” settings of the PC and TV, select the “discoverable” mode;
- find Bluetooth via PC and select the brand of your TV;
- If necessary, TV equipment is allowed to be paired with a computer.
WiFi
Since connecting a laptop to a TV is a network connection, one of the pieces of equipment must be a so-called access point. The second one will be used for control. If the user needs access to both devices, then he needs to connect a Wi-Fi router.
Before trying to connect via Wi-Fi, be sure to check whether your TV has a Wi-Fi module. Some models simply do not have it and connection will be impossible.
Expensive or cheap
As noted, the standards are clearly regulated. Therefore, the cable will either provide information transfer or not. Which HDMI cable is better to choose? German gamers conducted an interesting experiment regarding the effect of the cost of the wire on its operation. They purchased many different models from popular and unknown manufacturers.
Fans of video games connected a game console to the monitor and displayed the same images. Subsequently, a comparison of screenshots was carried out. For maximum accuracy, checksums were compared. These figures coincided 100%.
It would seem that the cost of choice does not affect the choice of an HDMI cable, but this experiment does not take into account sound transmission at all. Therefore, a repeat experiment was carried out. Again no difference was found. Therefore, there is absolutely no need to overpay for cable.
DLNA
It was mentioned above that DLNA is a local network between two devices. Data is transmitted over the network through a router, and this is one of the inconveniences, the second disadvantage is that the setup is quite complicated. The advantage is that you can control the TV through a computer.
So, you can configure DLNA in several ways. But first you need to connect to one network via an Ethernet cable or Wi-Fi.
The next setup step is to enable visibility of the PC within the local network in Windows. To do this, open the properties of the Internet connection and set “private network” in the settings (this is how the device understands that it is not included in the public Wi-Fi, but in the home one, that is, devices that can access the memory are safe). The next step is to “grant” permissions to folders that may be publicly accessible.
There are options here.
- Permission is given for each folder. Its properties open, the “security” tab, “advanced settings” - “allow sharing”. The downside is that the method is labor-intensive, and quickly moving between directories scattered throughout memory is problematic.
- A more convenient option for setting up folders is to use special software. Programs for working in local networks can be different - directly file managers or powerful media servers like VLC with a built-in manager, player, IPTV and even games. The advantage of such software is that you can conveniently configure the display of directories that will be visible to other equipment on the network, and quickly switch between them.
When everything is ready on the TV, all that remains is to connect to the PC from the TV. For some models, for example, Philips, after setting up Windows and synchronizing, devices on the DLNA network are displayed in the signal source selection menu. LG has Smart Share. The menu of “smart” options opens and the source is selected - a computer (can be a smartphone, tablet and other equipment). Samsung's utility is called AllShare. Once you enter it, a list of network devices will open. We select the system unit and use the files on it.
You can also use devices on a DLNA network using separate utilities on the TV. Different operating systems have their own applications, so you need to look for specific developers in branded stores.
Working with Multiple Displays
Here's how you can use multiple monitors at the same time:
- The duplication mode is a complete match of the image on both the PC and the TV - your actions are visible on all monitors connected to the system unit.
- “Expansion” is a mode for combining two screens so that each of them is independent.
To change the resolution on a separate device, select it through the “Screen” item and make the necessary settings.